
COCO 数据集使用说明书
下面的代码改写自 COCO 官方 API,改写后的代码 cocoz.py 被我放置在 Xinering/cocoapi。我的主要改进有:
- 增加对 Windows 系统的支持;
- 替换
defaultdict为dict.get(),解决 Windows 的编码问题。 - 跳过解压这一步骤(包括直接的或间接的解压),直接对图片数据
images与标注数据annotations操作。 - 因为,无需解压,所以 API 的使用更加便捷和高效。
具体的 API 使用说明见如下内容:
0 准备
为了可以使用 cocoz,你需要下载 Xinering/cocoapi。之后将其放在你需要运行的项目或程序根目录,亦或者使用如下命令添加环境变量(暂时的):
import sys

sys.path.append('D:\API\cocoapi\PythonAPI')  # 你下载的 cocoapi 所在路径

from pycocotools.cocoz import AnnZ, ImageZ, COCOZ   # 载入 cocoz
下面我们就可以利用这个 API 的 cocoz.AnnZ、cocoz.ImageZ 和 cocoz.COCOZ 类来操作 COCO 图片和标注了。下面我以 Windows 系统为例说明,Linux 是类似的。
1 cocoz.AnnZ 与 cocoz.ImageZ
root = r'E:\Data\coco'   # COCO 数据集所在根目录

annType = 'annotations_trainval2017'   # COCO 标注数据类型

annZ = AnnZ(root, annType)
我们来查看一下,该标注数据所包含的标注类型:
annZ.names
['annotations/instances_train2017.json',

 'annotations/instances_val2017.json',

 'annotations/captions_train2017.json',

 'annotations/captions_val2017.json',

 'annotations/person_keypoints_train2017.json',

 'annotations/person_keypoints_val2017.json']
以 dict 的形式载入 'annotations/instances_train2017.json' 的具体信息:
annFile = 'annotations/instances_val2017.json'

dataset = annZ.json2dict(annFile)
Loading json in memory ...

used time: 0.890035 s
dataset.keys()
dict_keys(['info', 'licenses', 'images', 'annotations', 'categories'])
dataset['images'][0] # 记录了一张图片的一些标注信息
{'license': 4,

 'file_name': '000000397133.jpg',

 'coco_url': 'http://images.cocodataset.org/val2017/000000397133.jpg',

 'height': 427,

 'width': 640,

 'date_captured': '2013-11-14 17:02:52',

 'flickr_url': 'http://farm7.staticflickr.com/6116/6255196340_da26cf2c9e_z.jpg',

 'id': 397133}
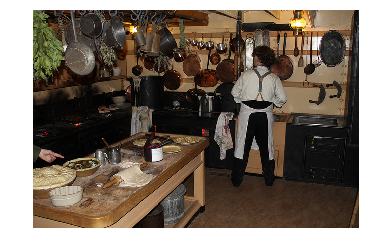
1.1 从网页获取图片
%pylab inline

import skimage.io as sio

coco_url = dataset['images'][0]['coco_url']

# use url to load image

I = sio.imread(coco_url)

plt.axis('off')

plt.imshow(I)

plt.show()
Populating the interactive namespace from numpy and matplotlib
1.2 从本地读取图片
为了避免解压数据集,我使用了 zipfile 模块:
imgType = 'val2017'

imgZ = ImageZ(root, imgType)

I = imgZ.buffer2array(imgZ.names[0])

plt.axis('off')

plt.imshow(I)

plt.show()

2 cocoz.COCOZ
root = r'E:\Data\coco'   # COCO 数据集所在根目录

annType = 'annotations_trainval2017'   # COCO 标注数据类型

annFile = 'annotations/instances_val2017.json'

annZ = AnnZ(root, annType)

coco = COCOZ(annZ, annFile)
Loading json in memory ...

used time: 1.02004 s

Loading json in memory ...

creating index...

index created!

used time: 0.431003 s
如果你需要预览你载入的 COCO 数据集,可以使用 print() 来实现:
print(coco)
description: COCO 2017 Dataset

url: http://cocodataset.org

version: 1.0

year: 2017

contributor: COCO Consortium

date_created: 2017/09/01
coco.keys()
dict_keys(['dataset', 'anns', 'imgToAnns', 'catToImgs', 'imgs', 'cats'])
2.1 展示 COCO 的类别与超类
cats = coco.loadCats(coco.getCatIds())

nms = set([cat['name'] for cat in cats])  # 获取 cat 的 name 信息

print('COCO categories: \n{}\n'.format(' '.join(nms)))

# ============================================================

snms = set([cat['supercategory'] for cat in cats])  # 获取 cat 的 name 信息

print('COCO supercategories: \n{}'.format(' '.join(snms)))
COCO categories:

kite potted plant handbag clock umbrella sports ball bird frisbee toilet toaster spoon car snowboard banana fire hydrant skis chair tv skateboard wine glass tie cell phone cake zebra baseball glove stop sign airplane bed surfboard cup knife apple broccoli bicycle train carrot remote cat bear teddy bear person bench horse dog couch orange hair drier backpack giraffe sandwich book donut sink oven refrigerator boat mouse laptop toothbrush keyboard truck motorcycle bottle pizza traffic light cow microwave scissors bus baseball bat elephant fork bowl tennis racket suitcase vase sheep parking meter dining table hot dog

COCO supercategories:

accessory furniture sports vehicle appliance electronic animal indoor outdoor person kitchen food
2.2 通过给定条件获取图片
获取包含给定类别的所有图片
# get all images containing given categories, select one at random

catIds = coco.getCatIds(catNms=['cat', 'dog', 'snowboar'])  # 获取 Cat 的 Ids

imgIds = coco.getImgIds(catIds=catIds )  #

img = coco.loadImgs(imgIds)
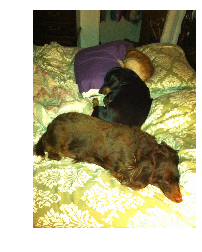
随机选择一张图片的信息:
img = coco.loadImgs(imgIds[np.random.randint(0,len(imgIds))])[0]

img
{'license': 4,

 'file_name': '000000318238.jpg',

 'coco_url': 'http://images.cocodataset.org/val2017/000000318238.jpg',

 'height': 640,

 'width': 478,

 'date_captured': '2013-11-21 00:01:06',

 'flickr_url': 'http://farm8.staticflickr.com/7402/9964003514_84ce7550c9_z.jpg',

 'id': 318238}
2.2.1 获取图片
从网络获取图片:
coco_url = img['coco_url']

I = sio.imread(coco_url)

plt.axis('off')

plt.imshow(I)

plt.show()

从本地获取图片:
这里有一个梗:cv2 的图片默认模式是 BGR 而不是 RGB,所以,将 I 直接使用 plt 会改变原图的颜色空间,为此我们可以使用 cv2.COLOR_BGR2RGB.
imgType = 'val2017'

imgZ = ImageZ(root, imgType)

I = imgZ.buffer2array(img['file_name'])

plt.axis('off')

plt.imshow(I)

plt.show()
2.3 将图片的 anns 信息标注在图片上
# load and display instance annotations

plt.imshow(I)

plt.axis('off')

annIds = coco.getAnnIds(imgIds=img['id'], catIds=catIds, iscrowd=None)

anns = coco.loadAnns(annIds)

coco.showAnns(anns)

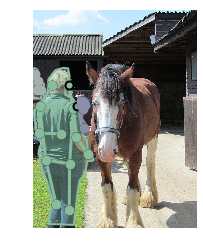
2.4 关键点检测
# initialize COCO api for person keypoints annotations

root = r'E:\Data\coco'   # COCO 数据集所在根目录

annType = 'annotations_trainval2017'   # COCO 标注数据类型

annFile = 'annotations/person_keypoints_val2017.json'

annZ = AnnZ(root, annType)

coco_kps = COCOZ(annZ, annFile)
Loading json in memory ...

used time: 0.882997 s

Loading json in memory ...

creating index...

index created!

used time: 0.368036 s
先选择一张带有 person 的图片:
catIds = coco.getCatIds(catNms=['person'])  # 获取 Cat 的 Ids

imgIds = coco.getImgIds(catIds=catIds)

img = coco.loadImgs(imgIds)[77]
# use url to load image

I = sio.imread(img['coco_url'])

plt.axis('off')

plt.imshow(I)

plt.show()

# load and display keypoints annotations

plt.imshow(I); plt.axis('off')

ax = plt.gca()

annIds = coco_kps.getAnnIds(imgIds=img['id'], catIds=catIds, iscrowd=None)

anns = coco_kps.loadAnns(annIds)

coco_kps.showAnns(anns)
2.5 看图说话
# initialize COCO api for person keypoints annotations

root = r'E:\Data\coco'   # COCO 数据集所在根目录

annType = 'annotations_trainval2017'   # COCO 标注数据类型

annFile = 'annotations/captions_val2017.json'

annZ = AnnZ(root, annType)

coco_caps = COCOZ(annZ, annFile)
Loading json in memory ...

used time: 0.435748 s

Loading json in memory ...

creating index...

index created!

used time: 0.0139964 s
# load and display caption annotations

annIds = coco_caps.getAnnIds(imgIds=img['id']);

anns = coco_caps.loadAnns(annIds)

coco_caps.showAnns(anns)

plt.imshow(I)

plt.axis('off')

plt.show()
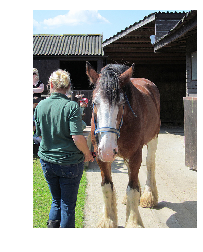
show:
A brown horse standing next to a woman in front of a house.

a person standing next to a horse next to a building

A woman stands beside a large brown horse.

The woman stands next to the large brown horse.

A woman hold a brown horse while a woman watches.
如果你需要使用官方 API, 可以参考 COCO 数据集的使用。
如果你觉得对你有帮助,请帮忙在 Github 上点个 star:datasetsome。该教程的代码我放在了 GitHub: COCOZ 使用说明书。
COCO 数据集使用说明书的更多相关文章
- COCO 数据集的使用
Windows 10 编译 Pycocotools 踩坑记 COCO数据库简介 微软发布的COCO数据库, 除了图片以外还提供物体检测, 分割(segmentation)和对图像的语义文本描述信息. ...
- COCO数据集深入理解
TensorExpand/TensorExpand/Object detection/Data_interface/MSCOCO/ 深度学习数据集介绍及相互转换 Object segmentation ...
- Pascal VOC & COCO数据集介绍 & 转换
目录 Pascal VOC & COCO数据集介绍 Pascal VOC数据集介绍 1. JPEGImages 2. Annotations 3. ImageSets 4. Segmentat ...
- [PocketFlow]解决TensorFLow在COCO数据集上训练挂起无输出的bug
1. 引言 因项目要求,需要在PocketFlow中添加一套PeleeNet-SSD和COCO的API,具体为在datasets文件夹下添加coco_dataset.py, 在nets下添加pelee ...
- 在ubuntu1604上使用aria2下载coco数据集效率非常高
简单的下载方法: 所以这里介绍一种能照顾大多数不能上外网的同学的一种简单便捷,又不会中断的下载方法:系统环境: Ubuntu 14.04 方法: a. 使用aria2 搭配命令行下载.需要先安装: s ...
- MS coco数据集下载
2017年12月02日 23:12:11 阅读数:10411 登录ms-co-co数据集官网,一直不能进入,FQ之后开看到下载链接.有了下载链接下载还是很快的,在我这儿晚上下载,速度能达到7M/s,所 ...
- coco数据集标注图转为二值图python(附代码)
coco数据集大概有8w张以上的图片,而且每幅图都有精确的边缘mask标注. 后面后分享一个labelme标注的json或xml格式转二值图的源码(以备以后使用) 而我现在在研究显著性目标检测,需要的 ...
- COCO数据集使用
一.简介 官方网站:http://cocodataset.org/全称:Microsoft Common Objects in Context (MS COCO)支持任务:Detection.Keyp ...
- Microsoft COCO 数据集
本篇博客主要以介绍MS COCO数据集为目标,分为3个部分:COCO介绍,数据集分类和COCO展示. 本人主要下载了其2014年版本的数据,一共有20G左右的图片和500M左右的标签文件.标签文件标记 ...
随机推荐
- 图片截取插件Cropper
自己仿照github上的例子写的demo,github上的例子太抽象了,自己写的最适合自己,通俗易懂. <!DOCTYPE html> <html> <head> ...
- 针对用户在个人中心绑定手机认证的一些js代码。
需求: 1:手机号码校验(格式的校验,手机号码是否已经绑定过)---未实现 2:填完手机号码,点击发送验证码,手机会收到一条信息 3:发送验证码按钮不可用,变成重新发送的倒计时 1):60秒以后又可以 ...
- Linux基础-软硬连接Block概念
建立/etc/passwd的软连接文件,放在/tmp目录下 使用文件名方式建立的软连接可以跨分区,删除目标文件后,软连接文件失效 建立/etc/passwd的硬链接文件,放在/boot下,如果不成功, ...
- HTML5之2D物理引擎 Box2D for javascript Games 系列 翻外篇--如何结合createJS应用box2d.js
太久没有更新了,新年回来工作,突然有收到网友的邮件提问,居然还有人在关注,惭愧,找了下电脑上还有一点儿存着,顺便先发这一个番外篇吧,好歹可以看到真实的效果,等我考完英语,一定会更新下一章," ...
- BNUOJ 12756 Social Holidaying(二分匹配)
题目链接:http://www.bnuoj.com/bnuoj/problem_show.php?pid=12756 Social Holidaying Time Limit: 3000ms Memo ...
- JavaScript中函数参数的值传递和引用传递
结论: 对于数字.字符串等基本类型变量,是将它们的值传递给了函数参数,函数参数的改变不会影响函数外部的变量. 对于数组和对象等是将对象(数组)的变量的值传递给了函数参数,这个变量保存的指向对象(数组) ...
- elasticsearch-head插件安装的一些坑!es6.5.4版本
折腾了一晚上,总算成功了!,大部分坑都记录了下来,版本升级太快真实个大坑,每个版本都不一样,学的心累!! 这坑太多了!主要就是以下几点最主要的: 因为我这里只使用hear安装,不使用哪个打包工具,所以 ...
- linux 进程内存解析【转】
转自:http://blog.csdn.net/lile269/article/details/6460807 之前我所了解的linux下进程的地址空间的布局的知识,是从APUE第2版的P430得来的 ...
- 查看sql语句加锁信息
问题: 最近使用quartz集群,总是报deadlock问题,所以需要查看一下执行的sql导致的加锁冲突. 步骤: 1.在要测试的库中创建指定表innodb_lock_monitor create t ...
- 一文看懂python主要应用领域或应用场景
Python简介 Python(英国发音:/ˈpaɪθən/美国发音:/ˈpaɪθɑːn/),是一种面向对象的解释型计算机程序设计语言,由荷兰人GuidovanRossum于1989年发明,第一个公开 ...