Eclipse+CXF框架开发Web服务实战
一、 说明 采用CXF框架开发webservice。 所用软件及版本如下。
操作系统:Window XP SP3。
JDK:JDK1.6.0_07,http://www.oracle.com/technetwork/java/javase/downloads/index.html。
Tomcat:apache-tomcat-6.0.14.exe,http://tomcat.apache.org/。
IDE:eclipse-jee-juno-SR1-win32.zip,http://www.eclipse.org/downloads/。
CXF:apache-cxf-2.6.10.zip,http://cxf.apache.org/download.html。
二、 JDK配置 安装JDK1.6.0,配置环境变量。

JAVA_HOME:C:\Program Files\Java\jre1.6.0_07。
Path:C:\Program Files\Java\jre1.6.0_07\bin。
CLASSPATH:C:\Program Files\Java\jre1.6.0_07\lib。
因本地只安装了JRE,故配置信息按JRE目录来设置。
三、 Tomcat配置 安装Tomcat,运行apache-tomcat-6.0.14.exe。 端口号:8080 用户名:admin 密码:111111
安装完成后,启动tomcat。 

四、 CXF服务端 1、下载apache-cxf-2.6.10.zip包,解压后数据如下。

2、新建Dynamic Web Project。 File—New—Project。

工程名:MyService。
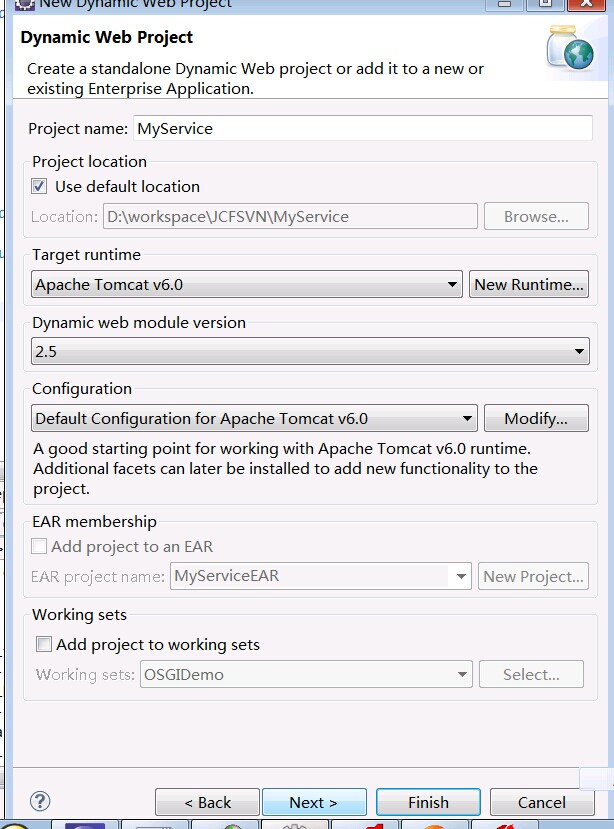
Target runtime要与安装的Tomcat一致,若不一致点击“New Runtime”设置。 比如我本地安装的Tomcat为v6.0。


Tomcat installation directory选择Tomcat安装目录。

Default output folder设置为:WebContent/WEB-INF/classes。

3、导入CXF库文件。 CXF库配置。


选中apache-cxf-2.6.10包下的lib目录,导入所有的jar文件。 本机目录为F: \Java开发\apache-cxf-2.6.10\lib。
添加完成后,会出现CXF名称库目录。

4、创建接口IcxfWB。 工程右键—New—Interface,添加代码:
- package com.yxj;
- import javax.jws.WebService;
- import javax.jws.WebParam;
- import javax.jws.WebMethod;
- @WebService
- public interface IcxfWB {
- @WebMethod
- String sayHello(@WebParam(name="name") String name);
- }
说明:
@WebService:标记表示该接口是一个WebService服务。
@WebMethod:标记表示WebService中的方法。
@WebParam(name="paramName")表示方法中的参数,name属性限制了参数的名称,若没有指定该属性,参数将会被重命名。
5、创建服务实现类CxfWBImpl。
- package com.yxj;
- public class CxfWBImpl implements IcxfWB {
- public String sayHello(String name) {
- return "Hello "+name;
- }
- }
6、编辑WebContent/WEB-INF下web.xml文件。
- <?xml version="1.0" encoding="UTF-8"?>
- <web-app xmlns:xsi="http://www.w3.org/2001/XMLSchema-instance" xmlns="http://java.sun.com/xml/ns/javaee" xmlns:web="http://java.sun.com/xml/ns/javaee/web-app_2_5.xsd" xsi:schemaLocation="http://java.sun.com/xml/ns/javaee http://java.sun.com/xml/ns/javaee/web-app_2_5.xsd" id="WebApp_ID" version="2.5">
- <display-name>MyService</display-name>
- <context-param>
- <param-name>contextConfigLocation</param-name>
- <param-value>WEB-INF/service-beans.xml</param-value>
- </context-param>
- <listener>
- <listener-class>org.springframework.web.context.ContextLoaderListener</listener-class>
- </listener>
- <servlet>
- <servlet-name>CXFServlet</servlet-name>
- <servlet-class>org.apache.cxf.transport.servlet.CXFServlet</servlet-class>
- </servlet>
- <servlet-mapping>
- <servlet-name>CXFServlet</servlet-name>
- <url-pattern>/*</url-pattern>
- </servlet-mapping>
- <welcome-file-list>
- <welcome-file>index.html</welcome-file>
- <welcome-file>index.htm</welcome-file>
- <welcome-file>index.jsp</welcome-file>
- <welcome-file>default.html</welcome-file>
- <welcome-file>default.htm</welcome-file>
- <welcome-file>default.jsp</welcome-file>
- </welcome-file-list>
- </web-app>
7、在WebContent/WEB-INF下创建刚才指定的service-beans.xml文件。
- <?xml version="1.0" encoding="UTF-8"?>
- <beans xmlns="http://www.springframework.org/schema/beans"
- xmlns:xsi="http://www.w3.org/2001/XMLSchema-instance"
- xmlns:jaxws="http://cxf.apache.org/jaxws"
- xsi:schemaLocation="
- http://www.springframework.org/schema/beans
- http://www.springframework.org/schema/beans/spring-beans.xsd
- http://cxf.apache.org/jaxws http://cxf.apache.org/schemas/jaxws.xsd">
- <import resource="classpath:META-INF/cxf/cxf.xml"/>
- <import resource="classpath:META-INF/cxf/cxf-extension-soap.xml"/>
- <import resource="classpath:META-INF/cxf/cxf-servlet.xml"/>
- <bean id="SayHello" class="com.yxj.CxfWBImpl" />
- <jaxws:endpoint id="sayHello" implementor="#SayHello" address="/sayHello"/>
- </beans>
五、 WebService部署
1、 打包工程
右键工程—Export—WAR file,指定输出路径。


2、 将war文件移动至apache-tomcat\webapps下。 本地操作是,复制F:\MyService.war到目录D:\Program Files\Apache Software Foundation\Tomcat 6.0\webapps。
3、 复制CFX文件到tomcat下。 复制F:\常用软件\Java开发\apache-cxf-2.6.10\lib目录下文件到 F:\JavaRoot\workspace\MyService\WebContent\WEB-INF\lib。
4、 重启Tomcat。 5、 浏览器访问http://localhost:8080/MyService。

六、 CXF客户端
1、生成Stub CXF提供了一个名为“wsdl2java.bat”的工具,该工具可以通过WSDL为特定的服务创建 stub。
本地目录,F:\常用软件\Java开发\apache-cxf-2.6.10\bin\下wadl2java工具。
命令wsdl2java –p 生成代码的包名 –d 生成代码的路径 wsdl地址。
本地命令如下。 wsdl2java -p com.yxj.client -d F:\clientsrc http://localhost:8080/MyService/sayHello?wsdl
生成结果文件在F:\clientsrc,生成文件如图。

2、新建Java Project。

3、将第一步中生成的F:\clientsrc文件夹下的所有java文件移至工程src下,刷新工程。

4、添加CXF包。


使用创建Service时配置好的CXF库。

6、 新建包含有main方法的Class,代码如下。
- package com.yxj.client;
- import org.springframework.context.support.ClassPathXmlApplicationContext;
- import com.yxj.client.IcxfWB;
- public class ClientCall {
- /**
- * @param args
- */
- public static void main(String[] args) {
- // TODO Auto-generated method stub
- ClassPathXmlApplicationContext context
- = new ClassPathXmlApplicationContext(new String[] {"com/yxj/client/client-beans.xml"});
- IcxfWB client = (IcxfWB)context.getBean("sayHello2");
- String response = client.sayHello("World");
- System.out.println("Response: " + response);
- System.exit(0);
- }
- }
7、 在类ClientCall同级目录,即com/yxj/client下新建client-beans.xml配置文件。
文件内容如下。
- <?xml version="1.0" encoding="UTF-8"?>
- <beans xmlns="http://www.springframework.org/schema/beans"
- xmlns:jaxws="http://cxf.apache.org/jaxws"
- xmlns:xsi="http://www.w3.org/2001/XMLSchema-instance"
- xsi:schemaLocation="http://www.springframework.org/schema/beans
- http://www.springframework.org/schema/beans/spring-beans.xsd
- http://cxf.apache.org/jaxws http://cxf.apache.org/schemas/jaxws.xsd">
- <jaxws:client id="sayHello2" serviceClass="com.yxj.client.IcxfWB" address="http://localhost:8080/MyService/sayHello?wsdl"/>
- </beans>
该方式访问ws服务是利用spring的依赖注入法,其中id是spring IOC容器唯一标识符,在代码中也是通过id获得服务对象的(context.getBean("sayHello2"));serviceClass是Webservices服务接口;address是服务的wsdl地址。
8、 运行客户端,控制台输出。
- Hello World
OK,至此大功告成!
Eclipse+CXF框架开发Web服务实战的更多相关文章
- WebService系列二:使用JDK和CXF框架开发WebService
一.使用JDK开发WebService 服务端程序创建: 1.新建一个JDK开发webservice的服务端maven项目JDKWebServiceServer 2. 定义一个接口,使用@WebSer ...
- 如何快速搭建一个基于ServiceStack框架的web服务
ServiceStack是一个高性能的.NET Web Service 平台,能够简化开发高性能的REST (支持JSON,XML,JSV,HTML,MsgPack,ProtoBuf,CSV等消息格式 ...
- 利用JAX-WS 开发web服务
近日在学习Rogers Candenhead的第六版的<Java 入门经典>第22章.利用JAX-WS 开发web服务,简略总结而言主要包括以下几个步骤: 1.定义服务端点接口类: 主要就 ...
- eclipse集成jetty开发web项目(不采用maven方式)
以前开发过程部署项目都是采用tomcat,偶然发现jetty,所以试了下,挺方便的,直切主题. 1.下载jetty,楼主使用的jetty8,地址http://download.eclipse.org/ ...
- SSM框架开发web项目系列(二) MyBatis真正的力量
前言 上篇SSM框架环境搭建篇,演示了我们进行web开发必不可少的一些配置和准备工作,如果这方面还有疑问的地方,可以先参考上一篇“SSM框架开发web项目系列(一) 环境搭建篇”.本文主要介绍MyBa ...
- SSM框架开发web项目系列(三) MyBatis之resultMap及关联映射
前言 在上篇MyBatis基础篇中我们独立使用MyBatis构建了一个简单的数据库访问程序,可以实现单表的基本增删改查等操作,通过该实例我们可以初步了解MyBatis操作数据库需要的一些组成部分(配置 ...
- SSM框架开发web项目系列(五) Spring集成MyBatis
前言 在前面的MyBatis部分内容中,我们已经可以独立的基于MyBatis构建一个数据库访问层应用,但是在实际的项目开发中,我们的程序不会这么简单,层次也更加复杂,除了这里说到的持久层,还有业务逻辑 ...
- Delphi XE5通过WebService开发Web服务端和手机客户端
Delphi XE5通过WebService开发Web服务端和手机客户端介绍 我们开发一个三层的android程序 建立一个webservices stand-alone vcl applicati ...
- WEBSERVICE之CXF框架开发webservice
之前学习了使用jdk开发webservice服务,现在开始学习使用框架(cxf)开发webservice. 1.准备工作 A.使用cxf开发webservice服务,需要用到apache-cxf-3. ...
随机推荐
- C++学习书籍推荐《C++编程思想第二版第一卷》下载
百度云及其他网盘下载地址:点我 编辑推荐 “经典原版书库”是响应教育部提出的使用原版国外教材的号召,为国内高校的计算机教学度身订造的.<C++编程思想>(英文版第2版)是书库中的一本,在广 ...
- css单位中px和em,rem的区别
css单位中分为相对长度单位.绝对长度单位. 今天我们主要讲解rem.em.px这些常用单位的区别和用法. px(绝对长度单位) 相信对于前端来说px这个单位是大家并不陌生,px这个单位,兼容性可以说 ...
- Socket编程:listen()函数英文翻译
作者:C语言达人 链接:https://zhuanlan.zhihu.com/p/24951131 来源:知乎 著作权归作者所有.商业转载请联系作者获得授权,非商业转载请注明出处. 本篇翻译的list ...
- html提示框插件
最近工作需要,用到各式各样的提示框,寻找了很久,发现一个的第三方的插件很好用,各种样式.接口良好.允许自定义. 官网:http://layer.layui.com/ 使用需要先引入jq1.8以上: & ...
- Excel催化剂开源第15波-VSTO开发之DataTable数据导出至单元格区域
上篇提到如何从Excel界面上拿到用户的数据,另外反方向的怎样输出给用户数据,也是关键之处. VSTO最大的优势是,这双向的过程中,全程有用户的交互操作. 而一般IT型的程序,都是脱离用户的操作,只能 ...
- c语言进阶5-递归算法
一. 什么是递归 程序调用自身的编程技巧称为递归( recursion). 递归做为一种算法在程序设计语言中广泛应用. 一个过程或函数在其定义或说明中有直接或间接调用自身的一种方法,它通常把一个大型 ...
- php laravel5.6引入geetest 行为验证
php laravel5.6引入geetest 行为验证 使用必要性 网站和APP,在所有可能被机器行为攻击的场景,例如但不限于注册.登录.短信接口.查询接口.营销活动.发帖评论等等,都可以部署使用「 ...
- kaptcha谷歌验证码工具
Kaptcha 简介 Kaptcha 是一个可高度配置的实用验证码生成工具,可自由配置的选项如: 验证码的字体 验证码字体的大小 验证码字体的字体颜色 验证码内容的范围(数字,字母,中文汉字!) 验证 ...
- Javaweb入门 数据库第一天
数据库概述 本菜鸟使用的数据库软件为Mariadb,以下内容都是以Mariadb数据库软件来写的学习总结. 数据库 所谓的数据库就是用于存储.管理数据的仓库,数据库根据底层存储数据结构的不同可以分为很 ...
- http状态码 400-499
类比 服务器:便利店 客户端:客人 http报文:中文语言+钱 400-499 客户的错误 400 :服务器不理解客服端请求的意思是什么,如请求报文损坏 举例: 客户端:@#!3&* 服务器: ...