
一个基于vue的时钟
前两天写了一个基于vue的小钟表,给大家分享一下。
其中时针和分针使用的是图片,结合transform制作;表盘刻度是通过transform和transformOrigin配合画的;外面的弧形框框,啊哈哈,也是用的图片。具体的看里面的注释就好了,感觉写的还算清楚,啊哈哈~
能帮到你的话,点个赞呗?
预览图:
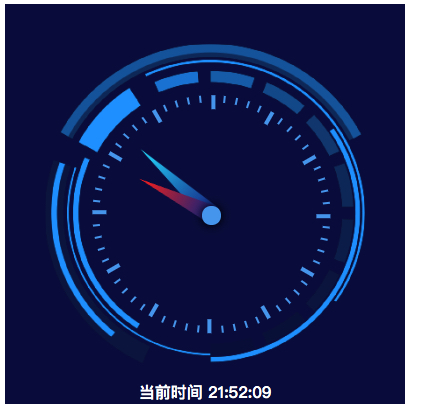
效果的话,可以看这里
https://jhcan333.github.io/can-Share/demos-tips/clockDemo.html
github 地址在这里
https://github.com/JHCan333/can-Share/blob/master/demos-tips/clockDemo.html
<!DOCTYPE html>

<html>

<head>

    <meta charset="UTF-8">

    <title>一个基于vue的时钟小demo</title>

    <script src="https://cdn.jsdelivr.net/npm/vue/dist/vue.js"></script>

    <style>

        .jhc-hour-needle {

            z-index: 5;

            width: 6%;

            height: 25%;

            position: absolute;

            left: 49%;

            bottom: 47%;

            transform-origin: center bottom;

            background: url(https://jhcan333.github.io/can-Share//image/clock/hourPoint.png) no-repeat;

            background-size: 100% 100%;

        }

        .jhc-min-needle {

            z-index: 2;

            width: 6%;

            height: 30%;

            position: absolute;

            left: 49%;

            bottom: 47%;

            transform-origin: center bottom;

            background: url(https://jhcan333.github.io/can-Share//image/clock/minPoint.png) no-repeat;

            background-size: 100% 100%;

        }

        .jhc-clock-area {

            width: 400px;

            height: 400px;

            position: relative;

            background: #050842;

        }

        .jhc-clock-back {

            width: 100%;

            height: 100%;

            position: absolute;

            top: 0px;

            left: 0px;

            background: url(https://jhcan333.github.io/can-Share//image/clock/clockBack.png) no-repeat;

            background-size: 100% 100%;

        }

        .jhc-clock-title {

            color: #fff;

            position: absolute;

            bottom: 10px;

            width: 100%;

            text-align: center;

            font-weight: bold;

        }

        .jhc-clock-dot {

            width: 6%;

            height: 6%;

            border-radius: 50%;

            position: absolute;

            background-color: #509fef;

            z-index: 20;

            left: 49%;

            top: 50.5%;

            box-shadow: 0px 0px 10px 1px #000;

        }

    </style>

</head>

<body>

<div id="app">

</div>

<script>

    var app = new Vue({

        el: '#app',

        template:

            `<div ref="area" :class="clockArea">

                <div :style="cssClock">

                    <div :style="cssDotWrap">

                        <div :style="Object.assign({},{

                                transform: 'rotateZ('+i*6+'deg)',

                                height: i%5==0?longDot.height:shourtDot.height,

                                width: i%5==0?longDot.width:shourtDot.width,

                            },cssDot)"

                             v-for="(dot,i) in 60"

                        ></div>

                    </div>

                    <div :style="Object.assign({},{

                                                transform: 'rotateZ('+hour+'deg)'

                                            })"

                         :class="hourNeedle"

                    ></div>

                    <div :style="Object.assign({},{

                                            transform: 'rotateZ('+min+'deg)'

                                        })"

                         :class="minNeedle"

                    ></div>

                    <div :class="clockDot"></div>

                    <div :class="clockBack"></div>

                </div>

                <div :class="clockTitle" :style="style">当前时间 {{timeDisplayArea}}</div>

            </div>`,

        data () {

            return {

                prefixCss: 'jhc-', // css 前缀

                cssClock: { //整个钟的盒子

                    position: 'absolute',

                    width: '100%',

                    height: '100%',

                    borderRadius: '50%',

                },

                cssDotWrap: { //装刻度的盒子

                    width: '100%',

                    height: '100%'

                },

                cssDot: { //刻度们

                    position: 'absolute',

                    backgroundColor: '#509fef'

                },

                longDot: { //长刻度

                    width: '3px',

                    height: '10px'

                },

                shourtDot: { //短刻度

                    width: '1px',

                    height: '5px'

                },

                timer: null, //用来标记自适应大小的timer

                updateTimer: null, // 更新时钟的timer

                style: {

                    bottom: '1px'

                }, //时钟的title的style

                scale:0.8, // 时钟占外层的百分比

                currTime: new Date() //当前日期对象

            }

        },

        created () {

            this.currTime = new Date()

            clearInterval(this.updateTimer)

            this.updateTimer = setInterval(() => {

                this.currTime = new Date()

            }, 1000)

        },

        mounted () {

            //设置时钟的大小

            this.setSize()

        },

        beforeDestroy () {

            clearInterval(this.updateTimer)

        },

        methods: {

            //设置钟表的型号大小

            setSize () {

                let width = this.getWidth()

                let height = this.getHeight()

                //时钟占外层的百分比

                let scale = this.scale

                //获取较短边

                let shortLth = width

                if (width > height) {

                    shortLth = height

                }

                //对时钟的直径做处理

                shortLth = shortLth * scale

                //获取到顶部和左部的距离

                let paddingW = (width - shortLth) / 2

                let paddingH = (height - shortLth) / 2

                //设置钟表整体的大小以及位置

                this.setStates('cssClock', {

                    height: shortLth + 'px',

                    width: shortLth + 'px',

                    top: paddingH + 'px',

                    left: paddingW + 'px',

                })

                //设置刻度所围绕区域的位置

                this.setStates('cssDotWrap', {

                    transform: `translate(${shortLth * 0.52}px,${shortLth * 0.16}px)` // 0.52 和 0.16 是我一点一点挪出来的,啊哈哈

                })

                //设置长短刻度的半径,以及尺寸

                let dotRadius = shortLth * 0.75 / 2 - 1

                let longDotWidth = Math.floor(dotRadius / 25) || 2

                let longDotHeight = Math.floor(dotRadius / 8) || 6

                let shortDotWidth = Math.floor(dotRadius / 50) || 1

                let shortDotHeight = Math.floor(dotRadius / 16) || 3

                //短刻度

                this.shourtDot = {

                    width: shortDotWidth + 'px',

                    height: shortDotHeight + 'px'

                }

                //长刻度

                this.longDot = {

                    width: longDotWidth + 'px',

                    height: longDotHeight + 'px'

                }

                //设置刻度旋转点的位置

                this.setStates('cssDot', {

                    transformOrigin: `${0}px ${dotRadius}px`

                })

            },

            getWidth () { //获取指定容器的宽度

                return this.getRef('area').offsetWidth || 200

            },

            getHeight () { //获取指定容器的高度

                return this.getRef('area').offsetHeight || 200

            },

            getRef (ref) { // 获取指定 ref 对象

                return this.$refs && this.$refs[ref] || {}

            },

            //模仿 react 的states

            setStates (prop, data) {

                let cache = this[prop]

                this[prop] = Object.assign({}, cache, JSON.parse(JSON.stringify(data)))

            },

        },

        computed: {

            sec () { //将当前秒数转化为秒针旋转的度数

                return this.currTime.getSeconds() * 6

            },

            min () { //将当前的分钟数转化为分针旋转的度数

                return this.currTime.getMinutes() * 6 + this.currTime.getSeconds() / 60 * 6

            },

            hour () { //将当前的小时数转化为时针旋转的度数

                return this.currTime.getHours() * 30 + this.currTime.getMinutes() / 60 * 30

            },

            timeDisplayArea(){ // 时间展示区

                let hours = this.currTime.getHours() > 9 ? this.currTime.getHours() : ('0' + this.currTime.getHours())

                let minutes = this.currTime.getMinutes() > 9 ? this.currTime.getMinutes() : ('0' + this.currTime.getMinutes())

                let seconds = this.currTime.getSeconds() > 9 ? this.currTime.getSeconds() : ('0' + this.currTime.getSeconds())

                return hours + ':' + minutes + ':' + seconds

            },

            hourNeedle () { //时针的class

                return `${this.prefixCss}hour-needle`

            },

            minNeedle () { //分针的class

                return `${this.prefixCss}min-needle`

            },

            clockArea () { //表盘的区域

                return `${this.prefixCss}clock-area`

            },

            clockBack () { //时钟的背景(外框图片)

                return `${this.prefixCss}clock-back`

            },

            clockTitle () { //时钟的title的class

                return `${this.prefixCss}clock-title`

            },

            clockDot () { //时钟的中心点

                return `${this.prefixCss}clock-dot`

            }

        },

    })

</script>

</body>

</html>
欢迎大家评论留言,请多多指教!
最近在搞一个和前端程序员相关的公号,除了技术分享之外,也增加了对于职业发展、生活记录之类的文章,欢迎大家关注,一起聊天、吐槽,一起努力工作,认真生活!

一个基于vue的时钟的更多相关文章
- 使用webpack4搭建一个基于Vue的组件库
组内负责的几个项目都有一些一样的公共组件,所以就着手搭建了个公共组件开发脚手架,第一次开发 library,所以是参考着 iview 的配置来搭建的.记录如何使用webpack4搭建一个library ...
- 新建一个基于vue.js+Mint UI的项目
上篇文章里面讲到如何新建一个基于vue,js的项目(详细文章请戳用Vue创建一个新的项目). 该项目如果需要组件等都需要自己去写,今天就学习一下如何新建一个基于vue.js+Mint UI的项目,直接 ...
- 一个基于vue的仪表盘demo
最近写了一个基于vue的仪表盘,其中 主要是和 transform 相关的 css 用的比较多.给大家分享一下,喜欢的话点个赞呗?嘿嘿 截图如下: 实际效果查看地址:https://jhcan333. ...
- 一个基于Vue.js+Mongodb+Node.js的博客内容管理系统
这个项目最初其实是fork别人的项目.当初想接触下mongodb数据库,找个例子学习下,后来改着改着就面目全非了.后台和数据库重构,前端增加了登录注册功能,仅保留了博客设置页面,但是也优化了. 一.功 ...
- Vue3教程:一个基于 Vue 3 + Vant 3 的商城项目开源啦!
之前发布过一篇文章,告诉大家我要开发一个 Vue3 的商城项目并开源到 GitHub 上,供大家练手和学习,随后也一直有收到留言和反馈,问我开发到哪里了,什么时候开源之类的问题,今天终于可以通知大家, ...
- 发布自己第一个npm 组件包(基于Vue的文字跑马灯组件)
一.前言 总结下最近工作上在移动端实现的一个跑马灯效果,最终效果如下: 印象中好像HTML标签的'marquee'的直接可以实现这个效果,不过 HTML标准中已经废弃了'marquee'标签 既然HT ...
- 优秀的基于VUE移动端UI框架合集
1. vonic 一个基于 vue.js 和 ionic 样式的 UI 框架,用于快速构建移动端单页应用,很简约,是我喜欢的风格 star 2.3k 中文文档 在线预览 2.vux 基于WeUI和Vu ...
- 一款基于Vue的扩展性组件库 VV-UI
github: https://github.com/VV-UI/VV-UI 演示地址: https://vv-ui.github.io/VV-UI/#/meta-info 1. LoadingBar ...
- Vue Admin - 基于 Vue & Bulma 后台管理面板
Vue Admin 是一个基于 Vue 2.0 & Bulma 0.3 的后台管理面板(管理系统),相当于是 Vue 版本的 Bootstrap 管理系统,提供了一组通用的后台界面 UI 和组 ...
随机推荐
- 朴素贝叶斯python代码实现(西瓜书)
朴素贝叶斯python代码实现(西瓜书) 摘要: 朴素贝叶斯也是机器学习中一种非常常见的分类方法,对于二分类问题,并且数据集特征为离散型属性的时候, 使用起来非常的方便.原理简单,训练效率高,拟合效果 ...
- html利用j获取局域网内的本机IP(根据客户端浏览器的ip获取)
根据客户端浏览器的ip获取 <!DOCTYPE html> <html> <head> <meta http-equiv="Content-Type ...
- (四十七)c#Winform自定义控件-树表格(treeGrid)
前提 入行已经7,8年了,一直想做一套漂亮点的自定义控件,于是就有了本系列文章. GitHub:https://github.com/kwwwvagaa/NetWinformControl 码云:ht ...
- Nginx反向服务器搭建
Nginx环境搭建 下载解压Nginx源码包 可以通过已有的压缩包 这里也可以通过yum的在线下载 wget http://nginx.org/download/nginx-1.13.7.tar.gz ...
- 你绝对不知道的head标签
先来梳理一下本文的目录结构 现在我将详解head标签和它六个子标签的属性和作用,请耐心看完,会有很大的收获哦! 一.head标签 可选属性: 属性 值 描述 profile URL 一个由空格分隔的 ...
- 通过代码审计找出网站中的XSS漏洞实战(三)
一.背景 笔者此前录制了一套XSS的视频教程,在漏洞案例一节中讲解手工挖掘.工具挖掘.代码审计三部分内容,准备将内容用文章的形式再次写一此,前两篇已经写完,内容有一些关联性,其中手工XSS挖掘篇地址为 ...
- CF803G - Periodic RMQ Problem 动态开点线段树 或 离线
CF 题意 有一个长度为n × k (<=1E9)的数组,有区间修改和区间查询最小值的操作. 思路 由于数组过大,直接做显然不行. 有两种做法,可以用动态开点版本的线段树,或者离线搞(还没搞)( ...
- gym/102059 E
gym/102059 待通过:A.D.G.J.M 已补过:E E:电路题,判断一个图是不是简单电路.不需要特殊的技巧,利用set存图,把度数为2的点都删掉,融入到一条边上即可. #include &l ...
- CF 13E Holes
Holes 题意:现在有一排洞,每个洞有一个弹力,能弹到ai之后的洞,球会弹到这个排的外面,现在有2个操作,0 a b 将第a个洞的弹力设为b, 1 a 将球放入第a个洞,求输出进洞的次数 和 弹出这 ...
- github 授权登录教程与如何设计第三方授权登录的用户表
需求:在网站上想评论一篇文章,而评论文章是要用户注册与登录的,那么怎么免去这麻烦的步骤呢?答案是通过第三方授权登录.本文讲解的就是 github 授权登录的教程. 效果体验地址:http://biao ...