
[译]Vulkan教程(24)索引buffer
[译]Vulkan教程(24)索引buffer
Index buffer 索引buffer
Introduction 入门
The 3D meshes you'll be rendering in a real world application will often share vertices between multiple triangles. This already happens even with something simple like drawing a rectangle:
你在真实世界应用程序中要渲染的3D网格,常常会在多个三角形之间共享顶点。这在绘制简单的矩形的时候就出现了:
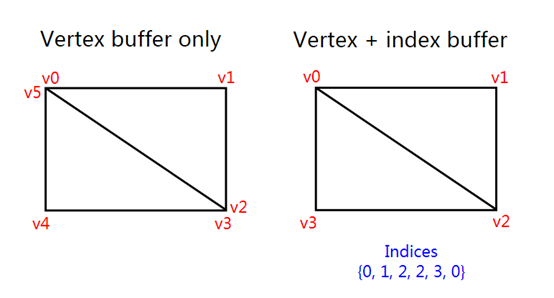
Drawing a rectangle takes two triangles, which means that we need a vertex buffer with 6 vertices. The problem is that the data of two vertices needs to be duplicated resulting in 50% redundancy. It only gets worse with more complex meshes, where vertices are reused in an average number of 3 triangles. The solution to this problem is to use an index buffer.
绘制一个矩形需要2个三角形,这意味着我们需要6个顶点的顶点buffer。问题是,有2个顶点的数据是重复的,这造成50%的冗余。当网格更复杂时,情况会更糟,where每个顶点平均被3个三角形复用。这个问题的解决办法是用索引buffer。
An index buffer is essentially an array of pointers into the vertex buffer. It allows you to reorder the vertex data, and reuse existing data for multiple vertices. The illustration above demonstrates what the index buffer would look like for the rectangle if we have a vertex buffer containing each of the four unique vertices. The first three indices define the upper-right triangle and the last three indices define the vertices for the bottom-left triangle.
一个索引buffer本质上是对顶点buffer的指针的数组。它允许你记录顶点数据,复用顶点数据。上述示例演示了索引buffer的样子for矩形if我们有一个包含这4个独立的顶点的顶点buffer。前3个索引定义了右上角,后3个索引定义了左下角的顶点。
Index buffer creation 创建索引buffer
In this chapter we're going to modify the vertex data and add index data to draw a rectangle like the one in the illustration. Modify the vertex data to represent the four corners:
本章我们要修改顶点数据,添加索引数据to绘制矩形-像演示的那样。修改顶点数据to代表4个角:
const std::vector<Vertex> vertices = {

    {{-0.5f, -0.5f}, {1.0f, 0.0f, 0.0f}},

    {{0.5f, -0.5f}, {0.0f, 1.0f, 0.0f}},

    {{0.5f, 0.5f}, {0.0f, 0.0f, 1.0f}},

    {{-0.5f, 0.5f}, {1.0f, 1.0f, 1.0f}}

};
The top-left corner is red, top-right is green, bottom-right is blue and the bottom-left is white. We'll add a new array indices to represent the contents of the index buffer. It should match the indices in the illustration to draw the upper-right triangle and bottom-left triangle.
左上角是红色,右上角是绿色,优先级是蓝色,左下角是白色。我们添加新数组indices to代表索引buffer的内容。它应当与演示的索引匹配to绘制右上角的三角形和左下角的三角形。
const std::vector<uint16_t> indices = {

    , , , , ,

};
It is possible to use either uint16_t or uint32_t for your index buffer depending on the number of entries in vertices. We can stick to uint16_t for now because we're using less than 65535 unique vertices.
可以用uint16_t 或uint32_t for你的索引buffer,这取决于vertices中的元素数。现在我们可以用uint16_t ,因为我们的顶点数少于65535。
Just like the vertex data, the indices need to be uploaded into a VkBuffer for the GPU to be able to access them. Define two new class members to hold the resources for the index buffer:
像顶点数据一样,索引也需要被上传到一个VkBuffer ,供GPU读写之。定义2个类成员to记录索引buffer的资源:
VkBuffer vertexBuffer;

VkDeviceMemory vertexBufferMemory;

VkBuffer indexBuffer;

VkDeviceMemory indexBufferMemory;
The createIndexBuffer function that we'll add now is almost identical to createVertexBuffer:
现在添加的createIndexBuffer 函数几乎与createVertexBuffer一样:
 void initVulkan() {

     ...

     createVertexBuffer();

     createIndexBuffer();

     ...

 }

 void createIndexBuffer() {

     VkDeviceSize bufferSize = sizeof(indices[]) * indices.size();

     VkBuffer stagingBuffer;

     VkDeviceMemory stagingBufferMemory;

     createBuffer(bufferSize, VK_BUFFER_USAGE_TRANSFER_SRC_BIT, VK_MEMORY_PROPERTY_HOST_VISIBLE_BIT | VK_MEMORY_PROPERTY_HOST_COHERENT_BIT, stagingBuffer, stagingBufferMemory);

     void* data;

     vkMapMemory(device, stagingBufferMemory, , bufferSize, , &data);

     memcpy(data, indices.data(), (size_t) bufferSize);

     vkUnmapMemory(device, stagingBufferMemory);

     createBuffer(bufferSize, VK_BUFFER_USAGE_TRANSFER_DST_BIT | VK_BUFFER_USAGE_INDEX_BUFFER_BIT, VK_MEMORY_PROPERTY_DEVICE_LOCAL_BIT, indexBuffer, indexBufferMemory);

     copyBuffer(stagingBuffer, indexBuffer, bufferSize);

     vkDestroyBuffer(device, stagingBuffer, nullptr);

     vkFreeMemory(device, stagingBufferMemory, nullptr);

 }
There are only two notable differences. The bufferSize is now equal to the number of indices times the size of the index type, either uint16_t or uint32_t. The usage of the indexBuffer should be VK_BUFFER_USAGE_INDEX_BUFFER_BIT instead of VK_BUFFER_USAGE_VERTEX_BUFFER_BIT, which makes sense. Other than that, the process is exactly the same. We create a staging buffer to copy the contents of indices to and then copy it to the final device local index buffer.
有2处区别要注意。bufferSize 现在等于索引的数量乘以索引的类型(uint16_t 或uint32_t)的字节数。indexBuffer 的用法应当是VK_BUFFER_USAGE_INDEX_BUFFER_BIT ,而不是VK_BUFFER_USAGE_VERTEX_BUFFER_BIT,这很合理。除此之外,过程完全一样。我们创建一个暂存buffer,复制indices 的内容进去,然后复制它到最后的设备局部索引buffer。
The index buffer should be cleaned up at the end of the program, just like the vertex buffer:
索引buffer应当在程序结束时被清理掉,像顶点buffer一样:
void cleanup() {

    cleanupSwapChain();

    vkDestroyBuffer(device, indexBuffer, nullptr);

    vkFreeMemory(device, indexBufferMemory, nullptr);

    vkDestroyBuffer(device, vertexBuffer, nullptr);

    vkFreeMemory(device, vertexBufferMemory, nullptr);

    ...

}
Using an index buffer 使用索引buffer
Using an index buffer for drawing involves two changes to createCommandBuffers. We first need to bind the index buffer, just like we did for the vertex buffer. The difference is that you can only have a single index buffer. It's unfortunately not possible to use different indices for each vertex attribute, so we do still have to completely duplicate vertex data even if just one attribute varies.
使用索引buffer来绘制,涉及createCommandBuffers的两个变化。我们先要绑定索引buffer,就像我们绑定顶点buffer一样。其区别是,你只能有1个索引buffer。不幸的是,不能为每个订单属性指定不同的索引,所以我们必须完全重复顶点数据-即使只有1个属性有差别。
vkCmdBindVertexBuffers(commandBuffers[i], , , vertexBuffers, offsets);

vkCmdBindIndexBuffer(commandBuffers[i], indexBuffer, , VK_INDEX_TYPE_UINT16);
An index buffer is bound with vkCmdBindIndexBuffer which has the index buffer, a byte offset into it, and the type of index data as parameters. As mentioned before, the possible types are VK_INDEX_TYPE_UINT16 and VK_INDEX_TYPE_UINT32.
索引通过vkCmdBindIndexBuffer 函数绑定,其参数为索引buffer、字节偏移量、索引数据的类型。如前所述,可能的类型是VK_INDEX_TYPE_UINT16 和VK_INDEX_TYPE_UINT32。
Just binding an index buffer doesn't change anything yet, we also need to change the drawing command to tell Vulkan to use the index buffer. Remove the vkCmdDraw line and replace it with vkCmdDrawIndexed:
只绑定一个索引buffer还不能改变什么,我们还需要改变绘制命令,告诉Vulkan要使用索引buffer。去掉vkCmdDraw 这一行,换成vkCmdDrawIndexed:
vkCmdDrawIndexed(commandBuffers[i], static_cast<uint32_t>(indices.size()), , , , );
A call to this function is very similar to vkCmdDraw. The first two parameters specify the number of indices and the number of instances. We're not using instancing, so just specify 1 instance. The number of indices represents the number of vertices that will be passed to the vertex buffer. The next parameter specifies an offset into the index buffer, using a value of 1 would cause the graphics card to start reading at the second index. The second to last parameter specifies an offset to add to the indices in the index buffer. The final parameter specifies an offset for instancing, which we're not using.
这个函数调用与vkCmdDraw很像。前2个参数指定了索引的数量和instance的数量。我们不用instancing,所以填入1。索引的数量代表要传入顶点buffer的数量。下一个参数指定了索引buffer的偏移量,使用1会导致图形卡从第二个索引开始读取。第二到最后一个参数指定了对索引buffer中的值的增加量。最后一个参数指定了instancing的偏移量,我们不用它。
Now run your program and you should see the following:
现在运行你的程序,你应当看到下述情景:
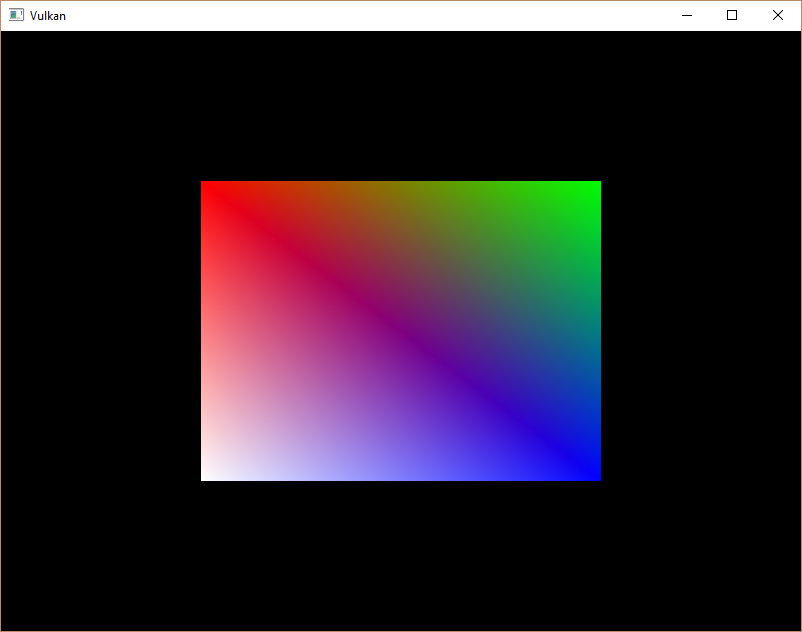
You now know how to save memory by reusing vertices with index buffers. This will become especially important in a future chapter where we're going to load complex 3D models.
你现在知道如何通过索引buffer复用顶点来节省内存。这在以后的章节会变得特别重要where我们要加载复杂的3D模型。
The previous chapter already mentioned that you should allocate multiple resources like buffers from a single memory allocation, but in fact you should go a step further. Driver developers recommend that you also store multiple buffers, like the vertex and index buffer, into a single VkBuffer and use offsets in commands like vkCmdBindVertexBuffers. The advantage is that your data is more cache friendly in that case, because it's closer together. It is even possible to reuse the same chunk of memory for multiple resources if they are not used during the same render operations, provided that their data is refreshed, of course. This is known as aliasing and some Vulkan functions have explicit flags to specify that you want to do this.
之前的章节已经提到了,你应当从一个单独的内存分配操作中为多个资源(如buffer)分配控件,但是实际上你应当再深入一步。驱动开发者推荐你将多个buffer(如顶点和索引buffer)保存到同一个,使用命令(如vkCmdBindVertexBuffers)里的偏移量来区分它们。优点是你的数据对缓存更友好,因为它们更靠近彼此。甚至可以将同一内存块用作多个资源if它们不再同一渲染操作时使用-当然,要保证它们的数据已经刷新。这被称为aliasing ,有的Vulkan函数有显式地标志to指定你想这样做。
C++ code / Vertex shader / Fragment shader
[译]Vulkan教程(24)索引buffer的更多相关文章
- [译]Vulkan教程(25)描述符布局和buffer
[译]Vulkan教程(25)描述符布局和buffer Descriptor layout and buffer 描述符布局和buffer Introduction 入门 We're now able ...
- [译]Vulkan教程(22)创建顶点buffer
[译]Vulkan教程(22)创建顶点buffer Vertex buffer creation 创建顶点buffer Introduction 入门 Buffers in Vulkan are re ...
- [译]Vulkan教程(23)暂存buffer
[译]Vulkan教程(23)暂存buffer Staging buffer 暂存buffer Introduction 入门 The vertex buffer we have right now ...
- [译]Vulkan教程(30)深度缓存
[译]Vulkan教程(30)深度缓存 Depth buffering 深度缓存 Introduction 入门 The geometry we've worked with so far is pr ...
- [译]Vulkan教程(31)加载模型
[译]Vulkan教程(31)加载模型 Loading models 加载模型 Introduction 入门 Your program is now ready to render textured ...
- [译]Vulkan教程(27)Image
[译]Vulkan教程(27)Image Images Introduction 入门 The geometry has been colored using per-vertex colors so ...
- [译]Vulkan教程(26)描述符池和set
[译]Vulkan教程(26)描述符池和set Descriptor pool and sets 描述符池和set Introduction 入门 The descriptor layout from ...
- [译]Vulkan教程(21)顶点input描述
[译]Vulkan教程(21)顶点input描述 Vertex input description 顶点input描述 Introduction 入门 In the next few chapters ...
- [译]Vulkan教程(19)渲染和呈现
[译]Vulkan教程(19)渲染和呈现 Rendering and presentation 渲染和呈现 Setup 设置 This is the chapter where everything ...
随机推荐
- 【Web技术】337- 秒懂 Web 缓存
点击上方"前端自习课"关注,学习起来~ 最近把前端缓存重新整理了一下,从整体的层面上把前端所有能用的缓存方案梳理了一遍.同时,对于http缓存,使用了表格的方案,使得原先晦涩难记的 ...
- Vue中实现聊天窗口overflow:auto自动滚动到底部,实现显示当前最新聊天消息
在做消息的项目,当有新消息的时候让新消息出现在最底部,此时的box用的是overflow:auto 注意:vue项目需要注意在dom结构渲染完再进行操作 <div class="mai ...
- JS中forEach和map的区别
共同点: 1.都是循环遍历数组中的每一项. 2.forEach()和map()里面每一次执行匿名函数都支持3个参数:数组中的当前项item,当前项的索引index,原始数组input. 3.匿名函数中 ...
- Atmel Studio 7.0 的使用方法
就在最近,Atmel终于推出了新版本IDE——Atmel Studio 7.0,该版本采用了微软最新的 Visual Studio 2015 平台,经过一段时间使用,Atmel Studio 7.0在 ...
- SQLHelper.cs类 微软C#版
using System; using System.Data; using System.Xml; using System.Data.SqlClient; using System.Collect ...
- c++-多态和vptr指针
多态的原理 #define _CRT_SECURE_NO_WARNINGS #include <iostream> using namespace std; class Parent { ...
- JavaScript图形实例:纺织物图案
1.简单纺织物图案 先在HTML页面中设置一个画布. <canvas id="myCanvas" width="360" height="240 ...
- [AI开发]DeepStream开发填坑记录
下面是在deepstream使用过程中碰到的一些坑: (1)Pipeline中的Sink如果需要编码存文件或者推rtmp的流,注意控制编码的参数,编码质量不要太高.否则可能Sink带不动,整个Pipe ...
- 使用 ASP.NET Core MVC 创建 Web API(六)
使用 ASP.NET Core MVC 创建 Web API 使用 ASP.NET Core MVC 创建 Web API(一) 使用 ASP.NET Core MVC 创建 Web API(二) 使 ...
- WPF无边框可拖动窗体
下面主要记录下创建无边框窗体,并且可以拖动.这种窗体主要用于弹出小窗体时. <Window x:Class="WpfApplication1.MainWindow" xmln ...