基于docker的mysql8的主从复制
基于docker的mysql8的主从复制
创建mysql的docker镜像
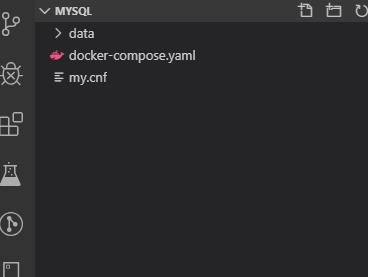
构建docker镜像,其中数据卷配置内容在下面,结构目录如下
version: '3.7'

services:

    db:

      # images 8.x

      image: mysql

      restart: always

      environment:

        MYSQL_ROOT_PASSWORD: 456123

      command:

        --default-authentication-plugin=mysql_native_password

        --character-set-server=utf8mb4

        --collation-server=utf8mb4_general_ci

        --explicit_defaults_for_timestamp=true

        --lower_case_table_names=1

      ports:

        - 3309:3306

      volumes:

        - ./data:/var/lib/mysql

        - ./my.cnf:/etc/my.cnf
配置mysql的主库
更新配置文件
# Copyright (c) 2017, Oracle and/or its affiliates. All rights reserved.

#

# This program is free software; you can redistribute it and/or modify

# it under the terms of the GNU General Public License as published by

# the Free Software Foundation; version 2 of the License.

#

# This program is distributed in the hope that it will be useful,

# but WITHOUT ANY WARRANTY; without even the implied warranty of

# MERCHANTABILITY or FITNESS FOR A PARTICULAR PURPOSE.  See the

# GNU General Public License for more details.

#

# You should have received a copy of the GNU General Public License

# along with this program; if not, write to the Free Software

# Foundation, Inc., 51 Franklin St, Fifth Floor, Boston, MA  02110-1301 USA

#

# The MySQL  Server configuration file.

#

# For explanations see

# http://dev.mysql.com/doc/mysql/en/server-system-variables.html

[mysqld]

pid-file        = /var/run/mysqld/mysqld.pid

socket          = /var/run/mysqld/mysqld.sock

datadir         = /var/lib/mysql

secure-file-priv= NULL

# Disabling symbolic-links is recommended to prevent assorted security risks

symbolic-links=0

# Custom config should go here

# [必须]启用二进制日志

log-bin=mysql-bin

# [必须]服务器唯一ID,默认是1  1~255

server-id=1

sql_mode=STRICT_TRANS_TABLES,NO_ENGINE_SUBSTITUTION
配置操作
启动mysql
docker-compose up -d
更新配置
查看容器
docker ps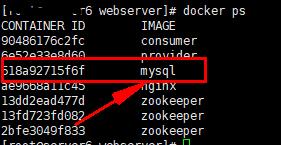
进入mysql交互
docker exec -it 518a92715f6f /bin/bash登录mysql
mysql -u root -p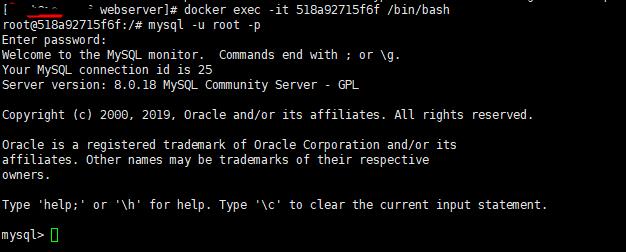
配置
#在主库上创建同步用户并授权

CREATE USER 'replicate'@'112.74.41.236' IDENTIFIED BY '123456';

GRANT REPLICATION SLAVE ON *.* TO 'replicate'@'112.74.41.236';

FLUSH PRIVILEGES;

#最后增加远程访问用户 并赋予所有权限,远程访问测试用

CREATE USER antsdouble IDENTIFIED BY '123456';

GRANT ALL ON *.* TO 'antsdouble'@'%';

#用navicate12及以上可以不用修复修复远程登录报报 caching_sha2_password异常

# mysql8 用新的驱动  driver-class-name: com.mysql.cj.jdbc.Driver

ALTER USER 'antsdouble'@'%' IDENTIFIED BY '123456' PASSWORD EXPIRE NEVER;

ALTER USER 'antsdouble'@'%' IDENTIFIED WITH mysql_native_password BY '123456';

FLUSH PRIVILEGES;

#查询master的状态,此处File,Position数据在配置从库时用到

show master status;

相关说明
server-id是唯一的,主从不能相同,server-id为1表示mysq数据库为主数据库,server-id为2表示mysql的数据库为从数据库
为何必须挂载到/etc/my.cnf 文件上,而不是/etc/mysql/my.cnf 文件上?因为mysql默认配置文件位置在/etc/mysql/my.cnf,挂在方式无法改变容器中文件内容,my.conf内容不会改变,my.cnf中没有我们自定义的配置内容,启动mysql容器会报错
lower_case_table_names:忽略表名、列名等数据结构的大小写(注意:不是每行记录内容的大小写!)。

log-bin:开启二进制记录。这是为了主从复制而做的设置。本文使用RBR(Row-Based Replication)模式。

slow_query_log=1:开启慢查询日志。如果某一条SQL执行的时间超过long_query_time设置的秒数,那么就记录下来。记录文件路径可以使用show variables;命令,在变量名是slow_query_log_file下查找到具体的日志文件路径。

long_query_time=1:单位是秒。指如果某一条SQL语句执行时间超过1秒,就记录下来。必须开启慢查询日志了以后,此变量才能使用。

log_error:开启错误日志。show variables like 'log_error'; 就可以查询到日志文件的路径。mysql的docker官方镜像如果设置别的取值会导致容器无法正常启动。
配置mysql的从库
更新配置文件
# Copyright (c) 2017, Oracle and/or its affiliates. All rights reserved.

#

# This program is free software; you can redistribute it and/or modify

# it under the terms of the GNU General Public License as published by

# the Free Software Foundation; version 2 of the License.

#

# This program is distributed in the hope that it will be useful,

# but WITHOUT ANY WARRANTY; without even the implied warranty of

# MERCHANTABILITY or FITNESS FOR A PARTICULAR PURPOSE.  See the

# GNU General Public License for more details.

#

# You should have received a copy of the GNU General Public License

# along with this program; if not, write to the Free Software

# Foundation, Inc., 51 Franklin St, Fifth Floor, Boston, MA  02110-1301 USA

#

# The MySQL  Server configuration file.

#

# For explanations see

# http://dev.mysql.com/doc/mysql/en/server-system-variables.html

[mysqld]

pid-file        = /var/run/mysqld/mysqld.pid

socket          = /var/run/mysqld/mysqld.sock

datadir         = /var/lib/mysql

secure-file-priv= NULL

# Disabling symbolic-links is recommended to prevent assorted security risks

symbolic-links=0

# Custom config should go here

# [必须]启用二进制日志

log-bin=mysql-bin

# [必须]服务器唯一ID,默认是1

server-id=1

sql_mode=STRICT_TRANS_TABLES,NO_ENGINE_SUBSTITUTION
配置操作
进入交互模式,方法同主库
配置从库
change master to master_host='112.74.41.236',master_port=3309,master_user='replicate',master_password='123456',master_log_file='binlog.000006',master_log_pos=3862;
说明
master_port:Master的端口号,指的是容器的端口号

master_user:用于数据同步的用户

master_password:用于同步的用户的密码

master_log_file:指定 Slave 从哪个日志文件开始复制数据,即上文中提到的 File 字段的值

master_log_pos:从哪个 Position 开始读,即上文中提到的 Position 字段的值

master_connect_retry:如果连接失败,重试的时间间隔,单位是秒,默认是60秒
查看
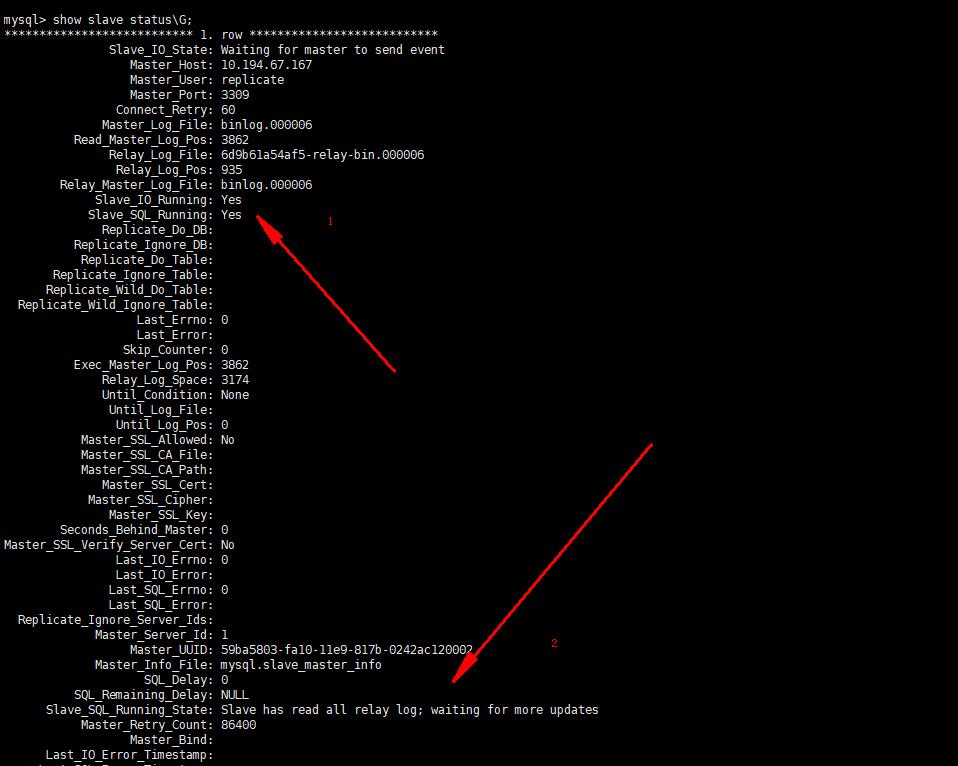
show slave status\G

# 查询slave的状态,Slave_IO_Running及Slave_SQL_Running进程必须正常运行,即YES状态,否则都是错误的状态 错误可以在2标记处查看到原因,也可以通过

show slave status;
测试功能
- 主库添加一条数
- 在从库查看
常见问题
可能产生的原因
网络不通

检查ip,端口

密码不对

检查是否创建用于同步的用户和用户密码是否正确

pos不对

检查Master的 Position
Could not execute Update_rows event on table oa.bui_bill_sum; Can't find record in 'bui_bill_sum', Error_code: 1032; handler error HA_ERR_KEY_NOT_FOUND; the event's master log mysql-bin.000138, end_log_pos 160051747
解决,临时
进入sql 执行

STOP SLAVE;

SET GLOBAL sql_slave_skip_counter =1; #表示跳过一步错误,后面的数字可变

START SLAVE;
永久
在my.cnf中配置

slave-skip-errors = 1032 就会跳过所有的1032的错误,多个用逗号分隔
mysql并没有从my.cnf文件中更新server_id,既然这样就只能手动修改了
set global server_id=2; #此处的数值和my.cnf里设置的一样就行

slave start;
基于docker的mysql8的主从复制的更多相关文章
- 基于docker/dockerfile实现redis主从复制
今天我们来搭建基于docker实现redis主从复制集群 为什么要使用redis集群模式? Redis可以说是内存数据库,mysql的数据库是真实存储在硬盘里的,因此,redis的读取速度要比mysq ...
- 基于Docker Compose搭建mysql主从复制(1主2从)
系统环境 * 3 Ubuntu 16.04 mysql 8.0.12 docker 18.06.1-ce docker-compose 1.23.0-rc3 *3 ==> PS ###我用的是 ...
- 基于Docker的Mysql主从复制搭建
来源:https://www.cnblogs.com/songwenjie/p/9371422.html?tdsourcetag=s_pctim_aiomsg 为什么基于Docker搭建? 资源有 ...
- 基于Docker的Mysql主从复制
基于Docker的Mysql主从复制搭建 为什么基于Docker搭建? 资源有限 虚拟机搭建对机器配置有要求,并且安装mysql步骤繁琐 一台机器上可以运行多个Docker容器 Docker容器之间相 ...
- Docker部署Mysql8.0.20并配置主从复制
1. Linux安装Mysql8.0.20并配置主从复制(一主一从,双主双从) Linux安装Mysql8.0.20并配置主从复制(一主一从,双主双从) 2. 前提准备 # 创建主从数据库文件夹 ...
- Linux基于Docker的Redis主从复制、哨兵模式搭建
本教程基于CentOS7,开始本教程前,请确保您的Linux系统已安装Docker. 1.使用docker下载redis镜像 docker pull redis 安装完成后,使用docker imag ...
- 基于Docker搭建MySQL主从复制
摘要: 本篇博文相对简单,因为是初次使用Docker,MySQL的主从复制之前也在Centos环境下搭建过,但是也忘的也差不多了,因此本次尝试在Docker中搭建. 本篇博文相对简单,因为是初次使用D ...
- 基于 Docker 搭建 MySQL 主从复制
本篇博文相对简单,因为是初次使用Docker,MySQL的主从复制之前也在Centos环境下搭建过,但是也忘的也差不多了,因此本次尝试在Docker中搭建. 根据网上教程走还是踩了一些坑,不过所幸最终 ...
- 如何利用docker快速构建MySQL主从复制环境
在学习MySQL的过程中,常常会测试各种参数的作用.这时候,就需要快速构建出MySQL实例,甚至主从. 考虑如下场景: 譬如我想测试mysqldump在指定--single-transaction参数 ...
随机推荐
- 使用 Eslint & standard 规范前端代码
前言 JavaScript的动态语言类型,给它带来了独特的魅力,产生了风格多样的开发范式,同时也带来了一些问题,从运行时常见的 undefined .null 报错,到代码随意的加减分号.换行.空格, ...
- 两个变量交换数字 不用第三个变量的情况下 int a = 5,b = 6
今天可是涨见识额 记录一下 第一种方法: a=a+bb=a-ba=a-b 第二种: b= a+(a=b)*0 一句话搞定
- Micronaut 微服务中使用 Kafka
今天,我们将通过Apache Kafkatopic构建一些彼此异步通信的微服务.我们使用Micronaut框架,它为与Kafka集成提供专门的库.让我们简要介绍一下示例系统的架构.我们有四个微型服务: ...
- 【ASP.NET-中级】SQLHelper数据访问公共类
ASP.NET开发中的三层开发思想指的是UI层(界面显示层),BLL层(业务逻辑层),DAL层(数据访问层)三层,三层之间通过函数的调用来达到降低耦合,易于系统维护的目的,SQLHelper助手类的主 ...
- 教老婆学Linux运维(二)Linux常用命令指南【下】
目录 tips:紧接上一篇,Linux常用命令指南[上] 2.4 文件解压缩 2.4.1 官宣的linux压缩工具:tar tar的基本命令格式为 tar [参数选项] [文件或目录] 我们前面学的命 ...
- JavaScript 类型 检测
前言 ECMAScript中有5种数据类型,分别为Number,Boolean,Null,Undifined和String,以及一种复杂的数据类型Object(由名值对组成,是这门语言所有对象的基础类 ...
- 【产品】PM常用的流程图
一.流程图分类 UML有很多种,大体可以分类两类:行为型的图和结构型的图.平时工作中的流程图,只要能把事情清晰的表明,用何种流程图表现形式,其实都无所谓. 但是,作为一名产品经理,共有哪些种类的流程图 ...
- 【网络安全】给你讲清楚什么是XSS攻击
给你讲清楚什么是XSS攻击 1. 什么是XSS攻击 跨站脚本攻击(Cross Site Scripting)本来的缩写为CSS,为了与层叠样式表(Cascading Style Sheets,CSS) ...
- elasticsearch http 搜索 测试
1.查询所有的documents http://192.168.43.45:9200/_search boost parameter 细粒度搜索条件权重控制 如:组装多个查询条件,其中一个匹配的想要优 ...
- java第4天:String static Arrays类,Math类
1 字符串的概述和特点 字符串一旦创建,是不可变的. 有双引号的就是字符串 *** 2 字符串的三种构造方法 2-1 第一种: 格式:String str = new String();| :-| 2 ...