Swgger2的简单使用
编写接口文档是一个非常枯燥的工作,我们采用Swagger2这套自动化文档工具来生成文档,它可以轻松的整合到Spring Boot中,并与Spring MVC程序配合组织出强大RESTful API文档。
1、在pom.xml文件中加入Swagger2的依赖
<!-- https://mvnrepository.com/artifact/io.springfox/springfox-swagger2 -->

<dependency>

    <groupId>io.springfox</groupId>

    <artifactId>springfox-swagger2</artifactId>

    <version>2.9.2</version>

</dependency>

<!-- https://mvnrepository.com/artifact/io.springfox/springfox-swagger-ui -->

<dependency>

    <groupId>io.springfox</groupId>

    <artifactId>springfox-swagger-ui</artifactId>

    <version>2.9.2</version>

</dependency>
2、创建Swagger2配置类
package com.offcn.springbootdemo2.Config; import org.springframework.context.annotation.Bean;
import org.springframework.context.annotation.Configuration;
import springfox.documentation.builders.ApiInfoBuilder;
import springfox.documentation.builders.PathSelectors;
import springfox.documentation.builders.RequestHandlerSelectors;
import springfox.documentation.service.ApiInfo;
import springfox.documentation.spi.DocumentationType;
import springfox.documentation.spring.web.plugins.Docket;
import springfox.documentation.swagger2.annotations.EnableSwagger2; @Configuration
@EnableSwagger2
public class SwaggerConfig { @Bean
public Docket createRestApi(){
return new Docket(DocumentationType.SWAGGER_2)
.apiInfo(apiInfo())
.select().apis(RequestHandlerSelectors.basePackage("com.offcn.springbootdemo2.Controller"))
.paths(PathSelectors.any()).build();
} private ApiInfo apiInfo() {
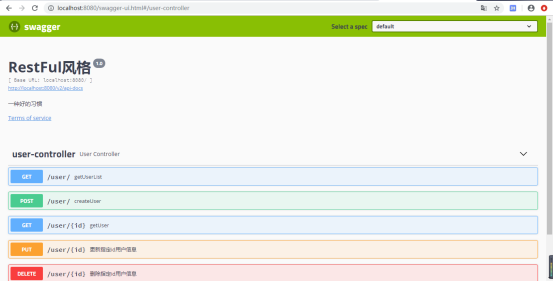
return new ApiInfoBuilder().title("RestFul风格").description("一种好的习惯")
.termsOfServiceUrl("http://www.baidu.com").contact("java").version("1.0").build();
}
}
3、修改Controller增加文档注释
 package com.offcn.springbootdemo2.Controller;

 import com.offcn.springbootdemo2.Pojo.User;

 import io.swagger.annotations.ApiImplicitParam;

 import io.swagger.annotations.ApiImplicitParams;

 import io.swagger.annotations.ApiOperation;

 import org.springframework.web.bind.annotation.*;

 import java.util.ArrayList;

 import java.util.Collections;

 import java.util.List;

 @RestController

 @RequestMapping("/user")

 public class UserController {

    private List<User> listUser= Collections.synchronizedList(new ArrayList<User>());

    @GetMapping("/")

    public List<User> getUserList(){

       return listUser;

    }

    /***

     * 新增用户

     * @param user

     * @return

     */

    @PostMapping("/")

    public String createUser(User user) {

       listUser.add(user);

       return "success";

    }

    /***

     * 获取指定id用户信息

     * @param id

     * @return

     */

    @GetMapping("/{id}")

    public User getUser(@PathVariable("id") Integer id) {

       for (User user : listUser) {

          if(user.getId()==id) {

             return user;

          }

       }

       return null;

    }

    /**

     * 更新指定id用户信息

     * @param id

     * @param user

     * @return

     */

    @PutMapping("/{id}")

    @ApiOperation(value="更新指定id用户信息", notes="根据id更新用户信息")

    @ApiImplicitParams({

          @ApiImplicitParam(name = "id", value = "用户ID", required = true, dataType = "Long"),

          @ApiImplicitParam(name = "user", value = "用户详细实体user", required = true, dataType = "User")

    })

    public String updateUser(@PathVariable("id") Integer id,User user) {

       for (User user2 : listUser) {

          if(user2.getId() == id) {

             user2.setName(user.getName());

             user2.setAge(user.getAge());

          }

       }

       return "success";

    }

    /***

     * 删除指定id用户

     * @param id

     * @return

     */

    @DeleteMapping("/{id}")

    @ApiOperation(value="删除指定id用户信息", notes="根据id删除用户信息")

    @ApiImplicitParam(name = "id", value = "用户id", required = true, dataType = "Long")

    public String deleteUser(@PathVariable("id") Integer id) {

       listUser.remove(getUser(id));

       return "success";

    }

 }
4、启动项目,在浏览器地址输入
http://localhost:8080/swagger-ui.html
查看Swagger2文档
额外添加一个依赖Lombok,可以省略实体类中繁琐的代码
<!-- https://mvnrepository.com/artifact/org.projectlombok/lombok -->

<dependency>

    <groupId>org.projectlombok</groupId>

    <artifactId>lombok</artifactId>

    <version>1.18.10</version>

    <scope>provided</scope>

</dependency>
Swgger2的简单使用的更多相关文章
- 【造轮子】打造一个简单的万能Excel读写工具
大家工作或者平时是不是经常遇到要读写一些简单格式的Excel? shit!~很蛋疼,因为之前吹牛,就搞了个这东西,还算是挺实用,和大家分享下. 厌烦了每次搞简单类型的Excel读写?不怕~来,喜欢流式 ...
- Fabio 安装和简单使用
Fabio(Go 语言):https://github.com/eBay/fabio Fabio 是一个快速.现代.zero-conf 负载均衡 HTTP(S) 路由器,用于部署 Consul 管理的 ...
- node.js学习(三)简单的node程序&&模块简单使用&&commonJS规范&&深入理解模块原理
一.一个简单的node程序 1.新建一个txt文件 2.修改后缀 修改之后会弹出这个,点击"是" 3.运行test.js 源文件 使用node.js运行之后的. 如果该路径下没有该 ...
- 哪种缓存效果高?开源一个简单的缓存组件j2cache
背景 现在的web系统已经越来越多的应用缓存技术,而且缓存技术确实是能实足的增强系统性能的.我在项目中也开始接触一些缓存的需求. 开始简单的就用jvm(java托管内存)来做缓存,这样对于单个应用服务 ...
- 在Openfire上弄一个简单的推送系统
推送系统 说是推送系统有点大,其实就是一个消息广播功能吧.作用其实也就是由服务端接收到消息然后推送到订阅的客户端. 思路 对于推送最关键的是服务端向客户端发送数据,客户端向服务端订阅自己想要的消息.这 ...
- 我的MYSQL学习心得(一) 简单语法
我的MYSQL学习心得(一) 简单语法 我的MYSQL学习心得(二) 数据类型宽度 我的MYSQL学习心得(三) 查看字段长度 我的MYSQL学习心得(四) 数据类型 我的MYSQL学习心得(五) 运 ...
- 使用 Nodejs 搭建简单的Web服务器
使用Nodejs搭建Web服务器是学习Node.js比较全面的入门教程,因为要完成一个简单的Web服务器,你需要学习Nodejs中几个比较重要的模块,比如:http协议模块.文件系统.url解析模块. ...
- ASP.NET Aries 入门开发教程2:配置出一个简单的列表页面
前言: 朋友们都期待我稳定地工作,但创业公司若要躺下,也非意念可控. 若人生注定了风雨飘摇,那就雨中前行了. 最机开始看聊新的工作机会,欢迎推荐,创业公司也可! 同时,趁着自由时间,抓紧把这系列教程给 ...
- 简单入门canvas - 通过刮奖效果来学习
一 .前言 一直在做PC端的前端开发,从互联网到行业软件.最近发现移动端已经成为前端必备技能了,真是不能停止学习.HTML5新增的一些东西,canvas是用的比较多也比较复杂的一个,简单的入门了一下, ...
随机推荐
- Python面试题(2)
1.一行代码实现1-100的和 ? 1 2 3 print(sum(range(1,101))) #range中的参数是1<=i<101 #sum是计算参数的和 2.在函数内部改变全局变量 ...
- 关于python切片操作笔记
一. Python可切片对象的索引方式 包括:正索引和负索引两部分,如下图所示,以a = [0, 1, 2, 3, 4, 5, 6, 7, 8, 9]为例: python索引方式.jpg 二. P ...
- ppt演讲者视图不可用的解决办法
1. 关闭ppt 2. 对着桌面右键,选择:nView Desktop Manager 3. 应用程序--增强--去掉“添加Powerpoint幻灯片显示扩展程序(W)”
- 历届试题 危险系数-(dfs+记录路径)
历届试题 危险系数 问题描述 抗日战争时期,冀中平原的地道战曾发挥重要作用. 地道的多个站点间有通道连接,形成了庞大的网络.但也有隐患,当敌人发现了某个站点后,其它站点间可能因此会失去联系. 我 ...
- c3p0参数
<c3p0-config> <default-config> <!--当连接池中的连接耗尽的时候c3p0一次同时获取的连接数.Default: 3 --> < ...
- Educational Round 66 题解
作为橙名来水了一发…… 这次题目就比上次良心多了.7题有5题会做. 然而风格仍然很怪异……还是练少了? A 水题.不过一开始没注意细节挂了几发,罚时罚的真痛…… 明显是能除以 $k$ 就除以 $k$, ...
- 【CF10D】 LCIS
题目链接 最长公共上升子序列 \(f[i][j]\)表示\(A\)的前\(i\)个数,匹配\(B\)的第\(j\)个数,且\(B[j]\)必选时的最长公共上升子序列长度 转移: if(A[i]==B[ ...
- nginx 日志之 access_log分割
如果任由访问日志写下去,日志文件会变得越来越大,甚至是写满磁盘. 所以,我们需要想办法把日志做切割,比如每天生成一个新的日志,旧的日志按规定时间删除即可. 实现日志切割可以通过写shell脚本或者系统 ...
- python3.5以上版本,typing模块提高代码健壮性
一 前言 Python是一门弱类型的语言,很多时候我们可能不清楚函数参数类型或者返回值类型,很有可能导致一些类型没有指定方法,在写完代码一段时间后回过头看代码,很可能忘记了自己写的函数需要传什么参数, ...
- 在centos系统的/etc/hosts添加了 当前主机的 ‘ NAT分配的IP controller’,RabbitMQ添加用户报错。
在centos系统的/etc/hosts添加了 当前主机的 ' NAT分配的IP controller',RabbitMQ添加用户报错. rabbitMq添加用户 报错信息如下 [root@contr ...