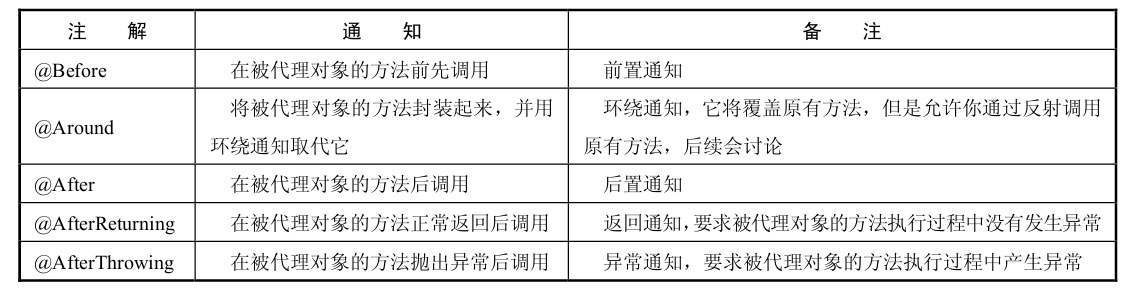
spring 使用@AspectJ注解开发Spring AOP
选择切点
代码清单:打印角色接口
package com.ssm.chapter11.aop.service;

import com.ssm.chapter11.game.pojo.Role;

public interface RoleService {

    // public void printRole(Role role);

    public void printRole(Role role, int sort);

}
代码清单:RoleService实现类
package com.ssm.chapter11.aop.service.impl;

import org.springframework.stereotype.Component;

import com.ssm.chapter11.aop.service.RoleService;

import com.ssm.chapter11.game.pojo.Role;

@Component

public class RoleServiceImpl implements RoleService {

    // @Override

    // public void printRole(Role role) {

    //     System.out.println("{id: " + role.getId() + ", " + "role_name : " + role.getRoleName() + ", " + "note : " + role.getNote() + "}");

    // }

    public void printRole(Role role, int sort) {

        System.out.println("{id: " + role.getId() + ", " + "role_name : " + role.getRoleName() + ", " + "note : " + role.getNote() + "}");

        System.out.println(sort);

    }

}
这个类没什么特别的,只是这个时候如果把printRole作为AOP的切点,那么用动态代理的语言就是要为类RoleServi-ceImpl生成代理对象,然后拦截printRole方法,于是可以产生各种AOP通知方法。
创建切面
package com.ssm.chapter11.aop.aspect;

import com.ssm.chapter11.aop.verifier.RoleVerifier;

import com.ssm.chapter11.aop.verifier.impl.RoleVerifierImpl;

import org.aspectj.lang.ProceedingJoinPoint;

import org.aspectj.lang.annotation.*;

@Aspect

public class RoleAspect {

    @DeclareParents(value = "com.ssm.chapter11.aop.service.impl.RoleServiceImpl+", defaultImpl = RoleVerifierImpl.class)

    public RoleVerifier roleVerifier;

    @Pointcut("execution(* com.ssm.chapter11.aop.service.impl.RoleServiceImpl.printRole(..))")

    public void print() {

    }

    // @Before("execution(* com.ssm.chapter11.aop.service.impl.RoleServiceImpl.printRole(..))")

    // @Before("execution(* com.ssm.chapter11.*.*.*.*.printRole(..)) && within(com.ssm.chapter11.aop.service.impl.*)")

    @Before("print()")

    // @Before("execution(* com.ssm.chapter11.aop.service.impl.RoleServiceImpl.printRole(..)) && args(role, sort)")

    public void before() {

        System.out.println("before ....");

    }

    @After("execution(* com.ssm.chapter11.aop.service.impl.RoleServiceImpl.printRole(..))")

    public void after() {

        System.out.println("after ....");

    }

    @AfterReturning("execution(* com.ssm.chapter11.aop.service.impl.RoleServiceImpl.printRole(..))")

    public void afterReturning() {

        System.out.println("afterReturning ....");

    }

    @AfterThrowing("execution(* com.ssm.chapter11.aop.service.impl.RoleServiceImpl.printRole(..))")

    public void afterThrowing() {

        System.out.println("afterThrowing ....");

    }

    @Around("print()")

    public void around(ProceedingJoinPoint jp) {

        System.out.println("around before ....");

        try {

            jp.proceed();

        } catch (Throwable e) {

            e.printStackTrace();

        }

        System.out.println("around after ....");

    }

}

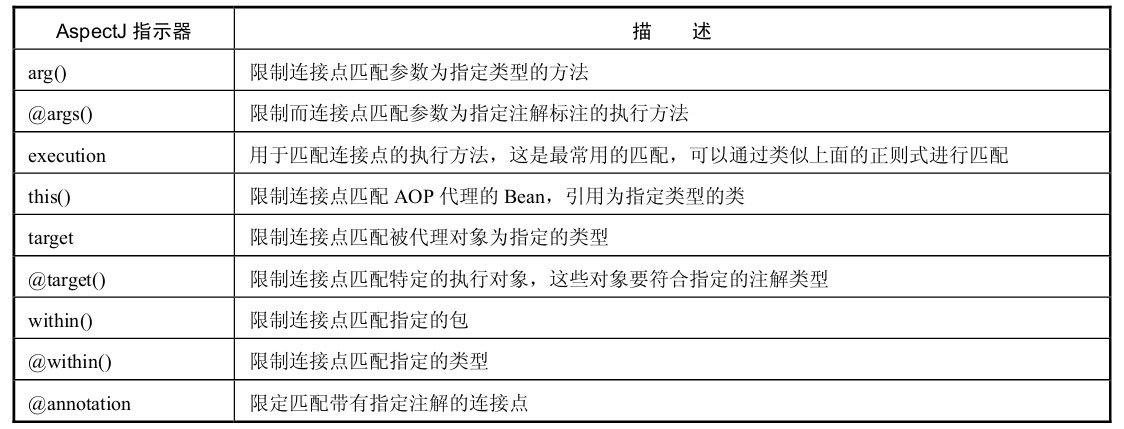
连接点
execution(* com.ssm.chapter11.aop.service.impl.RoleServiceImpl.printRole(..))
依次对这个表达式做出分析。
•execution:代表执行方法的时候会触发。
•*:代表任意返回类型的方法。
•com.ssm.chapter11.aop.service.impl.RoleServiceImpl:代表类的全限定名。
•printRole:被拦截方法名称。
•(..):任意的参数。
显然通过上面的描述,全限定名为com.ssm.chapter11.aop.service.impl.RoleServiceImpl的类的printRole方法被拦截了,这样它就按照AOP通知的规则把方法织入流程中。

测试AOP
package com.ssm.chapter11.aop.config;

import org.springframework.context.annotation.Bean;

import org.springframework.context.annotation.ComponentScan;

import org.springframework.context.annotation.Configuration;

import org.springframework.context.annotation.EnableAspectJAutoProxy;

import com.ssm.chapter11.aop.aspect.RoleAspect;

@Configuration

@EnableAspectJAutoProxy

@ComponentScan("com.ssm.chapter11.aop")

public class AopConfig {

    @Bean

    public RoleAspect getRoleAspect() {

        return new RoleAspect();

    }

}
Spring还提供了XML的方式,这里就需要使用AOP的命名空间了
<?xml version='1.0' encoding='UTF-8' ?>

<beans xmlns="http://www.springframework.org/schema/beans" xmlns:xsi="http://www.w3.org/2001/XMLSchema-instance"

       xmlns:context="http://www.springframework.org/schema/context" xmlns:aop="http://www.springframework.org/schema/aop"

       xsi:schemaLocation="http://www.springframework.org/schema/beans http://www.springframework.org/schema/beans/spring-beans-4.0.xsd

        http://www.springframework.org/schema/context http://www.springframework.org/schema/context/spring-context-4.0.xsd

        http://www.springframework.org/schema/aop  http://www.springframework.org/schema/aop/spring-aop-4.0.xsd">

    <aop:aspectj-autoproxy/>

    <bean id="roleAspect" class="com.ssm.chapter11.aop.aspect.RoleAspect"/>

    <bean id="roleService" class="com.ssm.chapter11.aop.service.impl.RoleServiceImpl"/>

</beans>
无论用XML还是用Java的配置,都能使Spring产生动态代理对象,从而组织切面,把各类通知织入到流程当中
代码清单:测试AOP流程
package com.ssm.chapter11.aop.main;

import com.ssm.chapter11.aop.verifier.RoleVerifier;

import com.ssm.chapter11.aop.verifier.impl.RoleVerifierImpl;

import org.aspectj.lang.annotation.DeclareParents;

import org.springframework.context.ApplicationContext;

import org.springframework.context.support.ClassPathXmlApplicationContext;

import org.springframework.context.annotation.AnnotationConfigApplicationContext;

import com.ssm.chapter11.aop.config.AopConfig;

import com.ssm.chapter11.aop.service.RoleService;

import com.ssm.chapter11.game.pojo.Role;

public class Main {

    public static void main(String[] args) {

        ApplicationContext ctx = new AnnotationConfigApplicationContext(AopConfig.class);

        // 使用XML使用ClassPathXmlApplicationContext作为IoC容器

        // ApplicationContext ctx = new ClassPathXmlApplicationContext("ssm/chapter11/spring-cfg3.xml");

        RoleService roleService = ctx.getBean(RoleService.class);

        Role role = new Role();

        role.setId(1L);

        role.setRoleName("role_name_1");

        role.setNote("note_1");

        RoleVerifier roleVerifier = (RoleVerifier) roleService;

        if (roleVerifier.verify(role)) {

            roleService.printRole(role, 1);

        }

        System.out.println("####################");

        //测试异常通知

        // role = null;

        // roleService.printRole(role);

    }

}
spring 使用@AspectJ注解开发Spring AOP的更多相关文章
- Spring学习之旅(八)Spring 基于AspectJ注解配置的AOP编程工作原理初探
由小编的上篇博文可以一窥基于AspectJ注解配置的AOP编程实现. 本文一下未贴出的相关代码示例请关注小编的上篇博文<Spring学习之旅(七)基于XML配置与基于AspectJ注解配置的AO ...
- 使用@AspectJ注解开发Spring AOP
一.实体类: Role public class Role { private int id; private String roleName; private String note; @Overr ...
- Spring Aop(二)——基于Aspectj注解的Spring Aop简单实现
转发地址:https://www.iteye.com/blog/elim-2394762 2 基于Aspectj注解的Spring Aop简单实现 Spring Aop是基于Aop框架Aspectj实 ...
- Spring学习之旅(七)基于XML配置与基于AspectJ注解配置的AOP编程比较
本篇博文用一个稍复杂点的案例来对比一下基于XML配置与基于AspectJ注解配置的AOP编程的不同. 相关引入包等Spring AOP编程准备,请参考小编的其他博文,这里不再赘述. 案例要求: 写一 ...
- spring boot纯注解开发模板
简介 spring boot纯注解开发模板 创建项目 pom.xml导入所需依赖 点击查看源码 <dependencies> <dependency> <groupId& ...
- Spring:基于注解的Spring MVC
什么是Spring MVC Spring MVC框架是一个MVC框架,通过实现Model-View-Controller模式来很好地将数据.业务与展现进行分离.从这样一个角度来说,Spring MVC ...
- Spring自动装配----注解装配----Spring自带的@Autowired注解
Spring自动装配----注解装配----Spring自带的@Autowired注解 父类 package cn.ychx; public interface Person { public voi ...
- Spring使用AspectJ注解和XML配置实现AOP
本文演示的是Spring中使用AspectJ注解和XML配置两种方式实现AOP 下面是使用AspectJ注解实现AOP的Java Project首先是位于classpath下的applicationC ...
- Spring注解开发系列Ⅵ --- AOP&事务
注解开发 --- AOP AOP称为面向切面编程,在程序开发中主要用来解决一些系统层面上的问题,比如日志,事务,权限等待,Struts2的拦截器设计就是基于AOP的思想,横向重复,纵向抽取.详细的AO ...
随机推荐
- 开启idea自动Build功能
修改Intellij IDEA的配置两步:1.setting -> Compile -> Build project automatically --> 选中 2.CTRL + SH ...
- 谈谈javascript中的prototype与继承
谈谈javascript中的prototype与继承 今天想谈谈javascript中的prototype. 通常来说,javascript中的对象就是一个指向prototype的指针和一个自身的属性 ...
- 解决 spring boot 线程中使用@Autowired注入Bean的方法,报java.lang.NullPointerException异常
问题描述 在开发中,因某些业务逻辑执行时间太长,我们常使用线程来实现.常规服务实现类中,使用 @Autowired 来注入Bean,来调用其中的方法.但如果在线程类中使用@Autowired注入的Be ...
- 洛谷 P1950 长方形_NOI导刊2009提高(2) 题解
P1950 长方形_NOI导刊2009提高(2) 题目描述 小明今天突发奇想,想从一张用过的纸中剪出一个长方形. 为了简化问题,小明做出如下规定: (1)这张纸的长宽分别为n,m.小明讲这张纸看成是由 ...
- 洛谷 P1855 榨取kkksc03 题解
P1855 榨取kkksc03 题目描述 洛谷2的团队功能是其他任何oj和工具难以达到的.借助洛谷强大的服务器资源,任何学校都可以在洛谷上零成本的搭建oj并高效率的完成训练计划. 为什么说是搭建oj呢 ...
- IntelliJ IDEA 2017 JDK Tomcat Maven 配置步骤详解(一)
要求 配置 Java基础环境(实际上应该在虚拟机linux环境下 安装CentOS 7,但是我这电脑实在承受不住了) 安装 开发工具 IntelliJ IDEA 2017.1 第一部分: JDK ...
- 微信小程序--安装教程
首先 奉上腾讯官方文档 方便参考:https://mp.weixin.qq.com/debug/wxadoc/design/index.html 个人认为没说啥特别有用的信息(可能是我看的太粗糙了) ...
- 安装vs code之后,win+e快捷键打开的是vs code,而不是文件管理器,解决方法
安装vs code之后,win+e快捷键打开的是vs code,而不是文件管理器,解决方法 xdg-mime default dde-file-manager.desktop inode/direct ...
- WSL2(Ubuntu)安装Docker
原文链接:https://www.cnblogs.com/blog5277/p/12071400.html 原文作者:博客园--曲高终和寡 *******************如果你看到这一行,说明 ...
- hadoop错误记录部分总结
错误记录与分析 错误1:java.net.BindException: Port in use: localhost:0 datanode节点启动时报错 日志信息如下: Exiting with st ...