activeMq学习应用
一、下载
二、安装
解压apache-activemq-5.15.0-bin.zip
D:\apache-activemq-5.15.7-bin\apache-activemq-5.15.7\bin\win64
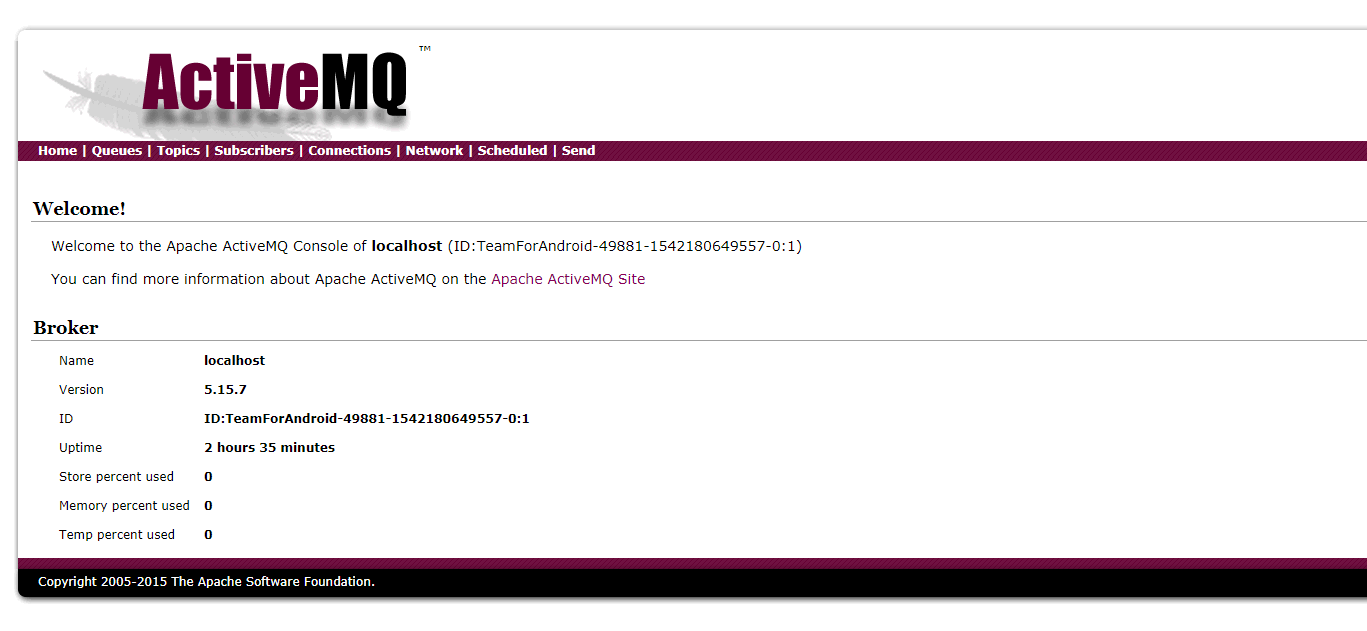
双击activemq.bat执行 开始自动安装启动
访问地址mq客户端页面 http://localhost:8161/admin/topics.jsp 登录账户密码默认admin/admin
三、使用
jar包 activemq-all-5.4.3.jar activemq-pool-5.4.3.jar
3.1.1ActiviteMQ消息有3种形式
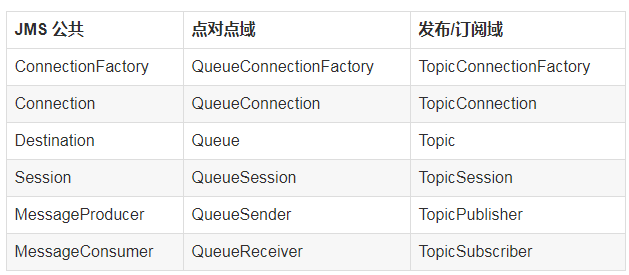
- 点对点方式(point-to-point)
点对点的消息发送方式主要建立在 Message Queue,Sender,reciever上,Message Queue 存贮消息,Sneder 发送消息,receive接收消息.具体点就是Sender Client发送Message Queue ,而 receiver Cliernt从Queue中接收消息和"发送消息已接受"到Quere,确认消息接收。消息发送客户端与接收客户端没有时间上的依赖,发送客户端可以在任何时刻发送信息到Queue,而不需要知道接收客户端是不是在运行
- 发布/订阅 方式(publish/subscriber Messaging)
发布/订阅方式用于多接收客户端的方式.作为发布订阅的方式,可能存在多个接收客户端,并且接收端客户端与发送客户端存在时间上的依赖。一个接收端只能接收他创建以后发送客户端发送的信息。作为subscriber ,在接收消息时有两种方法,destination的receive方法,和实现message listener 接口的onMessage 方法。
3.1.2ActiviteMQ接收和发送消息基本流程
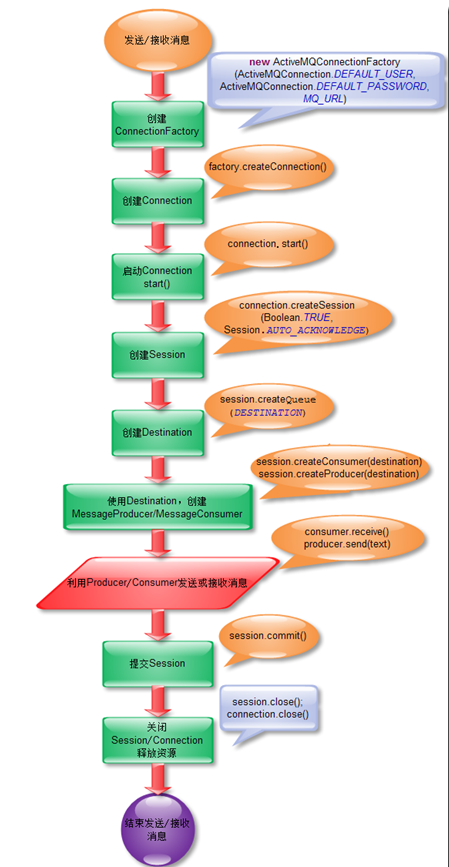
发送消息的基本步骤:
(1)、创建连接使用的工厂类JMS ConnectionFactory
(2)、使用管理对象JMS ConnectionFactory建立连接Connection,并启动
(3)、使用连接Connection 建立会话Session
(4)、使用会话Session和管理对象Destination创建消息生产者MessageSender
(5)、使用消息生产者MessageSender发送消息
消息接收者从JMS接受消息的步骤
(1)、创建连接使用的工厂类JMS ConnectionFactory
(2)、使用管理对象JMS ConnectionFactory建立连接Connection,并启动
(3)、使用连接Connection 建立会话Session
(4)、使用会话Session和管理对象Destination创建消息接收者MessageReceiver
(5)、使用消息接收者MessageReceiver接受消息,需要用setMessageListener将MessageListener接口绑定到MessageReceiver消息接收者必须实现了MessageListener接口,需要定义onMessage事件方法。
四、java代码
Spring集成
新建activemq_config.xml
<?xml version="1.0" encoding="UTF-8"?>
<beans xmlns="http://www.springframework.org/schema/beans"
xmlns:xsi="http://www.w3.org/2001/XMLSchema-instance"
xmlns:context="http://www.springframework.org/schema/context"
xmlns:aop="http://www.springframework.org/schema/aop"
xmlns:tx="http://www.springframework.org/schema/tx"
xsi:schemaLocation="
http://www.springframework.org/schema/beans
http://www.springframework.org/schema/beans/spring-beans-3.0.xsd
http://www.springframework.org/schema/context
http://www.springframework.org/schema/context/spring-context-3.0.xsd
http://www.springframework.org/schema/aop
http://www.springframework.org/schema/aop/spring-aop-3.0.xsd
http://www.springframework.org/schema/tx
http://www.springframework.org/schema/tx/spring-tx-3.0.xsd">
<!-- <value>tcp://192.168.0.140:61616</value> -->
<bean id="jmsFactory" class="org.apache.activemq.pool.PooledConnectionFactory"
destroy-method="stop">
<property name="connectionFactory">
<bean class="org.apache.activemq.ActiveMQConnectionFactory">
<property name="brokerURL">
<value>tcp://192.168.0.127:61616</value>
</property>
</bean>
</property>
<property name="maxConnections" value="100"></property>
</bean>
<!--测试Queue,队列的名字是spring-queue-->
<bean id="destinationQueue" class="org.apache.activemq.command.ActiveMQQueue">
<constructor-arg name="name" value="spring-queue"/>
</bean>
<!--测试Topic-->
<bean id="destinationTopic" class="org.apache.activemq.command.ActiveMQTopic">
<constructor-arg index="0" value="cms.vss.pic.topic2"/>
</bean>
<!--使用缓存可以提升效率-->
<bean id="cachingConnectionFactory" class="org.springframework.jms.connection.CachingConnectionFactory">
<property name="targetConnectionFactory" ref="jmsFactory"/>
<property name="sessionCacheSize" value="1"/>
</bean>
<!-- 生产者 -->
<bean id="jmsTemplate" class="org.springframework.jms.core.JmsTemplate">
<property name="connectionFactory" ref="cachingConnectionFactory"/>
<property name="messageConverter">
<bean class="org.springframework.jms.support.converter.SimpleMessageConverter"/>
</property>
</bean>
<!-- 消费者 -->
<bean id="jmsContainer"
class="org.springframework.jms.listener.DefaultMessageListenerContainer">
<property name="connectionFactory" ref="cachingConnectionFactory"/>
<property name="destination" ref="destinationTopic"/>
<property name="messageListener" ref="topicListener"/>
</bean>
<!-- 消息监听器 -->
<bean id="topicListener" class="com.zlkj.activemq.listener.TopicListener">
</bean>
</beans>
发送消息
package com.zlkj.wl.service;
import javax.annotation.Resource;
import javax.jms.Destination;
import javax.jms.JMSException;
import javax.jms.ObjectMessage;
import javax.jms.Session;
import org.springframework.jms.core.JmsTemplate;
import org.springframework.jms.core.MessageCreator;
import org.springframework.stereotype.Service;
import com.zlkj.wl.bean.ActiveBean;
@Service("senderService")
public class AMQSenderServiceImpl implements AmqSenderService {
@Resource(name = "jmsTemplate")
private JmsTemplate jmsTemplate;
//目的地队列的明证,我们要向这个队列发送消息
@Resource(name = "destinationTopic")
private Destination destination;
//向特定的队列发送消息
@Override
public void sendMsg(final ActiveBean mqParamDto) {
//final String msg = JsonTools.ojbToJson(mqParamDto, false);
// final String msg =mqParamDto;
try {
jmsTemplate.send(destination, new MessageCreator() {
@Override
public ObjectMessage createMessage(Session session) throws JMSException {
return session.createObjectMessage(mqParamDto);
//return session.createTextMessage(msg);
}
});
} catch (Exception ex) {
}
}
}
接收消息则通过xml中配置监听可以接收到消息
创建监听类
package com.zlkj.activemq.listener;
import javax.jms.Destination;
import javax.jms.JMSException;
import javax.jms.Message;
import javax.jms.MessageListener;
import javax.jms.TextMessage;
public class TopicListener implements MessageListener {
@Override
public void onMessage(Message msg) {
try {
Destination destination = msg.getJMSDestination();
String topic = destination.toString();
if(topic.equals("topic://INOUT")) {
System.out.println("1");
TextMessage txtMsg = (TextMessage) msg;
String message = txtMsg.getText();
//实际项目中拿到String类型的message(通常是JSON字符串)之后,
//会进行反序列化成对象,做进一步的处理
System.out.println("receive txt msg===" + message);
} else if (topic.equals("topic://ENROLL")) {
System.out.println("2");
TextMessage txtMsg = (TextMessage) msg;
String message = txtMsg.getText();
//实际项目中拿到String类型的message(通常是JSON字符串)之后,
//会进行反序列化成对象,做进一步的处理
System.out.println("receive txt msg===" + message);
} else if (topic.equals("topic://ACTION")) {
System.out.println("3");
TextMessage txtMsg = (TextMessage) msg;
String message = txtMsg.getText();
//实际项目中拿到String类型的message(通常是JSON字符串)之后,
//会进行反序列化成对象,做进一步的处理
System.out.println("receive txt msg===" + message);
}
} catch (JMSException e) {
throw new RuntimeException(e);
}
}
}
接收消息监听不打出时 注意constructor-arg的值(标红)和手动发送消息的session.createTopic("ENROLL")值应相同
不集成spring
发送消息
package com.zlkj.test;
import javax.jms.Connection;
import javax.jms.ConnectionFactory;
import javax.jms.Destination;
import javax.jms.JMSException;
import javax.jms.MessageProducer;
import javax.jms.ObjectMessage;
import javax.jms.Session;
import javax.jms.TextMessage;
import org.apache.activemq.ActiveMQConnection;
import org.apache.activemq.ActiveMQConnectionFactory;
import com.zlkj.pub.toolutil.JsonTools;
import com.zlkj.wl.bean.ActiveBean;
public class NoPersistenceActiveSender {
private static final int SENDNUM = 10;
public static void sendmes( ActiveBean record) {
//连接工厂
ConnectionFactory connectionFactory;
//连接
Connection connection = null;
//会话 接受或者发送消息的线程
Session session;
//消息的目的地
Destination destination;
//消息生产者
MessageProducer messageProducer;
//实例化连接工厂(连接到ActiveMQ服务器)
connectionFactory = new ActiveMQConnectionFactory(null, null, "tcp://192.168.0.127:61616");
try {
//通过连接工厂获取连接
connection = connectionFactory.createConnection();
//启动连接
connection.start();
//创建session
session = connection.createSession(Boolean.TRUE, Session.AUTO_ACKNOWLEDGE);
//创建一个名称为MyTopic的消息队列(生产者生成的消息放在哪)
destination = session.createTopic("ENROLL");
//创建消息生产者
messageProducer = session.createProducer(destination);
//发送消息
sendMessage(session, messageProducer,record);
session.commit();
} catch (Exception e) {
e.printStackTrace();
} finally {
if (connection != null) {
try {
connection.close();
} catch (JMSException e) {
e.printStackTrace();
}
}
}
}
/**
* 发送消息
*
* @param session
* @param messageProducer 消息生产者
* @throws Exception
*/
public static void sendMessage(Session session, MessageProducer messageProducer,ActiveBean record) throws Exception {
ObjectMessage message = session.createObjectMessage(record);
messageProducer.send(message);
// }
}
}
接收消息
package com.zlkj.test;
import javax.jms.Connection;
import javax.jms.ConnectionFactory;
import javax.jms.Destination;
import javax.jms.JMSException;
import javax.jms.Message;
import javax.jms.MessageConsumer;
import javax.jms.Session;
import javax.jms.TextMessage;
import org.apache.activemq.ActiveMQConnection;
import org.apache.activemq.ActiveMQConnectionFactory;
public class NoPersistenceReceiver {
public static void main(String[] args) {
ConnectionFactory connectionFactory;//连接工厂
Connection connection = null;//连接
Session session;//会话 接受或者发送消息的线程
Destination destination;//消息的目的地
MessageConsumer messageConsumer;//消息的消费者
//实例化连接工厂(连接到ActiveMQ服务器)
connectionFactory = new ActiveMQConnectionFactory(null, null, "tcp://192.168.0.127:61616");
try {
//通过连接工厂获取连接
connection = connectionFactory.createConnection();
//启动连接
connection.start();
//创建session
session = connection.createSession(Boolean.TRUE, Session.AUTO_ACKNOWLEDGE);
//生产者将消息发送到MyTopic,所以消费者要到MyTopic去取
destination = session.createTopic("ENROLL1a");
//destination = session.createTopic("MyTopic");
//创建消息消费者
messageConsumer = session.createConsumer(destination);
Message message = messageConsumer.receive();
while (message != null) {
TextMessage txtMsg = (TextMessage) message;
System.out.println("收到消息:" + txtMsg.getText());
message = messageConsumer.receive();
}
} catch (JMSException e) {
e.printStackTrace();
}
}
}
接收消息的时候一定执行main方法 用while死循环一直轮训手动接收发送的消息
学习activeMq源路径网址 https://www.jianshu.com/p/8caa6d66b10d
activeMq学习应用的更多相关文章
- ActiveMQ学习笔记(5)——使用Spring JMS收发消息
摘要 ActiveMQ学习笔记(四)http://my.oschina.net/xiaoxishan/blog/380446 中记录了如何使用原生的方式从ActiveMQ中收发消息.可以看出,每次 ...
- 【ActiveMQ】Spring Jms集成ActiveMQ学习记录
Spring Jms集成ActiveMQ学习记录. 引入依赖包 无论生产者还是消费者均引入这些包: <properties> <spring.version>3.0.5.REL ...
- ActiveMQ学习总结------原生实战操作(下)03
本篇将继续延续上一篇的内容,作为知识补充篇,为接下来我们学习spring整合ActiveMQ打好基础 本篇主要学习内容: 1.ActiveMQ 队列服务监听 2.ActiveMQ Topic模型 回顾 ...
- ActiveMQ学习教程/2.简单示例
ActiveMQ学习教程(二)——简单示例 一.应用IDEA构建Maven项目 File->New->Module...->Maven->勾选->选择->Next ...
- ActiveMQ学习教程/1.简要介绍与安装
ActiveMQ学习教程(一)——简要介绍与安装 一.名词: 1.JMS:即Java消息服务(Java Message Service)应用程序接口,是一个Java平台中关于面向消息中间件(MOM)的 ...
- ActiveMQ学习总结(一)
自己写的网上商城项目中使用了ActiveMQ,虽然相比于RabbitMQ,kafka,RocketMQ等相比,ActiveMQ可能性能方面不是最好的选择,不过消息队列其实原理区别不大,这里对学过的关于 ...
- 学习笔记-记ActiveMQ学习摘录与心得(二)
上个周末被我玩过去了,罪过罪过,现在又是一个工作日过去啦,居然有些烦躁,估计这几天看的东西有点杂,晚上坐下来把自己首要工作任务总结总结.上篇学习博客讲了ActiveMQ的特性及安装部署,下面先把我以前 ...
- 学习笔记-记ActiveMQ学习摘录与心得(一)
这两天在看开源的MQ技术,趁着晚上安静,把这两天学的东西摘录下.在公司学东西效率真心捉鸡,心里总觉得别扭,拿了公司的钱不干活还在那学习,表示心情不淡定,效率不行啊...晚上时间是我的,下班还是蛮开心的 ...
- ActiveMQ学习系列(四)----消息持久化到mysql
前记:目前学习还比较杂乱,还未找到系统化地学习ActiveMq的方法.在网上看到消息持久化的demo,了解了一下,在此记录. 一.目前ActiveMq支持的持久化方法 url:http://activ ...
- ActiveMQ 学习第二弹
经历了昨天的初识 ActiveMQ,正好今天下班有点事耽搁了还没法回家,那就再学习会 ActiveMQ 吧!现在官网的文档没啥好看的了,毕竟是入门学习,太深奥的东西也理解不了.然后看官网上有推荐书籍& ...
随机推荐
- lixuxmint系统定制与配置(3)-字体
小书匠Linux 有些系统自带的字体实在太难看了,看起来不清晰,不明确,有一个好的字体,可以带来好心情,并提高工作与效率. 1.常用中文字体 文泉驿微黑,微软雅黑,思源黑体 2.字体安装 2.1检查已 ...
- GoCN每日新闻(2019-09-26)
1. go-gin-api 路由中间件:Jaeger 链路追踪(六)https://mp.weixin.qq.com/s/Ea28475_UTNaM9RNfgPqJA2. golang interfa ...
- [java][JEECG] Maven settings.xml JEECG项目初始化 RouYi settings.xml配置
好吧一下是经验之谈,原本这些坑不应该躺的,从头看手册完全可以避免这些. 懒得整理了,看懂了就看,看不懂自己琢磨JEECG的帮助文档去,不过嘛我喜欢用Intelij IDEA,他里面都是别的IDE,不喜 ...
- MySQL 获得 当前日期时间 函数
mysql> select now(); 输出 -- :: 例子 mysql> ), now(); +---------------------+----------+---------- ...
- 2018-2019-2 20165212《网络对抗技术》Exp9 Web安全基础
2018-2019-2 20165212<网络对抗技术>Exp9 Web安全基础 基础问题回答 1.SQL注入攻击原理,如何防御? 原理:SQL注入,就是通过把SQL命令插入到Web表单递 ...
- ORACLE AUDIT
Oracle 作者:Davis_itpub 时间:2018-06-27 16:28:39 61 0 审计(Audit)用于监视用户所执行的数据库操作,并且Oracle 会将审计跟踪结果存放到OS ...
- useReducer介绍和简单使用(六)
上节课学习了useContext函数,那这节课开始学习一下useReducer,因为他们两个很像,并且合作可以完成类似的Redux库的操作.在开发中使用useReducer可以让代码具有更好的可读性和 ...
- 从库延迟增大,MySQL日志出现InnoDB: page_cleaner: 1000ms intended loop took 17915ms.
今天同事负责的数据库从库出现从库延迟增大,MySQL日志InnoDB: page_cleaner: 1000ms intended loop took 17915ms. 了解原因,keepalived ...
- HandlerThread: HandlerThread的理解
Android为了方便对Thread和Handler进行封装,也就是HandlerThread.HandlerThread继承自Thread,说白了就是Thread加上一个Looper.源码: 可以看 ...
- Eclipse 的快捷键以及文档注释、多行注释的快捷键 一、多行注释快捷键
一.多行注释快捷键 1.选中你要加注释的区域,用ctrl+shift+C 或者ctrl+/ 会加上//注释2.先把你要注释的东西选中,用shit+ctrl+/ 会加上/* */注释 3.以上快捷 ...