
Vue简易博客总结
项目结构:
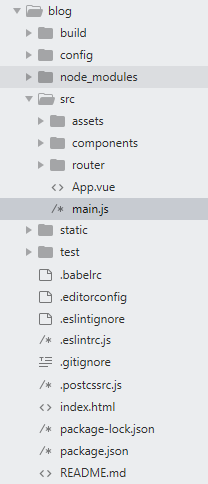
首先,编写博客的导航栏组件BlogHeader.vue:
 <template>

     <nav>

         <ul>

             <li>

                 <router-link to="/" exact>博客</router-link>

                 <router-link to="/add" exact>写博客</router-link>

             </li>

         </ul>

     </nav>

 </template>

 <script>

     export default{

         name:"blog-header"

     }

 </script>

 <style scoped>

     ul{

         list-style-type: none;

         text-align: center;

         margin: 0px;

     }

     li{

         display: inline-block;

         margin: 0 10px;

     }

     a{

         color: #fff;

         text-decoration: none;

         padding: 12px;

         border-radius: 5px;

     }

     nav{

         background: crimson;

         padding: 30px 0;

         margin:10px;

     }

     .router-link-active{

         background: rgba(255,255,255,0.8);

         color: #444;

     }

 </style>
如图所示:

然后,编写展示博客的组件showBlog.vue:
用到的知识点有axios访问api:更多axios知识点请访问:https://www.npmjs.com/package/axios
 new Vue({

   el: '#app',

   data () {

     return {

       info: null

     }

   },

   created () {

     axios

       .get('https://api.coindesk.com/v1/bpi/currentprice.json')

       .then(response => (this.info = response))

   }

 })

 <div id="app">

   {{ info }}

 </div>
错误处理:
 <!--

 很多时候我们可能并没有从 API 获取想要的数据。这可能是由于很多种因素引起的,比如 axios 调用可能由于多种原因而失败,包括但不限于:

 API 不工作了;

 请求发错了;

 API 没有按我们预期的格式返回信息。

 -->

 axios

   .get('https://api.coindesk.com/v1/bpi/currentprice.json')

   .then(response => (this.info = response.data.bpi))

   .catch(error => console.log(error))
自定义指令,详见:https://cn.vuejs.org/v2/guide/custom-directive.html
 // 注册一个全局自定义指令 `v-focus`

 Vue.directive('focus', {

   // 当被绑定的元素插入到 DOM 中时……

   inserted: function (el) {

     // 聚焦元素

     el.focus()

   }

 })

 //如果想注册局部指令,组件中也接受一个 directives 的选项:

 directives: {

   focus: {

     // 指令的定义

     inserted: function (el) {

       el.focus()

     }

   }

 }

 //然后你可以在模板中任何元素上使用新的 v-focus 属性,如下:

 <input v-focus>
过滤器:https://cn.vuejs.org/v2/guide/filters.html
showBlog.vue代码:
 <template>

   <div id="show-blog" v-theme:column="'narrow'">

     <h1 style="text-align: center;padding: 15px 0px 0px 0px">博客总览</h1>

     <input type="text" v-model="serach" placeholder="搜索" />

     <div v-for="blog in blogs" class="single-blog">

         <!-- | pipe管道过滤器的标识 -->

         <router-link v-bind:to="'/blog/' + blog.id"><h2 v-rainbow>{{blog.name}} </h2></router-link>

         <article>

             <!-- {{blog.price | snippet}} -->

              {{blog.detail | snippet}}

         </article>

     </div>

   </div>

 </template>

 <script>

 export default {

   name: 'show-blog',

   data(){

       return{

           blogs:[

           ],

           serach:''

       }

   },

   created(){

       /*this.$http.get('http://jsonplaceholder.typicode.com/posts').then(function(data){

               this.blogs = data.body.slice(0,30);

       })*/

       this.$axios.get('/api/items').then((data)=>{

   //        console.log(data.body);

          this.blogs = data.data;

       })

   },

 /*  computed:{

       filteredBlogs:function(){

           return this.blogs.filter((blog)=>{

               return blog.title.match(this.serach);

           })

       }*/

  // },

   //过滤器局部实现方法

   filters:{

       "to-uppercase":function(data){

           return data.toUpperCase();

       }

   },

   //自定义指令的局部实现方式

   directive:{

   }

 }

 </script>

 <style>

 #show-blog{

     max-width: 800px;

     margin:0 auto;

 }

 .single-blog{

     padding: 20px;

     margin: 20px auto;

     box-sizing: border-box;

     background: #ccc;

     border:1px dotted #aaa;

 }

 #show-blog a{

     color: #444;

     text-decoration: none;

 }

 input[type="text"]{

     padding: 8px;

     width:100%;

     box-shadow: border-box;

 }

 </style>
界面如图所示:
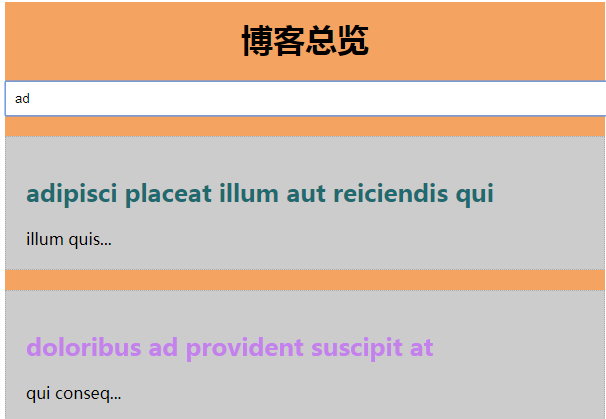
博客详情页代码:
 <template>

     <div id="single-blog">

         <h1>{{blog.title}}</h1>

         <article>{{blog.body}}</article>

     </div>

 </template>

 <script>

     export default{

         name:"singleblog",

         data(){

             return{

                 id:this.$route.params.id,

                 blog:{}

             }

         },

         created(){

             this.$http.get('http://jsonplaceholder.typicode.com/posts/'+this.id).then(function(data){

                   this.blog = data.body;

               })

         }

     }

 </script>

 <style>

     #single-blog{

         max-width: 800px;

         margin: 0 auto;

         padding: 20px;

         background: #eee;

         border:1px dotted #aaa;

     }

 </style>

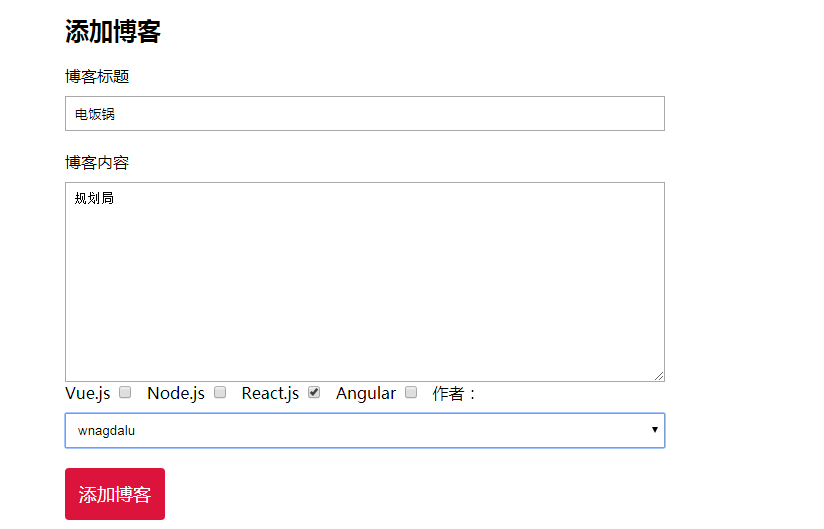
最后编写添加博客页代码:
 <template>

   <div id="add-blog" >

   <h2>添加博客</h2>

   <form action="" v-if="!submmited">

       <label>博客标题</label>

       <input type="text" v-model="blog.title" required="" />

       <label for="">博客内容</label>

       <textarea name="" id="" cols="30" rows="10" v-model="blog.content"></textarea>

     <div id="checkboxes">

       <label for="">Vue.js</label>

       <input type="checkbox" value="Vue.js" v-model="blog.categories" />

       <label for="">Node.js</label>

       <input type="checkbox" value="Node.js"  v-model="blog.categories"/>

       <label for="">React.js</label>

       <input type="checkbox" value="React.js"  v-model="blog.categories"/>

       <label for="">Angular</label>

       <input type="checkbox" value="Angular"  v-model="blog.categories"/>

       <label for="">作者:</label>

       <select v-model="blog.author">

         <option v-for="author in authors">

           {{author}}

         </option>

       </select>

       <button v-on:click.prevent="post">添加博客</button>

     </div>

   </form>

   <div>

     <h3 v-if="submmited">您的博客发布成功!</h3>

   </div>

   <hr>

   <div id="preview">

       <h3>博客总览</h3>

       <p>博客标题:{{blog.title}}</p>

       <p>博客内容:{{blog.content}}</p>

     <p>博客分类:</p>

     <ul>

       <li v-for="category in blog.categories">

         {{category}}

       </li>

     </ul>

     <p>作者:{{blog.author}}</p>

   </div>

   </div>

 </template>

 <script>

   import axios from 'axios'

 export default {

   name: 'addBlog',

   data () {

     return {

         blog:{

             title:"",

             content:"",

         categories:[],

         author:""

         },

       authors:["lianmin","wnagdalu","zhoujielun"],

       submmited:false

     }

   },

   methods:{

     post:function(){

       /*this.$http.post("http://jsonplaceholder.typicode.com/posts",{

         title:this.blog.title,

         body:this.blog.content,

         userId:1

       }).then(function(data){

         console.log(data.body);

         this.submmited=true;

       });*/

       var _this = this;

      axios.post("http://jsonplaceholder.typicode.com/posts",{

         title:this.blog.title,

         body:this.blog.content,

         userId:1

       }).then((data)=>{

         console.log(data.body);

         _this.submmited=true;

       });

     }

   }

 }

 </script>

 <!-- Add "scoped" attribute to limit CSS to this component only -->

 <style scoped>

 #add-blog *{

   box-sizing:border-box ;

 }

 #add-blog{

   margin: 20px auto;

   max-width: 600px;

   padding: 20px;

 }

 label{

   display: block;

   margin:20px 0 10px;

 }

 input[type="text"],textarea,select{

   display: block;

   width: 100%;

   padding: 8px;

 }

 textarea{

   height: 200px;

 }

 #checkboxes label{

   display: inline-block;

   margin-top: 0;

 }

 #checkboxes input{

   display: inline-block;

   margin-right: 10px;

 }

 button{

   display: block;

   margin:20px 0;

   background: crimson;

   color: #fff;

   border: 0;

   padding: 14px;

   border-radius: 4px;

   font-size: 18px;

   cursor: pointer;

 }

 #preview{

   padding: 10px 20px;

   border:1px dotted #ccc;

   margin:30px 0;

 }

 h3{

   margin-top: 10px;

 }

 </style>
最后进行路由表的相关配置:
 import Vue from 'vue'

 import Router from 'vue-router'

 import HelloWorld from '@/components/HelloWorld'

 import showblog from '@/components/showblog'

 import addblog from '@/components/AddBlog'

 import singleBlog from '@/components/SingleBlog'

 Vue.use(Router)

 export default new Router({

   routes: [

     {

       path: '/',

       name: 'showblog',

       component: showblog

     },

     {

       path: '/add',

       name: 'addblog',

       component: addblog

     },

     {

       path: '/blog/:id', /*路由参数*/

       component: singleBlog

     },

   ],

    mode:"history"  //不用显示#号

 })
还要在App.vue中进行一些编写,主要是使用写好的路由:
 <template>

   <div id="app">

       <blog-header></blog-header>

    <!--  <add-blog></add-blog> -->

     <!-- <show-blog></show-blog> -->

     <router-view/>

   </div>

 </template>

 <script>

 import AddBlog from './components/AddBlog'

 import showblog from './components/showblog'

 import blogHeader from './components/BlogHeader'

 export default {

   name: 'App',

   components: {

     'add-blog': AddBlog,

     'show-blog':showblog,

     "blog-header":blogHeader

   }

 }

 </script>

 <style>

 </style>
另外,还可以在main.js中进行一些全局属性的配置:
 // The Vue build version to load with the `import` command

 // (runtime-only or standalone) has been set in webpack.base.conf with an alias.

 import Vue from 'vue'

 import App from './App'

 import router from './router'

 import VueResource from 'vue-resource'

 import axios from 'axios'

 Vue.prototype.$axios = axios

 //全局配置axios

 //axios.defaults.baseURL='http://localhost:8080'

 //请求头配置

 /*

 axios.defaults.headers.common['Authorization'] = 'Token'

 axios.defaults.headers.post['Content-type'] = ''

 axios.defaults.headers.get['Accepts']='application/json'

 */

 Vue.config.productionTip = false

 Vue.use(VueResource)

 //自定义指令

 Vue.directive('rainbow',{

     bind(el,binding,vnode){

         el.style.color = "#" + Math.random().toString(16).slice(2,8)

     }

 })

 Vue.directive('theme',{

     bind(el,binding,vnode){

         if(binding.value=='wide'){

             el.style.maxWidth = "1260px"

         }else if(binding.value='narrow'){

             el.style.maxWidth="600px"

         }

         if(binding.arg=='column'){

             el.style.background = "#F4A460";

             el.style.margin = "10px auto"

         }

     }

 })

 //自定义过滤器  全局的实现方式

 /*Vue.filter("to-uppercase",function(value){

     return value.toUpperCase();

 })*/

 Vue.filter("snippet",function(value){

     return value.slice(0,10) + "...";

 })

 /* eslint-disable no-new */

 new Vue({

   el: '#app',

   router,

   components: { App },

   template: '<App/>'

 })
Vue简易博客总结的更多相关文章
- Django搭建简易博客
Django简易博客,主要实现了以下功能 连接数据库 创建超级用户与后台管理 利用django-admin-bootstrap美化界面 template,view与动态URL 多说评论功能 Markd ...
- 简易博客[ html + css ] 练习
1. 前言 通过使用 html + css 编写一个简易的博客作为入门练习 2. 代码及实现 2.1 目录结构 2.2 代码部分 <!DOCTYPE html> <html lang ...
- Nodejs+MongoDB+Bootstrap+esj搭建的个人简易博客
github:https://github.com/yehuimmd/myNodeBloy Nodejs+MongoDB+jQuery+Bootstrap-esj搭建的个人简易博客 主要功能 前台 : ...
- django 简易博客开发 5 markdown支持、代码高亮、gravatar头像服务
上一篇博客介绍了comments库使用及ajax支持,现在blog已经具备了基本的功能,但是只能发表文字,不支持富文本编辑.今天我们利用markdown添加富文本支持. markdown语法说明: h ...
- django 简易博客开发 4 comments库使用及ajax支持
首先还是贴一下源代码地址 https://github.com/goodspeedcheng/sblog 上一篇文章我们介绍了静态文件使用以及如何使用from实现对blog的增删改,这篇将介绍如何给 ...
- django 简易博客开发 3 静态文件、from 应用与自定义
首先还是贴一下源代码地址 https://github.com/goodspeedcheng/sblog 上一篇博客我们介绍了 django 如何在views中使用templates以及一些常用的数 ...
- django 简易博客开发 2 模板和数据查询
首先还是贴一下项目地址 https://github.com/goodspeedcheng/sblog 因为代码全在上面 上一篇博客我们介绍了 django的安装配置,新建project,新建a ...
- django 简易博客开发 1 安装、创建、配置、admin使用
首先贴一下项目地址吧 https://github.com/goodspeedcheng/sblog 到现在位置项目实现的功能有: 1.后台管理使用Admin ,前端显示使用bootstrap 2. ...
- Vue个人博客关于标题自动打字机效果Typewriter
最近在写个人Blog 中间看过很多个人博客的开发 一大部分用的是Hexo框架或者vuePress框架 导入各种主题样式插件等等 但是看多了就会发现 很多博主的个人博客基本都很相似 并没有什么新东西呈现 ...
随机推荐
- field load respone data
问题: AJAX 使用谷歌浏览器 POST 请求报如下错误 field load respone data 使用 火狐 浏览器就正常 调试1: 发现其实我请求的回调函数能打印出来数据,但是,在netw ...
- 编译android framework的例子【转】
本文转载自:http://blog.csdn.net/brucexu1978/article/details/7610358 在开发过程中,尤其是Framework相关开发时,有时候需要重新编译资源文 ...
- oracle导入dmp文件时出现异常
oracle导入dmp文件时出现错误 今天在给oracle导入dmp文件时老是出现错误,无论是命令行或PL/SQL,错误截图如下: 经查是导入用户的权限不足,导入用户并没有DBA权限,而导出的dmp文 ...
- oracle 定时器调用存储过程
转载请说明出处:http://t22011787.iteye.com/blog/1112745 一.查询系统中的job,可以查询视图 --相关视图 select * from dba_jobs; se ...
- ORACLE获取某个时间段之间的月份列表和日期列表
ORACLE获取某个时间段之间的月份列表获取某个时间段之间的月份列表(示例返回2009-03到2010-03之间的月份列表) SELECT TO_CHAR(ADD_MONTHS(TO_DATE('20 ...
- ibwebrtc-audio-processing-devel
http://ftp.ussg.iu.edu/cygwin/x86_64/release/webrtc-audio-processing/libwebrtc-audio-processing-deve ...
- 列表渲染v-for
v-for我们用v-for指令根据一组数据的选项列表进行渲染.v-for指令需要以item in items形式的特殊语法,items是源数据数组并且item是数组元素迭代的别名. demo: < ...
- is not mapped [from错误
我出现的错误是:org.hibernate.hql.ast.QuerySyntaxException: loginuser is not mapped [from loginuser] 配置文件如下: ...
- shell判断文件,目录是否存在或者具有权限 (转载)
转自:http://cqfish.blog.51cto.com/622299/187188 文章来源:http://hi.baidu.com/haigang/blog/item/e5f582262d6 ...
- bzoj 1623: [Usaco2008 Open]Cow Cars 奶牛飞车【排序+贪心】
从小到大排个序,然后能选就选 #include<iostream> #include<cstdio> #include<algorithm> using names ...