我的Android学习路线(一)
最近实在是闲的无聊,本着不能让自己的时间白白流失的目的,我就决定完成一下之前的诺言:把 Android 开发学了。正好手头有一本《Android 4编程入门经典》,于是便用两天时间把视图部分的代码全部敲了一遍。
然后寻思着这么一个现阶段的入门学习路线:
- 撸一个计算器出来,并且做到屏幕自动适配。
- 利用四大组件,给计算器加入各种鬼畜功能。
之前在入门 Java 的时候,老师在教我们 Java 图形界面之后便叫我们制作一个计算器,算是对图形界面的入门。其实当时写计算器的时候我偷了个懒,布局使用了绝对布局,反正我叫你 TextView 、Button 待哪儿你就给我待哪儿,让你多大就多大。这样做的好处就是,我根本不用考虑相对布局的时候产生的种种不可思议的情况,但是坏处就在于,这个图形界面的大小就定死了。但是为了赶紧把实验报告赶出来,我还是偷懒用了绝对布局。
好了现在轮到Android布局了,经过我半小时的奋战,弄出了这么一个玩意儿
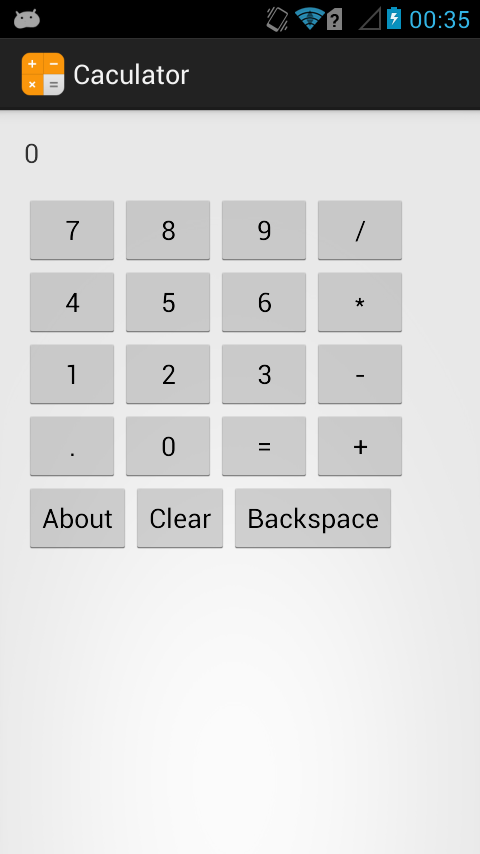
呃好吧的确还是非常的……粗糙,因为你可以看看我的源代码:
<RelativeLayout xmlns:android="http://schemas.android.com/apk/res/android"

    xmlns:tools="http://schemas.android.com/tools"

    android:layout_width="match_parent"

    android:layout_height="match_parent"

    android:paddingBottom="@dimen/activity_vertical_margin"

    android:paddingLeft="@dimen/activity_horizontal_margin"

    android:paddingRight="@dimen/activity_horizontal_margin"

    android:paddingTop="@dimen/activity_vertical_margin"

    tools:context=".MainActivity" >

    <TextView

        android:id="@+id/TextView_1"

        android:layout_width="fill_parent"

        android:layout_height="40dp"

        android:textSize="18sp"

        android:text="0" />

    <!-- 第一排按钮 -->

    <Button

        android:id="@+id/btn_7"

        android:layout_width="wrap_content"

        android:layout_height="wrap_content"

        android:layout_below="@id/TextView_1"

        android:text="7" />

    <Button

        android:id="@+id/btn_8"

        android:layout_width="wrap_content"

        android:layout_height="wrap_content"

        android:layout_toRightOf="@id/btn_7"

        android:layout_below="@id/TextView_1"

        android:text="8" />

    <Button

        android:id="@+id/btn_9"

        android:layout_width="wrap_content"

        android:layout_height="wrap_content"

        android:layout_toRightOf="@id/btn_8"

        android:layout_below="@id/TextView_1"

        android:text="9" />

    <Button

        android:id="@+id/btn_div"

        android:layout_width="wrap_content"

        android:layout_height="wrap_content"

        android:layout_toRightOf="@id/btn_9"

        android:layout_below="@id/TextView_1"

        android:text="/" />

    <!-- 第二排按钮 -->

    <Button

        android:id="@+id/btn_4"

        android:layout_width="wrap_content"

        android:layout_height="wrap_content"

        android:layout_below="@id/btn_7"

        android:text="4" />

    <Button

        android:id="@+id/btn_5"

        android:layout_width="wrap_content"

        android:layout_height="wrap_content"

        android:layout_toRightOf="@id/btn_4"

        android:layout_below="@id/btn_7"

        android:text="5" />

    <Button

        android:id="@+id/btn_6"

        android:layout_width="wrap_content"

        android:layout_height="wrap_content"

        android:layout_toRightOf="@id/btn_5"

        android:layout_below="@id/btn_7"

        android:text="6" />

    <Button

        android:id="@+id/btn_mul"

        android:layout_width="wrap_content"

        android:layout_height="wrap_content"

        android:layout_toRightOf="@id/btn_6"

        android:layout_below="@id/btn_7"

        android:text="*" />

    <!-- 第三排按钮 -->

    <Button

        android:id="@+id/btn_1"

        android:layout_width="wrap_content"

        android:layout_height="wrap_content"

        android:layout_below="@id/btn_4"

        android:text="1" />

    <Button

        android:id="@+id/btn_2"

        android:layout_width="wrap_content"

        android:layout_height="wrap_content"

        android:layout_toRightOf="@id/btn_1"

        android:layout_below="@id/btn_4"

        android:text="2" />

    <Button

        android:id="@+id/btn_3"

        android:layout_width="wrap_content"

        android:layout_height="wrap_content"

        android:layout_toRightOf="@id/btn_2"

        android:layout_below="@id/btn_4"

        android:text="3" />

    <Button

        android:id="@+id/btn_sub"

        android:layout_width="wrap_content"

        android:layout_height="wrap_content"

        android:layout_toRightOf="@id/btn_3"

        android:layout_below="@id/btn_4"

        android:text="-" />

    <!-- 第四排按钮 -->

    <Button

        android:id="@+id/btn_point"

        android:layout_width="wrap_content"

        android:layout_height="wrap_content"

        android:layout_below="@id/btn_1"

        android:text="." />

    <Button

        android:id="@+id/btn_0"

        android:layout_width="wrap_content"

        android:layout_height="wrap_content"

        android:layout_toRightOf="@id/btn_point"

        android:layout_below="@id/btn_1"

        android:text="0" />

    <Button

        android:id="@+id/btn_equ"

        android:layout_width="wrap_content"

        android:layout_height="wrap_content"

        android:layout_toRightOf="@id/btn_0"

        android:layout_below="@id/btn_1"

        android:text="=" />

    <Button

        android:id="@+id/btn_add"

        android:layout_width="wrap_content"

        android:layout_height="wrap_content"

        android:layout_toRightOf="@id/btn_equ"

        android:layout_below="@id/btn_1"

        android:text="+" />

    <!-- 第五排按钮 -->

    <Button

        android:id="@+id/btn_about"

        android:layout_width="wrap_content"

        android:layout_height="wrap_content"

        android:layout_below="@id/btn_point"

        android:text="About" />

    <Button

        android:id="@+id/btn_clear"

        android:layout_width="wrap_content"

        android:layout_height="wrap_content"

        android:layout_toRightOf="@id/btn_about"

        android:layout_below="@id/btn_point"

        android:text="Clear" />

    <Button

        android:id="@+id/btn_back"

        android:layout_width="wrap_content"

        android:layout_height="wrap_content"

        android:layout_toRightOf="@id/btn_clear"

        android:layout_below="@id/btn_point"

        android:text="Backspace" />

</RelativeLayout>
这里,我选择的是相对布局,目前在我看来相对布局是最简单的布局(对计算器这样的 app 来说)。
接下来是程序的逻辑,大致的思路就是用几个 Boolean 变量控制按钮的效果,具体变量如下:
is_A:判断目前输入的是哪个数字;
is_Add,is_Sub,is_Mul,is_Div:判断使用的运算方式;
result_exist:判断是否需要使用运算结果进行下一次运算;
operator_exist:判断之前一次的操作是否为按下运算符。
按照目前的进度,使用到的 boolean 变量只有上述七个,在第二次笔记上会加上新的变量以满足功能需求。
经过周日一个下午的努力,目前的计算器已经实现了基本的二元运算的功能,并且有按下运算符直接得出结果并等待第二个数字输入、使用结果直接进行下一部运算等功能。
代码如下,有点粗糙:
package cn.zhouxuchen.caculator; import android.os.Bundle;
import android.app.Activity;
import android.view.Menu;
import android.view.View;
import android.widget.Button;
import android.widget.TextView; public class MainActivity extends Activity { double num_A = 0;
double num_B = 0;
double result = 0; boolean is_A = true; //判断是否操作A数,是则操作A数,否则操作B数
boolean float_A = false; //判断在操作A时是否输入小数点
boolean float_B = false; //判断在操作B时是否输入小数点
boolean is_Add = false; //判断是否进行加法运算
boolean is_Sub = false; //判断是否进行减法运算
boolean is_Mul = false; //判断是否进行乘法运算
boolean is_Div = false; //判断是否进行除法运算
boolean result_exist = false; //判断是否已经计算出一个结果
boolean operator_exist = false; //判断是否已经按下运算符按钮 String textScreen = ""; @Override
protected void onCreate(Bundle savedInstanceState) {
super.onCreate(savedInstanceState);
setContentView(R.layout.activity_main); //--- 文字显示 ---
final TextView textView = (TextView) findViewById(R.id.TextView_1);
//--- 数字按钮 ---
Button btn_0 = (Button) findViewById(R.id.btn_0);
Button btn_1 = (Button) findViewById(R.id.btn_1);
Button btn_2 = (Button) findViewById(R.id.btn_2);
Button btn_3 = (Button) findViewById(R.id.btn_3);
Button btn_4 = (Button) findViewById(R.id.btn_4);
Button btn_5 = (Button) findViewById(R.id.btn_5);
Button btn_6 = (Button) findViewById(R.id.btn_6);
Button btn_7 = (Button) findViewById(R.id.btn_7);
Button btn_8 = (Button) findViewById(R.id.btn_8);
Button btn_9 = (Button) findViewById(R.id.btn_9);
//--- 运算符 ---
Button btn_add = (Button) findViewById(R.id.btn_add);
Button btn_sub = (Button) findViewById(R.id.btn_sub);
Button btn_mul = (Button) findViewById(R.id.btn_mul);
Button btn_div = (Button) findViewById(R.id.btn_div);
Button btn_equ = (Button) findViewById(R.id.btn_equ);
Button btn_posint = (Button) findViewById(R.id.btn_point);
//--- 其他按钮 ---
Button btn_about = (Button) findViewById(R.id.btn_about);
Button btn_clear = (Button) findViewById(R.id.btn_clear);
Button btn_back = (Button) findViewById(R.id.btn_back); //--- 为数字按钮添加监听器以及相应的方法 ---
btn_0.setOnClickListener(new View.OnClickListener() {
@Override
public void onClick(View arg0) {
result_exist = false;
operator_exist = false; if(is_A) {
num_A *= 10;
textScreen = num_A + "";
textView.setText(textScreen);
} else {
num_B *= 10;
textView.setText(textScreen + num_B);
}
}
}); btn_1.setOnClickListener(new View.OnClickListener() {
@Override
public void onClick(View arg0) {
result_exist = false;
operator_exist = false; if(is_A) {
num_A = num_A*10 + 1;
textScreen = num_A + "";
textView.setText(textScreen);
} else {
num_B = num_B*10 + 1;
textView.setText(textScreen + num_B);
}
}
}); btn_2.setOnClickListener(new View.OnClickListener() {
@Override
public void onClick(View arg0) {
result_exist = false;
operator_exist = false; if(is_A) {
num_A = num_A*10 + 2;
textScreen = num_A + "";
textView.setText(textScreen);
} else {
num_B = num_B*10 + 2;
textView.setText(textScreen + num_B);
}
}
}); btn_3.setOnClickListener(new View.OnClickListener() {
@Override
public void onClick(View arg0) {
result_exist = false;
operator_exist = false; if(is_A) {
num_A = num_A*10 + 3;
textScreen = num_A + "";
textView.setText(textScreen);
} else {
num_B = num_B*10 + 3;
textView.setText(textScreen + num_B);
}
}
}); btn_4.setOnClickListener(new View.OnClickListener() {
@Override
public void onClick(View arg0) {
result_exist = false;
operator_exist = false; if(is_A) {
num_A = num_A*10 + 4;
textScreen = num_A + "";
textView.setText(textScreen);
} else {
num_B = num_B*10 + 4;
textView.setText(textScreen + num_B);
}
}
}); btn_5.setOnClickListener(new View.OnClickListener() {
@Override
public void onClick(View arg0) {
result_exist = false;
operator_exist = false; if(is_A) {
num_A = num_A*10 + 5;
textScreen = num_A + "";
textView.setText(textScreen);
} else {
num_B = num_B*10 + 5;
textView.setText(textScreen + num_B);
} textView.setText(textScreen);
}
}); btn_6.setOnClickListener(new View.OnClickListener() {
@Override
public void onClick(View arg0) {
result_exist = false;
operator_exist = false; if(is_A) {
num_A = num_A*10 + 6;
textScreen = num_A + "";
textView.setText(textScreen);
} else {
num_B = num_B*10 + 6;
textView.setText(textScreen + num_B);
}
}
}); btn_7.setOnClickListener(new View.OnClickListener() {
@Override
public void onClick(View arg0) {
result_exist = false;
operator_exist = false; if(is_A) {
num_A = num_A*10 + 7;
textScreen = num_A + "";
textView.setText(textScreen);
} else {
num_B = num_B*10 + 7;
textView.setText(textScreen + num_B);
}
}
}); btn_8.setOnClickListener(new View.OnClickListener() {
@Override
public void onClick(View arg0) {
result_exist = false;
operator_exist = false; if(is_A) {
num_A = num_A*10 + 8;
textScreen = num_A + "";
textView.setText(textScreen);
} else {
num_B = num_B*10 + 8;
textView.setText(textScreen + num_B);
}
}
}); btn_9.setOnClickListener(new View.OnClickListener() {
@Override
public void onClick(View arg0) {
result_exist = false;
operator_exist = false; if(is_A) {
num_A = num_A*10 + 9;
textScreen = num_A + "";
textView.setText(textScreen);
} else {
num_B = num_B*10 + 9;
textView.setText(textScreen + num_B);
}
}
}); //--- 为运算符按钮添加监听器及相应的方法 ---
btn_add.setOnClickListener(new View.OnClickListener() {
@Override
public void onClick(View arg0) {
//--- 判断之前是否按下过运算符按钮 ---
if(operator_exist) {
is_Add = true;
is_Sub = false;
is_Mul = false;
is_Div = false;
return;
} else {
is_Add = true;
}
operator_exist = true; //--- 首先判断之前有没有运算出结果 ---
if(result_exist) {
num_A = result;
result_exist = false;
} //--- 判断是否需要计算出结果并进行下一次运算 ---
if(!is_A) {
if(is_Add) {
result = num_A + num_B;
is_Add = false;
} else if(is_Sub) {
result = num_A - num_B;
is_Sub = false;
} else if(is_Mul) {
result = num_A * num_B;
is_Mul = false;
} else if(is_Div){
result = num_A / num_B;
is_Div = false;
} num_A = result;
num_B = 0;
textScreen = num_A + " + ";
textView.setText(textScreen);
return;
} is_A = false;
textScreen = num_A + " + ";
textView.setText(textScreen);
}
}); btn_sub.setOnClickListener(new View.OnClickListener() {
@Override
public void onClick(View arg0) {
//--- 判断之前是否按下过运算符按钮 ---
if(operator_exist) {
is_Add = false;
is_Sub = true;
is_Mul = false;
is_Div = false;
return;
} else {
is_Sub = true;
}
operator_exist = true; //--- 首先判断之前有没有运算出结果 ---
if(result_exist) {
num_A = result;
result_exist = false;
} //--- 判断是否需要计算出结果并进行下一次运算 ---
if(!is_A) {
if(is_Add) {
result = num_A + num_B;
is_Add = false;
} else if(is_Sub) {
result = num_A - num_B;
is_Sub = false;
} else if(is_Mul) {
result = num_A * num_B;
is_Mul = false;
} else if(is_Div){
result = num_A / num_B;
is_Div = false;
} num_A = result;
num_B = 0;
textScreen = num_A + " - ";
textView.setText(textScreen);
return;
} is_A = false;
textScreen = num_A + " - ";
textView.setText(textScreen);
}
}); btn_mul.setOnClickListener(new View.OnClickListener() {
@Override
public void onClick(View arg0) {
//--- 判断之前是否按下过运算符按钮 ---
if(operator_exist) {
is_Add = false;
is_Sub = false;
is_Mul = true;
is_Div = false;
return;
} else {
is_Mul = true;
}
operator_exist = true; //--- 首先判断之前有没有运算出结果 ---
if(result_exist) {
num_A = result;
result_exist = false;
} //--- 判断是否需要计算出结果并进行下一次运算 ---
if(!is_A) {
if(is_Add) {
result = num_A + num_B;
is_Add = false;
} else if(is_Sub) {
result = num_A - num_B;
is_Sub = false;
} else if(is_Mul) {
result = num_A * num_B;
is_Mul = false;
} else if(is_Div){
result = num_A / num_B;
is_Div = false;
} num_A = result;
num_B = 0;
textScreen = num_A + " * ";
textView.setText(textScreen);
return;
} is_A = false;
textScreen = num_A + " * ";
textView.setText(textScreen);
}
}); btn_div.setOnClickListener(new View.OnClickListener() {
@Override
public void onClick(View arg0) {
//--- 判断之前是否按下过运算符按钮 ---
if(operator_exist) {
is_Add = false;
is_Sub = false;
is_Mul = false;
is_Div = true;
return;
} else {
is_Div = true;
}
operator_exist = true; //--- 首先判断之前有没有运算出结果 ---
if(result_exist) {
num_A = result;
result_exist = false;
} //--- 判断是否需要计算出结果并进行下一次运算 ---
if(!is_A) {
if(is_Add) {
result = num_A + num_B;
is_Add = false;
} else if(is_Sub) {
result = num_A - num_B;
is_Sub = false;
} else if(is_Mul) {
result = num_A * num_B;
is_Mul = false;
} else if(is_Div){
result = num_A / num_B;
is_Div = false;
} num_A = result;
num_B = 0;
textScreen = num_A + " / ";
textView.setText(textScreen);
return;
} is_A = false;
textScreen = num_A + " / ";
textView.setText(textScreen);
}
}); btn_equ.setOnClickListener(new View.OnClickListener() {
@Override
public void onClick(View arg0) {
if(is_A) {
result = num_A;
textScreen = result + "";
result_exist = true;
textView.setText(textScreen);
return;
} if(is_Add) {
result = num_A + num_B;
is_Add = false;
} else if(is_Sub) {
result = num_A - num_B;
is_Sub = false;
} else if(is_Mul) {
result = num_A * num_B;
is_Mul = false;
} else if(is_Div) {
result = num_A / num_B;
is_Div = false;
} textScreen = result + "";
num_A = 0;
num_B = 0;
is_A = true;
result_exist = true;
textView.setText(textScreen);
}
});
} }
--- 总结 ---
总的来说,写一个计算器出来对有一点编程基础的人来说就像叫一个小孩用笔画一个圆。做这个的目的是熟悉一下 Android 的布局方式以及使用监听器的方法,并不是很难。
我的Android学习路线(一)的更多相关文章
- Android学习路线总结,绝对干货
title: Android学习路线总结,绝对干货 tags: Android学习路线,Android学习资料,怎么学习android grammar_cjkRuby: true --- 一.前言 不 ...
- Android学习路线(二十四)ActionBar Fragment运用最佳实践
转载请注明出处:http://blog.csdn.net/sweetvvck/article/details/38645297 通过前面的几篇博客.大家看到了Google是怎样解释action bar ...
- Android学习路线指南
看到这位大牛的博文,不禁得感概,我最近也遇到了很多问题,内心彷徨不堪,转载大牛这篇博文,是为了更好的勉励自己.原文地址在最后面. 前言 看到一篇文章中提到"最近几年国内的初级Android程 ...
- (转)Android学习路线总结,绝对干货
一.前言 不知不觉自己已经做了几年开发了,由记得刚出来工作的时候感觉自己能牛逼,现在回想起来感觉好无知.懂的越多的时候你才会发现懂的越少. 如果你的知识是一个圆,当你的圆越大时,圆外面的世界也就越大. ...
- Android学习路线总结,绝对干货(转)
转自:https://www.cnblogs.com/yishaochu/p/5436094.html 一.前言 不知不觉自己已经做了几年开发了,由记得刚出来工作的时候感觉自己能牛逼,现在回想起来感觉 ...
- Android学习路线总结,绝对干货(转)
title: Android学习路线总结,绝对干货tags: Android学习路线,Android学习资料,怎么学习androidgrammar_cjkRuby: true--- 一.前言 不知不觉 ...
- Android学习路线(二十一)运用Fragment构建动态UI——创建一个Fragment
你能够把fragment看成是activity的模块化部分.它拥有自己的生命周期,接受它自己的输入事件,你能够在activity执行时加入或者删除它(有点像是一个"子activity&quo ...
- 工作不久的安卓开发者,他们是这样规划自己的Android学习路线
Android开发工作者工作不久的时候,会有一段迷茫期,觉得自己应该再学一点,却不知道从何学起,该怎样规划自己的学习路线呢?今天,我给大家梳理一下Android基础,就像建造房屋一样,要建造一座宏伟的 ...
- android学习路线总结
感谢安辉作者,学习路线 https://www.cnblogs.com/yishaochu/p/5436094.html https://www.cnblogs.com/jycboy/p/60666 ...
随机推荐
- linux 目录与文件命令
目录与文件常用命令 1.cd命令 cd [相对路径或绝对路径或特殊符号] 功用:变换目录 ps: 不加参数时,默认切换到用户主目录,即环境变量HOME指定的目录,如root用户的HOME变量为/roo ...
- redis的相关信息
Redis支持五种数据类型:string(字符串),hash(哈希),list(列表),set(集合)及zset(sorted set:有序集合). string类型是Redis最基本的数据类型,一个 ...
- 八、网页版消息推送SDK-WebSockets
介绍 由于项目组需求.最近在研究消息推送服务平台.结合业务和使用场景分析最终选择的是 Mosquitto 消息服务器. Mosquitto 服务器的安装.配置.集群搭建 我就不在这多说了.有兴趣的可以 ...
- POJ1269:Intersecting Lines(判断两条直线的关系)
题目:POJ1269 题意:给你两条直线的坐标,判断两条直线是否共线.平行.相交,若相交,求出交点. 思路:直线相交判断.如果相交求交点. 首先先判断是否共线,之后判断是否平行,如果都不是就直接求交点 ...
- OS X 10.9 Mavericks下如何安装Command Line Tools(命令行工具)
OS X 10.9 Mavericks下如何安装Command Line Tools(命令行工具) 今天OS X 10.9 Mavericks正式发布,免费更新,立即去更新看看效果. 不过升级后安装命 ...
- Linux系统——vim编辑器
一.Linux系统中最常用的文本编辑器 vi:类Unix系统中默认的文本编辑器 vim:vi编辑器的增强版 作用:创建或修改文本文件:维护Linux系统中各种配置文件 二.三种切换模式命令模式输入模式 ...
- python xpath 中的全部用法
不好意思 ,太仓促只能给你们个url 链接:https://blog.csdn.net/hhtnan/article/details/77509549
- Java线程常用方法汇总
1.sleep() 使当前线程(即调用该方法的线程)暂停执行一段时间,让其他线程有机会继续执行,但它并不释放对象锁.也就是说如果有synchronized同步快,其他线程仍然不能访问共享数据.注意该方 ...
- Paper List ABOUT Deep Learning
Deep Learning 方向的部分 Paper ,自用.一 RNN 1 Recurrent neural network based language model RNN用在语言模型上的开山之作 ...
- 架构私用Nuget服务器
1.新建一个空的asp.net站点 2.通过nuget引用 Nuget.Server程序集,引用后项目会多出一些文件.修改web.config 里的apikey为你要上传包时用的apikey,我的为: ...