
[Angular 2] Directive intro and exportAs
First, What is directive, what is the difference between component and directive.
For my understanding,
- component is something like 'canvas', 'form', 'table'... they have the template and their own functionality. It defines how a html tag should work like and look like.
- directive is something like 'ngIf', 'required', 'checked'... they don't necessary to have their own template (of course they can have). It change the original component way to work or looks like.
Basic 'directive' and 'component' they are quite similar, so just follow the rules when you want to choose using 'directive' or 'component':
- Add something new to the DOM with its own template, using component
- Modify something (can be functionality or template) already in teh DOM, using directive.
What we want to build is collapse directive:
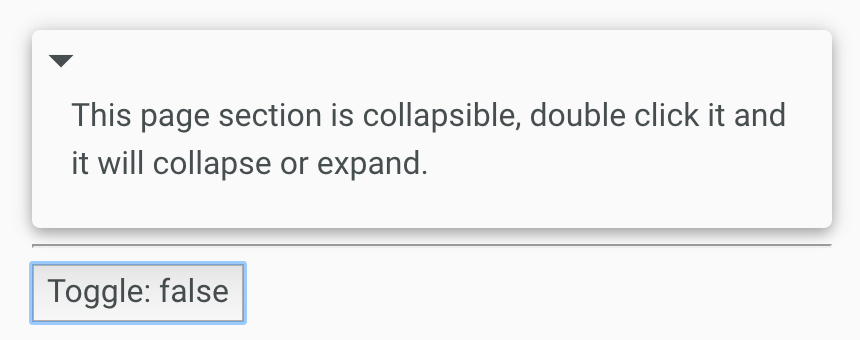
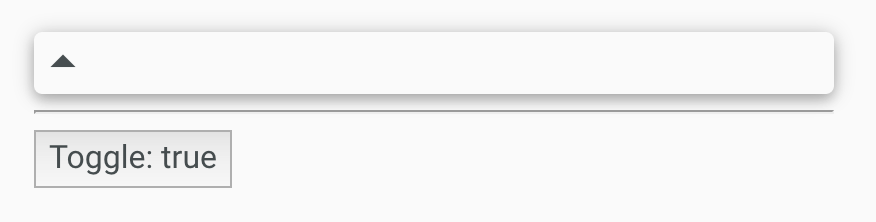
When you double click the panel, it will toggle the content show / hide and change the icon.
Also when you click the button which outside the panel, you will also be able to toggle the panel.
So it requires you know
- How to deal with Host elm's events --> @HostListener
- How to deal with Host elm's attrs --> @HostBinding
- How to export directive as API for the component which stay outside the host elm to use --> exportAs
First. let's see how to toggle it by using @HostListener & @HostBinding:
the host element html:
        <div collapse-on-click

             class="card card-strong disable-text-selection">

            <i class="md-icon collapsible-indicator" >arrow_drop_down</i>

            <i class="md-icon collapsible-indicator" >arrow_drop_up</i>

            <div class="collapsible-section" >

                This page section is collapsible, double click it and it will collapse or expand.

            </div>

        </div>
css:
.collapsed .collapsible-section{

    display: none;

}
directive:
import {Directive, HostListener, HostBinding} from "@angular/core";

@Directive({

    selector: '[collapse-on-click]'

})

export class CollapseOnClick {

    collapsed:boolean;

    constructor(){

        this.collapsed = false;

    }

    // set "collapsed" class to the host element according to

    // this.collapsed value

    @HostBinding('class.collapsed')

    get isCollapsed(){

        return this.collapsed;

    }

    // if the double click the host element, will fire toggle function

    @HostListener('dblclick')

    toggle(){

        this.collapsed = !this.collapsed;

    }

}
So everytime, when you double click the host element, it will run 'toggle()' function, it will change 'this.collapsed' value to true or false. Then we have a getter and setter to get and set 'this.collapsed'. According to 'this.collapsed', we will add 'collapsed' class to host element. This class will help to hide the content, as we define in css file.
So when toggle: true: the host html will change to:
<div collapse-on-click

             class="card card-strong disable-text-selection collasped">
When toggle: false:
<div collapse-on-click

             class="card card-strong disable-text-selection">
To switch the icon, we can use template reference from directive:
@Directive({

    selector: '[collapse-on-click]',

    exportAs: 'collapsible'

})
We define exportAs, which we can refer in host html:
        <div collapse-on-click #panel="collapsible"

             class="card card-strong disable-text-selection">

            <i class="md-icon collapsible-indicator" *ngIf="!panel.collapsed">arrow_drop_down</i>

            <i class="md-icon collapsible-indicator" *ngIf="panel.collapsed">arrow_drop_up</i>

            <div class="collapsible-section" >

                This page section is collapsible, double click it and it will collapse or expand.

            </div>

        </div>
And one improvement for using template reference is we not longer need to depend on a css class 'collapsed', to show / hide the content, we can just use ngIf.
        <div collapse-on-click #panel="collapsible"

             class="card card-strong disable-text-selection">

            <i class="md-icon collapsible-indicator" *ngIf="!panel.collapsed">arrow_drop_down</i>

            <i class="md-icon collapsible-indicator" *ngIf="panel.collapsed">arrow_drop_up</i>

            <div class="collapsible-section" *ngIf="!panel.collapsed">

                This page section is collapsible, double click it and it will collapse or expand.

            </div>

        </div>
This way can make the direcitve more reuseable.
Another benifite for using tempalte reference is that, we can call directive function or access directive props by ref.
        <div collapse-on-click #panel="collapsible"

             class="card card-strong disable-text-selection">

            <i class="md-icon collapsible-indicator" *ngIf="!panel.collapsed">arrow_drop_down</i>

            <i class="md-icon collapsible-indicator" *ngIf="panel.collapsed">arrow_drop_up</i>

            <div class="collapsible-section" *ngIf="!panel.collapsed">

                This page section is collapsible, double click it and it will collapse or expand.

            </div>

        </div>

        <hr />

        <button (click)="panel.toggle()">Toggle: {{panel.collapsed}}</button>
So, we add a button, which stay outside the host element. When it clicked, it will also call the toggle() method on directive to show / hide the content.
Notice: another way to write @HostListener:
@Directive({

    selector: '[collapse-on-click]',

    exportAs: 'collapsible',

    host: {

        '(dblclick)': 'toggle()'

    }

})
It is also clear.
------------------
app.ts:
import {Component} from "@angular/core";

import {NgModule} from "@angular/core";

import {platformBrowserDynamic} from "@angular/platform-browser-dynamic";

import {BrowserModule} from "@angular/platform-browser";

import {CollapseOnClick} from "./collapse-on-click.directive";

@Component({

    selector:'app',

    template: `

        <div collapse-on-click #panel="collapsible"

             class="card card-strong disable-text-selection">

            <i class="md-icon collapsible-indicator" *ngIf="!panel.collapsed">arrow_drop_down</i>

            <i class="md-icon collapsible-indicator" *ngIf="panel.collapsed">arrow_drop_up</i>

            <div class="collapsible-section" *ngIf="!panel.collapsed">

                This page section is collapsible, double click it and it will collapse or expand.

            </div>

        </div>

        <hr />

        <button (click)="panel.toggle()">Toggle: {{panel.collapsed}}</button>

        `

})

export class App {

}

@NgModule({

    declarations: [App, CollapseOnClick],

    imports: [BrowserModule],

    bootstrap: [App]

})

export class AppModule {

}

platformBrowserDynamic().bootstrapModule(AppModule);
collapsed-on-click.ts:
import {Directive, HostListener, HostBinding} from "@angular/core";

@Directive({

    selector: '[collapse-on-click]',

    exportAs: 'collapsible'

})

export class CollapseOnClick {

    collapsed:boolean;

    constructor(){

        this.collapsed = false;

    }

    // set "collapsed" class to the host element according to

    // this.collapsed value

    /*@HostBinding('class.collapsed')

    get isCollapsed(){

        return this.collapsed;

    }*/

    // if the double click the host element, will fire toggle function

    @HostListener('dblclick')

    toggle(){

        this.collapsed = !this.collapsed;

    }

}
[Angular 2] Directive intro and exportAs的更多相关文章
- [Angular] Export directive functionalities by using 'exportAs'
Directive ables to change component behaives and lookings. Directive can also export some APIs which ...
- 关于angular 自定义directive
关于angular 自定义directive的小结 首先我们创建一个名为"expander"的自定义directive指令: angular.module("myApp& ...
- [Angular] Custom directive Form validator
Create a directive to check no special characters allowed: import {Directive, forwardRef} from '@ang ...
- [Angular] Test Directive
directive: import { Directive, HostListener, HostBinding, ElementRef } from '@angular/core'; @Direct ...
- [Angular] Using directive to create a simple Credit card validator
We will use 'HostListener' and 'HostBinding' to accomplish the task. The HTML: <label> Credit ...
- angular service/directive
<html class=" js cssanimations csstransitions" ng-app="phonecatApp" > < ...
- 一个Demo就懂的Angular之directive
<body> <div ng-controller="myCtrl"> <hello-word></hello-word> < ...
- angular 中 directive中的多个指令
<div ng-controller="ctrl1"> <superman weight length speed>superman</superma ...
- Angular中directive——scope选项与绑定策略,这个也经常迷惑的。
开门见山地说,scope:{}使指令与外界隔离开来,使其模板(template)处于non-inheriting(无继承)的状态,当然除非你在其中使用了transclude嵌入,这点之后的笔记会再详细 ...
随机推荐
- JavaScript基础篇最全
本章内容: 简介 定义 注释 引入文件 变量 运算符 算术运算符 比较运算符 逻辑运算符 数据类型 数字 字符串 布尔类型 数组 Math 语句 条件语句(if.switch) 循环语句(for.fo ...
- jQuery 遍历 - parent() 方法
ylbtech-jQuery-sizzle:jQuery 遍历 - parent() 方法 parent() 获得当前匹配元素集合中每个元素的父元素,使用选择器进行筛选是可选的. 1.A,jQuer ...
- HDU 5679 Substring 后缀数组判重
题意:求母串中有多少不同的包含x字符的子串 分析:(首先奉上FZU官方题解) 上面那个题就是SPOJ694 ,其实这两个题一样,原理每次从小到大扫后缀sa数组,加上新的当前后缀的若干前缀,再减去重复的 ...
- 给Webkit内核的浏览器控件增加互交功能
转载请说明出处,谢谢~~ 昨天封装了基于webkit的wke浏览器内核,做成了duilib的浏览器控件,实现了浏览功能,但是单单的浏览功能还不满足需求,在我的仿酷狗项目中乐库的功能需要与浏览器互交. ...
- Asp.Net中文本换行
Asp.Net中文本换行 VB.NET Function HtmlCode(ByVal fString) If fString <> "" Then ...
- Annotations:注解
注解,作为元数据的一种形式,虽不是程序的一部分,却有以下作用: 可以让编译器跳过某些检测 某些工具可以根据注解信息生成文档等 某些注解可以在运行时检查 @表示这是一个注解 @Override ...
- 内核源码分析之linux内核栈(基于3.16-rc4)
在3.16-rc4内核源码中,内核给每个进程分配的内核栈大小为8KB.这个内核栈被称为异常栈,在进程的内核空间运行时或者执行异常处理程序时,使用的都是异常栈,看下异常栈的代码(include/linu ...
- PowerMock简介
PowerMock 写单元测试可能有些难.有时仅仅为了可测试性的目标而不得不牺牲好的设计.通常可测试性和好的测试之间是一致的,但是并不总是如此.比如,由于现存框架的限制,final classes.m ...
- <Chapter 2>2-2-1.用户偏好模式(The User Preferences Pattern)
在这个模块中我们要创建的应用是一个简单的钟.当一个用户访问这个网站时,这个应用会更具服务器的系统时间显示当前的时间.默认情况下,这个应用使用标准国际时间(UTC)时区显示当前时间.用户可以使用Goog ...
- 给sublime text添加ubuntu launcher快捷方式
1.下载sublime text 2文件,解压并复制到/opt目录,文件夹名称不要含有空格 2.在/usr/share/applications目录下新建sublime_text.desktop文件 ...