H3C S10512虚拟化配置
软件版本:Version 7.1.070, Release 7585P05
1、配置SW1
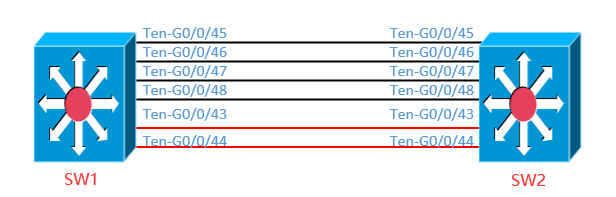
#设置SW1的成员编号为1,创建IRF端口2,并将它与物理接口Ten-G0/0/45、Ten-G0/0/46、Ten-G0/0/47、Ten-G0/0/48绑定。
<H3C>system-view
System View: return to User View with Ctrl+Z.
[H3C]sysname A
[A]irf member 1
[A]int range Ten-GigabitEthernet 0/0/45 to Ten-GigabitEthernet 0/0/48
[A-if-range]shutdown
[A-if-range]quit
[A]irf-port 2
[A-irf-port2]port group interface Ten-GigabitEthernet0/0/45
[A-irf-port2]port group interface Ten-GigabitEthernet0/0/46
[A-irf-port2]port group interface Ten-GigabitEthernet0/0/47
[A-irf-port2]port group interface Ten-GigabitEthernet0/0/48
[A-irf-port2]int range Ten-GigabitEthernet 0/0/45 to Ten-GigabitEthernet 0/0/48
[A-if-range]undo shutdown
# 将当前配置保存到下次启动配置文件。
<A>sa
The current configuration will be written to the device. Are you sure? [Y/N]:y
Please input the file name(*.cfg)[cfa0:/startup.cfg]
(To leave the existing filename unchanged, press the enter key):
Validating file. Please wait...
Configuration is saved to device successfully.
# 将设备的运行模式切换到IRF模式。
[A]chassis convert mode irf
The device will switch to IRF mode and reboot.
You are recommended to save the current running configuration and specify the configuration file for the next startup. Continue? [Y/N]:y
Do you want to convert the content of the next startup configuration file cfa0:/startup.cfg to make it available in IRF mode? [Y/N]:y
Now rebooting, please wait...
%Jun 19 16:39:42:065 2015 A DEV/5/SYSTEM_REBOOT: System is rebooting now.
设备重启后Device A组成了只有一台成员设备的IRF。
1、配置SW2
#设置SW2的成员编号为2,创建IRF端口1,并将它与物理接口Ten-G0/0/45、Ten-G0/0/46、Ten-G0/0/47、Ten-G0/0/48绑定。
<H3C>system-view
System View: return to User View with Ctrl+Z.
[H3C]sysname B
[B]irf member 2
[B]int range Ten-GigabitEthernet 0/0/45 to Ten-GigabitEthernet 0/0/48
[B-if-range]shutdown
[B-if-range]quit
[B]irf-port 1
[B-irf-port2]port group interface Ten-GigabitEthernet0/0/45
[B-irf-port2]port group interface Ten-GigabitEthernet0/0/46
[B-irf-port2]port group interface Ten-GigabitEthernet0/0/47
[B-irf-port2]port group interface Ten-GigabitEthernet0/0/48
[B-irf-port2]int range Ten-GigabitEthernet 0/0/45 to Ten-GigabitEthernet 0/0/48
[B-if-range]undo shutdown
# 将当前配置保存到下次启动配置文件。
<B>sa
The current configuration will be written to the device. Are you sure? [Y/N]:y
Please input the file name(*.cfg)[cfa0:/startup.cfg]
(To leave the existing filename unchanged, press the enter key):
Validating file. Please wait...
Configuration is saved to device successfully.
进行物理连线。
将设备的运行模式切换到IRF模式。
[B]chassis convert mode irf
The device will switch to IRF mode and reboot.
You are recommended to save the current running configuration and specify the configuration file for the next startup. Continue? [Y/N]:y
Do you want to convert the content of the next startup configuration file cfa0:/startup.cfg to make it available in IRF mode? [Y/N]:y
Now rebooting, please wait...
%Jun 19 16:41:29:433 2015 B DEV/5/SYSTEM_REBOOT: System is rebooting now.
设备B重启后与设备A形成IRF。
[B]dis irf
MemberID Slot Role Priority CPU-Mac Description
*1 6 Master 1 00e0-fc0f-8c07 ---
1 7 Standby 1 00e0-fc0f-8c08 ---
+2 6 Standby 1 00e0-fc0f-8c19 ---
2 7 Standby 1 00e0-fc0f-8c1a ---
--------------------------------------------------
* indicates the device is the master.
+ indicates the device through which the user logs in.
The bridge MAC of the IRF is: 0868-8d62-7200
Auto upgrade : yes
Mac persistent : always
Domain ID : 0
Auto merge : yes
IRF mode : normal
(3) 配置BFD MAD检测
[A]vlan 4090
[A-vlan4090]description mad-bfd
[A-vlan4090]port Ten-GigabitEthernet 1/0/0/43 Ten-GigabitEthernet 1/0/0/44 Ten
-GigabitEthernet 2/0/0/43 Ten-GigabitEthernet 2/0/0/44
[A-vlan4090]int vlan 4090
[A-Vlan-interface4090]mad bfd enable
[A-Vlan-interface4090]mad ip address 1.1.1.1 30 member 1
[A-Vlan-interface4090]mad ip address 1.1.1.2 30 member 2
[A]int Ten-GigabitEthernet 1/0/0/43
[A-Ten-GigabitEthernet1/0/0/43]undo stp enable
[A-Ten-GigabitEthernet1/0/0/43]int Ten-GigabitEthernet 1/0/0/44
[A-Ten-GigabitEthernet1/0/0/44]undo stp enable
[A-Ten-GigabitEthernet1/0/0/44]int Ten-GigabitEthernet 2/0/0/43
[A-Ten-GigabitEthernet2/0/0/43]undo stp enable
[A-Ten-GigabitEthernet2/0/0/44]int Ten-GigabitEthernet 2/0/0/43
[A-Ten-GigabitEthernet2/0/0/43]undo stp enable
[A]dis bfd session
Total Session Num: 1 Up Session Num: 0 Init Mode: Active
IPv4 session working in control packet mode:
LD/RD SourceAddr DestAddr State Holdtime Interface
4097/0 1.1.1.1 1.1.1.2 Down / Vlan4090
H3C S10512虚拟化配置的更多相关文章
- H3C S5120-52P-WiNet交换机配置
配置console口登录验证密码 <H3C>system-view [H3C]user-interface aux 0 [H3C-ui-aux0]authentication-mode p ...
- KVM虚拟化配置
KVM虚拟化 虚拟化概念 KVM虚拟化概念详讲 虚拟化配置 首先开启虚拟化的支持 并且增加一个50g的硬盘 free查看内存 grep -Ei 'vmx|svm' /proc/cpuinfo查看虚拟机 ...
- H3C远程登陆配置
1.配置本地用户(默认权限 level 1) [H3C]local-user admin [H3C-luser-admin]password cipher [H3C]super password le ...
- H3C S3100交换机配置VLAN和远程管理
一.基本设置 1. console线连接成功 2. 进入系统模式 <H3C>system-view //提示符由<H3C> 变为 [H3C] 3. 更改设备名称 [H3C]sy ...
- 飞鱼星、H3C企业路由器配置
飞鱼星企业路由器配置外网访问IIS 只配置端口映射就行,配置好了,如果不立即重启,需要等几分钟才能生效 H3C路由器配置虚拟服务器即可
- ESXi 嵌套KVM虚拟化 配置
VMware ESXi5.x默认不支持嵌套虚拟化,需要修改相关配置才能支持 1.ESXi5.1主机开通ssh,修改VMware ESXi配置文件使之嵌套虚拟化. 在配置文件后面加入如下配置:vhv ...
- 批量备份H3C交换机路由器配置
第一种(使用ftp下载配置文件): #!/bin/bash datetime=`date +%Y%m%d` BAKTIME=`date +%Y%m%d%H%M%S` user="admin& ...
- H3C交换机SNMP配置
1.启动/关闭SNMP Agent服务 在系统视图模式下: 启用:snmp-agent 关闭:undo snmp-agent 注:缺省情况下snmp agent是关闭的 2. 使能或禁止SNMP相应版 ...
- H3C/华为交换机配置NTP客户端
H3C clock timezone UTC add ntp-service unicast-server 1.1.1.1 //ntp服务器地址 clock protocol ntp ntp-serv ...
随机推荐
- 【LOJ3043】「ZJOI2019」线段树
题面 问题可以转化为每次区间覆盖操作有 \(\frac{1}{2}\) 的概率进行,求标记和的期望.于是我们只要求出所有点有标记的概率即可. 我们设 \(f_i\) 表示节点 \(i\) 有标记的概率 ...
- java格式化代码(java格式化代码工具类)
下别人的原来链接..... 支持效果不好要想格式化好需要解析语法树 7个积分我这里免费下 转自 https://download.csdn.net/download/jkl012789/ ...
- 安卓平分位置layout_weight学习记录
weight (权重) 使用把layout_width写成0 weight 为平分剩余父容器位置 两个标签平分 <?xml version="1.0" encoding ...
- RadioButton之互斥选择和Toast显示
前言: RadioButton用来单选并且用Toast来进行提示所选内容 RadioButton标签单独写的时候不能出现互斥现象,代码如下 <RadioButton android:layout ...
- 官网英文版学习——RabbitMQ学习笔记(四)Work queues
工作队列:把每个任务只发送给一个工作者. 上一篇我们是从一个指定的队列发送接收消息,在本文中,我们将创建一个工作队列,用于在多个工作者之间分配耗时的任务. 工作队列(即任务队列)背后的主要思想是避免立 ...
- C/C++贪心算法解决TSP问题
贪心算法解决旅行商问题 TSP问题(Traveling Salesman Problem,旅行商问题),由威廉哈密顿爵士和英国数学家克克曼T.P.Kirkman于19世纪初提出.问题描述如下: 有若干 ...
- 《Java面试全解析》1000道面试题大全详解(转)
<Java面试全解析>1000道 面试题大全详解 本人是 2009 年参加编程工作的,一路上在技术公司摸爬滚打,前几年一直在上海,待过的公司有 360 和游久游戏,因为自己家庭的原因,放弃 ...
- .NET 一次读取几百条数据优化,从原来30分钟优化到30秒
1.全部数据读取到内存, 不要使用string,而是使用stringbuilder,stringbuilder的效率非常高 2.添加到数据库 不要使用excute,而是使用事务,几百万条数据会请求数据 ...
- 066-PHP通过函数名调用函数
<?php function hello(){ //定义函数 echo '<br />Hello!<br />'; } function hellophp(){ //定义 ...
- Spring Cloud 支付宝支付的流程
沙箱环境又称沙盘,为了开发与调试所提供的环境,它与生产环境互相隔离,但具有生产环境几乎完全相同的功能蚂蚁金服开放平台——开发者中心1.https://openhome.alipay.com2.提供的调 ...