Configuring Network in CentOS 6.3 Virtual Box + Screenshots
Configuring Network in CentOS 6.3 Virtual Box + Screenshots
Posted: May 23, 2013 in Uncategorized
Tags: /etc/sysconfig/network-scripts/ifcfg-eth0, centos 6.3, centos 6.5, command line, configure network, internet, ip address, terminal, virtual box, windows 7
This is a guide on configuring network in CentOS 6.x in Virtual Box with screenshots (using terminal).
[UPDATE: This guide can also be used to configure network on CentOS 6.5]
So, here I have used CentOS 6.3 minimal and will be discussing on configuring the Virtual Box and CentOS for network access. If you need help installing CentOS minimal in the Virtual Box, you can find the instructions in my earlier post here.
Requirements:
- Virtual Box
- CentOS 6.3 or 6.5 (I have tested this on CentOS 6.3 and CentOS 6.5, you can use it on other 6.x versions too)
Step 1: Configure Virtual Box Network Settings:
There are different modes or ways you can configure your Virtual box network settings.
- Not Attached
- NAT
- Bridged Adapter
- Internal Network
- Host-Only Adapter
- Generic Driver
You can find more details about the different modes here.
I will be using the Bridged Adapter mode for this guide. It is faster as it treat the VM as an individual host within the network.
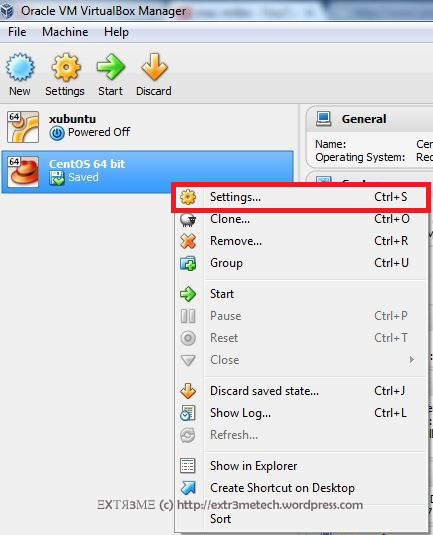
Open Virtual Box and right click on your CentOS VM, and click on “Settings“.
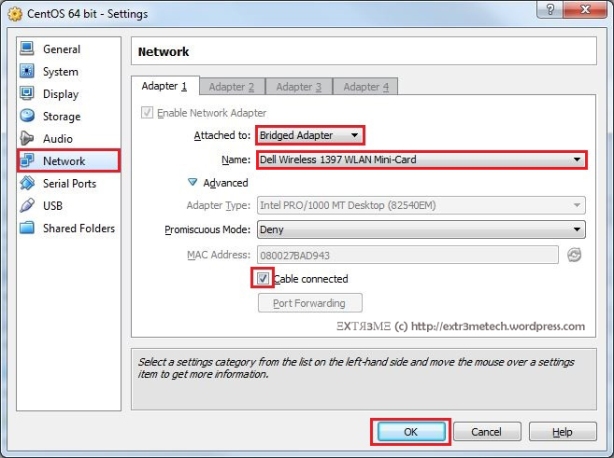
Now, go to the tab Network and change the “Attached to” field to “Bridged Adapter”. Then choose the “Name” to your network interface. For example, I have a dell wireless adapter, so I choose the Name as “Dell Wireless” from the drop down menu. And finally check the field “Cable Connected”. Finally, click on OK when you are done.
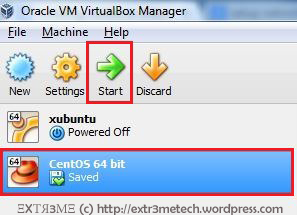
So, you have now configured the Virtual Box. Now, you can start your CentOS VM by selecting you VM and clicking on “Start”.
Step 2: Configure CentOS network settings:
You can configure your network either by using Dynamic IP addressing assigned by your DHCP server or you can manually configure your IP Address statically. You can choose either static or dynamic method and can do so by editing the file/etc/sysconfig/network-scripts/ifcfg-eth0.
Method 1: Dynamic IP
We can configure the network by using Dynamic IP address which are assigned automatically by the DHCP server. This is the simplest way to configure your network.
NOTE: You will have a line that starts with HWADDR in the your config file, do not change or modify that line.
In your terminal, type the following:
vi /etc/sysconfig/network-scripts/ifcfg-eth0
Now, add/modify the file as follows (DO NOT CHANGE the HWADDR line your config file):
DEVICE=eth0
BOOTPROTO=dhcp
ONBOOT=yes
NM_CONTROLLED=no
HWADDR=08:00:27:08:47:E9
Now, save the file by pressing “ESC” and typing :wq and hit ENTER.
To view your network config file. type the following in the terminal:
cat /etc/sysconfig/network-scripts/ifcfg-eth0

Now, you will have to restart your network. You can do so by typing the following in the terminal:
service network restart

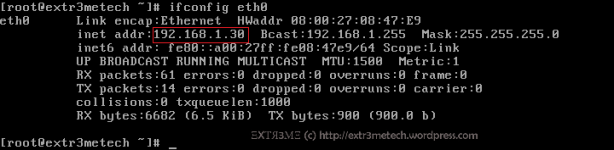
To view your IP address, type the following in your terminal:
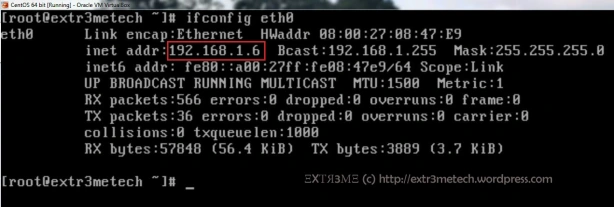
ifconfig eth0
You can see your IP Address of the interface eth0 next to the field “inet addr:” as shown below:
Now, if you have internet access, then you can check if you are able to ping any website. And you should be able to get the reply. For example, in your terminal type:
ping extr3metech.wordpress.com
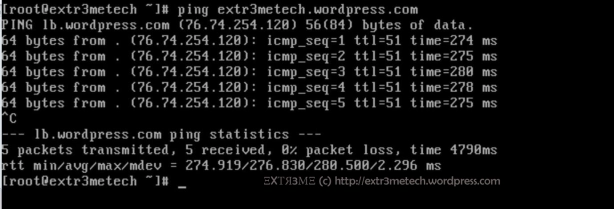
You can press CTRL+ C to stop the ping command.
So, Hurray! you have successfully setup up your network in your CentOS Virtual Box.
Method 2: Static IP
We can also assign the network information manually by assigning the IP Address, NETMASK , GATEWAY in the network interface config file.
NOTE: You will have a line that starts with HWADDR in your config file, do not change or modify that line.
Step1 : In you terminal, type:
vi /etc/sysconfig/network-scripts/ifcfg-eth0
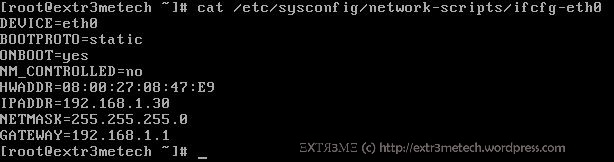
Now, edit/merge the file to the following
DEVICE=eth0
BOOTPROTO=static
ONBOOT=yes
NM_CONTROLLED=no
HWADDR=08:00:27:08:47:E9
IPADDR=192.168.1.30
NETMASK=255.255.255.0
GATEWAY=192.168.1.1
Now, press ESC and type :wq and hit ENTER to save and exit the configuration file.
To view the config file. type the following in the terminal:
cat /etc/sysconfig/network-scripts/ifcfg-eth0
Step 2: Change Host name:
To change host name , you have to edit the config file /etc/sysconfig/network. If you want to know to change the host name manually, you can follow the guide I have posted earlier here.
Step 3: Assign DNS Server IP
To manually assign primary and secondary DNS Server IP addresses, in your terminal type:
vi /etc/resolv.conf
Now, edit this file to the following:
nameserver 8.8.8.8
nameserver 8.8.4.4
Now, press ESC and type :wq and hit ENTER to save and exit the configuration file.
Now, if you want you can make sure you have entered and saved the correct configuration(It is a good practice to double check ). To view your dns config file, in your terminal type:
cat /etc/resolv.conf

Step 4: Restart network:
Finally, all you have to do is to restart your network service. To so so, type the following in the terminal:
service network restart
Now, you can check your Current IP configuration, by typing the following in the terminal:
ifconfig eth0
Now, if you have internet access, then you can check if you are able to ping any website. And you should be able to get the reply. For example, In your terminal type:
ping extr3metech.wordpress.com
You can press CTRL+ C to stop the ping command.
So, Hurray! you have successfully setup up your network manually in your CentOS Virtual Box.
Hope this guide helped you to configure network in your CentOS Virtual Machine.
If you have any queries or suggestions regarding this guide, feel free to leave a comment and will get back at you. Don’t forget to follow my blog to get future updates! ![]()
转载自:https://extr3metech.wordpress.com/2013/05/23/configuring-network-in-centos-6-3-virtual-box-screenshots/
Configuring Network in CentOS 6.3 Virtual Box + Screenshots的更多相关文章
- centos安装Oracle virtual box
1.进入virtualbox官网 https://www.virtualbox.org/wiki/Downloads 2.点击Linux distributions 3.向下翻至如图 4.在/etc/ ...
- Virtual Box中 CentOS双网卡设置
Virtual Box中 CentOS双网卡设置: 在Virtual Box中安装CentOS x86-64 6.4(final),配置了双网卡,eth0 为桥接模式 , eth1为内网模式 ...
- virtual box 下安装centos 7
1: 在virtual box下导入 镜像的时候报错: Failed to open/create the internal network 'HostInterfaceNetworking-Virt ...
- 为 Virtual Box 中的 CentOS 6.6 配置本地DVD光盘做yum软件源
因为virtual box 中的centos配置host-only共享win7上网,配置失败,所以只能使用Centos的 DVD 光盘来配置yum软件源.不然就没得完了. 1. 首先要在virtual ...
- Virtual Box + CentOS Minimal + Apache搭建Web服务器
本文并不介绍关于Virtual Box, CentOS, Apache的安装, 主要针对安装后相关的配置, 使宿主机(Host)可以访问客户机(Guest: CentOS in Virtual Box ...
- 在centos 6.5 在virtual box 上 安装增强版工具
centos 6.5 在virtual box 上 安装增强版工具: 出现:centos unable to find the source of your current linux kernel ...
- virtual box 安装centos min
2018-4-19 22:20:40 星期四 之前不小心把用了很久的centos镜像删掉了.....这里记录下安装最小版centos的步骤 1. 安装centos 2. 开启网络, 并设置为随机启动 ...
- virtual Box在Centos 7上的安装
1.首先,我们需要在oracle官网下载virtual Box的centos7版本: 下载地址为:http://download.virtualbox.org/virtualbox/5.0.12/Vi ...
- Virtual Box虚拟机Ubuntu18.X系统安装及Mysql基本开发配置
Linux简介 什么是 Linux? Linux:世界上不仅只有一个 Windows 操作系统,还有 Linux.mac.Unix 等操作系统.桌面操作系统下 Windows 是霸主,而 Linux ...
随机推荐
- LeetCode Add Two Numbers II
原题链接在这里:https://leetcode.com/problems/add-two-numbers-ii/ 题目: You are given two linked lists represe ...
- 简单理解call_user_func和call_user_func_array两个函数
call_user_func():调用一个回调函数处理字符串, 可以用匿名函数,可以用有名函数,可以传递类的方法, 用有名函数时,只需传函数的名称 用类的方法时,要传类的名称和方法名 传递的第一个参数 ...
- Swift:属性观察器
1.简单介绍 属性观察器监控和响应属性值的变化,每次属性被设置值的时候都会调用属性观察器,甚至新的值和现在的值相同的时候也不例外. 可以为除了延迟存储属性之外的其他存储属性添加属性观察器,也可以通过重 ...
- vmware rdm
RDM即裸磁盘映射,基本思想就是将host的磁盘直接映射给虚拟机使用 需要讨论的是: 1.rdm磁盘是否允许设置为共享,即可以映射给多个虚拟机使用(vmware不可用) 在 vSphere W ...
- Static方法在多线程环境下的运行
最近看了Jfinal 一致对model的那个static final dao有些疑惑,全局一个实例安全吗?同时也出了一个疑惑,静态方法执行会有并发影响吗?看代码 StaticThread.java p ...
- linux 安装配置Nginx
简介: Nginx是一款轻量级的Web 服务器/反向代理服务器及电子邮件(IMAP/POP3)代理服务器,并在一个BSD-like 协议下发行.由俄罗斯的程序设计师Igor Sysoev所开发,供俄国 ...
- Glacierskating测试记录
这个游戏本身已经很成熟了,要提什么建议的话也是吹毛求疵.... 不过个人来讲不是很喜欢这个游戏,喜欢程度排倒数第二吧....感觉游戏就是一个套路,掌握了套路就不好玩了.....优点是随时随地可以玩一把 ...
- STL-<queue>-priority queue的使用
简介: 优先队列是一种容器适配器,优先队列的第一个元素总是最大或最小的(自定义的数据类型需要重载运算符).它是以堆为基础实现的一种数据结构. 成员函数(Member functions) (const ...
- 小米抢购(简单版v0.1)-登录并验证抢购权限,以及获取真实抢购地址
小米(简单版)-登录并验证抢购权限,以及获取真实抢购地址! 并不是复制到浏览器就行了的 还得传递所需要的参数 这里只是前部分 后面的自己发挥了 { "stime": 1389 ...
- webservice通信调用天气预报接口实例
转载:http://www.cnblogs.com/warrior4236/p/5668449.html 一:环境搭建 1:新建一个java project工程weatherInf 2:引入相应的ja ...