-Three.js开发指南---用three.js创建你的第一个三维场景(第一章)
本章主要做了下面的工作
1 生成一个简单的场景,该场景的物体只有平面和坐标轴
2 在第一个demo的基础上添加光源和方块物体,并生成阴影
3 在第二个demo的基础上,增加动画,使得方块进行旋转
4 在第三个demo的基础上,增加图形操作界面,改变方块旋转的速度
5 在第四个demo的基础上,我们使用ascII效果(这个没有做出来,不知道为什么asciieffect没有定义)
在下面的demo中,
1 生成了场景,相机,渲染器,几何体(平面),材质(几何体和材质进行组合,组成物体),坐标轴,
2 将相机,渲染器,物体都添加到场景中,
3 然后再对场景和相机进行渲染
<!DOCTYPE html>

<html>

<head>

    <title>1</title>

    <script type="text/javascript" src="three.js"></script>

    <style>

        body {

            /* set margin to 0 and overflow to hidden, to go fullscreen */

            margin: 0;

            overflow: hidden;

        }

    </style>

</head>

<body>

<!-- Div which will hold the Output -->

<div id="WebGL-output">

</div>

<!-- Javascript code that runs our Three.js examples -->

<script type="text/javascript">

   function init() {

        var scene=new THREE.Scene();//生成一个场景

        //生成一个相机

        var camera=new THREE.PerspectiveCamera(45,window.innerWidth/window.innerHeight,0.1,1000);//视场,长宽比,近面,远面

        camera.position.x=-20;

        camera.position.y=40;

        camera.position.z=30;

        camera.lookAt(scene.position);

        //生成一个渲染器

        var render=new THREE.WebGLRenderer();

        render.setClearColorHex(0xEEEEEE);

        render.setSize(window.innerWidth,window.innerHeight);

        //生成一个坐标轴,辅助线,坐标轴的参数

        var axes=new THREE.AxisHelper(20);

        //生成一个平面

        var planeGeometry=new THREE.PlaneGeometry(60,20,10,10);//注意参数

        //生成一个材质,设置材质的颜色,同时显示线框

        var planeMaterial=new THREE.MeshBasicMaterial({color:0xcccccc,wireframe:true});

        //生成一个网格,将平面和材质放在一个网格中,组合在一起,组成一个物体

        var plane=new THREE.Mesh(planeGeometry,planeMaterial);

        plane.rotation.x=-0.5*Math.PI;

        plane.position.x=15;

        plane.position.y=0;

        plane.position.z=0;

        //将相机,渲染器,坐标轴,平面都追加到场景中,然后对场景和相机进行渲染

        scene.add(camera);

        scene.add(render);

        scene.add(axes);

        scene.add(plane);

        render.render(scene,camera);

        document.getElementById("WebGL-output").append(render.domElement);

    };

    window.onload = init;

</script>

</body>

</html>
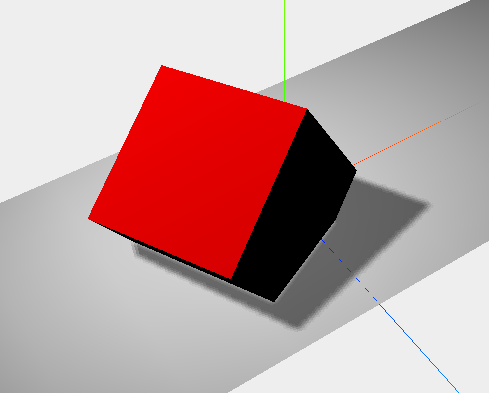
在下面的demo中,我们添加光源和设置物体阴影
1 three.js中有两种材质可以对光源产生反应,MeshLambertMaterial和MeshPhongMaterial,所以我们将上面demo中的MeshBasicMaterial替换为另外一个材质MeshLambertMaterial
2 我们设置点光源SpotLight
3 由于阴影需要大量的计算资源,所以three.js默认是不生成阴影的,需要进行设置
首先是渲染器,render.shadowMapEnabled=true
其次是允许物体投射阴影,cube.castShadow=true;
再其次是允许某些物体接受阴影,plane.receiveShadow=true
最后是光源也要投射阴影,spot.castShadow=true

<!DOCTYPE html>

<html>

<head>

    <title>1</title>

    <script type="text/javascript" src="three.js"></script>

    <style>

        body {

            /* set margin to 0 and overflow to hidden, to go fullscreen */

            margin: 0;

            overflow: hidden;

        }

    </style>

</head>

<body>

<!-- Div which will hold the Output -->

<div id="WebGL-output">

</div>

<!-- Javascript code that runs our Three.js examples -->

<script type="text/javascript">

   function init() {

        var scene=new THREE.Scene();//生成一个场景

        //生成一个相机

        var camera=new THREE.PerspectiveCamera(45,window.innerWidth/window.innerHeight,0.1,1000);//视场,长宽比,近面,远面

        camera.position.x=-20;

        camera.position.y=40;

        camera.position.z=30;

        camera.lookAt(scene.position);

        //生成一个渲染器

        var render=new THREE.WebGLRenderer();

        render.setClearColorHex(0xEEEEEE);

        render.setSize(window.innerWidth,window.innerHeight);

        render.shadowMapEnabled=true;//允许阴影映射,渲染阴影需要大量的资源,因此我们需要告诉渲染器我们需要阴影

        //生成一个坐标轴,辅助线

        var axes=new THREE.AxisHelper(20);

        //生成一个平面

        var planeGeometry=new THREE.PlaneGeometry(60,20,10,10);//平面

        //生成一个材质

        var planeMaterial=new THREE.MeshLambertMaterial({color:0xffffff});

        //生成一个网格,将平面和材质放在一个网格中,组合在一起,组成一个物体

        var plane=new THREE.Mesh(planeGeometry,planeMaterial);

        plane.rotation.x=-0.5*Math.PI;//将平面沿着x轴进行旋转

        plane.position.x=0;

        plane.position.y=0;

        plane.position.z=0;

        plane.receiveShadow=true;//平面进行接受阴影

        var cubeGeometry=new THREE.CubeGeometry(10,10,10);

        var planeMaterial1=new THREE.MeshLambertMaterial({color:0xff0000});

        var cube=new THREE.Mesh(cubeGeometry,planeMaterial1);

        //plane1.rotation.x=-0.5*Math.PI;//将平面沿着x轴进行旋转

        cube.position.x=-4;

        cube.position.y=3;

        cube.position.z=0;

        cube.castShadow=true;//需要阴影,方块进行投射阴影

        var spotLight=new THREE.SpotLight(0xffffff);

        spotLight.position.set(-40,60,-10);

        spotLight.castShadow=true;

        //将相机,渲染器,坐标轴,平面都追加到场景中,然后对场景和相机进行渲染

        scene.add(camera);

        scene.add(render);

        scene.add(axes);

        scene.add(plane);

        scene.add(cube);

        scene.add(spotLight);

        render.render(scene,camera);

        document.getElementById("WebGL-output").append(render.domElement);

    };

    window.onload = init;

</script>

</body>

</html>
在下面demo中,我们引入动画
让场景每隔一段时间进行一次渲染,setInterval方法会指定时间进行一次函数调用,
但是该方法并不考虑浏览器发生的事情,即使你正在浏览其他页面,该方法仍然会每隔固定的时间进行一次调用,
另外该方法并没有跟显示器的重新绘制同步,这将导致较高的cpu使用率
现在的浏览器有了requestAnimationFrame方法
<!DOCTYPE html>

<html>

<head>

    <title>1</title>

    <script type="text/javascript" src="three.js"></script>

    <style>

        body {

            /* set margin to 0 and overflow to hidden, to go fullscreen */

            margin: 0;

            overflow: hidden;

        }

    </style>

</head>

<body>

<!-- Div which will hold the Output -->

<div id="WebGL-output">

</div>

<!-- Javascript code that runs our Three.js examples -->

<script type="text/javascript">

   function init() {

        var scene=new THREE.Scene();//生成一个场景

        //生成一个相机

        var camera=new THREE.PerspectiveCamera(45,window.innerWidth/window.innerHeight,0.1,1000);//视场,长宽比,近面,远面

        camera.position.x=-20;

        camera.position.y=40;

        camera.position.z=30;

        camera.lookAt(scene.position);

        //生成一个渲染器

        var render=new THREE.WebGLRenderer();

        render.setClearColorHex(0xEEEEEE);

        render.setSize(window.innerWidth,window.innerHeight);

        render.shadowMapEnabled=true;//允许阴影映射,渲染阴影需要大量的资源,因此我们需要告诉渲染器我们需要阴影

        //生成一个坐标轴,辅助线

        var axes=new THREE.AxisHelper(20);

        //生成一个平面

        var planeGeometry=new THREE.PlaneGeometry(60,20,10,10);//平面

        //生成一个材质

        var planeMaterial=new THREE.MeshLambertMaterial({color:0xffffff});

        //生成一个网格,将平面和材质放在一个网格中,组合在一起,组成一个物体

        var plane=new THREE.Mesh(planeGeometry,planeMaterial);

        plane.rotation.x=-0.5*Math.PI;//将平面沿着x轴进行旋转

        plane.position.x=0;

        plane.position.y=0;

        plane.position.z=0;

        plane.receiveShadow=true;//平面进行接受阴影

        var cubeGeometry=new THREE.CubeGeometry(10,10,10);

        var planeMaterial1=new THREE.MeshLambertMaterial({color:0xff0000});

        var cube=new THREE.Mesh(cubeGeometry,planeMaterial1);

        //plane1.rotation.x=-0.5*Math.PI;//将平面沿着x轴进行旋转

        cube.position.x=-4;

        cube.position.y=3;

        cube.position.z=0;

        cube.castShadow=true;//需要阴影,方块进行投射阴影

        var spotLight=new THREE.SpotLight(0xffffff);

        spotLight.position.set(-40,60,-10);

        spotLight.castShadow=true;

        //将相机,渲染器,坐标轴,平面都追加到场景中,然后对场景和相机进行渲染

        scene.add(camera);

        scene.add(render);

        scene.add(axes);

        scene.add(plane);

        scene.add(cube);

        scene.add(spotLight);

        document.getElementById("WebGL-output").append(render.domElement);

         renderScene();

        function renderScene(){

            cube.rotation.x+=0.02;

            cube.rotation.y+=0.02;

            cube.rotation.z+=0.02;

            requestAnimationFrame(renderScene);

            render.render(scene,camera);

        }

    }

    window.onload = init;

</script>

</body>

</html>
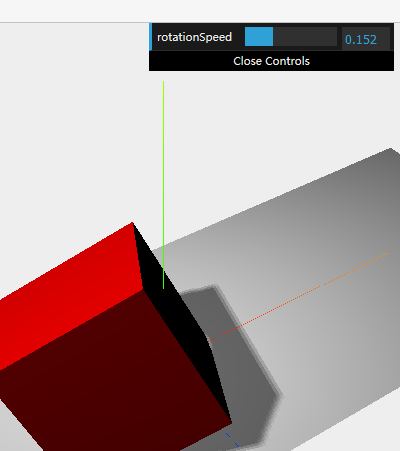
我们使用google创建的dat.GUI库创建一个简单的界面,来控制方块旋转的速度
1 首先引入google的dat.gui.js文件
2 生成一个gui对象
3 定义一个js对象controls,然后再将controls对象传递给dat.gui对象
<!DOCTYPE html>

<html>

<head>

    <title>1</title>

    <script type="text/javascript" src="three.js"></script>

    <script type="text/javascript" src="dat.gui.js"></script>

    <style>

        body {

            /* set margin to 0 and overflow to hidden, to go fullscreen */

            margin: 0;

            overflow: hidden;

        }

    </style>

</head>

<body>

<!-- Div which will hold the Output -->

<div id="WebGL-output">

</div>

<!-- Javascript code that runs our Three.js examples -->

<script type="text/javascript">

   function init() {

        var scene=new THREE.Scene();//生成一个场景

        //生成一个相机

        var camera=new THREE.PerspectiveCamera(45,window.innerWidth/window.innerHeight,0.1,1000);//视场,长宽比,近面,远面

        camera.position.x=-20;

        camera.position.y=40;

        camera.position.z=30;

        camera.lookAt(scene.position);

        //生成一个渲染器

        var render=new THREE.WebGLRenderer();

        render.setClearColorHex(0xEEEEEE);

        render.setSize(window.innerWidth,window.innerHeight);

        render.shadowMapEnabled=true;//允许阴影映射,渲染阴影需要大量的资源,因此我们需要告诉渲染器我们需要阴影

        //生成一个坐标轴,辅助线

        var axes=new THREE.AxisHelper(20);

        //生成一个平面

        var planeGeometry=new THREE.PlaneGeometry(60,20,10,10);//平面

        //生成一个材质

        var planeMaterial=new THREE.MeshLambertMaterial({color:0xffffff});

        //生成一个网格,将平面和材质放在一个网格中,组合在一起,组成一个物体

        var plane=new THREE.Mesh(planeGeometry,planeMaterial);

        plane.rotation.x=-0.5*Math.PI;//将平面沿着x轴进行旋转

        plane.position.x=0;

        plane.position.y=0;

        plane.position.z=0;

        plane.receiveShadow=true;//平面进行接受阴影

        var cubeGeometry=new THREE.CubeGeometry(10,10,10);

        var planeMaterial1=new THREE.MeshLambertMaterial({color:0xff0000});

        var cube=new THREE.Mesh(cubeGeometry,planeMaterial1);

        //plane1.rotation.x=-0.5*Math.PI;//将平面沿着x轴进行旋转

        cube.position.x=-4;

        cube.position.y=3;

        cube.position.z=0;

        cube.castShadow=true;//需要阴影,方块进行投射阴影

        var spotLight=new THREE.SpotLight(0xffffff);

        spotLight.position.set(-40,60,-10);

        spotLight.castShadow=true;

        //将相机,渲染器,坐标轴,平面都追加到场景中,然后对场景和相机进行渲染

        scene.add(camera);

        scene.add(render);

        scene.add(axes);

        scene.add(plane);

        scene.add(cube);

        scene.add(spotLight);

        document.getElementById("WebGL-output").append(render.domElement);

        renderScene();

        function renderScene(){

            cube.rotation.x+=controls.rotationSpeed;

            cube.rotation.y+=controls.rotationSpeed;

            cube.rotation.z+=controls.rotationSpeed;

            requestAnimationFrame(renderScene);

            render.render(scene,camera);

        }

    }

    var controls=new function(){

            this.rotationSpeed=0.02;

    };

    var gui=new dat.GUI();

    gui.add(controls,"rotationSpeed",0,0.5);

    window.onload = init;

</script>

</body>

</html>
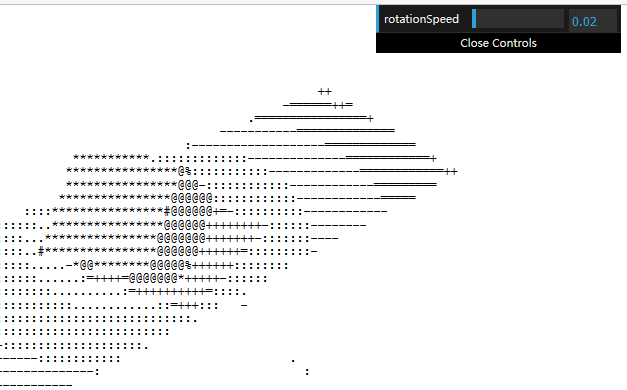
ASCII效果
1 引入AsciiEffect.js
2 生成一个ascii效果
3 页面追加的domElement由渲染器的domElement改成ascii效果的domelement
4 render的话就使用effect的render进行渲染
<!DOCTYPE html>

<html>

<head>

    <title>1</title>

    <script type="text/javascript" src="three.js"></script>

    <script type="text/javascript" src="dat.gui.js"></script>

    <script type="text/javascript" src="AsciiEffect.js"></script>

    <style>

        body {

            /* set margin to 0 and overflow to hidden, to go fullscreen */

            margin: 0;

            overflow: hidden;

        }

    </style>

</head>

<body>

<!-- Div which will hold the Output -->

<div id="WebGL-output">

</div>

<!-- Javascript code that runs our Three.js examples -->

<script type="text/javascript">

   function init() {

        var scene=new THREE.Scene();//生成一个场景

        //生成一个相机

        var camera=new THREE.PerspectiveCamera(45,window.innerWidth/window.innerHeight,0.1,1000);//视场,长宽比,近面,远面

        camera.position.x=-20;

        camera.position.y=40;

        camera.position.z=30;

        camera.lookAt(scene.position);

        //生成一个渲染器

        var render=new THREE.WebGLRenderer();

        render.setClearColorHex(0xEEEEEE);

        render.setSize(window.innerWidth,window.innerHeight);

        render.shadowMapEnabled=true;//允许阴影映射,渲染阴影需要大量的资源,因此我们需要告诉渲染器我们需要阴影

        //生成一个坐标轴,辅助线

        var axes=new THREE.AxisHelper(20);

        //生成一个平面

        var planeGeometry=new THREE.PlaneGeometry(60,20,10,10);//平面

        //生成一个材质

        var planeMaterial=new THREE.MeshLambertMaterial({color:0xffffff});

        //生成一个网格,将平面和材质放在一个网格中,组合在一起,组成一个物体

        var plane=new THREE.Mesh(planeGeometry,planeMaterial);

        plane.rotation.x=-0.5*Math.PI;//将平面沿着x轴进行旋转

        plane.position.x=0;

        plane.position.y=0;

        plane.position.z=0;

        plane.receiveShadow=true;//平面进行接受阴影

        var cubeGeometry=new THREE.CubeGeometry(10,10,10);

        var planeMaterial1=new THREE.MeshLambertMaterial({color:0xff0000});

        var cube=new THREE.Mesh(cubeGeometry,planeMaterial1);

        //plane1.rotation.x=-0.5*Math.PI;//将平面沿着x轴进行旋转

        cube.position.x=-4;

        cube.position.y=3;

        cube.position.z=0;

        cube.castShadow=true;//需要阴影,方块进行投射阴影

        var spotLight=new THREE.SpotLight(0xffffff);

        spotLight.position.set(-40,60,-10);

        spotLight.castShadow=true;

        //将相机,渲染器,坐标轴,平面都追加到场景中,然后对场景和相机进行渲染

        scene.add(camera);

        scene.add(render);

        scene.add(axes);

        scene.add(plane);

        scene.add(cube);

        scene.add(spotLight);

        var effect=new THREE.AsciiEffect(render);

        effect.setSize(window.innerWidth,window.innerHeight);

        document.getElementById("WebGL-output").append(effect.domElement);

        renderScene();

        function renderScene(){

            cube.rotation.x+=controls.rotationSpeed;

            cube.rotation.y+=controls.rotationSpeed;

            cube.rotation.z+=controls.rotationSpeed;

            requestAnimationFrame(renderScene);

            effect.render(scene,camera);

        }

    }

    var controls=new function(){

            this.rotationSpeed=0.02;

    };

    var gui=new dat.GUI();

    gui.add(controls,"rotationSpeed",0,0.5);

    window.onload = init;

</script>

</body>

</html>
-Three.js开发指南---用three.js创建你的第一个三维场景(第一章)的更多相关文章
- Three.js开发指南---使用three.js的材质(第四章)
材质就像物体的皮肤,决定了几何体的外表,例如是否像草地/金属,是否透明,是否显示线框等 一 材质 THREE.js的材质分为多种,Three.js提供了一个材质基类THREE.Material, 该基 ...
- Three.js开发指南---使用three.js里的各种光源(第三章)
本章的主要内容 1 three.js有哪些可用的光源 2 什么时候用什么光源. 3 如何调整配置各种光源 4 如何创建镜头炫光 一 光源 光源大概有7种, 其中基础光源有4种 环境光(AmbientL ...
- Node.js开发指南中的例子(mysql版)
工作原因需要用到nodejs,于是找到了<node.js开发指南>这本书来看看,作者BYVoid 为清华大学计算机系的高材生,年纪竟比我还小一两岁,中华地广物博真是人才辈出,佩服. 言归正 ...
- 学习Nodejs:《Node.js开发指南》微博项目express2迁移至express4过程中填的坑
<Node.js开发指南>项目地址https://github.com/BYVoid/microblog好不容易找到的基础版教程,但书中是基于express2的,而现在用的是express ...
- KeyboardJS 开发指南 - 与 Three.js 配合使用的捕捉键盘组合键库
KeyboardJS 开发指南 - 与 Three.js 配合使用的捕捉键盘组合键库 太阳火神的漂亮人生 (http://blog.csdn.net/opengl_es) 本文遵循"署名-非 ...
- 《Three js开发指南》 PDF
电子版仅供预览及学习交流使用,下载后请24小时内删除,支持正版,喜欢的请购买正版书籍:<Three js开发指南> pdf下载地址:链接: https://pan.baidu.com/s/ ...
- 《node.js开发指南》partial is not defined的解决方案
由于ejs的升级,<node.js开发指南>中使用的 partial 函数已经摒弃,使用foreach,include代替 原来的代码是: <%- partial('listitem ...
- NODE.JS开发指南学习笔记
1.Node.js是什么 Node.js是一个让JS运行在服务器端的开发平台,它可以作为服务器向用户提供服务.Node.js中的javascript只是Core javascript,或者说是ECMA ...
- Node.js 开发指南
1.Node.js 简介 Node.js 其实就是借助谷歌的 V8 引擎,将桌面端的 js 带到了服务器端,它的出现我将其归结为两点: V8 引擎的出色: js 异步 io 与事件驱动给服务器带来极高 ...
随机推荐
- android4.4以上,快捷实现标题栏透明
方法很简单写一个values-v19的文件夹,当安卓版本大于4.4时便会调用该文件夹下的styles.xml文件 结构如图: styles.xml <resources> <!-- ...
- IE6,IE7文档模式下 按钮type=submit在页面打开时会有一条黑线边框的处理方法。(转)
一:按钮border:none:同时使用背景图片来实现border效果. 二:在按钮外面嵌套一层label标签,里面的按钮input[type="submit"]的border:n ...
- Memcache所有方法及参数详解
memcache函数所有的方法列表如下: 参考http://www.php.net/manual/zh/function.Memcache-add.php Memcache::add - 添加一个值, ...
- 强大反调试cm的奇葩破解
系统 : Windows xp 程序 : Crackme-xp 程序下载地址 :http://pan.baidu.com/s/1slUwmVr 要求 : 编写注册机 使用工具 : OD & I ...
- REDIS 主从复制
REDIS目前给出了一个异步的主从复制版本系统.在redis里 提供了几种方式来完成这个工作. 主从复制主要对应在redis/replication.c这个文件里.源码框架里 分为3部分: Mas ...
- QT显示歌词渐变
central = new QWidget(this); setCentralWidget(central); central->setAutoFillBackground(true); cen ...
- Servlet-RequestDispatcher.forward方法
forward方法与Include方法非常相似,但有5点不同 1,在调用forward方法之前,输出缓冲区的数据会被清空,也就是说,在使用forward方法进行请求转发时,只可能输出别转发的web资源 ...
- HomeBrew安装和卸载
HomeBrew——OS X 不可或缺的套件管理器 1.安装,一行代码即可. /usr/bin/ruby -e "$(curl -fsSL https://raw.githubusercon ...
- 有关define定义函数所注意的实例
#define SQR(x) x*x int m=1,k=2; a=SQR(k+m)/SQR(k+m); a=k+m*k+m/k+m*k+m; a=2+1×2+1/2+1×2+1=7.5 #defin ...
- 转载《Android LayoutInflater详解》
在实际开发中LayoutInflater这个类还是非常有用的,它的作用类似于findViewById().不同点是LayoutInflater是用来找res/layout/下的xml布局文件,并且实例 ...