使用SecureCRT的SFTP在WINDOWS与LINUX之间传输文件(转载)
参考文献:
http://ice-k.iteye.com/blog/1068275
http://www.cnblogs.com/chen1987lei/archive/2010/11/26/1888391.html
背景:
方案:
SFTP命令

sftp> help

Available commands:

ascii                          Set transfer mode to ASCII

binary                         Set transfer mode to binary

cd path                        Change remote directory to 'path'

lcd path                       Change local directory to 'path'

detail remote-path             Display system information about remote

                                 file or folder

ldetail local-path             Display system information about local

                                 file or folder

chgrp group path               Change group of file 'path' to 'group'

chmod mode path                Change permissions of file 'path' to 'mode'

chown owner path               Change owner of file 'path' to 'owner'

exit                           Quit sftp

help                           Display this help text

include filename               Include commands from 'filename'

                                 Alternate: < filename

get [-r][-a | -b] remote-path  Download file

                                 -r downloads directory recursively

                                 force ascii (-a) or binary (-b) mode

ln [-s] existingpath linkpath  Hardlink / symlink remote file

ls [options] [path]            Display remote directory listing

lls [options] [path]           Display local directory listing

mkdir path                     Create remote directory

lmkdir path                    Create local directory

mv oldpath newpath             Move remote file

lmv oldpath newpath            Move local file

open [user@]host[:port]        Connect to remote host

put [-r][-a | -b] local-path   Upload file

                                 -r uploads directory recursively

                                 force ascii (-a) or binary (-b) mode

pwd                            Display remote working directory

lpwd                           Print local working directory

quit                           Quit sftp

rename oldname newname         Rename remote file

lrename oldname newname        Rename local file

rmdir path                     Remove remote directory

lrmdir path                    Remove local directory

rm path                        Delete remote file

lrm path                       Delete local file

su username                    Substitutes the current user

                                 This is only supported with VShell for

                                 Windows 3.5 or later.

type [transfer-mode]           Display or set file transfer mode

view remote-path               Download and open file

version                        Display protocol version
翻译一下就是:
sftp-- help

可用命令:

cd 路径                        更改远程目录到“路径”

lcd 路径                       更改本地目录到“路径”

chgrp group path               将文件“path”的组更改为“group”

chmod mode path                将文件“path”的权限更改为“mode”

chown owner path               将文件“path”的属主更改为“owner”

exit                           退出 sftp

help                           显示这个帮助文本

get 远程路径                   下载文件

ln existingpath linkpath       符号链接远程文件

ls [选项] [路径]               显示远程目录列表

lls [选项] [路径]              显示本地目录列表

mkdir 路径                     创建远程目录

lmkdir 路径                    创建本地目录

mv oldpath newpath             移动远程文件

open [用户@]主机[:端口]        连接到远程主机

put 本地路径                   上传文件

pwd                            显示远程工作目录

lpwd                           打印本地工作目录

quit                           退出 sftp

rmdir 路径                     移除远程目录

lrmdir 路径                    移除本地目录

rm 路径                        删除远程文件

lrm 路径                       删除本地文件

symlink existingpath linkpath  符号链接远程文件

version                        显示协议版本
我们主要用到的就是一下六个命令
cd 路径                        更改远程目录到“路径”

lcd 路径                       更改本地目录到“路径”

ls [选项] [路径]               显示远程目录列表

lls [选项] [路径]              显示本地目录列表

put 本地路径                   上传文件

get 远程路径                   下载文件
这里在详细说明一下远程目录和本地目录。
远程目录:ls查看到的是ubuntu虚拟机上面的目录
本地目录:lls查看到的是windows实体机上面的目录。
实例:
假设我需要实现windows下的e:\sftp\test1.txt和ubuntu下/home/enadmin/test2.txt的互换,可以进行一下操作:
put操作:windows->linux
查看目录权限
root@BJCGNMON01:/home# ll

total 20

drwxr-xr-x  5 root    root    4096 Apr 18 15:21 ./

drwxr-xr-x 24 root    root    4096 Jan  3 14:14 ../

drwxr-xr-x  9 enadmin enadmin 4096 Apr 18 15:22 enadmin/

drwxr-xr-x  2 root    root    4096 Apr 18 15:21 sftp/--可以看到sftp的权限是root的

drwxr-xr-x  2 root    root    4096 Apr 18 14:57 test/

root@BJCGNMON01:/home# chown -R enadmin.enadmin sftp/

root@BJCGNMON01:/home# ll

total 20

drwxr-xr-x  5 root    root    4096 Apr 18 15:21 ./

drwxr-xr-x 24 root    root    4096 Jan  3 14:14 ../

drwxr-xr-x  9 enadmin enadmin 4096 Apr 18 15:22 enadmin/

drwxr-xr-x  2 enadmin enadmin 4096 Apr 18 15:21 sftp/--修改以后权限变成enadmin的了

drwxr-xr-x  2 root    root    4096 Apr 18 14:57 test/
拷贝文件
sftp> put test* --初始想将文件从windows系统put到ubuntu系统,发现失败,提示拒绝访问

Uploading test1.txt to /home/test1.txt

put: failed to upload e:/sftp/test1.txt. 拒绝访问。

Uploading test2.txt to /home/test2.txt

put: failed to upload e:/sftp/test2.txt. 拒绝访问。

Uploading test3.txt to /home/test3.txt

put: failed to upload e:/sftp/test3.txt. 拒绝访问。

sftp> pwd --查看当前目录是/home目录,权限是root的

/home

sftp> cd /home/enadmin/ --我切换到enadmin目录下

sftp> ls

Graphs.pm             msmtp                 ntp

sent                  smokeping.tar.gz      smokepingrtt.tar.gz

smokepingrtt2.tar.gz  Target                wqy

wqy-zenhei-0.8.38-1.deb

sftp> lls

test1.txt             test2.txt             test3.txt

sftp> put test* -再次尝试将windows下的文件put到/homg/enadmin目录下,这次成功

Uploading test1.txt to /home/enadmin/test1.txt

  100% 4 bytes      4 bytes/s 00:00:00

e:/sftp/test1.txt: 4 bytes transferred in 0 seconds (4 bytes/s)

Uploading test2.txt to /home/enadmin/test2.txt

  100% 4 bytes      4 bytes/s 00:00:00

e:/sftp/test2.txt: 4 bytes transferred in 0 seconds (4 bytes/s)

Uploading test3.txt to /home/enadmin/test3.txt

  100% 5 bytes      5 bytes/s 00:00:00

e:/sftp/test3.txt: 5 bytes transferred in 0 seconds (5 bytes/s)

sftp> cd /home/sftp/--在修改sftp目录权限以后,再次切换到sftp目录下

sftp> ls

sftp> lls

test1.txt             test2.txt             test3.txt

sftp> put test* --这回put成功。所以跟权限相关

Uploading test1.txt to /home/sftp/test1.txt

  100% 4 bytes      4 bytes/s 00:00:00

e:/sftp/test1.txt: 4 bytes transferred in 0 seconds (4 bytes/s)

Uploading test2.txt to /home/sftp/test2.txt

  100% 4 bytes      4 bytes/s 00:00:00

e:/sftp/test2.txt: 4 bytes transferred in 0 seconds (4 bytes/s)

Uploading test3.txt to /home/sftp/test3.txt

  100% 5 bytes      5 bytes/s 00:00:00

e:/sftp/test3.txt: 5 bytes transferred in 0 seconds (5 bytes/s)
注意点:这里需要注意权限的问题。加入我是使用enadmin账户初始连接ubuntu的,那么我put的文件只能放到文件夹权限是enadmin 的目录下,不能放到文件夹权限是root的目录下。如果想放到文件夹权限是root的目录下,那么初始就使用root账户连接ubunut,然后再创建 sftp会话,这样就可以了。
get操作:linux->windows
get操作没有权限设定
sftp> pwd

/home/enadmin

sftp> lpwd

e:/Documents

sftp> lcd e:/sftp --切换目录

sftp> lls

rc.local              test1.txt             test2.txt

test3.txt

sftp> ls

Graphs.pm             msmtp                 ntp

sent                  smokeping.tar.gz      smokepingrtt.tar.gz

smokepingrtt2.tar.gz  Target                test1.txt

test2.txt             test3.txt             wqy

wqy-zenhei-0.8.38-1.deb

sftp> get Graphs.pm --下载文件到windows

Downloading Graphs.pm from /home/enadmin/Graphs.pm

  100% 13KB     13KB/s 00:00:00

/home/enadmin/Graphs.pm: 13503 bytes transferred in 0 seconds (13 KB/s)

sftp> lls --查看windows目录

Graphs.pm             rc.local              test1.txt

test2.txt             test3.txt

sftp>
使用SecureCRT的SFTP在WINDOWS与LINUX之间传输文件(转载)的更多相关文章
- SecureCRT的SFTP在Windows与Linux之间传输文件
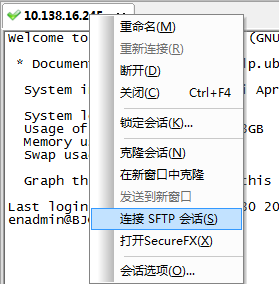
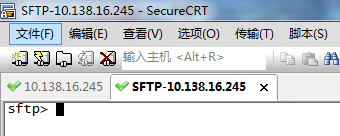
使用SecureCRT软件ssh连接到Linux虚拟机.然后在SecureCRT上面打开SFTP会话
- 使用SecureCRT的SFTP在WINDOWS与LINUX之间传输文件
景: 有一台主机,安装了windows7,在其安装了virtualbox,然后安装了ubuntu虚拟机.在windows7上安装SecureCRT来ssh连接ubuntu虚拟机.一般在windows上 ...
- 如何使用xftp工具在Windows与Linux之间传输文件
如何使用xftp工具在Windows与Linux之间传输文件 整理者:vashon 声明:感谢开源社区 xftp工具是一款SFTP,FTP文件传输软件,可在Windows pc与Unix/Linux之 ...
- 通过SSH实现Windows与linux之间传输文件
Linux是非常好的开发环境,但很多时候我们希望能够在Windows上操作,通过SSH协议可以实现两者之间传输文件. 一 需要在Linux系统上安装ssh-server,有的linux系统自带了. 查 ...
- 用rz,sz命令在windows和linux之间传输文件(转)
转自http://www.linuxmine.com/178.html有很多人没有听说过ZModem协议,更不知道有rz/sz这样方便的工具: 下面一段是从SecureCRT的帮助中copy的: ZM ...
- Windows、Linux之间传输文件的几种方式
常见的文件传输协议有ftp.sftp,sftp就是在ftp的基础上对传输的数据进行了加密. ftp速度快,sftp速度略慢但安全性高. ftp默认使用21端口,sftp默认使用22端口. 我使用的是C ...
- 利用SSH secure Shell实现windows与linux之间传输文件
在windows下安装SSH secure Shell.默认安装后有两个快捷方式. linux下需要安装openssh-server utuntu默认安装了opens是-client,所以不需要安装, ...
- windows与linux之间传输文件
1.使用SSH Secure Shell Client 百度网盘 下载地址 http://pan.baidu.com/s/1kTmp00J 2.使用pscp 百度网盘地址:http://pan.bai ...
- linux CentOS 安装rz和sz命令 lrzsz 实现windows和linux之间的文件上传 下载
https://blog.nbhao.org/1902.html https://bbs.csdn.net/topics/391989523 https://www.cnblogs.com/zhoul ...
随机推荐
- SpringMVC系列之(二) springMVC和Struts异同
Spring MVC属于SpringFrameWork的后续产品,已经融合在Spring Web Flow里面.Spring 框架提供了构建 Web 应用程序的全功能 MVC 模块.使用 Spring ...
- Eclipse 快捷方式 指定 固定 workspace
右点击Eclipse快捷键,然后点击属性, 把目标(target)内容修改如下: clipse -data c:\myworkspace -vm c:\ j2sdk1.5\jre\bin\javaw ...
- 【TCP/IP 协议】 TCP/IP 基础
总结 : 通过学习 TCP/IP 基础, 并总结相关笔记 和 绘制思维导图 到博客上, 对 TCP/IP 框架有了大致了解, 之后开始详细学习数据链路层的各种细节协议, 并作出笔记; 博客地址 : h ...
- iOS中GET 和 POST 数据请求
iOS中GET 和 POST 网络数据请求 同步请求和异步请求的差别: 1.同步请求,有主线程完成网路请求任务,在数据没有请求之前,用户的所有的交互事件应用都无法处理,会造成一种卡顿现象,影响用户体验 ...
- JAVA之旅(十三)——线程的安全性,synchronized关键字,多线程同步代码块,同步函数,同步函数的锁是this
JAVA之旅(十三)--线程的安全性,synchronized关键字,多线程同步代码块,同步函数,同步函数的锁是this 我们继续上个篇幅接着讲线程的知识点 一.线程的安全性 当我们开启四个窗口(线程 ...
- ZooKeeper实现命名服务
使用场景 命名服务就是提供名称的服务,Zookeeper的命名服务有两个应用方面.一个是提供类似JNDI功能,另一个是制作分布式的序列号生成器. JNDI功能,我们利用Zookeep ...
- Hive操作语句实例讲解(帮助你了解 桶 bucket)
http://blog.sina.com.cn/s/blog_66474b16010182yu.html这篇可以较好地理解什么是外部表external #创建表人信息表 person(String ...
- JAVA之旅(三)——数组,堆栈内存结构,静态初始化,遍历,最值,选择/冒泡排序,二维数组,面向对象思想
JAVA之旅(三)--数组,堆栈内存结构,静态初始化,遍历,最值,选择/冒泡排序,二维数组,面向对象思想 我们继续JAVA之旅 一.数组 1.概念 数组就是同一种类型数据的集合,就是一个容器 数组的好 ...
- JAVA之旅(一)——基本常识,JAVA概念,开发工具,关键字/标识符,变量/常量,进制/进制转换,运算符,三元运算
JAVA之旅(一)--基本常识,JAVA概念,开发工具,关键字/标识符,变量/常量,进制/进制转换,运算符,三元运算 Android老鸟重新学一遍JAVA是什么感觉?枯燥啊,乏味啊,而且归纳写博客,都 ...
- 关于React Native 报Export declarations are not supported by current JavaScript version错误的解决问题
设置.js文件默认以jsx的语法打开 在没有进行设置的情况下,每次打开WebStorm的时候打开包含jsx语法的.js文件都会有以下提示: 当然我们点击转换后就可以了,但是每次都会提示,所以还是来一个 ...