Spring,Struts2,MyBatis,Activiti,Maven,H2,Tomcat集成(一)——Maven,Tomcat,Spring集成
1、 创建Maven Web工程
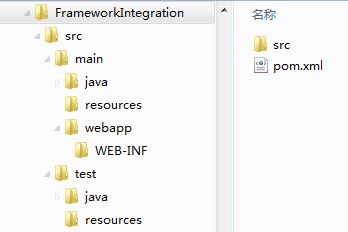
(1) 磁盘上创建Maven工程所需要的文件夹结构如下;
(2) 在与src同级目录中创建pom.xml文件;
<project xmlns="http://maven.apache.org/POM/4.0.0" xmlns:xsi="http://www.w3.org/2001/XMLSchema-instance"

  xsi:schemaLocation="http://maven.apache.org/POM/4.0.0 http://maven.apache.org/maven-v4_0_0.xsd">

  <modelVersion>4.0.0</modelVersion>

  <groupId>com.coshaho</groupId>

  <artifactId>FrameIntegration</artifactId>

  <packaging>war</packaging>

  <version>0.0.1-SNAPSHOT</version>

  <name>FrameIntegration Maven Webapp</name>

  <url>http://maven.apache.org</url>

</project>
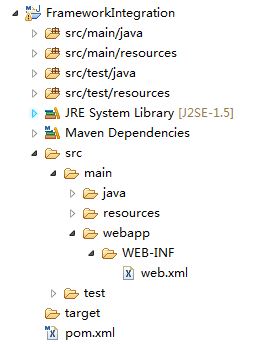
(3) Eclipse导入新建的Maven工程;
(4) 在WEB-INF目录下创建web.xml文件。
<!DOCTYPE web-app PUBLIC

 "-//Sun Microsystems, Inc.//DTD Web Application 2.3//EN"

 "http://java.sun.com/dtd/web-app_2_3.dtd" >

<web-app version="3.0" xmlns="http://java.sun.com/xml/ns/javaee"

     xmlns:xsi="http://www.w3.org/2001/XMLSchema-instance"

     xsi:schemaLocation="http://java.sun.com/xml/ns/javaee

     http://java.sun.com/xml/ns/javaee/web-app_3_0.xsd">

  <display-name>Framework Integration Web Application</display-name>

</web-app>
2、 集成Tomcat
(1) 在pom.xml文件中添加如下配置;
  <!-- 将Web项目自动部署到tomcat服务器的相关 配置信息-->

  <build>

    <!-- 将WebProject项目打包成WebProject.war自动部署到tomcat服务器的webapps目录下面 -->

    <finalName>FrameIntegrationWeb</finalName>

    <resources>

      <resource>

        <directory>src/main/java</directory>

        <includes>

          <include>**/*.properties</include>

          <include>**/*.xml</include>

        </includes>

        <!-- 是否替换资源中的属性-->

        <filtering>false</filtering>

      </resource>

      <resource>

        <directory>src/main/resources</directory>

      </resource>

      <resource>

        <directory>src/main/webapp</directory>

      </resource>

    </resources>

    <plugins>

      <plugin>

        <groupId>org.codehaus.cargo</groupId>

        <artifactId>cargo-maven2-plugin</artifactId>

        <version>1.2.3</version>

        <configuration>

          <container>

            <!-- 指明使用的tomcat服务器版本 -->

            <containerId>tomcat7x</containerId>

            <!--指明tomcat服务器的安装目录 -->

            <home>D:/software/apache-tomcat-7.0.64</home>

          </container>

          <type>existing</type>

          <home>D:/software/apache-tomcat-7.0.64</home>

          <properties>

            <!-- 监听端口配置;方便远程调试 -->

            <cargo.jvmargs>

              -Xdebug

              -Xrunjdwp:transport=dt_socket,server=y,suspend=n,address=8989

            </cargo.jvmargs>

          </properties>

        </configuration>

        <executions>

          <execution>

            <id>cargo-run</id>

            <phase>install</phase>

            <goals>

              <goal>run</goal>

            </goals>

          </execution>

        </executions>

      </plugin>

    </plugins>

  </build>
(2) src/main/webapp目录下添加index.jsp文件;
<html>

<body>

<h2>Web is started successfully!</h2>

</body>

</html>
(3) 测试Tomcat集成效果,eclipse中Run As->Maven install,前台访问http://localhost:8080/FrameIntegrationWeb。
3、 集成spring
(1) 添加Maven依赖(先添加最小依赖包);
<!-- spring4 -->

<!-- spring-core包含spring-core,logging -->

<dependency>

<groupId>org.springframework</groupId>

<artifactId>spring-core</artifactId>

<version>4.1.4.RELEASE</version>

</dependency>

<!-- spring-context包含spring-context, aop, beans, expression, aopalliance -->

<dependency>

<groupId>org.springframework</groupId>

<artifactId>spring-context</artifactId>

<version>4.1.4.RELEASE</version>

</dependency>

<!-- 用于单元测试 -->

<dependency>

<groupId>junit</groupId>

<artifactId>junit</artifactId>

<version>4.12</version>

<scope>test</scope>

</dependency>
(2) 在src/main/resources目录下配置spring.xml文件;
<?xml version="1.0" encoding="UTF-8"?>

<beans xmlns="http://www.springframework.org/schema/beans"

xmlns:xsi="http://www.w3.org/2001/XMLSchema-instance"

xmlns:context="http://www.springframework.org/schema/context"

xsi:schemaLocation="http://www.springframework.org/schema/beans

http://www.springframework.org/schema/beans/spring-beans-3.0.xsd

http://www.springframework.org/schema/context

http://www.springframework.org/schema/context/spring-context-3.0.xsd">

    <!-- 自动扫描com.coshaho.learn下面所有class文件 (自动注入) -->

    <context:component-scan base-package="com.coshaho.learn"/>

</beans>
(3) web.xml文件中配置spring监听器;
<listener>

<listener-class>org.springframework.web.context.ContextLoaderListener</listener-class>

</listener>

<context-param>

<param-name>contextConfigLocation</param-name>

  <param-value>classpath:spring.xml</param-value>

</context-param>
(4) spring测试,写如下测试类并进行单元测试。
a. HelloWorldServiceI.java
package com.coshaho.learn.service;

public interface HelloWorldServiceI

{

    String sayHello();

}
b. HelloWorldServiceImpl.java
package com.coshaho.learn.service.impl;

import org.springframework.stereotype.Service;

import com.coshaho.learn.service.HelloWorldServiceI;

@Service("helloWorldServiceImpl")

public class HelloWorldServiceImpl implements HelloWorldServiceI

{

    public String sayHello()

    {

        return "Hello world, spring!";

    }

}
c. SpringTest.java
package com.coshaho.learn.service.test;

import org.junit.Test;

import org.springframework.context.ApplicationContext;

import org.springframework.context.support.ClassPathXmlApplicationContext;

import com.coshaho.learn.service.HelloWorldServiceI;

public class SpringTest

{

    @Test

    public void helloWorldTest()

    {

        @SuppressWarnings("resource")

        ApplicationContext context = new ClassPathXmlApplicationContext("classpath:spring.xml");

        HelloWorldServiceI helloWorld = (HelloWorldServiceI)context.getBean("helloWorldServiceImpl");

        System.out.println(helloWorld.sayHello());

    }

}
d. Eclipse Run As->Junit Test
Spring,Struts2,MyBatis,Activiti,Maven,H2,Tomcat集成(一)——Maven,Tomcat,Spring集成的更多相关文章
- 手动配置三大框架整合:Spring+Struts2+mybatis
如今主流的项目框架中,数据库持久层有可能不是hibernate,而是mybatis或者ibatis,事实上它们都是一样的,以下我来把环境搭建一下: [导入相关jar包]新建web项目projectms ...
- 整合Spring+Struts2+Mybatis加spring单元测试等
前言 自己是在CentOS7的IntelliJ IDEA里开发的,里面中文输入法有问题经常用不了,所以这里用了很多chinglish,希望不要介意: 一:pom依赖 <?xml version= ...
- 用IntelliJ IDEA 开发Spring+SpringMVC+Mybatis框架 分步搭建一:建立MAVEN Web项目
一:创建maven web项目er
- Spring+SpringMVC+MyBatis+easyUI整合进阶篇(十二)Spring集成Redis缓存
作者:13 GitHub:https://github.com/ZHENFENG13 版权声明:本文为原创文章,未经允许不得转载. 整合Redis 本来以为类似的Redis教程和整合代码应该会很多,因 ...
- spring+struts2+mybatis
struts2.2.3 + spring3.1.0 + mybatis3.1.0集成简单demo 项目下载地址:http://download.csdn.net/detail/afgasdg/4171 ...
- 整合第二次(SSM第一次)------------>spring+struts2+mybatis
今天我们来讲解一下SSM整合,感觉整合这个比上一篇整合更费时,原因在于自己不太熟悉MyBatis了,下午的时候恶补了一下,看了一下相关的文档和PDF电子书,知识真的是你不用就会忘记的,以后还是不能懈怠 ...
- Spring+Struts2+Mybatis框架搭建时的常见典型问题
搭建SSM框架时,总是遇到这样那样的问题,有的一眼就能看出来,有的需要经验的积累.现将自己搭建SSM框架时遇到的典型问题总结如下: 一.Struts2框架下的action中无法使用@Autowired ...
- 6、Spring+Struts2+MyBatis(mybatis有代理)整合增删改查
1.创建如下的oracle脚本 create table userinfo (id ), name ), password telephone ), isadmin )); --4.2 用户表序列 c ...
- 5、Spring+Struts2+MyBatis+分页(mybatis无代理)增删改查
1.创建如下项目结构 2.在src下的com.entity包下创建Dept.java package com.entity; /** * 部门表 * @author Holly老师 * */ publ ...
- Spring+Struts2+Mybatis整合
1. 创建项目 2. 添加Spring能力 使用MyEclipse自动加载Struts2和Spring的jar包和配置文件,并在web.xml文件中添加上下文和监听器 web.xml文件如下: < ...
随机推荐
- 【BZOJ1417】Pku3156 Interconnect 记忆化搜索
[BZOJ1417]Pku3156 Interconnect Description 给出无向图G(V, E). 每次操作任意加一条非自环的边(u, v), 每条边的选择是等概率的. 问使得G连通的期 ...
- IOS控制系统手势返回
self.navigationController.interactivePopGestureRecognizer.enabled = YES; //手势返回的代理,如果自定义了leftButtonI ...
- Mac - Can't connect to local MySQL server through socket '/tmp/mysql.sock' (2)
在终端输入mysql,结果出现 macdeMacBook-Pro:~ mac$ alias mysql=/usr/local/mysql/bin/mysql macdeMacBook-Pro:~ ma ...
- Qt Package Project 打包发布程序
在Qt项目开发完成后,我们想将项目打包发布成一个可执行文件,需要做如下步骤: 首先,将项目中的release文件中的可执行文件拷到一个新建的文件夹中,例如project.exe,用Qt自带的生成必备的 ...
- 关注被关注表设计-UserFollowMapping
-- ---------------------------- -- Table structure for UserFollowMapping -- ------------------------ ...
- Redis之使用python脚本监控队列长度
编辑python脚本redis_conn.py #!/usr/bin/env python #ending:utf-8 import redis def redis_conn(): pool = re ...
- bit 32/64
[asm]64位编译32位汇编需要注意的 汇编语言在32位和64位下有区别 32位的汇编在代码前增加.code32 as可以通过--32指定生成32位汇编 在64位系统下ld链接生成3 ...
- Spark-Cache与Checkpoint
一.Cache缓存操作 scala> val rdd1 = sc.textFile("hdfs://192.168.146.111:9000/logs") rdd1: org ...
- 洛谷P2577 [ZJOI2005]午餐 dp
正解:序列dp 解题报告: 传送门! 这题首先要想到一个显然的贪心:每个窗口的排队顺序都是按照吃饭时间从大到小排序的 证明如下: 这种贪心通常都是用微扰法,这题也不例外 现在假如已经确定了每个窗口有哪 ...
- 分布式网格缓存Coherence简介
Coherence企业级缓存(一) 特点 摘要:Oracle Coherence是一个企业级的分布式集群缓存框架.具有自管理,自恢复,高可用性,高扩展性等优良特点,在电信BOSS等项目中有很大的应用价 ...