
Ant之build.xml配置详解【转】
原文:https://blog.csdn.net/mevicky/article/details/72828554
前言
国内关于build.xml的配置资料太零散了,实在是受不了,故而将自己的笔记整理成博文,方便大家查阅和理解。
build.xml配置参数
构建文件默认叫build.xml,其有很多配置参数。
project
每个构建文件都有一个project标签,有以下属性:
- default:表示默认的运行目标,这个属性是必须的。
- basedir:表示项目的基准目录。
- name:表示项目名。
- description:表示项目的描述。
如下:

每个项目对应一个构建文件,但是如果项目比较复杂,业务线比较多,则有可能对应很多个构建文件,比如:
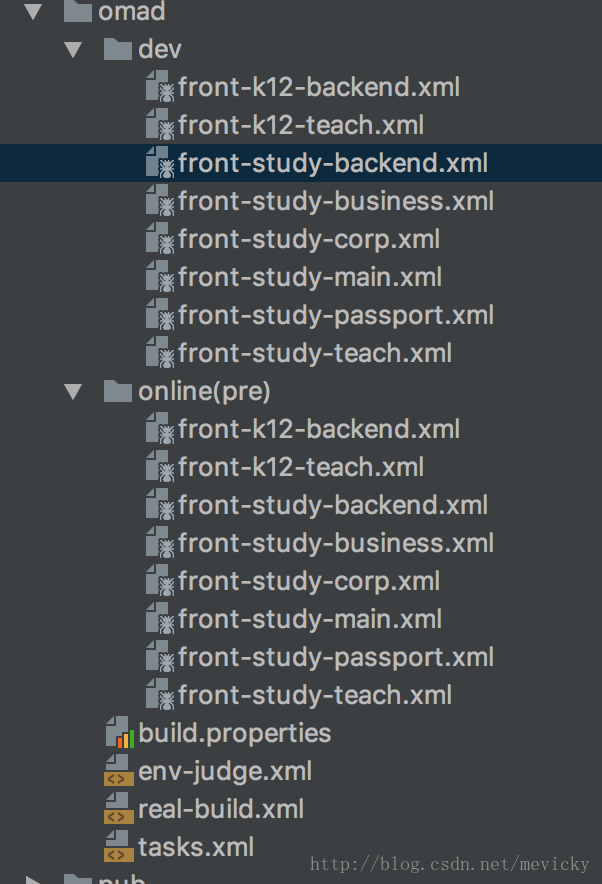
这时我们需要注意,每个构建文件都需要以project标签包含起来。
property
类似于常量,可以供给build.xml中的其他标签使用。有两个特点:
- 大小写敏感
- 不可改变,谁先设定,之后的都不能改变。
该标签可以与多个属性配合使用。
- name和value:
<property name="module_name" value="admin"/>
后面直接使用即可:
<echo message="begin nej-build ${module_name}..."/>
- name和refid:
<property name="srcpath" refid="dao.compile.classpath"/>
其中的dao.compile.classpath在别的地方进行了定义。当然,也可以通过直接引用的方式:
<property name="baseline.dir" value="${ob_baseline.dir}"/>
- name和location:
<property name="srcdir" location="src"/>
将srcdir的值设置为当前文件路径/src。
- file:
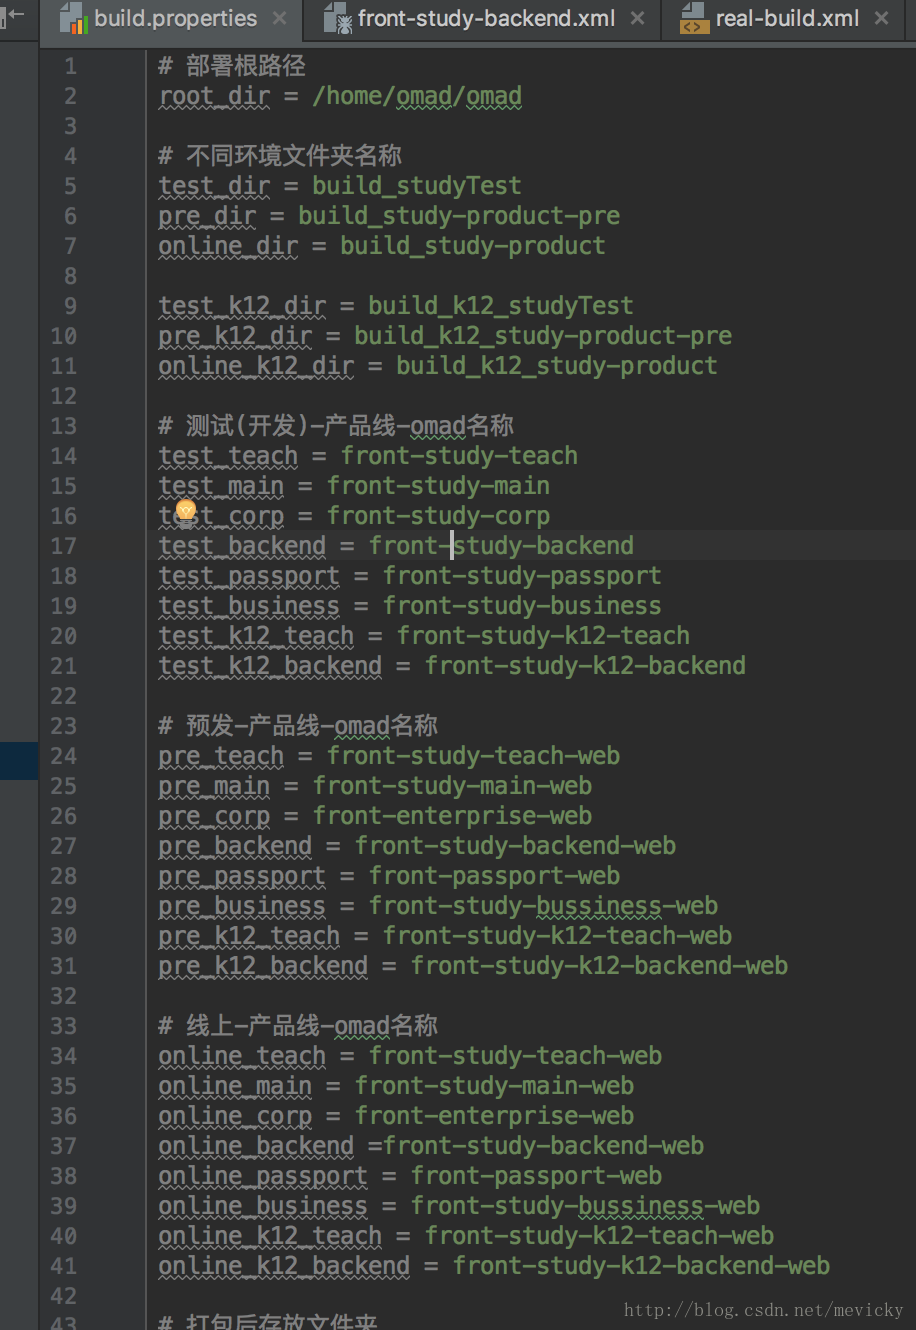
<property file="./omad/build.properties"/>
导入相对文件中的所有变量,这里的build.properties专门用来存放各种变量,示例如下:
url:
<property url="http://www.mysite.com/bla/props/foo.properties"/>
导入对应文件的属性
environment:
<property environment="env"/>
设置系统的环境变量前缀为env。比如
<property name="tomcat.home" value="${env.CATALINA_HOME}"/>
将系统的tomcat安装目录设置到tomcat.home属性中。
import
引入别的xml文件,提高复用性:
<import file="./env-judge.xml"/>

<import file="./tasks.xml"/>
甚至可以批量匹配:
<copy todir="${basedir}/src/html/${html.dir}" overwrite="true" includeEmptyDirs="true">

<fileset dir="${basedir}/lib">

<include name="module-*/**" />

</fileset>

</copy>
target
任务,一个project标签下有一个或多个target标签,代表任务,任务间可以存在依赖关系。有如下属性:
- name:用于标识,这个是必须的
- depends:用来指定所依赖的任务。
<!-- 初始化任务 -->

<target name="init">

<echo message=" init ${init} ..."/>

</target>

<!-- 编译 -->

<target name="compile" depends="init">

<delete dir="${classes.dir}" />

<mkdir dir="${classes.dir}" />

<javac srcdir="${src.dir}" destdir="${classes.dir}">

<classpath refid="master-classpath" />

</javac>

</target>

1

if:当属性设置时才执行该任务。

<target name="sync_module_k12_teach" if="${is_k12_teach}">

<antcall target="sync_module_item">

<param name="html.dir" value="org"/>

</antcall>

</target>

<target name="sync_module_backend" if="${is_backend}">

<antcall target="sync_module_item">

<param name="html.dir" value="admin"/>

</antcall>

</target>

<target name="sync_module_k12_backend" if="${is_k12_backend}">

<antcall target="sync_module_item">

<param name="html.dir" value="admin"/>

</antcall>

</target>
通过判断变量是否存在,执行不同的任务。
- unless:当属性未设置时才执行。
- description:任务描述。
echo
控制台显示
<echo message="begin clean res/module-xx、component-xx、res-base..."/>
delete
删除文件或文件目录,有如下属性
- file:删除文件
- dir:删除目录
- includeEmptyDirs:值得是否删除空目录,默认是true
- failonerror:报错是否停止,默认是true
- verbose:是否列出删除的文件,默认是false
示例如下:
<!--clean other dir-->

<target name="clean_other_dir">

<echo message="begin clean_other_dir..."/>

<delete dir="${basedir}/${compress.dir}"/>

<delete dir="${basedir}/pub"/>

<echo message="begin clean html module-xx..."/>

<delete includeemptydirs="true">

<fileset dir="${basedir}/src/html" >

<include name="**/module-*/**"/>

</fileset>

</delete>

<echo message="begin clean res/module-xx、component-xx、res-base..."/>

<delete includeemptydirs="true">

<fileset dir="${basedir}/res" >

<include name="module-*/**"/>

<include name="component-*/**"/>

<include name="res-base/**"/>

</fileset>

</delete>

</target>
mkdir
创建一个目录
<mkdir dir=”${class.root}”/>
copy
拷贝文件或文件目录,属性如下:
- file:表示源文件。
- tofile:表示目标文件。
- todir:表示目标目录。
- overwrite:是否覆盖目标文件,默认为false。
- includeEmptyDirs:是否拷贝空目录,默认为true。
- failonerror:如目标没有发现是否自动停止,默认值true。
- verbose:是否显示详细信息,默认值false。
示例:
<target name="cp">

<copy todir="${compress.dir}" overwrite="true">

<fileset dir="${ob_baseline.dir}">

<include name="pub/" />

<include name="res/" />

<include name="mail_template/" />

</fileset>

</copy>

</target>
fileset
文件集标签,通常与任务结合来使用,例如上面的copy的demo中,通过将fileset定义的文件路径下的文件,拷贝到todir指定的路径中。
也可以用于批量删除:
<delete includeemptydirs="true">

<fileset dir="${basedir}/src/html" >

<include name="**/module-*/**"/>

</fileset>

</delete>

<echo message="begin clean res/module-xx、component-xx、res-base..."/>

<delete includeemptydirs="true">

<fileset dir="${basedir}/res" >

<include name="module-*/**"/>

<include name="component-*/**"/>

<include name="res-base/**"/>

</fileset>

</delete>
也就是说,但凡遇到文件集操作,都需要用到fileset标签。
exec
用来执行系统命令,或者指定环境的命令。
比如:
<target name="test">

<exec executable="cmd.exe">

<arg line="/c dir"/>

</exec>

</target>
打开命名行,并转到c盘执行dir命令。
能够执行系统命令,就相当于可以执行各种环境比如node、gulp、bower等等:
<!--build style-->

<target name="build_style">

<echo message="begin build_style..."/>

<exec dir="." executable="gulp" failonerror="true">

<arg line="scss"/>

</exec>

</target>

<!--bower cache clean if必须是${]才是判断true,false, 否则只要有设定值即可执行-->

<target name="bower_cache_clean" if="${is_bower_cache_clean}">

<echo message="begin bower_cache_clean ..."/>

<exec dir="." executable="bower" failonerror="true">

<arg line="cache clean" />

</exec>

</target>
antcall
执行某个定义的任务。
<target name="sync_module_teach" if="${is_teach}">

<antcall target="sync_module_item">

<param name="html.dir" value="org"/>

</antcall>

</target>
执行sync_module_item任务,并设置参数html.dir的值为org。
该任务定义如下:
<target name="sync_module_item">

<echo message="begin sync_module ${html.dir}..."/>

<copy todir="${basedir}/src/html/${html.dir}" overwrite="true" includeEmptyDirs="true">

<fileset dir="${basedir}/lib">

<include name="module-*/**" />

</fileset>

</copy>

</target>
或者更为简单的表达:
<target name="deploy">

<echo message="begin auto deploy......"/>

<antcall target="clean"/>

<antcall target="bower_install"/>

<antcall target="cnpm_install"/>

<antcall target="sync_module"/>

<antcall target="build_style"/>

<antcall target="nej_build" />

<antcall target="cp"/>

</target>
parallel
并行执行多个子任务。
<parallel failonany="true">

<antcall target="sync_module_corp"/>

<antcall target="sync_module_main"/>

<antcall target="sync_module_teach"/>

<antcall target="sync_module_backend"/>

<antcall target="sync_module_passport"/>

<antcall target="sync_module_business"/>

<antcall target="sync_module_k12_teach"/>

<antcall target="sync_module_k12_backend"/>

<antcall target="build_style"/>

</parallel>
通过failonany控制如果一个失败,则不执行。通过并行执行,来提升性能,降低构建花费的时间。
regexp
用于正则的定义的使用,可以与matches结合使用。
比如,定义正则:
<regexp id="regexp_env_test" pattern="^${root_dir}/(${test_dir}|${test_k12_dir})/.+"/>

<regexp id="regexp_env_pre" pattern="^${root_dir}/(${pre_dir}|${pre_k12_dir})/.+"/>
通过pattern指定正则内容,通过id标识。
在需要匹配的时候,使用之:
<condition property="is_test">

<matches string="${basedir}">

<regexp refid="regexp_env_test"/>

</matches>

</condition>
condition
用来判断,如果包含的内容符合条件,则将property指定的属性设置为true,否则为false。
比如上面的例子中,就是将basedir变量的值和regexp_env_test对应的正则匹配,如果正确,就将is_test设置为true,然后后面的流程再去判断。
与之配合的标签有很多,下面一一介绍:
- istrue,isfalse:断言
<condition property="is_test_backend">

<and>

<istrue value="${is_test}"/>

<istrue value="${is_backend}"/>

</and>

</condition>
只有is_test和is_backend变量的值均为true,is_test_backend的值才为true。
- and:逻辑与,需要都满足条件才行,如上例所述。
- not:逻辑非,反过来的结果。
- or,xor:逻辑或和逻辑异或。
- isset:指定属性是否存在:
<condition property="scondition">

<!--如果属性name不存在则返回false-->

<isset property="name"/>

</condition>
equils:指定属性是否相等:
<condition property="scondition">

<!--如果arg1的值与arg2的值相等返回true,否则为false-->

<equals arg1="${name}" arg2="this is name"/>

</condition>
filesmatch:指定文件是否相等:
<condition property="scondition">

<!--如果file1所代表的文件与file2所代表的文件相等返回true,否则为false-->

<filesmatch file1="testfile1.txt" file2="testfile2.txt"/>

</condition>
Ant之build.xml配置详解【转】的更多相关文章
- ant+jmeter中build.xml配置详解
- java web.xml配置详解(转)
源出处:java web.xml配置详解 1.常规配置:每一个站的WEB-INF下都有一个web.xml的设定文件,它提供了我们站台的配置设定. web.xml定义: .站台的名称和说明 .针对环境参 ...
- web.xml配置详解之listener
web.xml配置详解之listener 定义 <listener> <listener-class>nc.xyzq.listener.WebServicePublishLis ...
- Spring 入门 web.xml配置详解
Spring 入门 web.xml配置详解 https://www.cnblogs.com/cczz_11/p/4363314.html https://blog.csdn.net/hellolove ...
- tomcat中server.xml配置详解(转载)(一)
转载自:https://www.cnblogs.com/starhu/p/5599773.html tomcat中server.xml配置详解 Tomcat Server的结构图如下:(该文件描述了如 ...
- Web.xml配置详解(转)
Web.xml配置详解 Posted on 2010-09-02 14:09 chinaifne 阅读(295105) 评论(16) 编辑 收藏 1 定义头和根元素 部署描述符文件就像所有XML文件一 ...
- SpringBoot—整合log4j2入门和log4j2.xml配置详解
关注微信公众号:CodingTechWork,一起学习进步. 引言 对于一个线上程序或者服务而言,重要的是要有日志输出,这样才能方便运维.而日志的输出需要有一定的规划,如日志命名.日志大小,日志分 ...
- Tomcat中的Server.xml配置详解
Tomcat中的Server.xml配置详解 Tomcat Server的结构图如下: 该文件描述了如何启动Tomcat Server <Server> <Listener /> ...
- Log4j2详解——XML配置详解
Log4j2详解--XML配置详解 找到了个很详细的文章链接 https://www.jianshu.com/p/bfc182ee33db
随机推荐
- Airtest基本使用
前段时间在博客中见到airtest的介绍,自己并实践了一番,用起来的确很方便,所以今天就来分享下. Airtest简介 Airtest是网易出品的一款基于图像识别和poco控件识别的一款UI自动化测试 ...
- Kosaraju与Tarjan(图的强连通分量)
Kosaraju 这个算法是用来求解图的强连通分量的,这个是图论的一些知识,前段时间没有学,这几天在补坑... 强连通分量: 有向图中,尽可能多的若干顶点组成的子图中,这些顶点都是相互可到达的,则这些 ...
- spring框架加载完成后执行上下文刷新事件(ContextRefreshedEvent)
目前spring框架是j2ee比较常用的项目开发技术,只需在web.xml文件中进行少许配置即可,代码如下所示:<!--spring的配置文件--><context-param> ...
- SpringBoot整合elasticsearch
在这一篇文章开始之前,你需要先安装一个ElasticSearch,如果你是mac或者linux可以参考https://www.jianshu.com/p/e47b451375ea,如果是windows ...
- 简单分析Java中审批业务流程业务原理
- Codeforces.487C.Prefix Product Sequence(构造)
题目链接 \(Description\) 对于一个序列\(a_i\),定义其前缀积序列为\(a_1\ \mathbb{mod}\ n,\ (a_1a_2)\ \mathbb{mod}\ n,...,( ...
- 英语口语练习系列-C30-生日-年历的周日和月份-如果白昼落进
词汇-生日-birthday 生日庆祝 birthday celebration birth noun UK /bɜːθ/ US /bɝːθ/ the time when a baby or youn ...
- Linux之经典互联网架构
经典互联网架构 netstat -tulnp |grep 80ss -tulnp|grep 80 前期铺垫: 1. Linux要能上网2. 掌握Linux软件包安装方法2.1 rpm包管理 2.1.1 ...
- Perfect Service [POJ 3398]
Perfect Service 描述 网络由N个通过N-1个通信链路连接的计算机组成,使得任何两台计算机可以通过独特的路由进行通信.如果两台计算机之间存在通信链路,则称这两台计算机是相邻的.计算机的邻 ...
- innerHTML innerText与outerHTML间的区别
innerHTML与innerText及outerHTML间的区别最容易使初学者搞混淆,为了更好的使读者区分开.下面我就通过一个demo来解释: 代码: <!DOCTYPE html>&l ...