Swagger UI 与SpringMVC的整合
关于 Swagger
Swagger能成为最受欢迎的REST APIs文档生成工具之一,有以下几个原因:
- Swagger 可以生成一个具有互动性的API控制台,开发者可以用来快速学习和尝试API。
- Swagger 可以生成客户端SDK代码用于各种不同的平台上的实现。
- Swagger 文件可以在许多不同的平台上从代码注释中自动生成。
- Swagger 有一个强大的社区,里面有许多强悍的贡献者。
Swagger 文档提供了一个方法,使我们可以用指定的 JSON 或者 YAML 摘要来描述你的 API,包括了比如 names、order 等 API 信息。
你可以通过一个文本编辑器来编辑 Swagger 文件,或者你也可以从你的代码注释中自动生成。各种工具都可以使用 Swagger 文件来生成互动的 API 文档。
Swagger 、SwaggerUI与SpringMVC的整合
1.Maven引入
<dependency>

    <groupId>javax.servlet</groupId>

    <artifactId>javax.servlet-api</artifactId>

    <version>3.1.0</version>

    <scope>provided</scope>

</dependency>

<dependency>

    <groupId>io.springfox</groupId>

    <artifactId>springfox-swagger2</artifactId>

    <version>2.5.0</version>

</dependency>

<dependency>

    <groupId>io.springfox</groupId>

    <artifactId>springfox-swagger-ui</artifactId>

    <version>2.5.0</version>

</dependency>

<dependency>

    <groupId>io.springfox</groupId>

    <artifactId>springfox-staticdocs</artifactId>

    <version>2.5.0</version>

</dependency>

<dependency>

    <groupId>org.hibernate</groupId>

    <artifactId>hibernate-validator</artifactId>

    <version>5.2.4.Final</version>

</dependency>
2.配置webconfig.xml
将 DispatcherServlet 的 url-pattern 改为 /
<servlet>

    <servlet-name>springMvc</servlet-name>

    <servlet-class>org.springframework.web.servlet.DispatcherServlet</servlet-class>

    <init-param>

      <param-name>contextConfigLocation</param-name>

      <param-value>classpath:spring-mvc.xml</param-value>

    </init-param>

    <load-on-startup>1</load-on-startup>

  </servlet>

  <servlet-mapping>

    <servlet-name>springMvc</servlet-name>

    <url-pattern>/</url-pattern>

  </servlet-mapping>
3.在spring-mvc.xml中添加自动扫描
<mvc:annotation-driven  />

    <!-- 自动扫描(自动注入) -->

     <context:component-scan base-package="com.xhl.swagger.api"/>

     <mvc:default-servlet-handler/>
4.新建Swagger配置类
import org.springframework.context.annotation.Bean;

import org.springframework.context.annotation.Configuration;

import org.springframework.web.servlet.config.annotation.ResourceHandlerRegistry;

import org.springframework.web.servlet.config.annotation.WebMvcConfigurerAdapter;

import com.google.common.base.Predicates;

import springfox.documentation.builders.RequestHandlerSelectors;

import springfox.documentation.spi.DocumentationType;

import springfox.documentation.spring.web.plugins.Docket;

import springfox.documentation.swagger2.annotations.EnableSwagger2;

@Configuration

@EnableSwagger2

public class SwaggerConfig extends WebMvcConfigurerAdapter {

     @Bean

        public Docket api() {

            return new Docket(DocumentationType.SWAGGER_2).select()

                    .apis(Predicates.not(RequestHandlerSelectors.basePackage("org.springframework.boot")))

                    .build();

        }

        @Override

        public void addResourceHandlers(ResourceHandlerRegistry registry)

        {

            registry.addResourceHandler("swagger-ui.html").addResourceLocations("classpath:/META-INF/resources/");

            registry.addResourceHandler("/webjars/**").addResourceLocations("classpath:/META-INF/resources/webjars/");

        }

}
5.建测试的Controller和常量
public interface Constants {

    /****** 系统标识符 开始 *********/

    /**

    * 错误 描述

    */

    String MSG_ERROR = "error";

    /**

    * 成功 描述

    */

    String MSG_SUCCESS = "OK";

    /****** 系统状态码 开始 ******/

    /**

    * 请求失败

    */

    int ERROR = 100;

    /**

    * 请求成功

    */

    int SUCCESS = 200;

}
import java.io.Serializable;

import com.fasterxml.jackson.annotation.JsonInclude;

import io.swagger.annotations.ApiModel;

import io.swagger.annotations.ApiModelProperty;

@ApiModel

@JsonInclude(JsonInclude.Include.NON_NULL)

public class Result<T> implements Serializable {

    private static final long serialVersionUID = 1L;

    /** 正常状态为0或200 **/

    @ApiModelProperty(value = "状态代码", name = "状态代码")

    private int code;

    /** 是code异常时,返回的错误信息(app直接显示) **/

    @ApiModelProperty(value = "错误码描述", name = "错误码描述")

    private String message;

    /** 返回的数据对象 **/

    @ApiModelProperty(value = "数据对象", name = "数据对象")

    private T data;

    /** 是code正常时的提示(不为空,app直接展示) **/

    @ApiModelProperty(value = "code正常时的提示信息", name = "code正常时的提示信息")

    private String toast = "";

    /** response中允许 空值,不允许 NULL值出现 **/

    @ApiModelProperty(value = "响应流信息", name = "响应流信息")

    private String response = "";

    public Result() {

    }

    public Result(int code,String message) {

        this.code = code;

        this.message = message;

    }

    public Result(int code,String message,T data) {

        this.code = code;

        this.message = message;

        this.data = data;

    }

    public Result(int code,String message,T data,String toast,String response) {

        this.code = code;

        this.message = message;

        this.data = data;

        this.toast = toast;

        this.response = response;

    }

    public int getCode() {

        return code;

    }

    public void setCode(int code) {

        this.code = code;

    }

    public String getMessage() {

        return message;

    }

    public void setMessage(String message) {

        this.message = message;

    }

    public T getData() {

        return data;

    }

    public void setData(T data) {

        this.data = data;

    }

    public String getToast() {

        return toast;

    }

    public void setToast(String toast) {

        this.toast = toast;

    }

    public String getResponse() {

        return response;

    }

    public void setResponse(String response) {

        this.response = response;

    }

   @Override

    public String toString() {

        return "Result{" +

                "code=" + code +

                ", message='" + message + '\'' +

                ", data=" + data + '\'' +

                ", toast=" + toast + '\'' +

                ", response=" + response +

                '}';

    }

}
@ApiModel(value = "用户信息")

public class UserVo {

    @ApiModelProperty(value = "用户id", required = true)

    private String userId;

    @ApiModelProperty(value = "昵称", required = true)

    private String userName;

    public String getUserId() {

        return userId;

    }

    public void setUserId(String userId) {

        this.userId = userId;

    }

    public String getUserName() {

        return userName;

    }

    public void setUserName(String userName) {

        this.userName = userName;

    }

}
import org.springframework.web.bind.annotation.RequestMapping;
import org.springframework.web.bind.annotation.RequestMethod;
import org.springframework.web.bind.annotation.RequestParam;
import org.springframework.web.bind.annotation.RestController; import com.qdingnet.pcloud.api.common.utils.StringUtils;
import com.qdingnet.pcloud.api.swagger.constants.Constants;
import com.qdingnet.pcloud.api.swagger.constants.Result;
import com.qdingnet.pcloud.api.swagger.vo.UserVo; import io.swagger.annotations.ApiOperation;
import io.swagger.annotations.ApiParam; @RestController
@RequestMapping("/api/json/user")
public class SwaggerController { @RequestMapping(value = "/add", method = RequestMethod.POST)
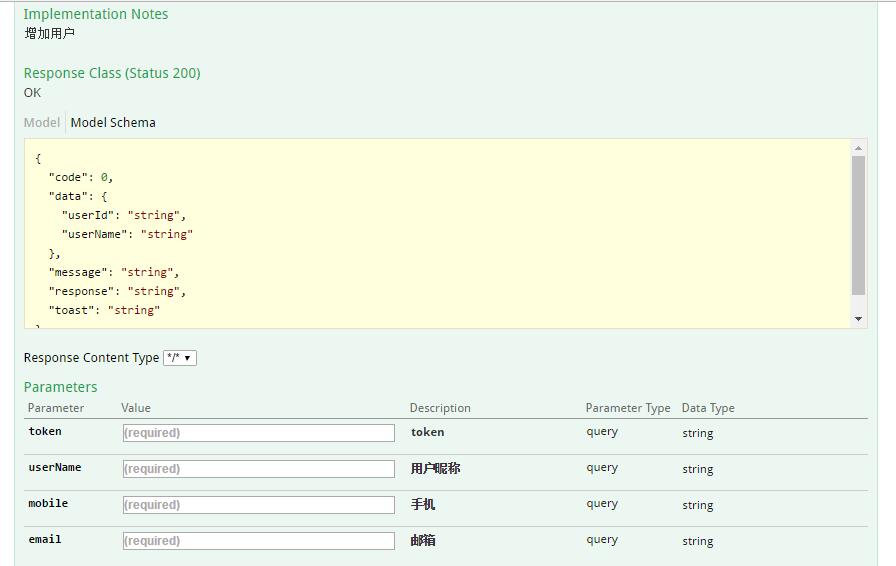
@ApiOperation(value = "添加用户", notes = "增加用户")
public Result<UserVo> add(@ApiParam(name = "token", value = "token",required = true) @RequestParam(name = "token", required = true) String token,
@ApiParam(name = "userName",value = "用户昵称",required = true)@RequestParam(name = "userName",required = true)String userName,
@ApiParam(name = "mobile",value = "手机",required = true)@RequestParam(name = "mobile",required = true)String mobile,
@ApiParam(required = true, name = "email", value = "邮箱") @RequestParam(name = "email", required = true) String email ) {
UserVo userVo = new UserVo();
userVo.setUserId(StringUtils.getUUID());
userVo.setUserName(userName);
return new Result<UserVo>(Constants.SUCCESS,Constants.MSG_SUCCESS,userVo);
} @RequestMapping(value = "/getUser", method = RequestMethod.GET)
@ApiOperation(value = "测试获取用户", notes = "测试获取用户")
public Result<UserVo> getUser() {
UserVo userVo = new UserVo();
userVo.setUserId(StringUtils.getUUID());
userVo.setUserName("测试获取用户");
return new Result<UserVo>(Constants.SUCCESS,Constants.MSG_SUCCESS,userVo);
}
}
6.测试运行
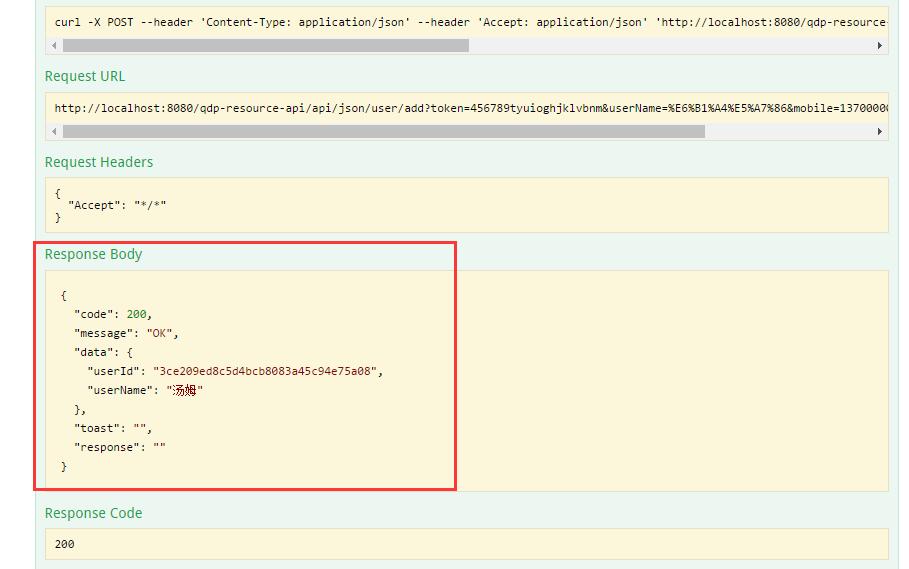
首先通过:http://localhost:8080/工程名/api/json/user/getUser.do 可以访问:
{"code":200,"message":"OK","data":{"userId":"d1239dc4e4164662af754c64e42762cd","userName":"测试获取用户"},"toast":"","response":""}
其次通过:http://localhost:8080/工程名/v2/api-docs 可以查看具体的接口描述信息:

最后通过:http://localhost:8080/工程名/swagger-ui.html 进行访问和测试:

7.如果请求需要带参数的话,Swagger可以直接显示出可以输入请求参数的入口和描述:
请求结果:
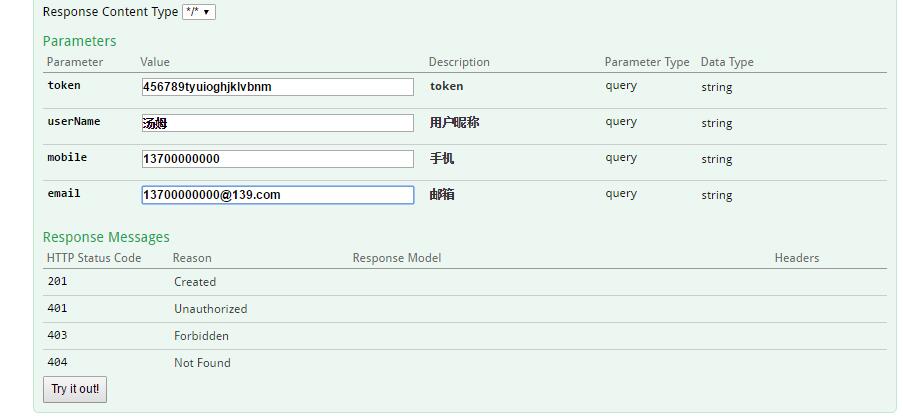
Try it out
Swagger UI 与SpringMVC的整合的更多相关文章
- Swagger UI 与SpringMVC的整合 II
pom.xml <!-- swagger开始 --> <dependency> <groupId>io.springfox</groupId> < ...
- WebApi使用swagger ui自动生成接口文档
之前就写到.最近正在使用webapi.这里介绍一个实用的东西swageer ui现在开发都是前后端分开.我们这里是给前端提供api.有时候对于一个api的描述,并不想专门写一份文档.很浪费时间.swa ...
- SpringMVC+JWT+Swagger UI+RestFul
前言: 其实很早就想写这篇文章了,因为我觉得这会对很多新手有指引作用,当初自己也是瞎子过河的摸索着过来的.目前后台开发比较流行的MVC框架中使用Spring MVC还是比较多的,当然还有Spring ...
- Swagger与SpringMVC项目整合
Swagger与SpringMVC项目整合 来源:http://www.2cto.com/kf/201502/376959.html 为了方便的管理项目中API接口,在网上找了好多关于API接口管理的 ...
- TP框架整合Swagger UI接口文档
1.下载swagger ui:http://swagger.io/swagger-ui/: 2.在应用目录里新建一个目录xxx:如图 3.解压后把dist目录的所有文件拷贝到新建的目录里面: 4.在新 ...
- SpringMVC融合Swagger UI使用
相信大家都很熟悉springmvc,在用其进行开发工作的时候,有没有遇到几个小问题?比如: 1.前后端分离的模式下,前端开发人员如何得知后端的开发进度,有哪些接口可用? 2.后端开发人员在测试自己的接 ...
- 使用 Swagger UI 与 Swashbuckle 创建 RESTful Web API 帮助文件
作者:Sreekanth Mothukuru 2016年2月18日 本文旨在介绍如何使用常用的 Swagger 和 Swashbuckle 框架创建描述 Restful API 的交互界面,并为 AP ...
- sonne_game网站开发03 spring-mvc+freemarker整合
今天的任务就是在spring+mybatis+springmvc的基础上,将freemarker整合进来. freemarker是什么? freemarker是一种模板引擎.它的目的是基于模板和数据, ...
- IDEA下使用maven构建web项目(SpringMVC+Mybatis整合)
需求背景:由于最近总是接到一些需求,需要配合前端团队快速建设移动端UI应用或web应用及后台业务逻辑支撑的需求,若每次都复用之前复杂业务应用的项目代码,总会携带很多暂时不会用到的功能或组件,这样的初始 ...
随机推荐
- BZOJ2616 : SPOJ PERIODNI
长为$A$,宽为$B$的矩阵放$K$个车的方案数$=C(A,K)\times C(B,K)\times K!$. 建立笛卡尔树,那么左右儿子独立,设$f[i][j]$表示$i$子树内放$j$个车的方案 ...
- 新浪SAE创建微信模板消息应用与SVN的使用
本地项目源文件必须放在应用名目录下面的数字目录里面.如:D:\SVN\xtmp1\1 我们在前面讲述在新浪SAE中如何建站,今天我们来详解如何上传文件.新浪SAE中是不允许用FTP来上传的.我们只能用 ...
- Alpha冲刺(4/10)——2019.4.27
所属课程 软件工程1916|W(福州大学) 作业要求 Alpha冲刺(4/10)--2019.4.27 团队名称 待就业六人组 1.团队信息 团队名称:待就业六人组 团队描述:同舟共济扬帆起,乘风破浪 ...
- Selenium Java环境配置
Selenium Java环境配置 上次配置的是C#的环境,今天主要来配置一下Java环境. 首先,对于java环境配置最基础的JDK和JRE 先前我做过配置,这里就不重述了,网上的教程超级多.在基础 ...
- oracle日常查看
--全部表空间的大小select tablespace_name, sum(bytes)/1024/1024 from dba_data_files group by tablespace_name; ...
- Codefoces909E Coprocessor(拓扑排序)
http://codeforces.com/problemset/problem/909/E 由于分了两个queue,所以push的时候可以统一操作,不会影响彼此.两个queue相当于是平等的,只是q ...
- 广告行业中常说的 CPC,CPM,CPD,CPT,CPA,CPS 等词的意思是什么?
广告投放流程主要分为展示和转化,CPC/CPM/CPD/CPT/CPA/CPS等代表的是不同的结算模式 展示端的结算方式有: CPM(Cost Per Mille) 每千人成本:只要向足够量级的用户展 ...
- Initialize a vector in C++ (5 different ways)
https://www.geeksforgeeks.org/initialize-a-vector-in-cpp-different-ways/ Following are different way ...
- 【ASP.NET Core】浅说目录浏览
何谓“浅说”?就是一句话说不完,顶多两句话就介绍完毕,然后直接给上实例的解说方式.化繁为简,从七千年前到现在,从老祖宗到咱们,一直都在追求的理想目标,尽可能把复杂的东西变成简单的. 老周告诉你一个可以 ...
- <climits>头文件定义的符号常量
<climits>头文件定义的符号常量 CHAR_MIN char的最小值 SCHAR_MAX signed char 最大值 SCHAR_MIN signed char 最小值 ...