
『计算机视觉』Mask-RCNN_训练网络其三:训练Model
Github地址:Mask_RCNN
『计算机视觉』Mask-RCNN_论文学习
『计算机视觉』Mask-RCNN_项目文档翻译
『计算机视觉』Mask-RCNN_推断网络其一:总览
『计算机视觉』Mask-RCNN_推断网络其二:基于ReNet101的FPN共享网络
『计算机视觉』Mask-RCNN_推断网络其三:RPN锚框处理和Proposal生成
『计算机视觉』Mask-RCNN_推断网络其四:FPN和ROIAlign的耦合
『计算机视觉』Mask-RCNN_推断网络其五:目标检测结果精炼
『计算机视觉』Mask-RCNN_推断网络其六:Mask生成
『计算机视觉』Mask-RCNN_推断网络终篇:使用detect方法进行推断
『计算机视觉』Mask-RCNN_锚框生成
『计算机视觉』Mask-RCNN_训练网络其一:数据集与Dataset类
『计算机视觉』Mask-RCNN_训练网络其二:train网络结构&损失函数
『计算机视觉』Mask-RCNN_训练网络其三:训练Model
一、模型初始化
1、创建模型并载入预训练参数
准备了数据集后,我们开始构建model,training网络结构上一节已经介绍完了,现在我们看一看训练时如何调用training结构的网络。
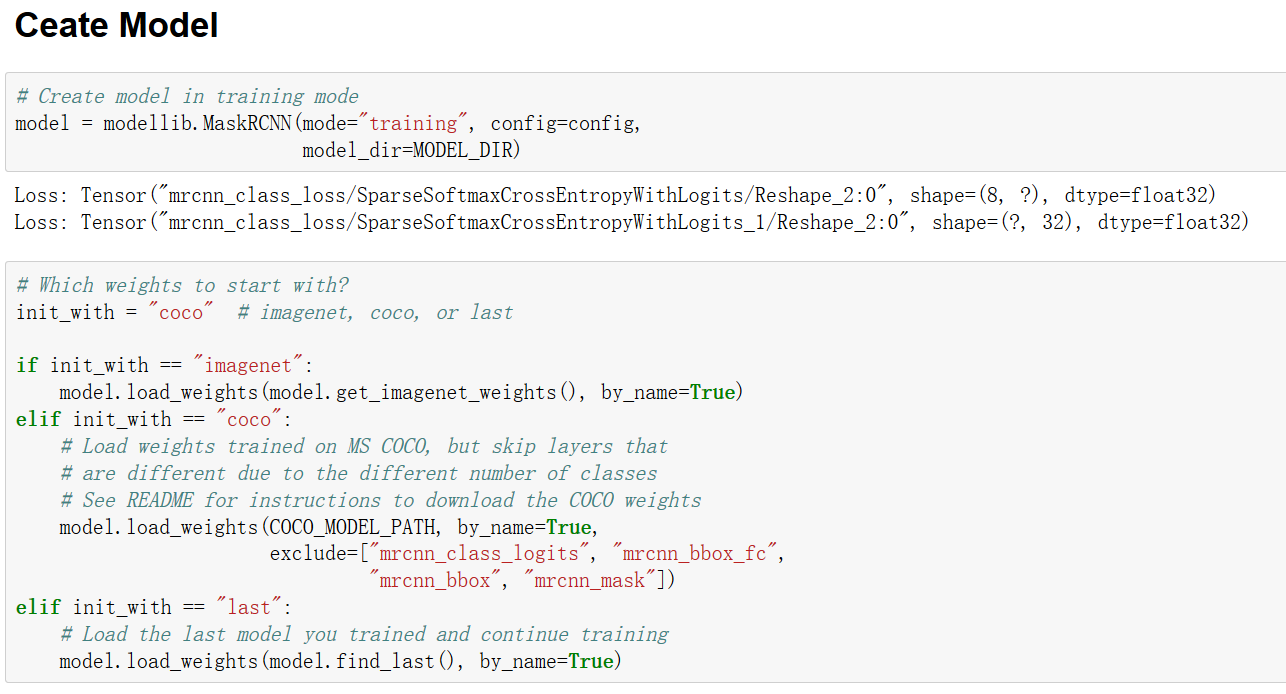
如上所示,我们首先建立图结构(详见上节『计算机视觉』Mask-RCNN_训练网络其二:train网络结构),然后选择初始化参数方案
例子(train_shape.ipynb)中使用的是COCO预训练模型,如果想要"Finds the last checkpoint file of the last trained model in the
model directory",那么选择"last"选项。
载入参数方法如下,注意几个之前接触不多的操作,
- 载入h5文件使用模块为h5py
- keras model有属性.layers以list形式返回全部的层对象
keras.engine下的saving模块load_weights_from_hdf5_group_by_name按照名字对应,而load_weights_from_hdf5_group按照记录顺序对应
    def load_weights(self, filepath, by_name=False, exclude=None):

        """Modified version of the corresponding Keras function with

        the addition of multi-GPU support and the ability to exclude

        some layers from loading.

        exclude: list of layer names to exclude

        """

        import h5py

        # Conditional import to support versions of Keras before 2.2

        # TODO: remove in about 6 months (end of 2018)

        try:

            from keras.engine import saving

        except ImportError:

            # Keras before 2.2 used the 'topology' namespace.

            from keras.engine import topology as saving

        if exclude:

            by_name = True

        if h5py is None:

            raise ImportError('`load_weights` requires h5py.')

        f = h5py.File(filepath, mode='r')

        if 'layer_names' not in f.attrs and 'model_weights' in f:

            f = f['model_weights']

        # In multi-GPU training, we wrap the model. Get layers

        # of the inner model because they have the weights.

        keras_model = self.keras_model

        layers = keras_model.inner_model.layers if hasattr(keras_model, "inner_model")\

            else keras_model.layers

        # Exclude some layers

        if exclude:

            layers = filter(lambda l: l.name not in exclude, layers)

        if by_name:

            saving.load_weights_from_hdf5_group_by_name(f, layers)

        else:

            saving.load_weights_from_hdf5_group(f, layers)

        if hasattr(f, 'close'):

            f.close()

        # Update the log directory

        self.set_log_dir(filepath)
2、从h5文件一窥load模式
keras model的层
对于layer对象我们有一下几点说明
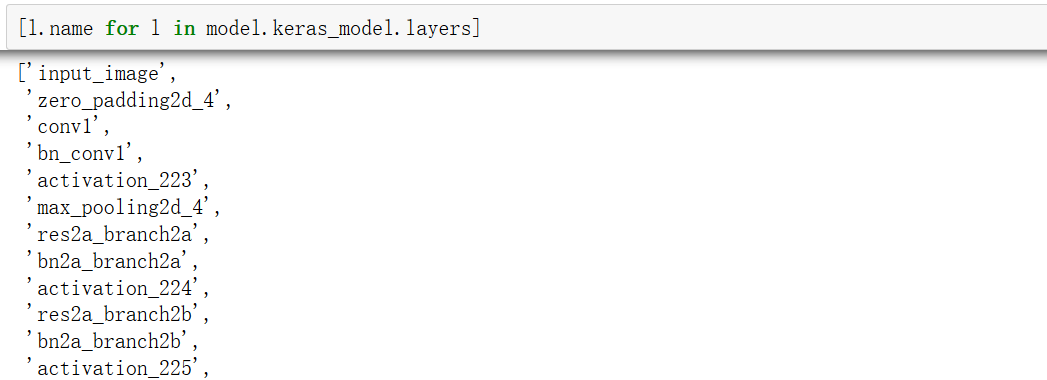
layer.name:查询层对象的节点名称
layer.trainable:层对象是否可训练
对于TimeDistributed对象,其.layer方法返回对象才是我们要设定的层对象
载入模型并查看layers如下,
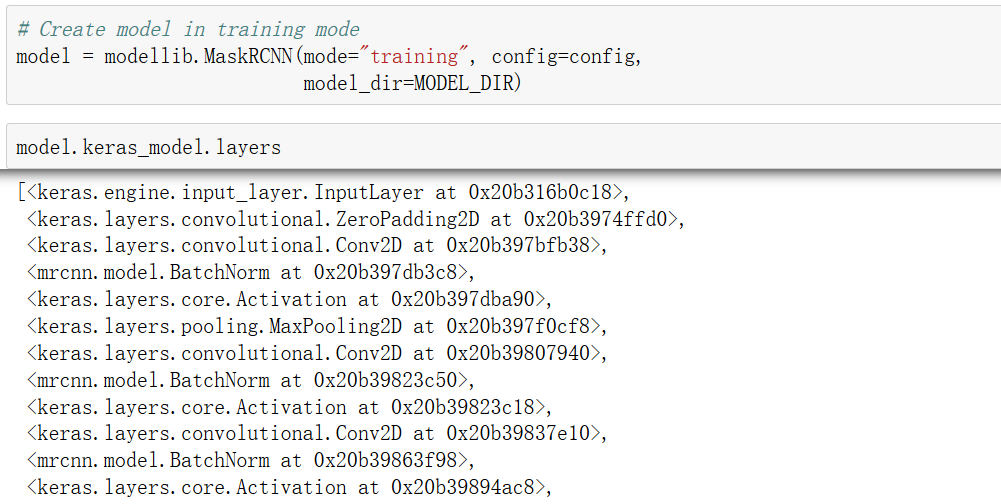
查看名称如下,名称即我们在build函数中为每个层设置的名称,和TensorFlow一样,参数载入依赖于此。
h5 文件记录
载入h5文件并查看,f.attrs记录了三个值,第一个为字符串list,后两个均为字符串,对于"layer_names"我们如下尝试,其记录了各个层的name字符串(h5记录的都是二进制形式,需要转码)
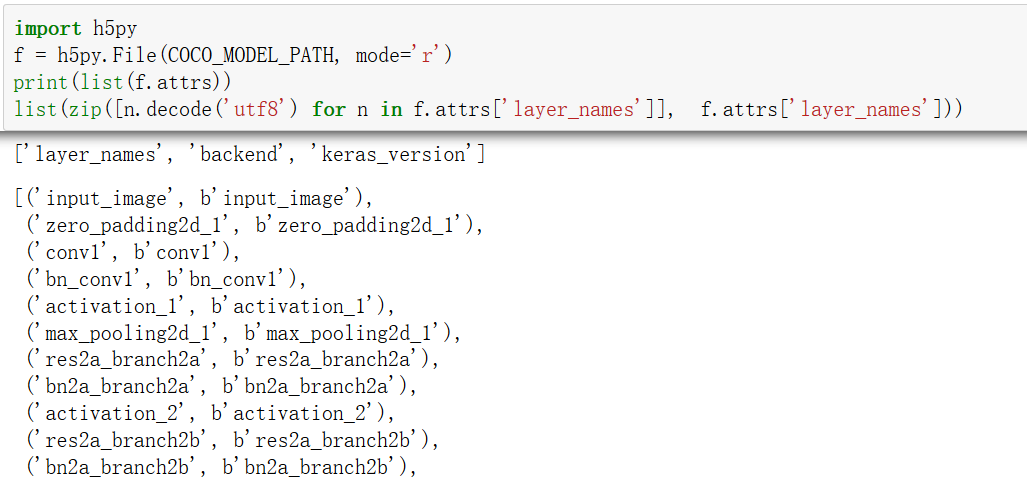
在keras.engine的saving方法中,可以看到后两个记录的解析,实际测试一个是keras的版本号,一个会返回b'tensorflow'
        if 'keras_version' in f.attrs:

        original_keras_version = f.attrs['keras_version'].decode('utf8')

    else:

        original_keras_version = '1'

    if 'backend' in f.attrs:

        original_backend = f.attrs['backend'].decode('utf8')

    else:

        original_backend = None
"layer_names"记录的字符串们可以视为h5文件索引,其索引对象为子h5对象,子h5对象有attrs:"weight_names",也是字符串list,可以索引子h5对象,其索引出的便是参数值,示意如下:
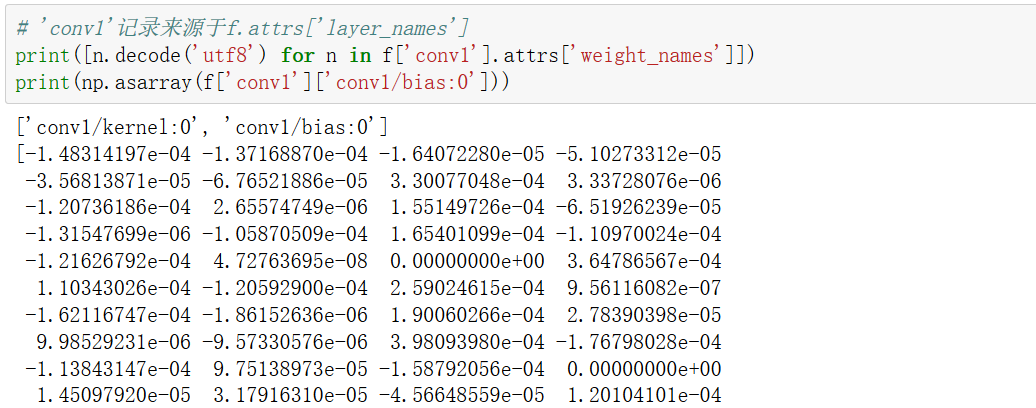
实际的载入参数时,keras API已经封装的很好了,不需要我们自己取对应h5中的名称和网络中的名称,然后更新参数值。交由saving.load_weights_from_hdf5_group_by_name(f, layers),输入f句柄,输入需要载入参数的层对象即可对应名字完成载入。
二、模型训练
本部不讲解网络结构,主要介绍的是训练步骤,网络结构介绍见:『计算机视觉』Mask-RCNN_训练网络其二:train网络结构
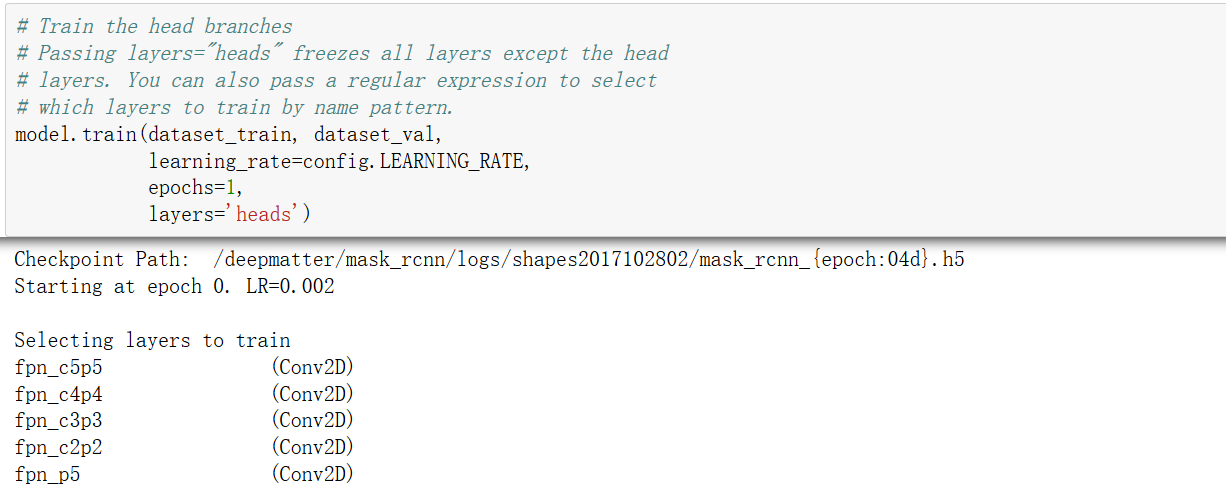
模型训练有两种模式,
Only the heads. Here we're freezing all the backbone layers and training only the randomly initialized layers (i.e. the ones that we didn't use pre-trained weights from MS COCO). To train only the head layers, pass
layers='heads'to thetrain()function.Fine-tune all layers. For this simple example it's not necessary, but we're including it to show the process. Simply pass
layers="allto train all layers.
1、train方法文档
train方法声明如下
def train(self, train_dataset, val_dataset, learning_rate, epochs, layers,

              augmentation=None, custom_callbacks=None, no_augmentation_sources=None)
文档说明如下
"""Train the model.
   train_dataset, val_dataset: Training and validation Dataset objects.
   learning_rate: The learning rate to train with
   epochs: Number of training epochs. Note that previous training epochs
           are considered to be done alreay, so this actually determines
           the epochs to train in total rather than in this particaular
           call.
   layers: Allows selecting which layers to train. It can be:
       - A regular expression to match layer names to train
       - One of these predefined values:
         heads: The RPN, classifier and mask heads of the network
         all: All the layers
         3+: Train Resnet stage 3 and up
         4+: Train Resnet stage 4 and up
         5+: Train Resnet stage 5 and up
   augmentation: Optional. An imgaug (https://github.com/aleju/imgaug)
       augmentation. For example, passing imgaug.augmenters.Fliplr(0.5)
       flips images right/left 50% of the time. You can pass complex
       augmentations as well. This augmentation applies 50% of the
       time, and when it does it flips images right/left half the time
       and adds a Gaussian blur with a random sigma in range 0 to 5.

           augmentation = imgaug.augmenters.Sometimes(0.5, [
               imgaug.augmenters.Fliplr(0.5),
               imgaug.augmenters.GaussianBlur(sigma=(0.0, 5.0))
           ])
custom_callbacks: Optional. Add custom callbacks to be called
    with the keras fit_generator method. Must be list of type keras.callbacks.
   no_augmentation_sources: Optional. List of sources to exclude for
       augmentation. A source is string that identifies a dataset and is
       defined in the Dataset class.
"""
2、模型准备&数据准备
首先对模型设置进行准备。
- 指定训练层时既可以输入层名层,也可以输入预定的字符串,输入预定字符串则其解析规则见下面开头几行。最终获取layers变量记录要训练层的名字(或者正则表达式)
- 然后准备数据,data_generator函数涉及预处理流程很繁琐(见model.py),可以自行查阅
- 生成文件保存目录
        assert self.mode == "training", "Create model in training mode."

        # Pre-defined layer regular expressions

        layer_regex = {

            # all layers but the backbone

            "heads": r"(mrcnn\_.*)|(rpn\_.*)|(fpn\_.*)",

            # From a specific Resnet stage and up

            "3+": r"(res3.*)|(bn3.*)|(res4.*)|(bn4.*)|(res5.*)|(bn5.*)|(mrcnn\_.*)|(rpn\_.*)|(fpn\_.*)",

            "4+": r"(res4.*)|(bn4.*)|(res5.*)|(bn5.*)|(mrcnn\_.*)|(rpn\_.*)|(fpn\_.*)",

            "5+": r"(res5.*)|(bn5.*)|(mrcnn\_.*)|(rpn\_.*)|(fpn\_.*)",

            # All layers

            "all": ".*",

        }

        if layers in layer_regex.keys():

            layers = layer_regex[layers]

        # Data generators

        train_generator = data_generator(train_dataset, self.config, shuffle=True,

                                         augmentation=augmentation,

                                         batch_size=self.config.BATCH_SIZE,

                                         no_augmentation_sources=no_augmentation_sources)

        val_generator = data_generator(val_dataset, self.config, shuffle=True,

                                       batch_size=self.config.BATCH_SIZE)

        # Create log_dir if it does not exist

        if not os.path.exists(self.log_dir):

            os.makedirs(self.log_dir)
3、model处理
这里主要的步骤就是
- 将前一步的可训练层名称传入函数self.set_trainable(layers),设置对应层对象的trainable属性为True
- self.compile方法设定优化器,综合各个loss给出整体优化对象,最后编译model
        # Callbacks

        callbacks = [

            keras.callbacks.TensorBoard(log_dir=self.log_dir,

                                        histogram_freq=0, write_graph=True, write_images=False),

            keras.callbacks.ModelCheckpoint(self.checkpoint_path,

                                            verbose=0, save_weights_only=True),

        ]

        # Add custom callbacks to the list

        if custom_callbacks:

            callbacks += custom_callbacks

        # Train

        log("\nStarting at epoch {}. LR={}\n".format(self.epoch, learning_rate))

        log("Checkpoint Path: {}".format(self.checkpoint_path))

        self.set_trainable(layers)

        self.compile(learning_rate, self.config.LEARNING_MOMENTUM)

        # Work-around for Windows: Keras fails on Windows when using

        # multiprocessing workers. See discussion here:

        # https://github.com/matterport/Mask_RCNN/issues/13#issuecomment-353124009

        if os.name is 'nt':

            workers = 0

        else:

            workers = multiprocessing.cpu_count()  # 单机默认为0
self.compile方法
    def compile(self, learning_rate, momentum):

        """Gets the model ready for training. Adds losses, regularization, and

        metrics. Then calls the Keras compile() function.

        """

        # Optimizer object

        optimizer = keras.optimizers.SGD(

            lr=learning_rate, momentum=momentum,

            clipnorm=self.config.GRADIENT_CLIP_NORM)

        # Add Losses

        # First, clear previously set losses to avoid duplication

        self.keras_model._losses = []

        self.keras_model._per_input_losses = {}

        loss_names = [

            "rpn_class_loss",  "rpn_bbox_loss",

            "mrcnn_class_loss", "mrcnn_bbox_loss", "mrcnn_mask_loss"]

        for name in loss_names:

            layer = self.keras_model.get_layer(name)

            if layer.output in self.keras_model.losses:

                continue

            loss = (

                tf.reduce_mean(layer.output, keep_dims=True)

                * self.config.LOSS_WEIGHTS.get(name, 1.))

            self.keras_model.add_loss(loss)

        # Add L2 Regularization

        # Skip gamma and beta weights of batch normalization layers.

        reg_losses = [

            keras.regularizers.l2(self.config.WEIGHT_DECAY)(w) / tf.cast(tf.size(w), tf.float32)

            for w in self.keras_model.trainable_weights

            if 'gamma' not in w.name and 'beta' not in w.name]

        self.keras_model.add_loss(tf.add_n(reg_losses))

        # Compile

        self.keras_model.compile(

            optimizer=optimizer,

            loss=[None] * len(self.keras_model.outputs))

        # Add metrics for losses

        for name in loss_names:

            if name in self.keras_model.metrics_names:

                continue

            layer = self.keras_model.get_layer(name)

            self.keras_model.metrics_names.append(name)

            loss = (

                tf.reduce_mean(layer.output, keepdims=True)

                * self.config.LOSS_WEIGHTS.get(name, 1.))

            self.keras_model.metrics_tensors.append(loss)
self.set_trainable方法
    def set_trainable(self, layer_regex, keras_model=None, indent=0, verbose=1):

        """Sets model layers as trainable if their names match

        the given regular expression.

        """

        # Print message on the first call (but not on recursive calls)

        if verbose > 0 and keras_model is None:

            log("Selecting layers to train")

        keras_model = keras_model or self.keras_model

        # In multi-GPU training, we wrap the model. Get layers

        # of the inner model because they have the weights.

        layers = keras_model.inner_model.layers if hasattr(keras_model, "inner_model")\

            else keras_model.layers

        for layer in layers:

            # Is the layer a model?

            if layer.__class__.__name__ == 'Model':  # 不同层隶属不同的class,但Model class是单一的

                print("In model: ", layer.name)

                self.set_trainable(

                    layer_regex, keras_model=layer, indent=indent + 4)

                continue

            if not layer.weights:

                continue

            # Is it trainable?

            trainable = bool(re.fullmatch(layer_regex, layer.name))

            # Update layer. If layer is a container, update inner layer.

            if layer.__class__.__name__ == 'TimeDistributed':

                layer.layer.trainable = trainable

            else:

                layer.trainable = trainable

            # Print trainable layer names

            if trainable and verbose > 0:

                log("{}{:20}   ({})".format(" " * indent, layer.name,

                                            layer.__class__.__name__))
4、训练model
最简单的一步了,调用keras接口训练即可,上一步定义的callbacks也是在这里传入
        self.keras_model.fit_generator(

            train_generator,

            initial_epoch=self.epoch,

            epochs=epochs,

            steps_per_epoch=self.config.STEPS_PER_EPOCH,

            callbacks=callbacks,

            validation_data=val_generator,

            validation_steps=self.config.VALIDATION_STEPS,

            max_queue_size=100,

            workers=workers,

            use_multiprocessing=True,

        )

        self.epoch = max(self.epoch, epochs)
至此,train方法便自动的开始了模型的训练工作。
『计算机视觉』Mask-RCNN_训练网络其三:训练Model的更多相关文章
- 『计算机视觉』经典RCNN_其二:Faster-RCNN
项目源码 一.Faster-RCNN简介 『cs231n』Faster_RCNN 『计算机视觉』Faster-RCNN学习_其一:目标检测及RCNN谱系 一篇讲的非常明白的文章:一文读懂Faster ...
- 『计算机视觉』经典RCNN_其一:从RCNN到Faster-RCNN
RCNN介绍 目标检测-RCNN系列 一文读懂Faster RCNN 一.目标检测 1.两个任务 目标检测可以拆分成两个任务:识别和定位 图像识别(classification)输入:图片输出:物体的 ...
- 『计算机视觉』Mask-RCNN_推断网络其二:基于ReNet101的FPN共享网络暨TensorFlow和Keras交互简介
零.参考资料 有关FPN的介绍见『计算机视觉』FPN特征金字塔网络. 网络构架部分代码见Mask_RCNN/mrcnn/model.py中class MaskRCNN的build方法的"in ...
- 『计算机视觉』Mask-RCNN_推断网络其四:FPN和ROIAlign的耦合
一.模块概述 上节的最后,我们进行了如下操作获取了有限的proposal, # [IMAGES_PER_GPU, num_rois, (y1, x1, y2, x2)] # IMAGES_PER_GP ...
- 『计算机视觉』Mask-RCNN
一.Mask-RCNN流程 Mask R-CNN是一个实例分割(Instance segmentation)算法,通过增加不同的分支,可以完成目标分类.目标检测.语义分割.实例分割.人体姿势识别等多种 ...
- 『计算机视觉』Mask-RCNN_训练网络其二:train网络结构&损失函数
Github地址:Mask_RCNN 『计算机视觉』Mask-RCNN_论文学习 『计算机视觉』Mask-RCNN_项目文档翻译 『计算机视觉』Mask-RCNN_推断网络其一:总览 『计算机视觉』M ...
- 『计算机视觉』Mask-RCNN_训练网络其一:数据集与Dataset类
Github地址:Mask_RCNN 『计算机视觉』Mask-RCNN_论文学习 『计算机视觉』Mask-RCNN_项目文档翻译 『计算机视觉』Mask-RCNN_推断网络其一:总览 『计算机视觉』M ...
- 『计算机视觉』Mask-RCNN_推断网络其六:Mask生成
一.Mask生成概览 上一节的末尾,我们已经获取了待检测图片的分类回归信息,我们将回归信息(即待检测目标的边框信息)单独提取出来,结合金字塔特征mrcnn_feature_maps,进行Mask生成工 ...
- 『计算机视觉』Mask-RCNN_推断网络其三:RPN锚框处理和Proposal生成
一.RPN锚框信息生成 上文的最后,我们生成了用于计算锚框信息的特征(源代码在inference模式中不进行锚框生成,而是外部生成好feed进网络,training模式下在向前传播时直接生成锚框,不过 ...
随机推荐
- java框架之Shiro-安全/权限框架
准备 简介 Apache Shiro 是 Java 的一个安全(权限)框架. Shiro 不仅可以用在 JavaSE 环境,也可以用在 JavaEE 环境. Shiro 可以完成:认证.授权.加密.会 ...
- java之动态代理
摘要 相比于静态代理,动态代理避免了开发人员编写各个繁锁的静态代理类,只需简单地指定一组接口及目标类对象就能动态的获得代理对象. 这里说的静态代理可以理解为之前使用的装饰者模式,从之前使用装饰者模式实 ...
- python 关于 input
name = input("请输入你的姓名:") print(name) 解释:input表示输入,当你输入一个名字的时候, 它打印出来的东西,也就是你输入的东西, 结果: 请输入 ...
- 【Python】-NO.97.Note.2.Python -【Python 基本数据类型】
1.0.0 Summary Tittle:[Python]-NO.97.Note.2.Python -[Python 基本数据类型] Style:Python Series:Python Since: ...
- JavaBean持久化
JavaBean持久化并不局限于Swing构件的存储,可以使用该机制存储任意对象的集合,只要遵守一些简单的规则即可. XMLEncoder内置了对下列类型的支持: ●null ●所有基本类型及其包装器 ...
- maven pom添加oracle11驱动
参考这篇文章 https://blog.csdn.net/youren_zt/article/details/60132324 OracleJDBC驱动包是需要Oracle官方授权才能被下载.mave ...
- 计算一个字符串的每个字符出现的次数案例——Map集合
其中,字符的包装类是Character;字符串包装类是String: 遍历字符串转换的数组,每个元素都是一个字符,看创建的这个集合有木有,一开始肯定是没有的其实,字符作为key,所以判断的是这个创建的 ...
- nor flash与nand flash启动的简单比较--APPLE的ARM学习笔记一
2010-10-08 22:26:00 A,nor flash与nand flash的一些区别 1)接口区别: NOR FLASH地址线和数据线分开,来了地址和控制信号,数据就出来. NAND Fla ...
- 浮点数(double、float)的格式化问题及处理
---恢复内容开始--- 平时常会面临浮点数的格式处理问题,下面就举例说一说常见的问题及处理: 1,科学计数法问题 一个浮点数123456789.10,在打印的时候变成了1.234567891E8,处 ...
- Redis学习-list数据类型
list类型是一个链表结构,主要功能有push,pop等.而且list是一个双向链表,可以通过相关操作进行集合的头部或者尾部添加,删除元素. lpush key string 在key对应的list的 ...