SpringBoot mybatis配置
首先pom.xml
 <!-- mybatis 配置 -->

        <dependency>

            <groupId>org.mybatis.spring.boot</groupId>

            <artifactId>mybatis-spring-boot-starter</artifactId>

            <version>1.3.0</version>

        </dependency>

        <dependency>

            <groupId>mysql</groupId>

            <artifactId>mysql-connector-java</artifactId>

        </dependency>
application.properties
#mysql配置

spring.datasource.chen.jdbc-url=jdbc:mysql://localhost:3306/chen?serverTimezone=Asia/Shanghai

spring.datasource.chen.username=root

spring.datasource.chen.password=root

#mysql-connector-java 6中的

spring.datasource.chen.driver-class-name=com.mysql.cj.jdbc.Driver
配置DataSource
package com.example.demo.configuration;

import org.springframework.boot.context.properties.ConfigurationProperties;

import org.springframework.boot.jdbc.DataSourceBuilder;

import org.springframework.context.annotation.Bean;

import org.springframework.context.annotation.Configuration;

import javax.sql.DataSource;

@Configuration

public class DataSourceConfig {

    @Bean(name = "dataSource")

    @ConfigurationProperties(prefix = "spring.datasource.chen")

    public DataSource chenDataSource() {

        return DataSourceBuilder.create().build();

    }

}
新增DTO实体类
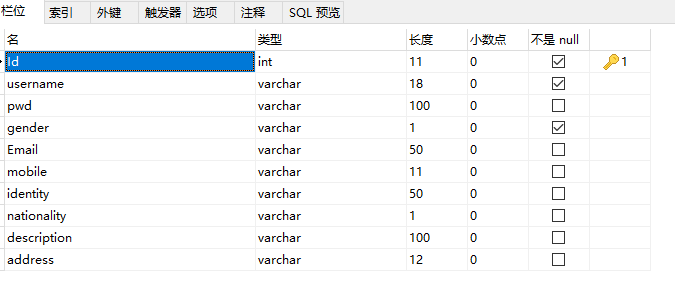
package com.example.demo.biz.dto;

public class User {

    private int id;

    private String userName;

    private String passWord;

    private String gender;

    private String email;

    private String mobile;

    private String identity;

    private String nationality;

    private String description;

    private String address;

    public int getId() {

        return id;

    }

    public void setId(int id) {

        this.id = id;

    }

    public void setUserName(String userName) {

        this.userName = userName;

    }

    public String getUserName() {

        return userName;

    }

    public String getPassWord() {

        return passWord;

    }

    public void setPassWord(String passWord) {

        this.passWord = passWord;

    }

    public String getGender() {

        return gender;

    }

    public String getEmail() {

        return email;

    }

    public String getMobile() {

        return mobile;

    }

    public String getIdentity() {

        return identity;

    }

    public String getNationality() {

        return nationality;

    }

    public String getDescription() {

        return description;

    }

    public String getAddress() {

        return address;

    }

    public void setGender(String gender) {

        this.gender = gender;

    }

    public void setEmail(String email) {

        this.email = email;

    }

    public void setMobile(String mobile) {

        this.mobile = mobile;

    }

    public void setIdentity(String identity) {

        this.identity = identity;

    }

    public void setNationality(String nationality) {

        this.nationality = nationality;

    }

    public void setDescription(String description) {

        this.description = description;

    }

    public void setAddress(String address) {

        this.address = address;

    }

    @Override

    public String toString() {

        return "User{" +

                "id=" + id +

                ", userName='" + userName + '\'' +

                ", passWord='" + passWord + '\'' +

                ", gender='" + gender + '\'' +

                ", email='" + email + '\'' +

                ", mobile='" + mobile + '\'' +

                ", identity='" + identity + '\'' +

                ", nationality='" + nationality + '\'' +

                ", description='" + description + '\'' +

                ", address='" + address + '\'' +

                '}';

    }

}
新增DAO层:
package com.example.demo.biz.dao;

import com.example.demo.biz.dto.User;

import org.apache.ibatis.annotations.Param;

import org.springframework.stereotype.Repository;

import java.util.List;

/**

 * xml  形式配置

 */

@Repository

public interface UserMapper {

    List<User> getAll();

    User getOne(int id);

    void insertUser(User user);

    void deleteUserById(int id);

    /**

     * 动态sql

     * @param sql

     * @return

     */

    List<User> queyrUserList(String sql);

    /**

     * 动态sql

     * @param sql

     * @return

     */

    List<User> queyrUserList2(@Param("querySql") String sql);

}
添加xml方式配置
#mybatis xml配置

mybatis.config-location=classpath:mybatis/mybatis-config.xml

mybatis.mapper-locations=classpath:mybatis/mapper/*.xml
添加sqlmap.xml
<?xml version="1.0" encoding="UTF-8" ?>

<!DOCTYPE configuration PUBLIC "-//mybatis.org//DTD Config 3.0//EN" "http://mybatis.org/dtd/mybatis-3-config.dtd">

<configuration>

    <settings>

        <!--当返回行的所有列都是空时,MyBatis默认返回null  注意pom.xml :mybatis 1.3.0-->

        <setting name="returnInstanceForEmptyRow" value="true"/>

        <!-- 显示查询语句 -->

        <setting name="logImpl" value="STDOUT_LOGGING" />

        <!--是否使用缓存-->

        <setting name="cacheEnabled" value="true" />

        <!-- 懒加载 -->

        <setting name="lazyLoadingEnabled" value="true" />

        <!--是否允许单条sql 返回多个数据集  (取决于驱动的兼容性) default:true-->

        <setting name="multipleResultSetsEnabled" value="true"/>

        <!--是否可以使用列的别名 (取决于驱动的兼容性) default:true-->

        <setting name="useColumnLabel" value="true"/>

    </settings>

    <!--

      3.typeAliases:起别名的标签

          typeAlias:为某个java类型起别名

              type:指定要起别名的全类名,默认别名就是类小写,(但是其实他是不区分大小写的,也就是说你全部大写也没问题)

              alias:新的别名

          package:为某个包下的类批量起别名(这个会存在的一个问题就是可能会重复,重复的情况下还可以用@Alias来解决)

              name:指定包名(这个就相当于是为这个包下的所有的类都创建了一个默认的别名)

      当然还有一个起别名的方式就是在实体上使用@Alias来起别名

      注:起别名看自己的情况,推荐还是在mapper文件中使用全类名

  -->

    <typeAliases>

        <typeAlias alias="Integer" type="java.lang.Integer" />

        <typeAlias alias="Long" type="java.lang.Long" />

        <typeAlias alias="HashMap" type="java.util.HashMap" />

        <typeAlias alias="LinkedHashMap" type="java.util.LinkedHashMap" />

        <typeAlias alias="ArrayList" type="java.util.ArrayList" />

        <typeAlias alias="LinkedList" type="java.util.LinkedList" />

    </typeAliases>

</configuration>
<?xml version="1.0" encoding="UTF-8"?>

<!DOCTYPE mapper PUBLIC "-//mybatis.org//DTD Mapper 3.0//EN" "http://mybatis.org/dtd/mybatis-3-mapper.dtd">

<mapper namespace="com.example.demo.biz.dao.UserMapper">

    <resultMap id="BaseResultMap" type="com.example.demo.biz.dto.User" >

        <id column="id" property="id" jdbcType="INTEGER" />

        <result column="username" property="userName" jdbcType="VARCHAR" />

        <result column="pwd" property="passWord" jdbcType="VARCHAR" />

        <result column="gender" property="gender" jdbcType="VARCHAR"/>

        <result column="email" property="email" jdbcType="VARCHAR" />

        <result column="mobile" property="mobile" jdbcType="VARCHAR" />

        <result column="identity" property="identity" jdbcType="VARCHAR" />

        <result column="nationality" property="nationality" jdbcType="VARCHAR" />

        <result column="description" property="description" jdbcType="VARCHAR" />

        <result column="address" property="address" jdbcType="VARCHAR" />

    </resultMap>

    <sql id="Base_Column_List">

        id, username, pwd, gender, email,mobile,identity,address

    </sql>

    <select id="getAll" resultMap="BaseResultMap">

        SELECT

        <include refid="Base_Column_List"/>

        FROM c_tbl_users

    </select>

    <select id="getOne" parameterType="java.lang.Long" resultMap="BaseResultMap" >

        SELECT

        <include refid="Base_Column_List"/>

        FROM c_tbl_users

        WHERE id = #{id}

    </select>

    <insert id="insertUser" parameterType="com.example.demo.biz.dto.User">

       insert into c_tbl_users (username,pwd,gender,email,mobile,identity,address)

       values(#{userName},#{passWord},#{gender},#{email},#{mobile},#{identity},#{address})

    </insert>

    <delete id="deleteUserById" parameterType="Integer">

        delete t from c_tbl_users t where t.id=#{id}

    </delete>

    <select id="queyrUserList" parameterType="java.lang.String" resultMap="BaseResultMap">

        ${value1}

    </select>

    <select id="queyrUserList2" parameterType="java.lang.String" resultMap="BaseResultMap">

        ${querySql}

    </select>

</mapper>
注意:dao包扫描
@SpringBootApplication

//@EnableScheduling

@MapperScan("com.example.demo.biz.dao")

public class DemoApplication {

    public static void main(String[] args) {

        SpringApplication.run(DemoApplication.class, args);

    }

}
测试:
package com.example.demo.biz;

import com.example.demo.biz.dao.UserMapper;

import org.junit.Test;

import org.junit.runner.RunWith;

import org.springframework.beans.factory.annotation.Autowired;

import org.springframework.boot.test.context.SpringBootTest;

import org.springframework.test.context.junit4.SpringRunner;

import javax.sql.DataSource;

@RunWith(SpringRunner.class)

@SpringBootTest

public class UserTest {

    @Autowired

    protected UserMapper userMapper;

    @Autowired

    DataSource dataSource;

    @Test

    public void test1(){

        System.out.println("dataSource = "+dataSource);

    }

    @Test

    public void test2(){

        System.out.println(userMapper.getAll());

    }

}
运行test2:

SpringBoot mybatis配置的更多相关文章
- SpringBoot+Mybatis配置Pagehelper分页插件实现自动分页
SpringBoot+Mybatis配置Pagehelper分页插件实现自动分页 **SpringBoot+Mybatis使用Pagehelper分页插件自动分页,非常好用,不用在自己去计算和组装了. ...
- springboot + mybatis配置分页插件
一:使用pagehelper配置分页插件 1:首先配置springboot +mybatis框架 参考:http://www.cnblogs.com/liyafei/p/7911549.html 2 ...
- SpringBoot+MyBatis配置多数据源
SpringBoot 可以支持多数据源,这是一个非常值得学习的功能,但是从现在主流的微服务的架构模式中,每个应用都具有唯一且准确的功能,多数据源的需求很难用到,考虑到实际情况远远比理论复杂的多,这里还 ...
- springboot + mybatis配置多数据源示例
转:http://www.jb51.net/article/107223.htm 在实际开发中,我们一个项目可能会用到多个数据库,通常一个数据库对应一个数据源. 代码结构: 简要原理: 1)Datab ...
- spring-boot mybatis配置
接着我们的spring boot项目,spring boot如何使用mybatis访问数据库呢? 个人习惯使用mapper接口和xml配置sql,从pom.xml入手 1.1 添加依赖 <dep ...
- springboot+mybatis 配置sql打印日志
第一种: 配置类型 # 配置slq打印日志 logging.level.com.lawt.repository.mapper=debug重点: #其中 com.lawt.repository.ma ...
- SpringBoot MyBatis 配置多数据源 (静态多个)
转载地址:https://www.jianshu.com/p/118ca1d5ecf9?utm_campaign=haruki&utm_content=note&utm_medium= ...
- SpringBoot集成mybatis配置
一个有趣的现象:传统企业大都喜欢使用hibernate,互联网行业通常使用mybatis:之所以出现这个问题感觉与对应的业务有关,比方说,互联网的业务更加的复杂,更加需要进行灵活性的处理,所以myba ...
- 转-spring-boot 注解配置mybatis+druid(新手上路)-http://blog.csdn.net/sinat_36203615/article/details/53759935
spring-boot 注解配置mybatis+druid(新手上路) 转载 2016年12月20日 10:17:17 标签: sprinb-boot / mybatis / druid 10475 ...
随机推荐
- sale.order
# 初始化一个变量用来记录产品类型line_type = ''# 循环明细行for product in self.options: # 拿到该明细行的产品类型 product_type = prod ...
- Django + Axios & Ajax post和get 传参
话说千遍淡如水,不如代码来一通. Axios post: let params = new URLSearchParams(); params.append('id',xx) axios({ ur ...
- Python 总结
python3.7下载地址 Python安装pip 1.首先检查linux有没有安装python-pip包,直接执行 yum install python-pip 2.没有python-pip包就执行 ...
- Java发送邮件功能
package com.hd.all.test.testjava; import java.util.Properties; import javax.mail.Address; import jav ...
- 如何用VSCode手动编译Ace Editor
对于习惯微软VS的用户,可能很不习惯开源社区兴起的前端开发流程.随着NodeJs的兴起,JavaScript已经成为Github上开源项目最多的语言.使用微软提供的VSCode可以很好地利用这些开源项 ...
- sublime-text3打造markdown编辑器
编辑插件 sublime自带的markdown语法高亮并不是很友好,推荐安装Markdown Editing,github主页然后在视图->语法里选择MarkdownEditing启用,支持三种 ...
- Django框架详细介绍---模型---ORM
一.概述 ORM(Object Relational Mapping),全称:对象关系映射,简单的说就是通过创建类.实例化出对象的方法,使得类.对象.对象的属性能够和数据库中的表.记录.字段意义对应. ...
- GreenDao 使用和数据库升级
1使用方法 一.添加依赖 在bulid.gradle文件下的dependencies下添加所需依赖 compile 'org.greenrobot:greendao:3.2.2' // add l ...
- 对字符串md5加密
public String getMD5(String str) { try { // 生成一个MD5加密计算摘要 MessageDigest md = MessageDigest.getInstan ...
- Django之CBV源码解析
l链接跳转:https://www.cnblogs.com/hnlmy/p/9662798.html 以及https://www.cnblogs.com/hnlmy/p/10603999.html