利用STM32CubeMX来生成USB_HID_Mouse工程【添加ADC】(2)【非dma和中断方式】
上回讲到怎么采集一路的adc的数据,这次我们来采集两路的数据。
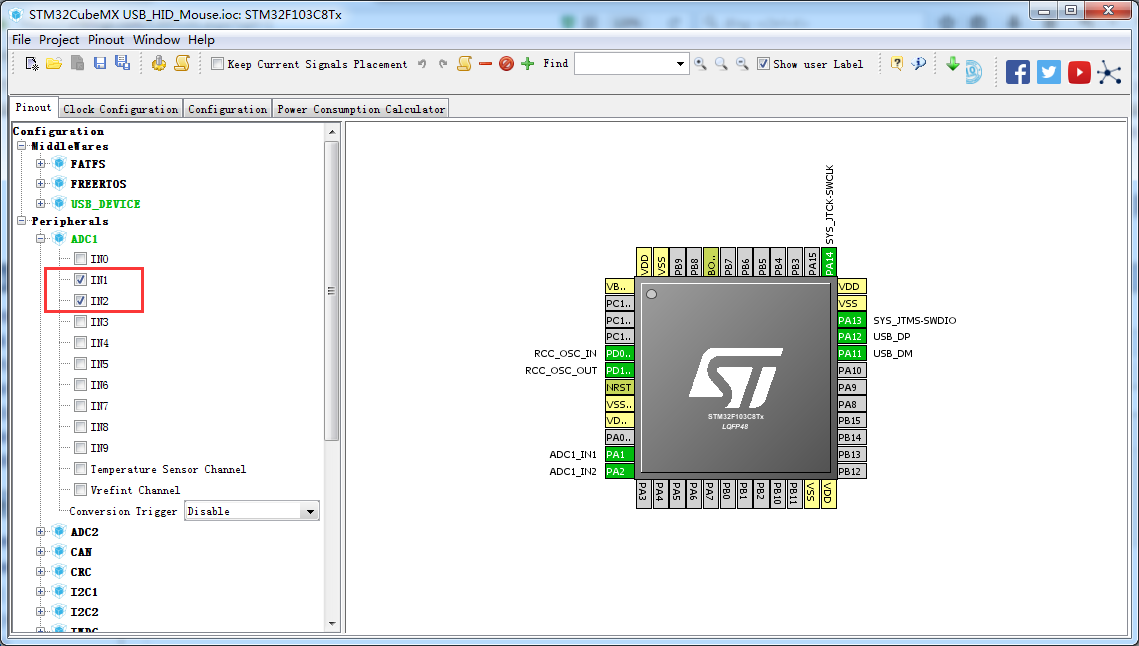

现在直接修改原先的代码
/* Private variables ---------------------------------------------------------*/

uint16_t AD_Value_Buf[];

uint16_t AD_X_Value = ;

uint16_t AD_Y_Value = ;

/* USER CODE END PV */
/* USER CODE BEGIN 3 */

  for(uint8_t i=;i<;i++)

  {

      /*##-1- Start the conversion process #######################################*/

    HAL_ADC_Start(&hadc1);//<为启动ADC装换

    /*##-2- Wait for the end of conversion #####################################*/

    /**

     *   Before starting a new conversion, you need to check the current state of

     *   the peripheral; if it’s busy you need to wait for the end of current

     *   conversion before starting a new one.

     *   For simplicity reasons, this example is just waiting till the end of the

     *   conversion, but application may perform other tasks while conversion

     *   operation is ongoing.

     */

    HAL_ADC_PollForConversion(&hadc1, );//<表示等待转换完成,第二个参数表示超时时间,单位ms.

    /* Check if the continous conversion of regular channel is finished */

    if(HAL_IS_BIT_SET(HAL_ADC_GetState(&hadc1), HAL_ADC_STATE_REG_EOC))

    {

        /*##-3- Get the converted value of regular channel  ######################*/

        AD_Value_Buf[i] = HAL_ADC_GetValue(&hadc1);

        #ifdef RTT_LOG_ENABLED

        loge("AD_Value_Buf[%d] %d",i,AD_Value_Buf[i]);

        #endif//RTT_LOG_ENABLED

    }

  }

    HAL_ADC_Stop(&hadc1);
现在测测一下

现在和我们的HID的报告相结合
  mouseHID.buttons = ;

  mouseHID.x = ;

  mouseHID.y = ;

  mouseHID.wheel = ;
    AD_X_Value = AD_Value_Buf[];

    AD_Y_Value = AD_Value_Buf[];

    #ifdef RTT_LOG_ENABLED

    loge("AD_X_Value %d",AD_X_Value);

    loge("AD_Y_Value %d",AD_Y_Value);
   #endif//RTT_LOG_ENABLED

  // Send HID report

    mouseHID.x = AD_Value_map(AD_X_Value,,,-,);//从0-4095映射到-20~20

    mouseHID.y = AD_Value_map(AD_Y_Value,,,,-);//从0-4095映射到20~-20

    USBD_HID_SendReport(&hUsbDeviceFS, (uint8_t*)&mouseHID, sizeof(struct mouseHID_t));
/* USER CODE BEGIN 0 */

int16_t AD_Value_map(int16_t x, int16_t in_min, int16_t in_max, int16_t out_min, int16_t out_max)

{

    return (x - in_min) * (out_max - out_min) / (in_max - in_min) + out_min;

}

/* USER CODE END 0 */
利用STM32CubeMX来生成USB_HID_Mouse工程【添加ADC】(2)【非dma和中断方式】的更多相关文章
- 利用STM32CubeMX来生成USB_HID_Mouse工程【添加ADC】(1)
现在原来的基础上添加ADC的功能. 现在(利用STM32CubeMX来生成USB_HID_Mouse工程)基础上新增硬件 JoyStick Shield 游戏摇杆扩展板 与STM32F103C8的连接 ...
- 利用STM32CubeMX来生成USB_HID_Mouse工程
硬件开发板:STM32F103C8 软件平台 好了现在开始利用STM32CubeMX来生成我们的工程 1.新建工程 选择MCU的型号 选择选择时钟 开启usb的模块 选择USB的类 配置时钟树(主要是 ...
- 利用STM32CubeMX来生成USB_HID_host工程
修改时钟(备注这边使用25mhz的主晶振) 选择debug_level等级为3
- 试用bus hound来分析STM32CubeMX来生成USB_HID_Mouse工程
Bus Hound (x64). Complements of www.perisoft.net STM32_HID_mouse Device - Device ID (followed by the ...
- 使用STM32CubeMX生成USB_HOST_HID工程[添加对CAPS_LOCK指示灯的控制][SetReport]
在之前(使用STM32CubeMX生成USB_HOST_HID工程)的基础上进行修改 在结合之前在pc上的测试 USB之HID类Set_Report Request[调试手记1] 测试代码如下: /* ...
- 利用STM32CubeMX之SPI
现在我们继续使用STM32CubeMX来生成SPI工程.我们的硬件平台还是我们熟悉的STM32F103C8开发板. 设置时钟树中的配置 现在打开SPI的设置 如果想修改管脚的名字可以红色框中进行修改, ...
- STM32 ADC多通道转换DMA模式与非DMA模式两种方法(HAL库)
一.非DMA模式(转) 说明:这个是自己刚做的时候百度出来的,不是我自己做出来的,因为感觉有用就保存下来做学习用,原文链接:https://blog.csdn.net/qq_24815615/arti ...
- 利用STM32CubeMX生成HID双向通讯工程
使用开发板为正点原子ministm32 现在我们先使用HID descriptor Tool来生成我们需要的hid的 保存使用选择.H // D:\usb资料\HID\MSDEV\Projects\t ...
- 使用STM32CubeMX生成RTC工程[闹钟中断2]
在上次使用STM32CubeMX生成RTC工程[闹钟中断]基础上实现周期间隔的闹钟 一些场合需要周期性的闹钟 现在为了方便设置每十秒来一次. 备注: 当然可以直接修改HAL库static HAL_St ...
随机推荐
- RabbitMQ(3) Spring boot集成RabbitMQ
springboot集成RabbitMQ非常简单,如果只是简单的使用配置非常少,springboot提供了spring-boot-starter-amqp项目对消息各种支持. 资源代码:练习用的代码. ...
- week7 ls
week7 ls 实现ls: 实现ls -l:
- Django+七牛上传+查看+下载文件相关函数,新整理未完全测试
M class File(models.Model): # 文档模型 name = models.CharField(max_length=255) staff = models.ForeignKey ...
- MySQL 排名、分组后组内排名、取各组的前几名 及排名后更新插入数据表中
一.排名 /*普通排名:从1开始,顺序往下排*/ AS rank ) r ORDER BY score; /*并列排名:相同的值是相同的排名*/ SELECT cs.* , CASE WHEN @p= ...
- Wireshark 过滤器语法
wireshark有两种过滤器: 捕捉过滤器(CaptureFilters):用于决定将什么样的信息记录在捕捉结果中. 显示过滤器(DisplayFilters):用于在捕捉结果中进行详细查找. 捕捉 ...
- python之路--面向对象(三)
一 isinstance(obj,cls)和issubclass(sub,super) isinstance(obj,cls)检查是否obj是否是类 cls 的对象.由于Python中一切都是类,所以 ...
- Python _Mix*9
1. 函数 函数是对功能的封装 语法: def 函数名(形参列表): 函数体(代码块) 代码块中有可能包含return 调用: 函数名(实参列表) def mix(a,b): #def 函数名(a和b ...
- faker模块
faker模块中有很多函数,可以直接生成手机号,身份证号,姓名等 1.安装faker pip install faker 2.faker的使用 from faker import Faker f=Fa ...
- aps.net国际化本地资源 .resources”正确嵌入或链接到程序集
asp.net国际化提供了资源文件的解决的方式, asp.net自带的两个项目文件夹 分别是:App_GlobalResources和App_LocalResources, App_GlobalRes ...
- lvs负载均衡(DR模式)
lvs负载均衡(DR模式) 系统环境:lvs+keepalivedcentos7.5 ip:192.168.1.157 vip:192.168.1.150(主)centos7.5 ip:192.168 ...