saltstack一键部署高可用
一健推送apache
[root@server1 minions]# cd /etc/salt/
[root@server1 salt]# vim master
[root@server1 salt]# mkdir /srv/salt
[root@server1 salt]# cd /srv/salt/
[root@server1 salt]# mkdir apache
[root@server1 salt]# cd apache/
[root@server1 apache]# vim install.sls
apache-install:
pkg.installed:
- pkgs:
- httpd
- php
file.managed:
- name: /var/www/html/index.php
- source: salt://apache/files/index.php
- mode: 644
- user: root
- group: root
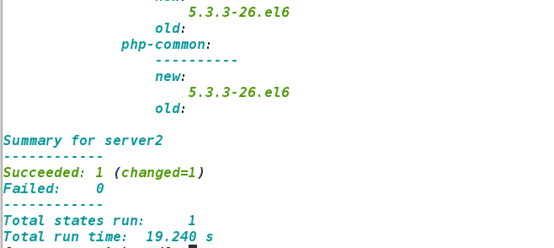
[root@server1 httpd]# salt server2 state.sls apache.install
[root@server1 apache]# vim service.sls
include:
- apache.install
apache-service:
file.managed:
- name: /etc/httpd/conf/httpd.conf
- source: salt://apache/files/httpd.conf
service.running:
- name: httpd
- enable: True
- reload: True
- watch:
- file: apache-service
[root@server1 apache]# cd files/
[root@server1 files]# ls
httpd.conf(从server2(apache端)scp过来) index.php
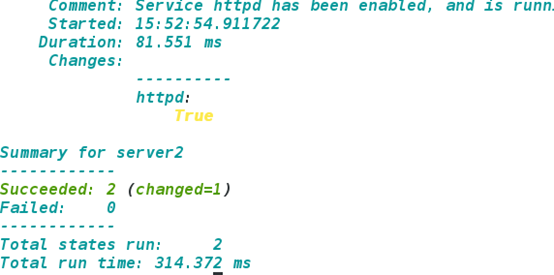
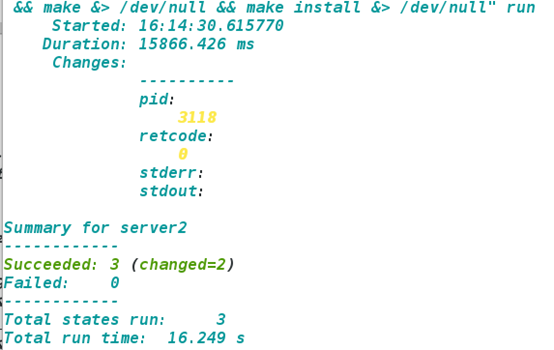
[root@server1 apache]# salt server2 state.sls apache.service
一健部署nginx
[root@server1 salt]# mkdir nginx
[root@server1 salt]# cd nginx
[root@server1 nginx]# mkdir files
[root@server1 nginx]# cd files
[root@server1 files]# ls
nginx-1.14.0.tar.gz nginx(可以从网上找一个启动脚本) nginx.conf(从server3scp)
[root@server1 files]# cd ..
[root@server1 nginx]# vim install.sls
include:
- pkgs.make
nginx-install:
pkg.installed:
- pkgs:
- gcc
- pcre-devel
- openssl-devel
file.managed:
- name: /mnt/nginx-1.14.0.tar.gz
- source: salt://nginx/files/nginx-1.14.0.tar.gz
cmd.run:
- name: cd /mnt && tar zxf nginx-1.14.0.tar.gz && cd nginx-1.14.0 && sed -i.bak 's/CFLAGS="$CFLAGS -g"/#CFLAGS="$CFLAGS -g"/g' auto/cc/gcc && sed -i.bak 's/#define NGINX_VER "nginx\/" NGINX_VERSION/#define NGINX_VER "nginx"/g' src/core/nginx.h && ./configure --prefix=/usr/local/nginx --with-http_ssl_module --with-http_stub_status_module --with-threads --with-file-aio &> /dev/null && make &> /dev/null && make install &> /dev/null
- creates: /usr/local/nginx
[root@server1 nginx]# salt server3 state.sls nginx.install
[root@server1 nginx]# vim service.sls
include:
- nginx.install
/usr/local/nginx/conf/nginx.conf:
file.managed:
- source: salt://nginx/files/nginx.conf
nginx-service:
file.managed:
- name: /etc/init.d/nginx
- source: salt://nginx/files/nginx
- mode: 755
service.running:
- name: nginx
- enable: True
- reload: True
- watch:
- file: /usr/local/nginx/conf/nginx.conf
[root@server1 nginx]# salt server3 state.sls nginx.service

[root@server1 nginx]# cd ..
[root@server1 salt]# mkdir pkgs
[root@server1 salt]# cd pkgs/
[root@server1 pkgs]# vim make.sls
gcc:
pkg.installed:
- pkgs:
- gcc
- pcre-devel
- openssl-devel
一健推送haproxy,实现负载均衡
[root@server1 salt]# mkdir haproxy
[root@server1 haproxy]# mkdir files
[root@server1 haproxy]# cd files/
[root@server1 files]# ls
haproxy-1.6.11.tar.gz haproxy.cfg haproxy.init
[root@server1 files]# cd ..
[root@server1 haproxy]# cd ..
[root@server1 salt]# mkdir users
[root@server1 salt]# cd users/
[root@server1 users]# vim haproxy.sls
haproxy-group:
group.present:
- name: haproxy
- gid: 200
haproxy:
user.present:
- uid: 200
- gid: 200
- home: /usr/local/haproxy
- createhome: False
- shell: /sbin/nologin
[root@server1 salt]# cd /srv/salt/haproxy/
[root@server1 haproxy]# vim install.sls
include:
- pkgs.make
- users.haproxy
haproxy-install:
file.managed:
- name: /mnt/haproxy-1.6.11.tar.gz
- source: salt://haproxy/files/haproxy-1.6.11.tar.gz
cmd.run:
- name: cd /mnt && tar zxf haproxy-1.6.11.tar.gz && cd haproxy-1.6.11 && make TARGET=linux2628 UES_PCRE=1 USE_OPENSSL=1 USE_ZLIB=1 PREFIX=/usr/local/haproxy && make TARGET=linux2628 UES_PCRE=1 USE_OPENSSL=1 USE_ZLIB=1 PREFIX=/usr/local/haproxy install
- creates: usr/local/haproxy
/etc/haproxy:
file.directory:
- mode: 755
/usr/sbin/haproxy:
file.symlink:
- target: /usr/local/haproxy/sbin/haproxy
[root@server1 haproxy]# salt server1 state.sls haproxy.install
没有报错即成功
[root@server1 mnt]# cd haproxy-1.6.11/examples
[root@server1 examples]# cp haproxy.init /srv/salt/haproxy/files
[root@server1 examples]# cp content-sw-sample.cfg /srv/salt/haproxy/files
[root@server1 haproxy]# cd /srv/salt/haproxy/files/
[root@server1 files]# ls
[root@server1 files]# mv content-sw-sample.cfg haproxy.cfg
[root@server1 files]# vim haproxy.cfg
global
maxconn 10000
stats socket /var/run/haproxy.stat mode 600 level admin
log 127.0.0.1 local0
uid 200
gid 200
chroot /var/empty
daemon
defaults
mode http
log global
option httplog
option dontlognull
monitor-uri /monitoruri
maxconn 8000
timeout client 30s
stats uri /admin/stats
retries 2
option redispatch
timeout connect 5s
timeout server 5s
timeout queue 30s
# The public 'www' address in the DMZ
frontend public
bind *:80 name clear
#bind 192.168.1.10:443 ssl crt /etc/haproxy/haproxy.pem
#use_backend static if { hdr_beg(host) -i img }
#use_backend static if { path_beg /img /css }
default_backend static
# The static backend backend for 'Host: img', /img and /css.
backend static
balance roundrobin
#option httpchk HEAD /favicon.ico
server statsrv1 172.25.8.2:80 check inter 1000
server statsrv2 172.25.8.3:80 check inter 1000
[root@server1 files]# cd ..
[root@server1 haproxy]# vim service.sls
include:
- haproxy.install
/etc/haproxy/haproxy.cfg:
file.managed:
- source: salt://haproxy/files/haproxy.cfg
haproxy-service:
file.managed:
- name: /etc/init.d/haproxy
- source: salt://haproxy/files/haproxy.init
- mode: 755
service.running:
- name: haproxy
- enable: True
- reload: True
- watch:
- file: /etc/haproxy/haproxy.cfg
[root@server1 haproxy]# salt server1 state.sls haproxy.service
无报错即可
一键全推送
[root@server1 haproxy]# cd ..
[root@server1 salt]# vim top.sls
base:
'server2':
- apache.service
'server3':
- nginx.service
'server1':
- haproxy.service
ot@server1 salt]# salt '*' state.highstate
一键推送高可用
[root@server1 salt]# vim /etc/salt/master
取消注释
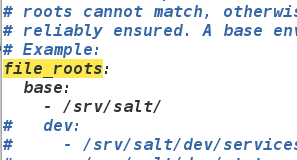
pillar_roots:
base:
- /srv/pillar
[root@server1 salt]# /etc/init.d/salt-master restart
[root@server1 srv]# cd ..
[root@server1 srv]# mkdir pillar
[root@server1 srv]# cd pillar/
[root@server1 pillar]# vim top.sls
base:
'*':
- web.install
- keepalived.install
[root@server1 pillar]# cd /srv/salt/apache/
[root@server1 apache]# vim service.sls
include:
- apache.install
apache-service:
file.managed:
- name: /etc/httpd/conf/httpd.conf
- source: salt://apache/files/httpd.conf
- template: jinja
- context:
port: {{ pillar['port'] }}
bind: {{ pillar['bind'] }}
service.running:
- name: httpd
- enable: True
- reload: True
- watch:
- file: apache-service
[root@server1 apache]# vim /srv/pillar/web/install.sls (web目录自己创建)
{% if grains['fqdn'] == 'server2' %}
webserver: httpd
bind: 172.25.8.2
port: 80
{% elif grains['fqdn'] == 'server3' %}
webserver: nginx
{% elif grains['fqdn'] == 'server1' %}
webserver: haproxy
{% endif %}
[root@server1 apache]# vim files/httpd.conf
Listen {{ bind }}:{{ port }}
推送keepalived
server4:
[root@server1 apache]# cd ..
[root@server1 salt]# mkdir keepalived
[root@server1 salt]# cd keepalived/
[root@server1 keepalived]# mkdir files
[root@server1 keepalived]# cd files/
[root@server1 files]# ls
keepalived-2.0.6.tar.gz
[root@server1 files]# cd ..
[root@server1 keepalived]# vim install.sls
include:
- pkgs.make
kp-install:
file.managed:
- name: /mnt/keepalived-2.0.6.tar.gz
- source: salt://keepalived/files/keepalived-2.0.6.tar.gz
cmd.run:
- name: cd /mnt && tar zxf keepalived-2.0.6.tar.gz && cd keepalived-2.0.6 && ./configure --prefix=/usr/local/keepalived --with-init=SYSV &> /dev/null && make &> /dev/null && make install &> /dev/null
- creates: /usr/local/keepalived
tu
[root@server1 keepalived]# salt server4 state.sls keepalived.install
[root@server1 keepalived]# cd files/
[root@server1 files]# ls
keepalived keepalived-2.0.6.tar.gz keepalived.conf
[root@server1 files]# cd ..
vim service.sls
[root@server1 keepalived]# cd files/
[root@server1 files]# vim keepalived.conf
global_defs {
notification_email {
root@localhost
}
notification_email_from keepalived@localhost
smtp_server 127.0.0.1
smtp_connect_timeout 30
router_id LVS_DEVEL
vrrp_skip_check_adv_addr
#vrrp_strict
vrrp_garp_interval 0
vrrp_gna_interval 0
}
vrrp_instance VI_1 {
state {{ STATE }}
interface eth0
virtual_router_id {{ VRID }}
priority {{ PRIORITY }}
advert_int 1
authentication {
auth_type PASS
auth_pass 1111
}
virtual_ipaddress {
172.25.8.100
}
}
[root@server1 salt]# cd ..
[root@server1 keepalived]# vim service.sls
[root@server1 keepalived]# cd ..
[root@server1 salt]# cd ..
[root@server1 srv]# cd pillar/
[root@server1 pillar]# mkdir keepalived
[root@server1 pillar]# cd keepalived/
[root@server1 keepalived]# vim install.sls
{% if grains['fqdn'] == 'server1' %}
state: MASTER
vrid: 88
priority: 100
{% elif grains['fqdn'] == 'server4' %}
state: MASTER
vrid: 88
priority: 1
{% endif %}
tu
[root@server1 keepalived]# cd ..
[root@server1 salt]# vim top.sls
base:
'server4':
- haproxy.service
- keepalived.service
'server2':
- apache.service
'server3':
- nginx.service
'server1':
- haproxy.service
- keepalived.service
[root@server1 salt]# salt '*' state.highstate
saltstack一键部署高可用的更多相关文章
- 基于saltstack自动化部署高可用kubernetes集群
SaltStack自动化部署HA-Kubernetes 本项目在GitHub上,会不定期更新,大家也可以提交ISSUE,地址为:https://github.com/skymyyang/salt-k8 ...
- kubernetes实战(二十):k8s一键部署高可用Prometheus并实现邮件告警
1.基本概念 本次部署使用的是CoreOS的prometheus-operator. 本次部署包含监控etcd集群. 本次部署适用于二进制和kubeadm安装方式. 本次部署适用于k8s v1.10版 ...
- kubernetes kubeadm部署高可用集群
k8s kubeadm部署高可用集群 kubeadm是官方推出的部署工具,旨在降低kubernetes使用门槛与提高集群部署的便捷性. 同时越来越多的官方文档,围绕kubernetes容器化部署为环境 ...
- kubernetes部署高可用Harbor
前言 本文Harbor高可用依照Harbor官网部署,主要思路如下,大家可以根据具体情况选择搭建. 部署Postgresql高可用集群.(本文选用Stolon进行管理,请查看文章<kuberne ...
- k8s部署高可用Ingress
部署高可用Ingress 官网地址https://kubernetes.github.io/ingress-nginx/deploy/ 获取ingress的编排文件 wget https://raw. ...
- 附012.Kubeadm部署高可用Kubernetes
一 kubeadm介绍 1.1 概述 参考<附003.Kubeadm部署Kubernetes>. 1.2 kubeadm功能 参考<附003.Kubeadm部署Kubernetes& ...
- Quartz学习笔记:集群部署&高可用
Quartz学习笔记:集群部署&高可用 集群部署 一个Quartz集群中的每个节点是一个独立的Quartz应用,它又管理着其他的节点.这就意味着你必须对每个节点分别启动或停止.Quartz集群 ...
- 企业运维实践-还不会部署高可用的kubernetes集群?使用kubeadm方式安装高可用k8s集群v1.23.7
关注「WeiyiGeek」公众号 设为「特别关注」每天带你玩转网络安全运维.应用开发.物联网IOT学习! 希望各位看友[关注.点赞.评论.收藏.投币],助力每一个梦想. 文章目录: 0x00 前言简述 ...
- SaltStack一键部署负载均衡和高可用
一.负载均衡的部署 server1 haproxy (调度器) server2 apache server3 nginx 1)在server1上首先安装salt-minion服务.并 ...
随机推荐
- css水平居中,竖直居中技巧(一)
css水平居中,竖直居中技巧(一)===### 1.效果 ### 2.代码#### 2.1.index.html <!DOCTYPE html> <html lang="z ...
- 读书笔记<深入理解JVM>01 关于OutOfMemoryError 堆空间的溢出
代码片段如下: package com.gosaint.shiro; import java.util.ArrayList; import java.util.List; public class H ...
- 标签控件JLabel的使用
---------------siwuxie095 工程名:TestUI 包名:com.siwuxie095.ui 类名:TestLabel.j ...
- [转]PHP部分常见算法
1. 用户密码六位数,不能大于六位而不能小于六数,数字值正则为[0-9],请用PHP写出有几种可能性,并做暴力破解; function dePassword($pwd) { $tmp = array( ...
- android sdk更新源
什么是Android SDK: SDK:(software development kit)软件开发工具包.被软件开发工程师用于为特定的软件包.软件框架.硬件平台.操作系统等建立应用软件的开发工具的集 ...
- oracle数据库输入conn / as sysdba 出现ORA-01031: insufficient privileges + 忘记sys密码如何改密码
今天忘记了oracle数据库sys用户的密码,想着直接改密码输入conn / as sysdba 出现了ORA-01031: insufficient privileges(权限不足)的错误,到处搜教 ...
- WordCount编码与测试
1. github项目地址:https://github.com/wwwwu/WordCount 2.PSP表格: PSP2.1 PSP阶段 预估耗时 (分钟) 实际耗时 (分钟) Planning ...
- HDU 3001 Travelling (状压DP + BFS)
题意:有一个人要去旅游,他想要逛遍所有的城市,但是同一个城市又不想逛超过2次.现在给出城市之间的来往路费,他可以选择任意一个点为起点. 问逛遍所有城市的最低路费是多少. 析:用三进制表示每个城市的访问 ...
- 第4章 jQuery中的事件和动画
4.1 jQuery中的事件 4.1.1 加载DOM jQuery就是用 `$(document).ready()方法来代替传统JavaScript的window.onload方法的. 1.执行时机 ...
- Fiddler系统监控参数解读
转自:https://blog.csdn.net/txj236/article/details/38872855 在对系统监控的过程中,发现ClientConnected和ClientBeginReq ...