Redmine 安装指南
第一种方式 (一键安装):
准备工作:
1、最小化安装CentOS7
2、更新YUM源
3、更新系统关闭防火墙
yum -y update
systemctl stop firewalld
systemctl disable firewalld
4、如果出现下图的提示:请执行: yum install perl perl-Data-Dumper wget -y

5、下载一键安装包
cd /tmp
添加执行权限:
chmod +x /tmp/bitnami-redmine-3.4.5-1-linux-x64-installer.run
安装过程如下
[root@youway bak]# ./bitnami-redmine-2.6.3-0-linux-installer.run
Language Selection
Please select the installation language
[1] English - English
[2] Spanish - Español
[3] Japanese - 日本語
[4] Korean - 한국어
[5] Simplified Chinese - 简体中文
[6] Hebrew - עברית
[7] German - Deutsch
[8] Romanian - Română
[9] Russian - Русский
Please choose an option [1] :
----------------------------------------------------------------------------
欢迎来到 Bitnami Redmine Stack 安装程序。
----------------------------------------------------------------------------
选择您想要安装的组件,清除您不想安装的组件。当您准备继续时,点击前进。
Subversion [Y/n] :n
PhpMyAdmin [Y/n] :n
Redmine : Y (Cannot be edited)
Git [Y/n] :n
上述选择是否正确? [Y/n]:y
----------------------------------------------------------------------------
安装文件夹
请选择安装Bitnami Redmine Stack的文件夹
选择一个文件夹 [/opt/redmine-2.6.3-0]: /var/www/redmine
警告: 选中的文件夹非空。请选择另外的文件夹
按 [Enter] 继续:
----------------------------------------------------------------------------
创建管理员帐户
Bitnami Redmine Stack admin 用户创建
您的真实姓名 [User Name]: admin
Email地址 [user@example.com]: youway@abc.com
登录 [user]: admin
密码 :
请确认密码 :
----------------------------------------------------------------------------
缺省数据配置语言
选择缺省数据配置语言:
[1] Bosnian
[2] 保加利亚语
[3] Catalan
[4] 捷克语
[5] Danish
[6] 德语
[7] 英语
[8] 西班牙
[9] 法语
[10] Galician
[11] 希伯来语
[12] Hungarian
[13] 意大利语
[14] 日语
[15] 朝鲜语
[16] Lithuanian
[17] 荷兰语
[18] Norwegian
[19] 波兰语
[20] 葡萄牙语
[21] 罗马尼亚语
[22] 俄语
[23] Slovak
[24] Slovenian
[25] 塞尔维亚语
[26] 瑞典语
[27] Turkish
[28] Ukrainian
[29] Vietnamese
[30] 中文
请选择选项 [30] :
----------------------------------------------------------------------------
Do you want to configure mail support? [y/N]:y
---------------------------------------------------------------------------
配置SMTP设置
This is required so your application can send notifications via email.
默认电子邮件提供商:
[1] GMail
[2] 自定义
请选择选项 [1] : 2
----------------------------------------------------------------------------
配置SMTP设置
This data is stored in the application configuration files and may be visible to
others. For this reason, it is recommended that you do not use your personal
account credentials.
用户名 []:
密码:
SMTP主机[]:
SMTP端口[]
安全链接:
【1】没有
【2】SSL
【3】TLS
----------------------------------------------------------------------------
安装程序已经准备好将 Bitnami Redmine Stack 安装到您的电脑。
您确定要继续吗? [Y/n]:y
----------------------------------------------------------------------------
正在安装 Bitnami Redmine Stack 至您的电脑中,请稍候。
正在安装
0% ______________ 50% ______________ 100%
#########################################
----------------------------------------------------------------------------
安装程序已经将 Bitnami Redmine Stack 安装于您的电脑中。
启动Redmine应用程序。 [Y/n]: y
信息: To access the Bitnami Redmine Stack, go to
http://127.0.0.1:80 from your browser.
按 [Enter] 继续:
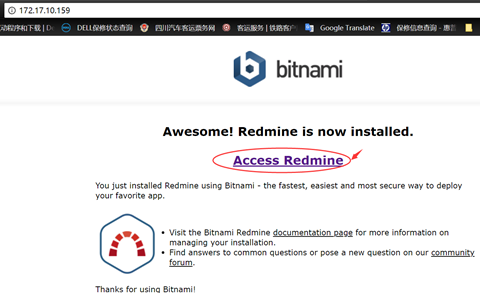
然后再通过http://ipaddress,使用安装时的使用的用户名和密码,访问进行其它配置
默认安装目录:
/var/www/redmine
配置目录:
/var/www/redmine/apps/redmine/htdocs/config/configuration.yml
/var/www/redmine/apps/redmine/htdocs/config/settings.yml
可选操作:
取消数据库限制访问:
/var/www/redmine/mysql/my.cnf中取消
bind_address=127.0.0.1本地访问数据库:
mysql -u root -p -S /opt/redmine-2.6.3-0/mysql/tmp/mysql.sock -P 3306
重启:
/var/www/redmine/ctlscript.sh restart
第二种方式 (直接下载VM进行导入):
1、下载地址:
2、VM导入过程(略)
3、启动虚拟机至如下图面,提示初始WEB登录用户名和密码:登录系统的用户和密码默认为bitnami
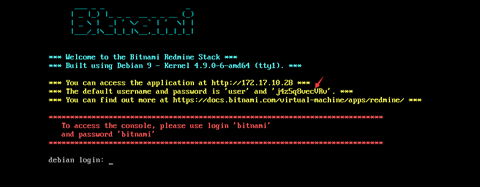
4、登录WEB界面
5、参考文档:
https://docs.bitnami.com/virtual-machine/faq/#how-to-find-application-credentials
https://docs.bitnami.com/virtual-machine/faq/#how-to-connect-to-the-server-through-ssh
优化:
1、工具栏字体太小:
vi /var/www/redmine/apps/redmine/htdocs/public/stylesheets/application.css
第二行:
body { font-family: Verdana, sans-serif; font-size:px; color:#333; margin: 0; padding: 0; min-width: 900px; }
2、与LDAP集成(此环境是在microsft AD)
注意:base DN:区分大小 登录名属性区分大小写。redmine主机需要把DNS指向DC,或者配置HOST文件。
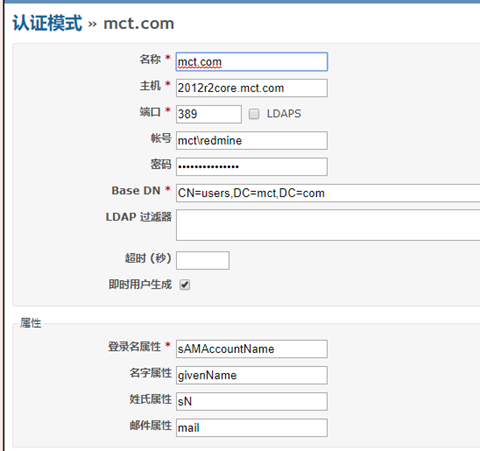

AD里面必须要填姓、名、邮箱字段,否则用户在首次使会报错,让手动填账号姓、名、邮箱地址
3、修改服务端口号
更改为3000为列,需要修改2个文件:
3.1:httpd.conf文件
vi /etc/httpd.conf下找到这行
#Listen 12.34.56.78:8081
Listen 8081
更改为
#Listen 12.34.56.78:3000
Listen 3000
在把下面
# If your host doesn't have a registered DNS name, enter its IP address here.
ServerName localhost:8081
更改为
# If your host doesn't have a registered DNS name, enter its IP address here.
ServerName localhost:3000
3.2 bitnami.conf文件
vi /var/www/redmine/apache2/conf/bitnami.conf
# Default Virtual Host configuration.
<IfVersion < 2.3 >
NameVirtualHost *:8081
NameVirtualHost *:443
</IfVersion>
<VirtualHost _default_:8081>
DocumentRoot "/var/www/redmine/apache2/htdocs"
<Directory "/var/www/redmine/apache2/htdocs">
Options Indexes FollowSymLinks
AllowOverride All
<IfVersion < 2.3 >
Order allow,deny
Allow from all
</IfVersion>
<IfVersion >= 2.3 >
Require all granted
</IfVersion>
</Directory>
更改为:
# Default Virtual Host configuration.
<IfVersion < 2.3 >
NameVirtualHost *:3000
NameVirtualHost *:443
</IfVersion>
<VirtualHost _default_:3000>
DocumentRoot "/var/www/redmine/apache2/htdocs"
<Directory "/var/www/redmine/apache2/htdocs">
Options Indexes FollowSymLinks
AllowOverride All
<IfVersion < 2.3 >
Order allow,deny
Allow from all
</IfVersion>
<IfVersion >= 2.3 >
Require all granted
</IfVersion>
</Directory>
Redmine 安装指南的更多相关文章
- centos+nginx+redmine+gitosis安装指南
说明 这篇文章我现在的主要目的是记录自己安装redmine和gitosis的过程,可能写的有些糙,请各位读者见谅.我会在后面的时间里逐渐完善细节.但我想,这已经是网上迄今为止国内最详细的nginx+r ...
- Redmine(window7)安装
首先要准备Ruby相关文件,Redmine是基于Ruby on rails开发的. 1.下载railsinstaller,我这时下载的版本是railsinstaller-2.2.1.exe,对应的官网 ...
- 开源Bug管理系统Redmine安装和使用心得
最终忍受不了公司使用论坛+Excel来进行bug反馈和管理工作了,于是花了一个上午时间研究了下bug管理系统.这样一个bug管理系统能够轻松的查看bug新增了哪些,攻克了哪些.当前是谁,要在什么时间解 ...
- Ubuntu+Ruby+MySQL+Nginx+Redmine部署记录
(2019年2月19日注:这篇文章原先发在自己github那边的博客,时间是2016年7月26日) 周五的时候老大布置了一个任务下来,要部署一个Redmine用于研发部,同时升级工作室的Redmine ...
- bitnami redmine版本由2.3.1升级至3.2.2过程
环境: 操作系统为ubuntu13.**版本,非长期支持版. 安装目录:/opt/redmine-2.3.1-0/ 所有者用户:root 安装过程: 1. 备份2.3.1数据库 sudo /opt/r ...
- nGrinder安装指南
NGrinder 由两个模块组成,其运行环境为 Oracle JDK 1.6 nGrinder controller web 应用程序,部署在Tomcat 6.x 或更高的版本 nGrinder A ...
- postgresql pgsql最新版安装指南及数据存储路径更改及主从配置
postgresql pgsql最新版安装指南及数据存储路径更改及主从配置 安装指南 首先在apt的list添加你当前系统版本对应的apt列表 目前官网有16.04,14.04,12.04 分别对应下 ...
- redmine整合GIT版本库
redmine整合GIT版本库 服务器的环境: Ubuntu 11.10 64位 Redmine 1.4.5.stable.10943 git version 1.7.5.4 + gitolite ...
- Centos 6.5 部署 redmine 3.3
验证ruby版本 如果有就卸载安装最新的 yum install gcc* openssl openssl-devel -y wget https://ruby.taobao.org/mirrors/ ...
随机推荐
- webpack分离css单独打包
这篇文章过期了,webpack4.x已经不这么用了,最新的可以看这个地址webpack实战场景系列 原文地址:http://www.izhongxia.com/posts/44724.html CHA ...
- Android 生态消息推送平台介绍
一.手机厂商平台 华为消息推送服务 华为推送(Push)是为开发者提供的消息推送平台,建立了从云端到手机端的消息推送通道,使应用可以将最新信息及时通知用户,从而构筑良好的用户关系,提升用户的感知和活跃 ...
- saltstack二次开发(一)
Saltstack简介 Salt是一个配置管理系统,能够维护预定义状态的远程节点(比如,确保指定的包被安装,指定的服务在运行),一个分布式远程执行系统,用来在远程节点(可以是单个节点,也可以是任意规则 ...
- python第四十三课——封装性
1.面向对象的三大特性:封装性.继承性.多态性 封装: 封装使用的领悟: 1).生活层面:食品.快递.计算机.明星... 2).计算机层面: ①.模块.类.函数... ②.属性数据的封装与隐藏 权限修 ...
- go变量和常量
一.变量 1. 命名规则:字母或者_下划线开头 2.“:=” 这种模式只能用于函数内部,常量const不能用这种模式来定义 二.常量 1. 常量const必须在定义的时候就赋值 2. 常量的值在整个过 ...
- 【转】使用程序修改系统(IE)代理设置
文章都是发布在github再转到这边的,这边格式可能会乱掉.博客地址:benqy.com 这是本人在做的一个前端开发调试工具(HttpMock),功能是web服务器+http日记+http代理(类似f ...
- 问题解决:Apache: You don't have permission to access / on this server
虚拟主机(Virtual Host)是指在一个机器上运行多个网络站点 (比如:www.company1.com和www.company2.com). 如果每个网络站点拥有不同的IP地址,则虚拟主机可以 ...
- Linux下RPM包的安装
Linux下RPM包安装 二进制包(RPM包.系统默认包) RPM安装 rpm -ivh 包全名(查询依赖网址:http://www.rpmfind.net) -i(install):安装 -v(ve ...
- C语言各种数据类型取值范围
速查表: char -128 ~ +127 1Byte -2^7 ~ 2^7-1 unsigned char 0 ~ 255 1Byte 0 ~ 2^8-1 short -32767 ~ + 3276 ...
- 学习ASP.NET Core,你必须了解无处不在的“依赖注入”(转载)
ASP.NET Core的核心是通过一个Server和若干注册的Middleware构成的管道,不论是管道自身的构建,还是Server和Middleware自身的实现,以及构建在这个管道的应用,都需要 ...