WPF MVVM实例三
在没给大家讲解wpf mwm示例之前先给大家简单说下MVVM理论知识:
WPF技术的主要特点是数据驱动UI,所以在使用WPF技术开发的过程中是以数据为核心的,WPF提供了数据绑定机制,当数据发生变化时,WPF会自动发出通知去更新UI。
我们使用模式,一般是想达到高内聚低耦合。在WPF开发中,经典的编程模式是MVVM,是为WPF量身定做的模式,该模式充分利用了WPF的数据绑定机制,最大限度地降低了Xmal文件和CS文件的耦合度,也就是UI显示和逻辑代码的耦合度,如需要更换界面时,逻辑代码修改很少,甚至不用修改。与WinForm开发相比,我们一般在后置代码中会使用控件的名字来操作控件的属性来更新UI,而在WPF中通常是通过数据绑定来更新UI;在响应用户操作上,WinForm是通过控件的事件来处理,而WPF可以使用命令绑定的方式来处理,耦合度将降低。
首先MVVM设计模式的结构
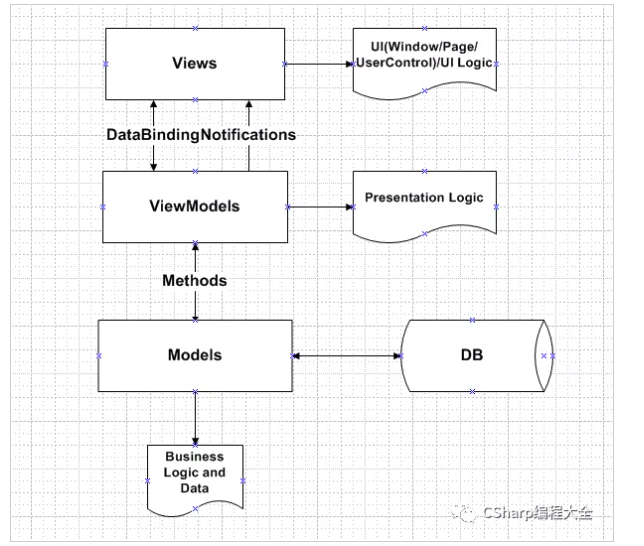
Views: 由Window/Page/UserControl等构成,通过DataBinding与ViewModels建立关联;
ViewModels:由一组命令,可以绑定的属性,操作逻辑构成;因为View与ViewModel进行了解耦,我们可以对ViewModel进行Unit Test;
Models:可以是实体对象或者Web服务;
下面通过一个简单的例子,来介绍一些WPF MVVM模式。首先项目结构:

DelegateCommand.cs
using System;

using System.Collections.Generic;

using System.Linq;

using System.Text;

using System.Threading.Tasks;

using WpfApp13.Commands;

namespace WpfApp13.ViewModels

{

    class MainWindowViewModel:NotificationObject

    {

        private double  input1;

        public double Input1

        {

            get { return input1; }

            set

            {

                input1 = value;

                this.RaisePropertyChange("Input1");

            }

        }

        private double input2;

        public double Input2

        {

            get { return input2; }

            set

            {

                input2 = value;

                this.RaisePropertyChange("Input2");

            }

        }

        private double result;

        public double Result

        {

            get { return result; }

            set

            {

                result = value;

                this.RaisePropertyChange("Result");

            }

        }

        public DelegateCommand AddCommand { get; set; }

        public void Add(object parameter)

        {

            this.Result = this.Input1 + this.Input2;

        }

        public MainWindowViewModel()

        {

            this.AddCommand = new DelegateCommand();

            this.AddCommand.ExcuteAction = new Action<object>(this.Add);

        }

    }

}
MainWindowViewModel.cs
using System;

using System.Collections.Generic;

using System.Linq;

using System.Text;

using System.Threading.Tasks;

using WpfApp13.Commands;

namespace WpfApp13.ViewModels

{

    class MainWindowViewModel:NotificationObject

    {

        private double  input1;

        public double Input1

        {

            get { return input1; }

            set

            {

                input1 = value;

                this.RaisePropertyChange("Input1");

            }

        }

        private double input2;

        public double Input2

        {

            get { return input2; }

            set

            {

                input2 = value;

                this.RaisePropertyChange("Input2");

            }

        }

        private double result;

        public double Result

        {

            get { return result; }

            set

            {

                result = value;

                this.RaisePropertyChange("Result");

            }

        }

        public DelegateCommand AddCommand { get; set; }

        public void Add(object parameter)

        {

            this.Result = this.Input1 + this.Input2;

        }

        public MainWindowViewModel()

        {

            this.AddCommand = new DelegateCommand();

            this.AddCommand.ExcuteAction = new Action<object>(this.Add);

        }

    }

}
NotificationObject.CS
using System;

using System.Collections.Generic;

using System.ComponentModel;

using System.Linq;

using System.Text;

using System.Threading.Tasks;

namespace WpfApp13.ViewModels

{

    class NotificationObject : INotifyPropertyChanged

    {

        public event PropertyChangedEventHandler PropertyChanged;

        public void RaisePropertyChange(string propertyName)

        {

            if(this.PropertyChanged!=null)

            {

                this.PropertyChanged.Invoke(this, new PropertyChangedEventArgs(propertyName));

            }

        }

    }

}
MainWindow.xaml.CS
using System;

using System.Collections.Generic;

using System.Linq;

using System.Text;

using System.Threading.Tasks;

using System.Windows;

using System.Windows.Controls;

using System.Windows.Data;

using System.Windows.Documents;

using System.Windows.Input;

using System.Windows.Media;

using System.Windows.Media.Imaging;

using System.Windows.Navigation;

using System.Windows.Shapes;

using WpfApp13.ViewModels;

namespace WpfApp13

{

    /// <summary>

    /// MainWindow.xaml 的交互逻辑

    /// </summary>

    public partial class MainWindow : Window

    {

        public MainWindow()

        {

            InitializeComponent();

            this.DataContext = new MainWindowViewModel();

        }

    }

}

MainWindow.xaml
<Window x:Class="WpfApp13.MainWindow"

        xmlns="http://schemas.microsoft.com/winfx/2006/xaml/presentation"

        xmlns:x="http://schemas.microsoft.com/winfx/2006/xaml"

        xmlns:d="http://schemas.microsoft.com/expression/blend/2008"

        xmlns:mc="http://schemas.openxmlformats.org/markup-compatibility/2006"

        xmlns:local="clr-namespace:WpfApp13"

        mc:Ignorable="d"

        Title="MainWindow" Height="450" Width="800">

    <Grid>

        <StackPanel>

            <Slider Name="slider1" MinHeight="25" Value="{Binding Input1}"/>

            <Slider Name="slider2" MinHeight="25" Value="{Binding Input2}"/>

            <Slider Name="slider3" MinHeight="25" Value="{Binding Result}"/>

            <Button Name="addButton" Content="ADD" FontSize="30" MinHeight="40" Command="{Binding AddCommand}"/>

        </StackPanel>

    </Grid>

</Window>
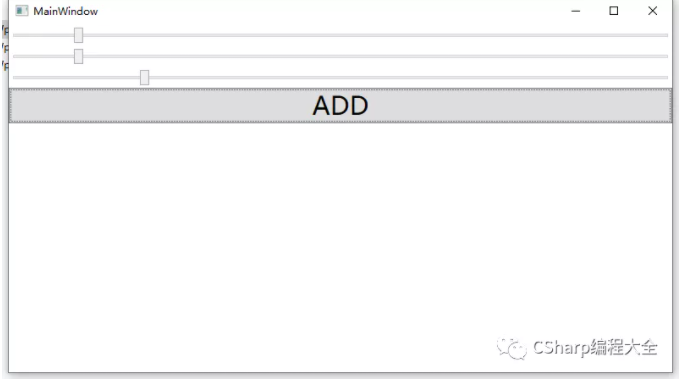
运行效果:
分别拖动滑块slider1和slider2,点击按钮后slider3就会自动变化
百度网盘源码下载地址:
链接:https://pan.baidu.com/s/1AvBncokY8SiW0fd9XqrPRw
提取码:ttpo
WPF MVVM实例三的更多相关文章
- wpf mvvm 实例
1.程序结构如图所示: 2.Model实现 在Model文件夹下新建业务类StudentModel,代码如下: public class StudentModel : INotifyPropertyC ...
- 一个简单的WPF MVVM实例【转载】
引用地址:http://blog.csdn.net/yl2isoft/article/details/20838149 1 新建WPF 应用程序WPFMVVMExample 程序结构如下图所示. 2 ...
- WPF项目学习.三
工具代码记录 版权声明:本文为博主初学经验,未经博主允许不得转载. 一.前言 记录在学习与制作WPF过程中遇到的解决方案. 分页控件的制作,邮件发送,日志代码,excel导入导出等代码的实现过程: 二 ...
- 从PRISM开始学WPF(七)MVVM(三)事件聚合器EventAggregator-更新至Prism7.1
原文:从PRISM开始学WPF(七)MVVM(三)事件聚合器EventAggregator-更新至Prism7.1 事件聚合器EventAggregator [7.1updated]除了app部分,没 ...
- Jquery如何序列化form表单数据为JSON对象 C# ADO.NET中设置Like模糊查询的参数 从客户端出现小于等于公式符号引发检测到有潜在危险的Request.Form 值 jquery调用iframe里面的方法 Js根据Ip地址自动判断是哪个城市 【我们一起写框架】MVVM的WPF框架(三)—数据控件 设计模式之简单工厂模式(C#语言描述)
jquery提供的serialize方法能够实现. $("#searchForm").serialize();但是,观察输出的信息,发现serialize()方法做的是将表单中的数 ...
- 从PRISM开始学WPF(七)MVVM(三)事件聚合器EventAggregator?
原文:从PRISM开始学WPF(七)MVVM(三)事件聚合器EventAggregator? 从PRISM开始学WPF(一)WPF? 从PRISM开始学WPF(二)Prism? 从PRISM开始学WP ...
- WPF使用MVVM(三)-事件转命令
WPF使用MVVM(三)-事件转命令 上一节介绍了WPF中的命令,可是仅仅介绍的是WPF框架给我们提供的点击命令,也就是用Command属性来绑定一个命令,用来响应按钮的点击行为!显然这是不够的,界面 ...
- WPF/MVVM 快速开始指南(译)(转)
WPF/MVVM 快速开始指南(译) 本篇文章是Barry Lapthorn创作的,感觉写得很好,翻译一下,做个纪念.由于英文水平实在太烂,所以翻译有错或者译得不好的地方请多指正.另外由于原文是针对W ...
- WPF MVVM UI分离之《交互与数据分离》 基础才是重中之重~delegate里的Invoke和BeginInvoke 将不确定变为确定系列~目录(“机器最能证明一切”) 爱上MVC3系列~全局异常处理与异常日志 基础才是重中之重~lock和monitor的区别 将不确定变成确定~我想监视我的对象,如果是某个值,就叫另一些方法自动运行 将不确定变成确定~LINQ DBML模型可以对
WPF MVVM UI分离之<交互与数据分离> 在我们使用WPF过程中,不可避免并且超级喜欢使用MVVM框架. 那么,使用MVVM的出发点是视觉与业务逻辑分离,即UI与数据分离 诸如下 ...
随机推荐
- TCP/IP__TCP/IP协议
1.定位:指因特网整个TCP/IP协议族,由四个层次组成:网络接入层.网络层.主机到主机层.应用层.也叫DoD模型.每一层都呼叫它的下一层所提供的网络来完成自己的需求. 2.与OSI模型的对应: 3. ...
- 武装你的WEBAPI-OData资源更新Delta
本文属于OData系列 目录 武装你的WEBAPI-OData入门 武装你的WEBAPI-OData便捷查询 武装你的WEBAPI-OData分页查询 武装你的WEBAPI-OData资源更新Delt ...
- 深入了解JavaScript中基于原型(prototype)的继承机制
原型 前言 继承是面向对象编程中相当重要的一个概念,它对帮助代码复用起到了很大的作用. 正文 Brendan Eich在创建JavaScript时,没有选择当时最流行的类继承机制,而是借鉴Self,用 ...
- switch表达式为字符串
package EXERCISE; import java.util.*; public class HashCode { //switch判断字符串.switch表达式byte,short,int, ...
- 牛客小白月赛17 G 区间求和
传送门 题意: 题解: 原本想着使用暴力方法: 1 #include<stdio.h> 2 #include<string.h> 3 #include<iostream& ...
- HDU - 4221 贪心
题意: 你有n个任务,每一个任务有一个完成所需时间AI,和一个截止时间BI.时间从0开始,如果完成任务的时间(设这个时间为ans)大于BI那么就会收到ans-BI的惩罚,问你完成所有这些任务你会收到的 ...
- 再记一次 应用服务器 CPU 暴高事故分析
一:背景 1. 前言 大概有2个月没写博客了,不是不想写哈
- [Python] Pandas 中 Series 和 DataFrame 的用法笔记
目录 1. Series对象 自定义元素的行标签 使用Series对象定义基于字典创建数据结构 2. DataFrame对象 自定义行标签和列标签 使用DataFrame对象可以基于字典创建数据结构 ...
- K8S(03)核心插件-Flannel网络插件
系列文章说明 本系列文章,可以基本算是 老男孩2019年王硕的K8S周末班课程 笔记,根据视频来看本笔记最好,否则有些地方会看不明白 需要视频可以联系我 K8S核心网络插件Flannel 目录 系列文 ...
- K8S(15)监控实战-ELK收集K8S内应用日志
K8S监控实战-ELK收集K8S内应用日志 目录 K8S监控实战-ELK收集K8S内应用日志 1 收集K8S日志方案 1.1 传统ELk模型缺点: 1.2 K8s容器日志收集模型 2 制作tomcat ...