
认证授权:IdentityServer4 - 单点登录
前言
上一篇文章介绍了IdentityServer4的各种授权模式,本篇继续介绍使用IdentityServer4实现单点登录效果。
单点登录(SSO)
SSO( Single Sign-On ),中文意即单点登录,单点登录是一种控制多个相关但彼此独立的系统的访问权限,拥有这一权限的用户可以使用单一的ID和密码访问某个或多个系统从而避免使用不同的用户名或密码,或者通过某种配置无缝地登录每个系统。
概括就是:一次登录,多处访问
案例场景:
1、提供资源服务(WebApi):订单:Order(cz.Api.Order)、商品:Goods(cz.Api.Goods)……
2、业务中存在多个系统:门户系统、订单系统、商品系统……
3、实现用户登录门户后,跳转订单系统、商品系统时,不需要登录认证(单点登录效果)
一、环境准备:
调整项目如下图结构:
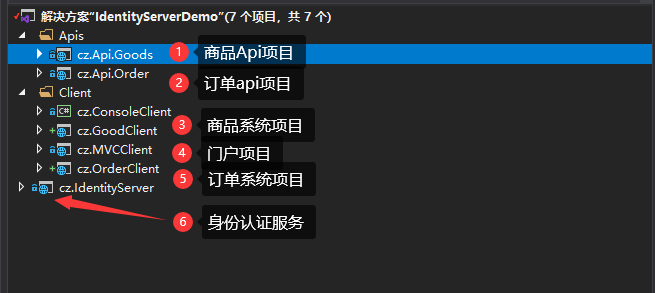
在身份认证项目(cz.IdentityServer)中InMemoryConfig中客户端列表中添加以下客户端内容:(其他内容同上一篇设置相同)
new Client

{

    ClientId = "main_client",

    ClientName = "Implicit Client",

    ClientSecrets = new [] { new Secret("secret".Sha256()) },

    AllowedGrantTypes = GrantTypes.Implicit,

    RedirectUris = { "http://localhost:5020/signin-oidc" },

    PostLogoutRedirectUris = { "http://localhost:5020/signout-callback-oidc" },

    //是否显示授权提示界面

    RequireConsent = true,

    AllowedScopes = {

        IdentityServerConstants.StandardScopes.OpenId,

        IdentityServerConstants.StandardScopes.Profile

    }

},

new Client

{

    ClientId = "order_client",

    ClientName = "Order Client",

    ClientSecrets = new [] { new Secret("secret".Sha256()) },

    AllowedGrantTypes = GrantTypes.Code,

    AllowedScopes = {

        "order","goods",

        IdentityServerConstants.StandardScopes.OpenId,

        IdentityServerConstants.StandardScopes.Profile

    },

    RedirectUris = { "http://localhost:5021/signin-oidc" },

    PostLogoutRedirectUris = { "http://localhost:5021/signout-callback-oidc" },

    //是否显示授权提示界面

    RequireConsent = true,

},

new Client

{

    ClientId = "goods_client",

    ClientName = "Goods Client",

    ClientSecrets = new [] { new Secret("secret".Sha256()) },

    AllowedGrantTypes = GrantTypes.Code,

    RedirectUris = { "http://localhost:5022/signin-oidc" },

    PostLogoutRedirectUris = { "http://localhost:5022/signout-callback-oidc" },

    //是否显示授权提示界面

    RequireConsent = true,

    AllowedScopes = {

        "goods",

        IdentityServerConstants.StandardScopes.OpenId,

        IdentityServerConstants.StandardScopes.Profile

    }

}
二、程序实现:
1、订单、商品Api项目:
a)订单API项目调整:添加Nuget包引用:
Install-Package IdentityServer4.AccessTokenValidation
b)调整Statup文件:
public class Startup

{

    public Startup(IConfiguration configuration)

    {

        Configuration = configuration;

    }

    public IConfiguration Configuration { get; }

    // This method gets called by the runtime. Use this method to add services to the container.

    public void ConfigureServices(IServiceCollection services)

    {

        services.AddControllers();

        //IdentityServer

        services.AddMvcCore()

                .AddAuthorization();

        //配置IdentityServer

        services.AddAuthentication("Bearer")

                .AddIdentityServerAuthentication(options =>

                {

                    options.RequireHttpsMetadata = false; //是否需要https

                    options.Authority = $"http://localhost:5600";  //IdentityServer授权路径

                    options.ApiName = "order";  //需要授权的服务名称

                });

    }

    // This method gets called by the runtime. Use this method to configure the HTTP request pipeline.

    public void Configure(IApplicationBuilder app, IWebHostEnvironment env)

    {

        if (env.IsDevelopment())

        {

            app.UseDeveloperExceptionPage();

        }

        app.UseRouting();

        app.UseAuthentication();

        app.UseAuthorization();

        app.UseEndpoints(endpoints =>

        {

            endpoints.MapControllers();

        });

    }

}
c)添加控制器:OrderController
namespace cz.Api.Order.Controllers

{

   [ApiController]

   [Route("[controller]")]

   [Authorize]
  public class OrderController : ControllerBase

    {

        private static readonly string[] Summaries = new[]

        {

            "Order1", "Order2", "Order3", "Order4", "Order5", "Order6", "Order7", "Order8", "Order9", "Order10"

        };

        private readonly ILogger<OrderController> _logger;

        public OrderController(ILogger<OrderController> logger)

        {

            _logger = logger;

        }

     //模拟返回数据

        [HttpGet]

        public IEnumerable<WeatherForecast> Get()

        {

            var rng = new Random();

            return Enumerable.Range(1, 5).Select(index => new WeatherForecast

            {

                Date = DateTime.Now.AddDays(index),

                TemperatureC = rng.Next(-20, 55),

                Summary = Summaries[rng.Next(Summaries.Length)]

            })

            .ToArray();

        }

    }

}
d)商品项目同步调整,调整Api和方法
2、门户项目:
添加Nuget引用:
Install-Package IdentityServer4.AccessTokenValidation
Install-Package Microsoft.AspNetCore.Authentication.OpenIdConnect
a)调整HomeController如下内容:
public class HomeController : Controller

{

    private readonly ILogger<HomeController> _logger;

    public HomeController(ILogger<HomeController> logger)

    {

        _logger = logger;

    }

    [Authorize]

    public IActionResult Index()

    {

        //模拟返回应用列表

        List<AppModel> apps = new List<AppModel>();

        apps.Add(new AppModel() { AppName = "Order Client", Url = "http://localhost:5021" });

        apps.Add(new AppModel() { AppName = "Goods Client", Url = "http://localhost:5022" });

        return View(apps);

    }

    [Authorize]

    public IActionResult Privacy()

    {

        return View();

    }

public IActionResult Logout()

    {

        return SignOut("oidc", "Cookies");

    }

}
b)调整主页视图:
@model List<AppModel>

@{

    ViewData["Title"] = "Home Page";

}

<style>

    .box-wrap {

        text-align: center;

        /*        background-color: #d4d4f5;*/

        overflow: hidden;

    }

        .box-wrap > div {

            width: 31%;

            padding-bottom: 31%;

            margin: 1%;

            border-radius: 10%;

            float: left;

            background-color: #36A1DB;

        }

</style>

<div class="text-center">

    <div class="box-wrap">

        @foreach (var item in Model)

        {

            <div class="box">

                <a href="@item.Url" target="_blank">@item.AppName</a>

            </div>

        }

    </div>

</div>
c)调整Statup文件中ConfigureServices方法:
public void ConfigureServices(IServiceCollection services)

{

    services.Configure<CookiePolicyOptions>(options =>

    {

        // This lambda determines whether user consent for non-essential cookies is needed for a given request.

        options.CheckConsentNeeded = context => true;

        options.MinimumSameSitePolicy = SameSiteMode.Lax;

    });

    JwtSecurityTokenHandler.DefaultMapInboundClaims = false;

    services.AddControllersWithViews();

    services.AddAuthentication(options =>

    {

        options.DefaultScheme = "Cookies";

        options.DefaultChallengeScheme = "oidc";

    })

    .AddCookie("Cookies")

    .AddOpenIdConnect("oidc", options =>

    {

        options.RequireHttpsMetadata = false;

        options.Authority = "http://localhost:5600";

        options.ClientId = "main_client";

        options.ClientSecret = "secret";

        options.ResponseType = "id_token";

        options.SaveTokens = true;

        options.GetClaimsFromUserInfoEndpoint = true;

        //事件

        options.Events = new Microsoft.AspNetCore.Authentication.OpenIdConnect.OpenIdConnectEvents()

        {

            //远程故障

            OnRemoteFailure = context =>

            {

                context.Response.Redirect("/");

                context.HandleResponse();

                return Task.FromResult(0);

            },

            //访问拒绝

            OnAccessDenied = context =>

            {

                //重定向到指定页面

                context.Response.Redirect("/");

                //停止此请求的所有处理并返回给客户端

                context.HandleResponse();

                return Task.FromResult(0);

            },

        };

    });

}
3、订单、商品客户端项目:
添加Nuget引用:
Install-Package IdentityServer4.AccessTokenValidation
Install-Package Microsoft.AspNetCore.Authentication.OpenIdConnect
a)修改HomeController内容如下:
public class HomeController : Controller

{

    private readonly ILogger<HomeController> _logger;

    public HomeController(ILogger<HomeController> logger)

    {

        _logger = logger;

    }

    [Authorize]

    public IActionResult Index()

    {

        return View();

    }

    public async Task<IActionResult> PrivacyAsync()

    {

        var accessToken = await HttpContext.GetTokenAsync("access_token");

        var client = new HttpClient();

        client.DefaultRequestHeaders.Authorization = new AuthenticationHeaderValue("Bearer", accessToken);

        var content = await client.GetStringAsync("http://localhost:5601/order");

        client.DefaultRequestHeaders.Authorization = new AuthenticationHeaderValue("Bearer", accessToken);

        var contentgoods = await client.GetStringAsync("http://localhost:5602/goods");

        ViewData["Json"] = $"Goods:{contentgoods}\r\n " +

            $"Orders:{content}";

        return View();

    }

    [ResponseCache(Duration = 0, Location = ResponseCacheLocation.None, NoStore = true)]

    public IActionResult Error()

    {

        return View(new ErrorViewModel { RequestId = Activity.Current?.Id ?? HttpContext.TraceIdentifier });

    }

    public IActionResult Logout()

    {

        return SignOut("oidc", "Cookies");

    }

}
b)调整对应视图内容:
#####Home.cshtml
@{

    ViewData["Title"] = "Home Page";

}

@using Microsoft.AspNetCore.Authentication

<h2>Claims</h2>

<div class="text-center">

    <dl>

        @foreach (var claim in User.Claims)

        {

            <dt>@claim.Type</dt>

            <dd>@claim.Value</dd>

        }

    </dl>

</div>

<div class="text-center">

    <h2>Properties</h2>

    <dl>

        @foreach (var prop in (await Context.AuthenticateAsync()).Properties.Items)

        {

            <dt>@prop.Key</dt>

            <dd>@prop.Value</dd>

        }

    </dl>

</div>

#####Privacy.cshtml
@{
ViewData["Title"] = "API Result";
}
<h1>@ViewData["Title"]</h1>
<p>@ViewData["Json"]</p>
c)Statup中设置客户端信息
public void ConfigureServices(IServiceCollection services)

{

    services.Configure<CookiePolicyOptions>(options =>

    {

        // This lambda determines whether user consent for non-essential cookies is needed for a given request.

        options.CheckConsentNeeded = context => true;

        options.MinimumSameSitePolicy = SameSiteMode.Lax;

    });

    JwtSecurityTokenHandler.DefaultMapInboundClaims = false;

    services.AddControllersWithViews();

    services.AddAuthentication(options =>

    {

        options.DefaultScheme = "Cookies";

        options.DefaultChallengeScheme = "oidc";

    })

    .AddCookie("Cookies")

    .AddOpenIdConnect("oidc", options =>

    {

        options.RequireHttpsMetadata = false;

        options.Authority = "http://localhost:5600";

        options.ClientId = "order_client";

        options.ClientSecret = "secret";

        options.ResponseType = "code";

        options.SaveTokens = true;

        options.Scope.Add("order");

        options.Scope.Add("goods");

        options.GetClaimsFromUserInfoEndpoint = true;

        //事件

        options.Events = new Microsoft.AspNetCore.Authentication.OpenIdConnect.OpenIdConnectEvents()

        {

            //远程故障

            OnRemoteFailure = context =>

            {

                context.Response.Redirect("/");

                context.HandleResponse();

                return Task.FromResult(0);

            },

            //访问拒绝

            OnAccessDenied = context =>

            {

                //重定向到指定页面

                context.Response.Redirect("/");

                //停止此请求的所有处理并返回给客户端

                context.HandleResponse();

                return Task.FromResult(0);

            },

        };

    });

}
d)商品客户端调整按照以上内容调整类似。
三、演示效果:
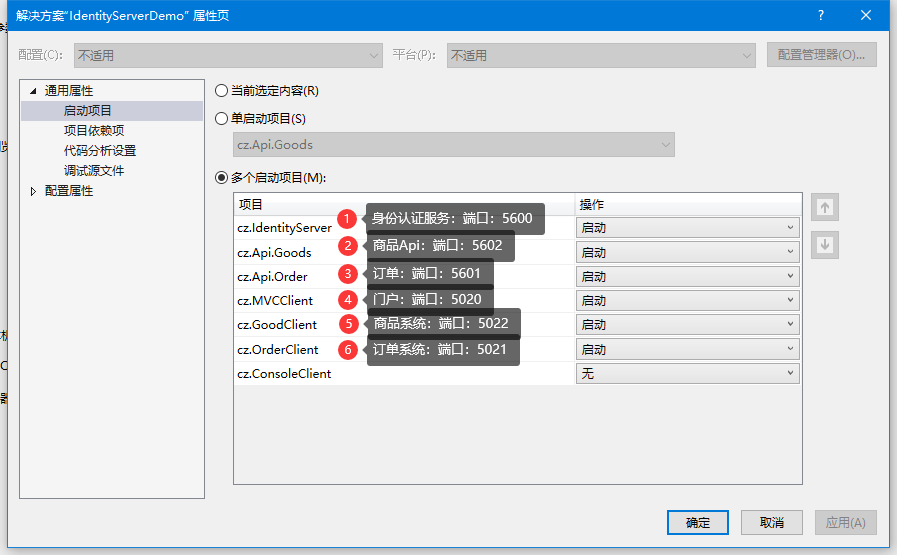
1、设置项目启动如下图:
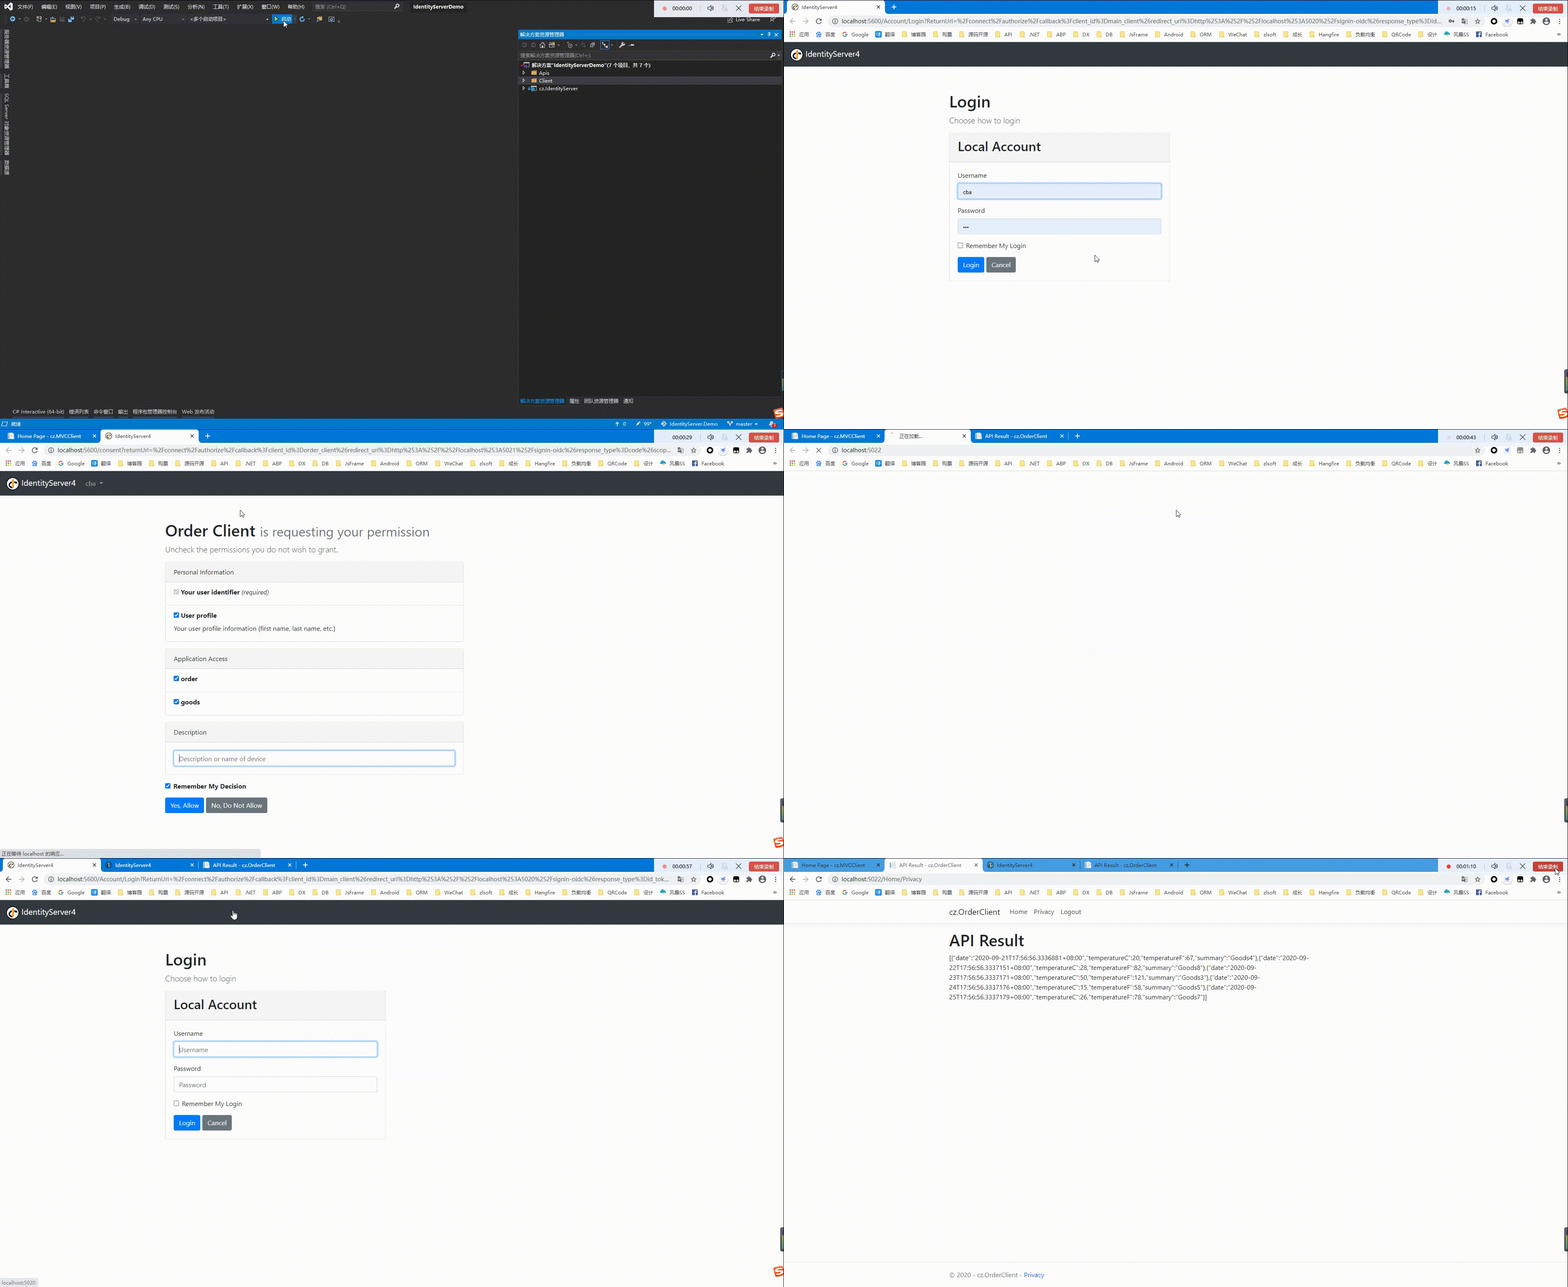
2、示例效果:
四、总结:
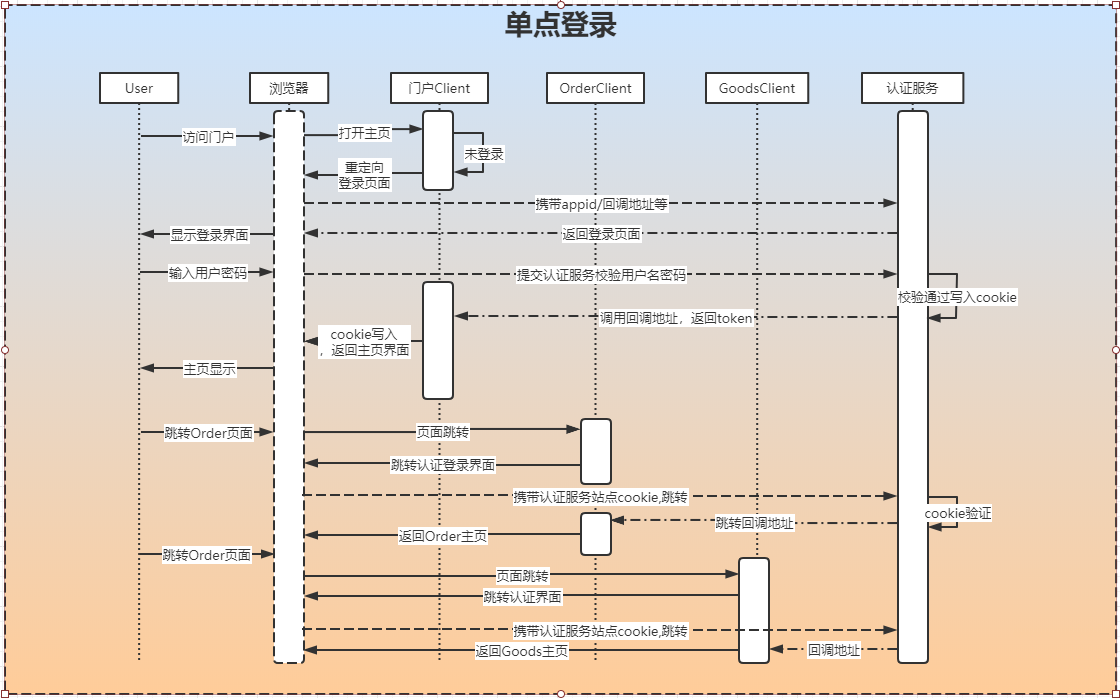
通过以上操作,整理单点登录流程如下图:
踩坑:当登录取消、授权提示拒绝时,总是跳转错误界面。
解决办法:客户端定义时,定义事件:对访问拒绝添加处理逻辑。
//事件

options.Events = new Microsoft.AspNetCore.Authentication.OpenIdConnect.OpenIdConnectEvents()

{

  //远程故障

  OnRemoteFailure = context =>

  {

    context.Response.Redirect("/");

    context.HandleResponse();

    return Task.FromResult(0);

  },

  //访问拒绝

  OnAccessDenied = context =>

  {

    //重定向到指定页面

    context.Response.Redirect("/");

    //停止此请求的所有处理并返回给客户端

    context.HandleResponse();

    return Task.FromResult(0);

  },

};
GitHub地址:https://github.com/cwsheng/IdentityServer.Demo.git
认证授权:IdentityServer4 - 单点登录的更多相关文章
- NET Core 2.0使用Cookie认证实现SSO单点登录
NET Core 2.0使用Cookie认证实现SSO单点登录 之前写了一个使用ASP.NET MVC实现SSO登录的Demo,https://github.com/bidianqing/SSO.Sa ...
- OAuth2.0认证和授权以及单点登录
https://www.cnblogs.com/shizhiyi/p/7754721.html OAuth2.0认证和授权机制讲解 2017-10-30 15:33 by shizhiyi, 2273 ...
- 阶段5 3.微服务项目【学成在线】_day16 Spring Security Oauth2_02-用户认证技术方案-单点登录
2 用户认证技术方案 2.1 单点登录技术方案 分布式系统要实现单点登录,通常将认证系统独立抽取出来,并且将用户身份信息存储在单独的存储介质,比如: MySQL.Redis,考虑性能要求,通常存储在R ...
- ASP.NET Core 2.0使用Cookie认证实现SSO单点登录
之前写了一个使用ASP.NET MVC实现SSO登录的Demo,https://github.com/bidianqing/SSO.Sample,这个Demo是基于.NET Framework,.NE ...
- 单点登录(十八)----cas4.2.x客户端增加权限控制shiro
我们在上面章节已经完成了cas4.2.x登录启用mongodb的验证方式. 单点登录(十三)-----实战-----cas4.2.X登录启用mongodb验证方式完整流程 也完成了获取管理员身份属性 ...
- Spring Cloud Alibaba 实战(十一) - Spring Cloud认证授权
欢迎关注全是干货的技术公众号:JavaEdge 本文主要内容: 如何实现用户认证与授权? 实现的三种方案,全部是通过画图的方式讲解.以及三种方案的对比 最后根据方案改造Gateway和扩展Feign ...
- 029.[转] SSO单点登录的通用架构实现
单点登录的通用架构实现 pphh发布于2018年4月26日 http://www.hyhblog.cn/2018/04/26/single_sign_on_arch/ 目录 1. 什么是单点登录 2. ...
- SANGFOR AC配置AD域单点登录(一)----AC侧配置
一.需求 1. AD域单点登录适用于客户内网已有AD域统一管理内网用户,部署AC后,希望AC和AD域结合实现平滑认证.即终端PC开机通过域帐号登录AD域后自动通过AC认证上网,无需再次人为通过AC认证 ...
- IdentityServer4实现单点登录统一认证
什么是单点登录统一认证:假如某公司旗下有10个网站(比如各种管理网站:人事系统啊,财务系统啊,业绩系统啊等),我是该公司一管理员或者用户,按照传统网站模式是这样:我打开A网站 输入账号密码 然后进入到 ...
随机推荐
- 跟我一起学.NetCore之配置变更监听
前言 通常程序中配置少不了,配置的修改也避免不了,配置的热更新为此给应用程序带来很大的便捷,不用重启,提高用户体验:但往往有时候需要对修改进行审计,也就是需要记录,有时候也会针对配置修改的时候触发相关 ...
- HDFS 2.X新特性
1 集群间数据拷贝 1.scp实现两个远程主机之间的文件复制 scp -r hello.txt root@hadoop103:/user/atguigu/hello.txt // 推 push scp ...
- 操作系统-中断(2)IA-32/Linux的向量中断方式
一.Intel定义下的异常和中断 不同体系和教材往往对异常和中断有不同的定义. Intel定义:中断是一种典型的由I/O设备触发的.与当前正在执行的指令无关的异步事件:而异常是处理器执行一条指令时,由 ...
- Lambda 表达式推演全过程
Java 的 Lambda 表达式推演过程: 第一步:正常的类实现(外部实现),new一个对象,然后重写方法实现 public class TestLambda3 { public static vo ...
- 自动部署Asp.Net Core到Docker
原文链接:个人博客:自动部署Asp.Net Core至Docker 本文简介 最近在开发一个管理系统,代码框架是用的前后台分离的方式 后台使用的是Asp.Net Core平台,开发所有业务,向前台提供 ...
- 【Azure DevOps系列】Azure DevOps生成代码覆盖率
前言 在做单元测试时,代码覆盖率可以作为我们衡量代码质量的一个指标,本章我们将使用Azure DevOps帮助我们生成代码覆盖率的结果.Azure DevOps构建管道还是具有代码覆盖率选项的,在Vi ...
- 架构设计 | 基于电商交易流程,图解TCC事务分段提交
本文源码:GitHub·点这里 || GitEE·点这里 一.场景案例简介 1.场景描述 分布式事务在业务系统中是十分常见的,最经典的场景就是电商架构中的交易业务,如图: 客户端通过请求订单服务,执行 ...
- Linux 操作系统 基础
root: 管理员 /: 根目录[windows : 计算机] ~: 家目录: 管理员:/root/.. 非管理员:/home/... 命令提示符: [root@localhost abc]#: ro ...
- 深入了解Netty【二】零拷贝
引言 以下翻译自:Zero Copy I: User-Mode Perspective 零拷贝是什么? 为了更好地理解问题的解决方案,我们首先需要理解问题本身.让我们来看看什么是参与网络服务器的简单过 ...
- Linq 下的扩展方法太少了,您期待的 MoreLinq 来啦
一:背景 1. 讲故事 前几天看同事在用 linq 给内存中的两个 model 做左连接,用过的朋友都知道,你一定少不了一个叫做 DefaultIfEmpty 函数,这玩意吧,本来很流畅的 from. ...