React-Native需要css和布局-20160902
import React, { Component } from 'react';

import {

  AppRegistry,

  StyleSheet,

  Text,

  View,

} from 'react-native';

class helloworld extends Component {

  render() {

    return (

        <View style={styles.style_0}>

            <View style = {styles.styleView}>

                <Text style={styles.style_text}>自由摆放</Text>

            </View>

            <View style={[styles.styleView ,styles.centerView]}>

                    <Text style={styles.style_text}>居中显示</Text>

            </View>

            <View style={[styles.styleView,styles.rightView]}>

                    <Text style={styles.style_text}>居右显示</Text>

            </View>

            <View style={[styles.styleView,styles.leftView]}>

                <Text style={styles.style_text}>居左显示</Text>

            </View>

           <View style={[styles.styleView,styles.autoView,{marginTop:20}]}>

                 <Text style={styles.style_text}>自动显示</Text>

           </View>

           <View style={[styles.styleView,styles.stretchView,{marginTop:20}]}>

                 <Text style={styles.style_text}>伸展显示</Text>

             </View>

          <View style={styles.vertical_centerView}>

                 <Text style={styles.style_text}>垂直居中显示显示</Text>

          </View>

        </View>

    );

  }

}

        const styles = StyleSheet.create({

            style_0:{

                flex:1,

                borderColor:'red',

                borderWidth:2,

            },

            styleView:{

                width:100,

                height:50,

                backgroundColor:'blue'

            },

            style_text:{

                color:'white',

                marginTop:18,

                textAlign:'center',

            },

            centerView:{

              alignSelf:'center',

            },

            rightView:{

                alignSelf:'flex-end',

            },

            leftView:{

                alignSelf:'flex-start'

            },

            autoView:{

                alignSelf:'auto'

            },

            stretchView:{

                alignSelf:'stretch'

            },

            vertical_centerView:{

                flex:1,

                borderColor:'red',

                borderWidth:2,

                justifyContent:'center',

                alignItems:'center',

            },

        });

AppRegistry.registerComponent('小棚', () => helloworld);
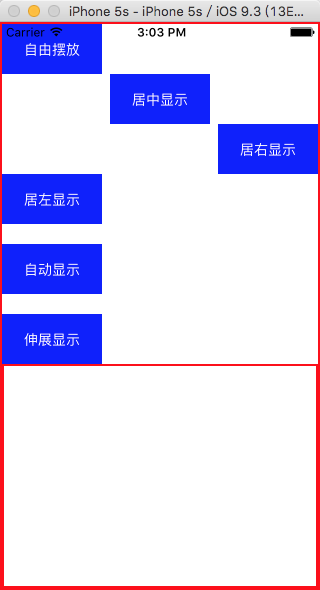
运行结果
React-Native需要css和布局-20160902的更多相关文章
- React Native 中 CSS 的使用
首先声明,此文原作者为黎 跃春 React Native中CSS 内联样式 对象样式 使用Stylesheet.Create 样式拼接 导出样式对象 下面的代码是index.ios.js中的代码: / ...
- 3、手把手教React Native实战之flexbox布局
flexbox是Flexible Box的缩写,弹性盒子布局 主流的浏览器都支持 flexbox布局是伸缩容器(container)和伸缩项目(item)组成 Flexbox布局的主体思想是元素可以 ...
- 4、手把手教React Native实战之flexbox布局(伸缩属性)
###伸缩项目的属性 1.order 定义项目的排列顺序,数值越小,排列越靠前,默认值为0,语法为:order:整数值 2.flex-grow 定义伸缩项目的放大比例,默认值为0,即表示如果存在剩余空 ...
- React Native入门 认识Flexbox布局
Flexbox布局是由W3C在09年提出的在Web端取代CSS盒子模型的一种布局方式. ReactNative实现了Flexbox布局的大部分功能. Flexbox布局所使用的属性,基本可以分为两大类 ...
- React Native的ListView的布局使用
1> ListView组件用于显示一个垂直的滚动列表,其中的元素之间结构近似而仅数据不同. ListView更适于长列表数据,且元素个数可以增删.和ScrollView不同的是,ListView ...
- 从web移动端布局到react native布局
在web移动端通常会有这样的需求,实现上中下三栏布局(上下导航栏位置固定,中间部分内容超出可滚动),如下图所示: 实现方法如下: HTML结构: <div class='container'&g ...
- React Native基础&入门教程:初步使用Flexbox布局
在上篇中,笔者分享了部分安装并调试React Native应用过程里的一点经验,如果还没有看过的同学请点击<React Native基础&入门教程:调试React Native应用的一小 ...
- React Native布局
一款好的APP离不了一个漂亮的布局,本文章将向大家分享React Native中的布局方式FlexBox. 在React Native中布局采用的是FleBox(弹性框)进行布局. FlexBox提供 ...
- React Native探索(四)Flexbox布局详解
相关文章 React Native探索系列 前言 在Android开发中我们有很多种布局,比如LinearLayout和RelativeLayout,同样在React Native也有它的布局,这个布 ...
随机推荐
- Windows 10(64位)配置Caffe运行环境的基本流程
最新博客地址已搬家到: http://blog.csdn.net/zzlyw/article/details/53215148
- 对偶SVM
1.对偶问题的推导 为什么要求解对偶问题?一是对偶问题往往更容易求解,二是可以自然的引入核函数. 1.1 用拉格朗日函数将原问题转化为"无约束"等价问题 原问题是: 写出它的拉格朗 ...
- linux Mint18 backspace怎么不能连续删除
打开菜单--->首选项--->键盘,如下图所示: 打开启用重复按键即可,就可以随心所欲的连续删除,连续移动光标了
- SpringMVC
使用注解去完成整个项目 安装spring的一个插件,则相关的提示就会出来
- Vue.js与MVVM
MVVM 是Model-View-ViewModel 的缩写,它是一种基于前端开发的架构模式,其核心是提供对View 和 ViewModel 的双向数据绑定,这使得ViewModel 的状态改变可以自 ...
- wpf 悬浮窗口的实现
又到了写点东西的时候,因为有了新的收获,所以用随笔来记录下自己的成长.话不多说,正入主题. 最近又遇到一个新的需求,有一组控件,需要悬浮显示在面板的边缘上,刚开始的时候,是不显示的,点击后显示,然后再 ...
- Android Studio 关联源码问题
Android Studio 点击某个类查看源码有时候会出现如下情况 这种情况并不是每个项目都会出现这种情况,那是因为项目的编译版本不同,有的关联了Sources中的源码,而有的没有. 下面说一下具 ...
- ios 弹出不同的键盘
iOS 提供了10种键盘类型,在开发中,我们可以根据不同的需求,选择不同的键盘样式,例如,当我们只需要输入手机号码时,可以选择纯数字类型的键盘(NumbersAndPunctuation),当我们需要 ...
- python map()
map()函数接收两个参数,一个是函数,一个是序列,map将传入的函数依次作用到序列的每个元素,并把结果作为新的list返回. 举例说明,比如我们有一个函数f(x)=x%2,要把这个函数作用在一个li ...
- Datazen介绍
Datazen是移动端全平台的图表解决方案,基于HTML5的应用,实现了全平台的整合.此篇主要对其功能进行大体介绍. 这个平台最近刚被微软收购,相信微软看重的是其HTML5在全移动端平台的实现.Dat ...