
cenos 安装nginx并添加到service
系统平台:CentOS release 6.6 (Final) 64位。
一、安装编译工具及库文件
yum -y install make zlib zlib-devel gcc-c++ libtool openssl openssl-devel
二、首先要安装 PCRE
PCRE 作用是让 Ngnix 支持 Rewrite 功能。
1、下载 PCRE 安装包,下载地址: http://downloads.sourceforge.net/project/pcre/pcre/8.35/pcre-8.35.tar.gz
[root@bogon src]# wget http://downloads.sourceforge.net/project/pcre/pcre/8.35/pcre-8.35.tar.gz

2、解压安装包:
[root@bogon src]# tar zxvf pcre-8.35.tar.gz
3、进入安装包目录
[root@bogon src]# cd pcre-8.35
4、编译安装
[root@bogon pcre-8.35]# ./configure

[root@bogon pcre-8.35]# make && make install
5、查看pcre版本
[root@bogon pcre-8.35]# pcre-config --version

安装 Nginx
1、下载 Nginx,下载地址:http://nginx.org/download/nginx-1.6.2.tar.gz
[root@bogon src]# wget http://nginx.org/download/nginx-1.6.2.tar.gz
 2、解压安装包
[root@bogon src]# tar zxvf nginx-1.6.2.tar.gz
3、进入安装包目录
[root@bogon src]# cd nginx-1.6.2
4、编译安装
[root@bogon nginx-1.6.2]# ./configure --prefix=/usr/local/webserver/nginx --with-http_stub_status_module --with-http_ssl_module --with-pcre=/usr/local/src/pcre-8.35

[root@bogon nginx-1.6.2]# make

[root@bogon nginx-1.6.2]# make install
5、查看nginx版本
[root@bogon nginx-1.6.2]# /usr/local/webserver/nginx/sbin/nginx -v

到此,nginx安装完成。
Nginx 配置
创建 Nginx 运行使用的用户 www:
[root@bogon conf]# /usr/sbin/groupadd www

[root@bogon conf]# /usr/sbin/useradd -g www www
配置nginx.conf ,将/usr/local/webserver/nginx/conf/nginx.conf替换为以下内容
[root@bogon conf]#  cat /usr/local/webserver/nginx/conf/nginx.conf

user www www;

worker_processes 2; #设置值和CPU核心数一致

error_log /usr/local/webserver/nginx/logs/nginx_error.log crit; #日志位置和日志级别

pid /usr/local/webserver/nginx/nginx.pid;

#Specifies the value for maximum file descriptors that can be opened by this process.

worker_rlimit_nofile 65535;

events

{

  use epoll;

  worker_connections 65535;

}

http

{

  include mime.types;

  default_type application/octet-stream;

  log_format main  '$remote_addr - $remote_user [$time_local] "$request" '

               '$status $body_bytes_sent "$http_referer" '

               '"$http_user_agent" $http_x_forwarded_for';


#charset gb2312;


  server_names_hash_bucket_size 128;

  client_header_buffer_size 32k;

  large_client_header_buffers 4 32k;

  client_max_body_size 8m;


  sendfile on;

  tcp_nopush on;

  keepalive_timeout 60;

  tcp_nodelay on;

  fastcgi_connect_timeout 300;

  fastcgi_send_timeout 300;

  fastcgi_read_timeout 300;

  fastcgi_buffer_size 64k;

  fastcgi_buffers 4 64k;

  fastcgi_busy_buffers_size 128k;

  fastcgi_temp_file_write_size 128k;

  gzip on;

  gzip_min_length 1k;

  gzip_buffers 4 16k;

  gzip_http_version 1.0;

  gzip_comp_level 2;

  gzip_types text/plain application/x-javascript text/css application/xml;

  gzip_vary on;


  #limit_zone crawler $binary_remote_addr 10m;

 #下面是server虚拟主机的配置

 server

  {

    listen 80;#监听端口

    server_name localhost;#域名

    index index.html index.htm index.php;

    root /usr/local/webserver/nginx/html;#站点目录

      location ~ .*\.(php|php5)?$

    {

      #fastcgi_pass unix:/tmp/php-cgi.sock;

      fastcgi_pass 127.0.0.1:9000;

      fastcgi_index index.php;

      include fastcgi.conf;

    }

    location ~ .*\.(gif|jpg|jpeg|png|bmp|swf|ico)$

    {

      expires 30d;

  # access_log off;

    }

    location ~ .*\.(js|css)?$

    {

      expires 15d;

   # access_log off;

    }

    access_log off;

  }

}
检查配置文件ngnix.conf的正确性命令:
[root@bogon conf]# /usr/local/webserver/nginx/sbin/nginx -t

启动 Nginx
Nginx 启动命令如下:
[root@bogon conf]# /usr/local/webserver/nginx/sbin/nginx

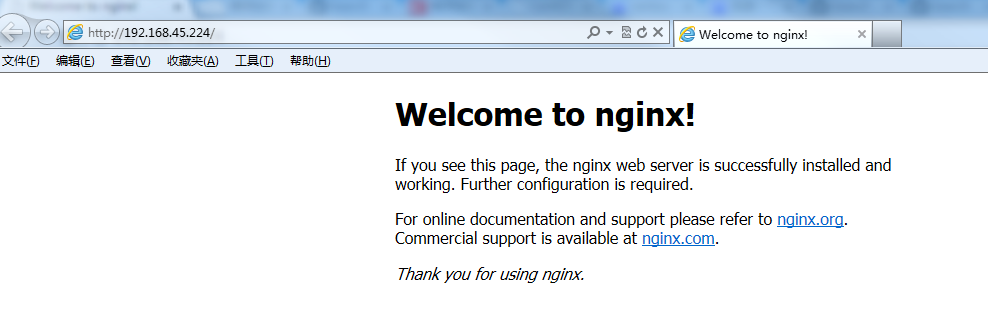
访问站点
从浏览器访问我们配置的站点ip:
Nginx 其他命令
以下包含了 Nginx 常用的几个命令:
/usr/local/webserver/nginx/sbin/nginx -s reload            # 重新载入配置文件

/usr/local/webserver/nginx/sbin/nginx -s reopen            # 重启 Nginx

/usr/local/webserver/nginx/sbin/nginx -s stop              # 停止 Nginx
三:将nginx添加到系统service
1. vim /etc/init.d/nginx 将下面的代码复制进去保存
#!/bin/bash

# nginx Startup script for the Nginx HTTP Server

#

# chkconfig: - 85 15

# description: Nginx is a high-performance web and proxy server.

# It has a lot of features, but it's not for everyone.

# processname: nginx

# pidfile: /var/run/nginx.pid

# config: /usr/local/nginx/conf/nginx.conf

nginxd=/usr/local/nginx/sbin/nginx

nginx_config=/usr/local/nginx/conf/nginx.conf

nginx_pid=/usr/local/nginx/nginx.pid

RETVAL=0

prog="nginx"

# Source function library.

. /etc/rc.d/init.d/functions

# Source networking configuration.

. /etc/sysconfig/network

# Check that networking is up.

[ ${NETWORKING} = "no" ] && exit 0

[ -x $nginxd ] || exit 0

# Start nginx daemons functions.

start() {

if [ -e $nginx_pid ];then

   echo "nginx already running...."

   exit 1

fi

   echo -n $"Starting $prog: "

   daemon $nginxd -c ${nginx_config}

   RETVAL=$?

   echo

   [ $RETVAL = 0 ] && touch /var/lock/subsys/nginx

   return $RETVAL

}

# Stop nginx daemons functions.

stop() {

        echo -n $"Stopping $prog: "

        killproc $nginxd

        RETVAL=$?

        echo

        [ $RETVAL = 0 ] && rm -f /var/lock/subsys/nginx /var/run/nginx.pid

}

# reload nginx service functions.

reload() {

    echo -n $"Reloading $prog: "

 $nginxd -s reload

    #if your nginx version is below 0.8, please use this command: "kill -HUP `cat ${nginx_pid}`"

    RETVAL=$?

    echo

}

# See how we were called.

case "$1" in

start)

        start

        ;;

stop)

        stop

        ;;

reload)

        reload

        ;;

restart)

        stop

        start

        ;;

status)

        status $prog

        RETVAL=$?

        ;;

*)

        echo $"Usage: $prog {start|stop|restart|reload|status|help}"

        exit 1

esac

exit $RETVAL
3. 保存文件后执行以下代码:
[root@localhost /]# cd /etc/rc.d/init.d
[root@localhost init.d]# chmod +x nginx
[root@localhost init.d]# /sbin/chkconfig --level 345 nginx on
任何位置都能运行 service nginx start 可选 start | stop | restart | reload | status | help
cenos 安装nginx并添加到service的更多相关文章
- 新安装和已安装nginx如何添加未编译安装模块/补丁
新安装和已安装nginx如何添加未编译安装模块/补丁 --http://www.apelearn.com/bbs/forum.php?mod=viewthread&tid=10485& ...
- 安装nginx和添加ssl证书
一. 准备: 1. 需要有一台centos的服务器 2. 域名解析到服务器 3. 域名的nginx证书 二. 安装Nginx(输入下面的指令后:可访问实验机器外网 HTTP 服务http://118. ...
- CentOS下安装Nginx并添加nginx_upload_module
安装前,最好能保证依赖的系统软件已经升级. yum update CentOS上安装Nginx,如果只是简单安装,不附加其他第三方模块,一句话可以搞定: yum install nginx ...
- 已安装nginx动态添加模块
说明:已经安装好的nginx,需要添加一个未被编译安装的模块,需要怎么弄呢? 具体:这里以安装第三方ngx_http_google_filter_module模块为例nginx的模块是需要重新编译ng ...
- centos nginx,php添加到Service
SHELL脚本: nginx vim /etc/init.d/nginx #!/bin/sh # # nginx - this script starts and stops the nginx da ...
- CentOS7.0 采用压缩包 安装Nginx 1.7.4和添加Tomcat为系统服务 nginx结合tomcat
CentOS7.0 采用压缩包 安装Nginx 1.7.4 一.安装准备首先由于nginx的一些模块依赖一些lib库,所以在安装nginx之前,必须先安装这些lib库,这些依赖库主要有g++.gcc ...
- 在已编译安装nginx上动态添加模块
一.添加nginx模块 找到安装nginx的源码根目录,如果没有的话下载新的源码 wget http://nginx.org/download/nginx-1.8.1.tar.gz 查看ngixn版本 ...
- 【Nginx】如何为已安装的Nginx动态添加模块?看完我懂了!!
写在前面 很多时候,我们根据当时的项目情况和业务需求安装完Nginx后,后续随着业务的发展,往往会给安装好的Nginx添加其他的功能模块.在为Nginx添加功能模块时,要求Nginx不停机.这就涉及到 ...
- 十三、给已安装的nginx动态添加模块
给已安装的nginx动态添加模块说明:已经安装好的nginx,需要添加一个未被编译安装的模块,需要怎么弄呢?具体:这里以安装 --with-http_ssl_module模块为例nginx的模块是需要 ...
随机推荐
- libevent源码学习
怎么快速学习开源库比如libevent? libevent分析 - sparkliang的专栏 - 博客频道 - CSDN.NET Libevent源码分析 - luotuo44的专栏 - 博客频道 ...
- C++中的STL中map用法详解(转)
原文地址: https://www.cnblogs.com/fnlingnzb-learner/p/5833051.html C++中的STL中map用法详解 Map是STL的一个关联容器,它提供 ...
- pyCharm最新2018激活码(转)
原文地址:https://blog.csdn.net/u014044812/article/details/78727496 社区版和专业版区别: 因公司的需求,需要做一个爬取最近上映的电影.列车号. ...
- linux记录每个用户执行的命令
1.在/etc/profile中添加如下代码: #history USER_IP=`>/dev/null| awk '{print $NF}'|sed -e 's/[()]//g'` HISTD ...
- sql多表更新使用别名(小技巧)
update A set A.CityRegionID=B.ParentID, A.CityName=(select RegionName from Common_Region ...
- 26.OGNL与ValueStack(VS)-N语法top语法
转自:https://wenku.baidu.com/view/84fa86ae360cba1aa911da02.html N语法[0]:<s:property value="[0]& ...
- Mysql 查询列名
#列名 select COLUMN_NAME from information_schema.columns where TABLE_SCHEMA='yunpiaobox_db' and table_ ...
- curl常用设置-涉及超时相关
curl_easy_setopt( curl, CURLOPT_VERBOSE, 1L ); //在屏幕打印请求连接过程和返回http数据 curl_easy_setopt( curl, CURLOP ...
- zookeeper 分布式计数器
分布式计数器的思路是:指定一个Zookeeper数据节点作为计数器,多个应用实例在分布式锁的控制下,通过更新该数据节点的内容来实现计数功能. Curator中封装了实现,例如 DistributedA ...
- 用logger在控制台打印信息
第一步: 导入jar包,maven项目可以直接添加 <dependency> <groupId>log4j</groupId> <artifactId> ...