
Flask中路由系统以及蓝图的使用
一、Flask的路由系统
1.@app.route()装饰器中的参数
methods:当前URL地址,允许访问的请求方式
@app.route("/info", methods=["GET", "POST"])

def student_info():

    stu_id = int(request.args["id"])

    return f"Hello Old boy {stu_id}"  #格式化输出
endpoint:反向RUL地址,默认位视图函数名(url_for)
from flask import url_for

@app.route("/info", methods=["GET", "POST"], endpoint="r_info")

def student_info():

    print(url_for("r_info"))  # /info

    stu_id = int(request.args["id"])

    return f"Hello Old boy {stu_id}"  # 格式化输出
defaults:视图函数的参数默认值
from flask import url_for

@app.route("/info", methods=["GET", "POST"], endpoint="r_info", defaults={"nid": 100})

def student_info(nid):

    print(url_for("r_info"))  # /info

    # stu_id = int(request.args["id"])

    print(nid)  #

    return f"Hello Old boy {nid}"  # Python3.6的新特性 f"{变量名}格式化输出"
strict_slashes:url地址结尾符"/" 的控制False:无论结尾“/”是否存在均可以访问,True:结尾必须不是“/”
# 访问地址 : /info

@app.route("/info", strict_slashes=True)

def student_info():

    return "Hello Old boy info"

# 访问地址 : /infos  or  /infos/

@app.route("/infos", strict_slashes=False)

def student_infos():

    return "Hello Old boy infos"
redirect_to:url地址重定向
# 访问地址 : /info 浏览器跳转至 /infos

@app.route("/info", strict_slashes=True, redirect_to="/infos")

def student_info():

    return "Hello Old boy info"

@app.route("/infos", strict_slashes=False)

def student_infos():

    return "Hello Old boy infos"
subdomain:子域名前缀subdomian=“wurenxiansheng”这样写可以得到wurenxiansheng.bokeyuan.com前提是app.config["SERVER_NAME"]="bokeyuan.com"
app.config["SERVER_NAME"] = "bokeyuan.com"

@app.route("/info",subdomain="wurenxiansheng")

def student_info():

    return "Hello wurenxiansheng info"

# 访问地址为: wurenxiansheng.bokeyuan.com/info
2.动态参数路由:
from flask import url_for

# 访问地址 : http://127.0.0.1:5000/info/1

@app.route("/info/<int:nid>", methods=["GET", "POST"], endpoint="r_info")

def student_info(nid):

    print(url_for("r_info",nid=2))  # /info/2

    return f"Hello Old boy {nid}"  # Python3.6的新特性 f"{变量名}"
<int:nid>就是在url后定义一个参数接收
这种动态参数路由,在url_for的时候,一定要将动态参数名+参数值添加进去,否则会抛出参数错误的异常
3.Flask初始化配置
app = Flask(__name__)

app.template_folder = "templates"    #指定模板存放路径

app.static_folder = "文件夹名字"    #指定静态文件的存放路径

app.static_url_path = "/static"    # 指定静态文件访问路径

static_host = None    #静态文件的存放服务器
4.Flask对象配置
查看默认配置及配置项
app.config == app.default_config
我们可以把关于Flask的一些配置,单拎出来创建一个独立的类或者文件用来存放用的时候直接导入,但是要记住用app.config.from_object(Obj)引入配置文件
class FlaskSetting(object):

    DEBUG = True    #打开Flask的debug模式

app.config.from_object(FlaskSetting)
二、Flask中的蓝图
1.初始Flask蓝图(blueprint)
把Blueprint理解为不能被run的Flask对象
创建一个项目然后将目录结构做成如下(这是一个简单的对于数据的增删改查):
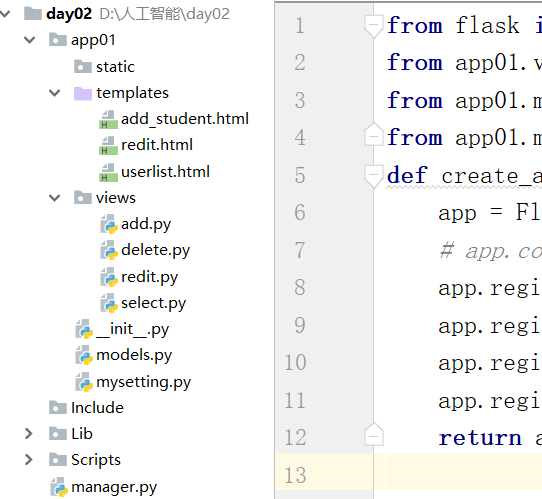
static:存放静态文件
templates:存放html文件
views:存放视图文件也就是咱们的蓝图(blueprint)
mysetting.py:关于Flask的一些配置
我们只看一个查看的功能走一下流程
views中的select.py文件中的内容:
from flask import Blueprint,render_template

student = [

    {"name":"小霞","age":"","gender":"女"},

    {"name":"小红","age":"","gender":"女"},

    {"name":"小明","age":"","gender":"男"},

    {"name":"小亮","age":"","gender":"男"},

    {"name":"小兰","age":"","gender":"女"},

]

list_student = Blueprint("list_student",__name__)

@list_student.route("/user_list",methods=["GET","POST"])

def user_list():

    return render_template("userlist.html",student_list=student)
userlist.html文件中的内容:
<!DOCTYPE html>

<html lang="zh-CN">

<head>

    <meta charset="utf-8">

    <meta http-equiv="X-UA-Compatible" content="IE=edge">

    <meta name="viewport" content="width=device-width, initial-scale=1">

    <!-- 上述3个meta标签*必须*放在最前面,任何其他内容都*必须*跟随其后! -->

    <title></title>

    <!-- Bootstrap -->

</head>

<body>

<a href="">添加学生信息</a>

<table border="1px">

    <thead>

        <tr>

            <th>名字</th>

            <th>性别</th>

            <th>年龄</th>

            <th>操作</th>

        </tr>

    </thead>

    <tbody>

        {% for student in student_list %}

            <tr>

                <td>{{ student.name }}</td>

                <td>{{ student.gender }}</td>

                <td>{{ student.age }}</td>

                <td>

                    <a href="">删除</a>

                    <a href="">编辑</a>

                </td>

            </tr>

        {% endfor %}

    </tbody>

</table>

</body>

</html>
manager.py文件中的内容:
from app01 import create_app

app = create_app()

if __name__ == '__main__':

    app.run(debug=True)
app01中的__init__.py中的内容:
from flask import Flask

from app01.views import select

def create_app():

    app = Flask(__name__)

    app.register_blueprint(select.list_student)

    return app
蓝图内部的视图函数及route不要出现重复
Flask中路由系统以及蓝图的使用的更多相关文章
- Flask最强攻略 - 跟DragonFire学Flask - 第七篇 Flask 中路由系统
Flask中的路由系统其实我们并不陌生了,从一开始到现在都一直在应用 @app.route("/",methods=["GET","POST" ...
- 第七篇 Flask 中路由系统以及参数
Flask中的路由系统其实我们并不陌生了,从一开始到现在都一直在应用 @app.route("/",methods=["GET","POST" ...
- 第七篇 Flask 中路由系统
1. @app.route() 装饰器中的参数 如果不明白装饰器 点击这里 methods : 当前 url 地址,允许访问的请求方式 @app.route("/info", me ...
- 7,Flask 中路由系统
Flask中的路由系统 @app.route("/",methods=["GET","POST"]) 为什么要这么用?其中的工作原理我们知道 ...
- flask中路由系统
flask中的路由我们并不陌生,从一开始到现在都一直在应用 @app.route("/",methods=["GET","POST"]) 1 ...
- Flask中路由系统、Flask的参数及app的配置
@app.route('/', methods=['GET', 'POST']) 1. @app.route()装饰器中的参数 methods:当前URL地址,允许访问的请求方式 @app.route ...
- Flask 中路由系统
1. @app.route() 装饰器中的参数 methods : 当前 url 地址,允许访问的请求方式 @app.route("/info", methods=["G ...
- Flask 的路由系统 FBV 与 CBV
Flask的路由系统 本质: 带参数的装饰器 传递函数后 执行 add_url_rule 方法 将 函数 和 url 封装到一个 Rule对象 将Rule对象 添加到 app.url_map(Map对 ...
- Flask中路由参数
Flask中路由参数.请求方式设置 一.参数设置 1.参数类型 Flask中参数的使用 @app.route('/parames/<username>/') def hello_world ...
随机推荐
- python参数Sample Code
import time import datetime import getopt import sys try: opts, args = getopt.getopt(sys.argv[1:], & ...
- python的return
关于python的return用法,在stackoverflow里的问题: Python — return, return None, and no return at all Consider th ...
- 图形查询属性(IdentifyTask实现查询)//查询本地服务
主页代码: <!DOCTYPE html> <html> <head> <meta charset="utf-8"> <tit ...
- linux每天一小步---mv命令详解
1 命令功能 mv命令用来移动文件及目录或者重命名文件及目录,它是move的缩写,cp命令与mv命令在很多功能上都非常相似,但是又具有很大的区别,其中组大的区别在于cp命令的使用会保留源文件和目录,而 ...
- Linux 基础教程 40-df和du命令
df df用于显示文件系统的整体磁盘使用量. 基本用法 df [选项] [目录/文件] 其常用选项如下所示: 选项 说明 -a, --all 显示所有文件系统,包括/proc等虚拟文件系统 - ...
- 深入浅出 MappedByteBuffer
前言 java io操作中通常采用BufferedReader,BufferedInputStream等带缓冲的IO类处理大文件,不过java nio中引入了一种基于MappedByteBuffer操 ...
- 使用Intel的FPGA电源设计FPGA 供电的常用反馈电阻阻值
使用Intel的FPGA电源设计FPGA 供电的常用反馈电阻阻值. 当前仅总结使用EN5339芯片的方案 Vout = Ra*0.6/Rb + 0.6 芯片手册推荐Ra取348K,则 3.3V时,取R ...
- spring+ibatis事务管理配置
<!-- 配置事务管理器 --> <bean id="transactionManager" class="org.springfram ...
- lambda distinct
public ActionResult Index() { IList<RegisterModel> regList = new List<RegisterModel>() { ...
- [leetcode] 12. Merge Sorted Array
这道题的无聊之处在于题目其实给了一些很奇怪的测试用例.比如他会给一些空的数组来,但是这个是不科学的,因为在C++中不允许定义一个空的列表,我们用的又不是那种糙又快的python,所以在这里我遇到了一些 ...