
uni-app app端 人脸识别
在听到人脸识别,哇塞!感觉来个个高大上的,去阿里 腾讯 看他们的人脸识别方法,官方sdk什么的。
到后来,需求确定了,拍照(照片)上传,后台去识别是不是本人,这一瞬间从天堂到地狱,放着官方那么好的方法,不要。
用照片,还的自己去写,去实现。
下面为大家提供一个 uni-app 自动拍照 上传照片 后端做匹配处理。
参考插件市场的 https://ext.dcloud.net.cn/plugin?id=4892
在使用前 先去manifest.json 选择APP模块配置, 勾选直播推流
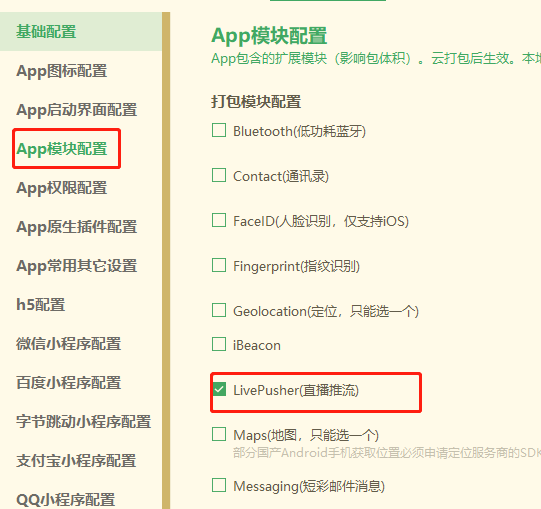
直接采用nvue开发,直接使用live-pusher组件进行直播推流,如果是vue开发,则需要使用h5+的plus.video.LivePusher对象来获取
nuve js注意事项
注意nuve 页面 main.js 的封装函数 。无法直接调用(小程序其他的端没有测试)
在APP端 this.api报错,显示是undefined,难道nvue页面,要重新引入api文件
在APP端,main.js中挂载Vuex在nvue页面无法使用this.$store.state.xxx
简单粗暴点直接用uni.getStorageSync 重新获取一遍
//获取用户数据 userInfo在Data里定义

this.userInfo = uni.getStorageSync('userInfo')
nuve css注意事项
单位只支持px
其他的em,rem,pt,%,upx 都不支持
需要重新引入外部css
不支持使用 import 的方式引入外部 css
<style src="@/common/test.css"></style>
默认flex布
display: flex; //不需要写

//直接用下面的标签

flex-direction: column;

align-items: center;

justify-content: space-between;
页面样式
<view class="live-camera" :style="{ width: windowWidth, height: windowHeight }">

        <view class="title">

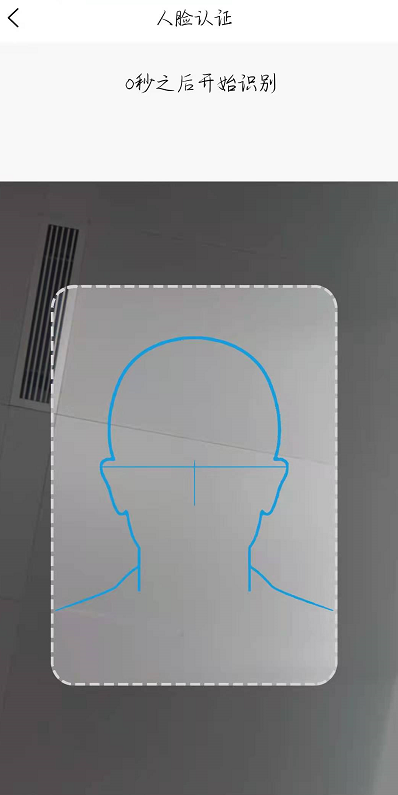
            {{second}}秒之后开始识别

        </view>

        <view class="preview" :style="{ width: windowWidth, height: windowHeight-80 }">

            <live-pusher id="livePusher" ref="livePusher" class="livePusher" mode="FHD" beauty="1" whiteness="0"

                aspect="2:3" min-bitrate="1000" audio-quality="16KHz" :auto-focus="true" :muted="true"

                :enable-camera="true" :enable-mic="false" :zoom="false" @statechange="statechange"

                :style="{ width: cameraWidth, height: cameraHeight }"></live-pusher>

            <!--提示语-->

            <cover-view class="remind">

                <text class="remind-text" style="">{{ message }}</text>

            </cover-view>

            <!--辅助线-->

            <cover-view class="outline-box" :style="{ width: windowWidth, height: windowHeight-80 }">

                <cover-image class="outline-img" src="../../static/idphotoskin.png"></cover-image>

            </cover-view>

    </view>

</view>
JS部分
<script>

    import operate from '../../common/operate.js'

    import api from '../../common/api.js'

    export default {

        data() {

            return {

                //提示

                message: '',

                //相机画面宽度

                cameraWidth: '',

                //相机画面宽度

                cameraHeight: '',

                //屏幕可用宽度

                windowWidth: '',

                //屏幕可用高度

                windowHeight: '',

                //流视频对象

                livePusher: null,

                //照片

                snapshotsrc: null,

                //倒计时

                second: 0,

                ifPhoto: false,

                // 用户信息

                userInfo: []

            };

        },

        onLoad() {

            //获取屏幕高度

            this.initCamera();

            //获取用户数据

            this.userInfo = uni.getStorageSync('userInfo')

            setTimeout(() => {

                //倒计时

                this.getCount()

            }, 500)

        },

        onReady() {

            // console.log('初始化 直播组件');

            this.livePusher = uni.createLivePusherContext('livePusher', this);

        },

        onShow() {

            //开启预览并设置摄像头

            this.startPreview();

        },

        methods: {

            //获取屏幕高度

            initCamera() {

                let that = this

                uni.getSystemInfo({

                    success: function(res) {

                        that.windowWidth = res.windowWidth;

                        that.windowHeight = res.windowHeight;

                        that.cameraWidth = res.windowWidth;

                        that.cameraHeight = res.windowWidth * 1.5;

                    }

                });

            },

            //启动相机

            startPreview() {

                this.livePusher.startPreview({

                    success(res) {

                        console.log('启动相机', res)

                    }

                });

            },

            //停止相机

            stopPreview() {

                let that = this

                this.livePusher.stopPreview({

                    success(res) {

                        console.log('停止相机', res)

                    }

                });

            },

            //摄像头 状态

            statechange(e) {

                console.log('摄像头', e);

                if (this.ifPhoto == true) {

                    //拍照

                    this.snapshot()

                }

            },

            //抓拍

            snapshot() {

                let that = this

                this.livePusher.snapshot({

                    success(res) {

                        that.snapshotsrc = res.message.tempImagePath;

                        that.uploadingImg(res.message.tempImagePath)

                    }

                });

            },

            // 倒计时

            getCount() {

                this.second = 5

                let timer = setInterval(() => {

                    this.second--;

                    if (this.second < 1) {

                        clearInterval(timer);

                        this.second = 0

                        this.ifPhoto = true

                        this.statechange()

                    }

                }, 1000)

            },

            // 图片上传

            uploadingImg(e) {

                let url = e

                // console.log(url);

                let that = this

                uni.uploadFile({

                    url: operate.api + 'api/common/upload',

                    filePath: url,

                    name: 'file',

                    formData: {

                        token: that.userInfo.token

                    },

                    success(res) {

                        // console.log(res);

                        let list = JSON.parse(res.data)

                        // console.log(list);

                        that.request(list.data.fullurl)

                    }

                })

            },

            //验证请求

            request(url) {

                let data = {

                    token: this.userInfo.token,

                    photo: url

                }

                api.renzheng(data).then((res) => {

                    // console.log(res);

                    operate.toast({

                        title: res.data.msg

                    })

                    if (res.data.code == 1) {

                        setTimeout(() => {

                            operate.redirectTo('/pages/details/details')

                        }, 500)

                    }

                    if (res.data.code == 0) {

                        setTimeout(() => {

                            this.anew(res.data.msg)

                        }, 500)

                    }

                })

            },

            // 认证失败,重新认证

            anew(msg) {

                let that = this

                uni.showModal({

                    content: msg,

                    confirmText: '重新审核',

                    success(res) {

                        if (res.confirm) {

                            // console.log('用户点击确定');

                            that.getCount()

                        } else if (res.cancel) {

                            // console.log('用户点击取消');

                            uni.navigateBack({

                                delta: 1

                            })

                        }

                    }

                })

            },

        }

    };

</script>
css 样式
<style lang="scss">

    // 标题

    .title {

        font-size: 35rpx;

        align-items: center;

        justify-content: center;

    }

    .live-camera {

        .preview {

            justify-content: center;

            align-items: center;

            .outline-box {

                position: absolute;

                top: 0;

                left: 0;

                bottom: 0;

                z-index: 99;

                align-items: center;

                justify-content: center;

                .outline-img {

                    width: 750rpx;

                    height: 1125rpx;

                }

            }

            .remind {

                position: absolute;

                top: 880rpx;

                width: 750rpx;

                z-index: 100;

                align-items: center;

                justify-content: center;

                .remind-text {

                    color: #dddddd;

                    font-weight: bold;

                }

            }

        }

    }

</style>
uni-app app端 人脸识别的更多相关文章
- face recognition[翻译][深度人脸识别:综述]
这里翻译下<Deep face recognition: a survey v4>. 1 引言 由于它的非侵入性和自然特征,人脸识别已经成为身份识别中重要的生物认证技术,也已经应用到许多领 ...
- 基于javaweb人脸识别注册登录系统
---恢复内容开始--- 现在是2019年,人脸识别技术已经相当成熟了,百度自2017年发布人脸识别技术,已经被广泛应用,不管从现在的iphoneX掀起的面部解锁到手机应用端的各种人脸认证,这一技术已 ...
- uniapp安卓ios百度人脸识别、活体检测、人脸采集APP原生插件
插件亮点 1 支持安卓平板(横竖屏均可),苹果的iPad.2 颜色图片均可更换. 特别提醒 此插件包含 android 端和 iOS 端,考虑到有些同学只做其中一个端的 app,特意分为 2 个插件, ...
- [译]Kubernetes 分布式应用部署和人脸识别 app 实例
原文地址:KUBERNETES DISTRIBUTED APPLICATION DEPLOYMENT WITH SAMPLE FACE RECOGNITION APP 原文作者:skarlso 译文出 ...
- 移动端车牌识别、行驶证识别OCR为共享汽车APP增添技术色彩
本文主题:移动端车牌识别.行驶证识别OCR为共享汽车APP增添技术色彩 本文关键词:车牌识别,证件识别,移动端车牌识别,行驶证识别,手机车牌识别,驾驶证识别 近两年,随着共享单车以及共享电车的兴起,有 ...
- Android人脸识别App(带web上传注册信息)
人脸识别+本机Web后端人脸sdk采用虹软sdk,本机web采用AndServer:上传姓名+人脸图片即可实现注册源码地址:https://github.com/joetang1989/ArcFace ...
- Android 虹软免费人脸识别App
人脸识别+本机Web后端 人脸sdk采用虹软sdk,本机web采用AndServer:上传姓名+人脸图片即可实现注册源码地址:https://github.com/joetang1989/ArcFac ...
- 百度APP移动端网络深度优化实践分享(三):移动端弱网优化篇
本文由百度技术团队“蔡锐”原创发表于“百度App技术”公众号,原题为<百度App网络深度优化系列<三>弱网优化>,感谢原作者的无私分享. 一.前言 网络优化解决的核心问题有三个 ...
- 呛口大话APP 移动端到底怎么玩
[上海站]活动概况 时间:2016年04月09日13:30-16:30 地点:上海市黄浦区黄陂北路227号中区广场105室WE+联合办公空间 主办:APICloud.七牛.听云 报名网址:http:/ ...
随机推荐
- 记一次 .NET 某电商交易平台Web站 CPU爆高分析
一:背景 1. 讲故事 已经连续写了几篇关于内存暴涨的真实案例,有点麻木了,这篇换个口味,分享一个 CPU爆高 的案例,前段时间有位朋友在 wx 上找到我,说他的一个老项目经常收到 CPU > ...
- Linux 查看实时网卡流量的方法 网速 nload sar iftop dstat
1.使用nload yum install -y gcc gcc-c++ ncurses-devel make wgetwget http://www.roland-riegel.de/nload/n ...
- fragment textWatcher的设置位置
override fun onStart() { super.onStart() Log.d("------------", "1") val titleWat ...
- PHP转JAVA开发30分钟实战攻略
服务端开发中,有很多知识是相通的,例如mysql,redis,http协议等. 基于这些基础,在编程语言上的转变并不困难. 本文主要从下面几点出发,讲述如何快速从php开发转为java开发: 使用框架 ...
- GO语言异常处理02---返回错误
package main import ( "errors" "fmt" "math" ) /*计算圆面积,同时返回[结果-错误对]*/ f ...
- 智能驾驶操作系统OS
智能驾驶操作系统OS 自动驾驶操作系统是一个流程化.复杂的综合系统,设计到众多流程和领域.首先,分为不同的层,包括:感知层.认知层.决策规划层.控制层和执行层几个层面. 自动驾驶操作系统是一个流程化. ...
- tensorflow-yolov4实施方法
tensorflow-yolov4实施方法 tensorflow-yolov4-tflite YOLOv4: Optimal Speed and Accuracy of Object Detectio ...
- 图分析Rapids cuGraph
图分析Rapids cuGraph 英伟达(Nvidia)建立的新的开源库可能是推进分析和使图形数据库更快的秘密要素. 在Nvidia GPU上进行并行处理. Nvidia很久以前就不再只是" ...
- AI芯片体系结构目标图形处理
AI芯片体系结构目标图形处理 AI chip architecture targets graph processing 可编程图形流处理器(GSP)能够执行"直接图形处理.片上任务图管理和 ...
- python+selenium基础篇,键盘操作
1.任务要求:打开百度,在百度搜索里面输入python,通过键盘复制python到搜狗搜索,粘贴到搜狗搜索框中 实现代码如下: from selenium import webdriver from ...