
postgresql高可用集群部署
一、概况
1、概念
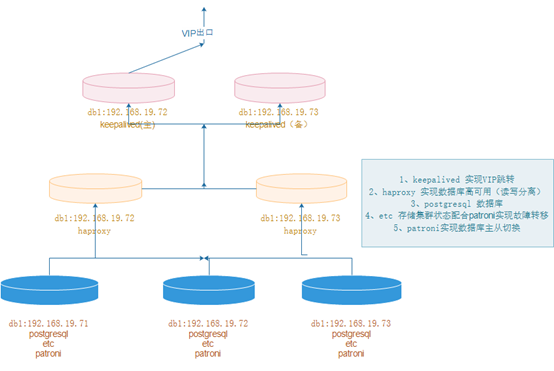
  pgsql高可用集群采用postgresql+etcd+patroni+haproxy+keepalived等软件实现,以postgresql做数据库,etcd存储集群状态,patroni与etcd结合实现数据库集群故障切换,
haproxy实现数据库高可用(读读写分离),keepalived实现VIP跳转。
2、拓扑图
二、postgresql部署(三个节点)
1、下载解压
https://www.enterprisedb.com/download-postgresql-binaries

mkdir -p /data/pg_data

tar xf postgresql-10.18-1-linux-x64-binaries.tar.gz -C /data/
2、创建用户并授权
useradd postgres

passwd postgres

chown -R postgres.postgres /data/
3、初始化数据库(postgres用户下)
切换目录

[root@centos7 ~]# su – postgres

初始化目录

[postgres@centos7 ~]$ /data/pgsql/bin/initdb -D /data/pg_data/
4、配置变量
su – postgres

vim .bash_profile

PATH=$PATH:$HOME/bin export PATH

export PATH

export PGHOME=/data/pgsql

export PATH=$PATH:$PGHOME/bin

export PGDATA=/data/pg_data

export PGLOG=/data/pg_log/pg.log

source .bash_profile

mkdir -p /data/pg_log

chown postgres.postgres /data/pg_data

chown postgres.postgres /data/pg_log
5、配置postgresql启动脚本
vim  /etc/systemd/system/postgresql.service

[Unit]

Description=PostgreSQL database server

After=network.target

[Service]

Type=forking

User=postgres

Group=postgres

ExecStart= /data/pgsql/bin/pg_ctl -D /data/pg_data/  start

ExecReload= /data/pgsql/bin/pg_ctl -D /data/pg_data/ restart

ExecStop= /data/pgsql/bin/pg_ctl -D /data/pg_data/  stop

PrivateTmp=true

[Install]

WantedBy=multi-user.target
6、启动与关闭
systemctl daemon-reload

开启

systemctl start postgresql

关闭

systemctl stop postgresql

重启

systemctl restart postgresql
7、数据库添加密码
[postgres@pgsql-19 ~]$ psql -U postgres -h localhost

postgres=# alter user postgres with password 'P@sswrd';
8、允许远程连接
vim /data/pg_data/pg_hba.conf

host    all             all             0.0.0.0/0               md5

vim /data/pg_data/postgresql.conf
listen_addresses = '*'
password_encryption = on
重启数据库
systemctl restart postgresql
三、etcd部署(三个节点)
1、下载解压
tar xf etcd-v3.1.20-linux-amd64.tar.gz -C /usr/local/

ln -s /usr/local/etcd-v3.1.20-linux-amd64 /usr/local/etcd
2、文件配置
mkdir -p /usr/local/etcd/data/etcd

vim /usr/local/etcd/conf.yml

name: pgsql_1971

data-dir: /usr/local/etcd/data/etcd

listen-client-urls: http://192.168.19.71:2379,http://127.0.0.1:2379

advertise-client-urls: http://192.168.19.71:2379,http://127.0.0.1:2379

listen-peer-urls: http://192.168.19.71:2380

initial-advertise-peer-urls: http://192.168.19.71:2380

initial-cluster: pgsql_1971=http://192.168.19.71:2380,pgsql_1972=http://192.168.19.72:2380,pgsql_1973=http://192.168.19.73:2380

initial-cluster-token: etcd-cluster-token

initial-cluster-state: new

mkdir -p /usr/local/etcd/data/etc

vim /usr/local/etcd/conf.yml

name: pgsql_1972

data-dir: /usr/local/etcd/data/etcd

listen-client-urls: http://192.168.19.72:2379,http://127.0.0.1:2379

advertise-client-urls: http://192.168.19.72:2379,http://127.0.0.1:2379

listen-peer-urls: http://192.168.19.72:2380

initial-advertise-peer-urls: http://192.168.19.72:2380

initial-cluster: pgsql_1971=http://192.168.19.71:2380,pgsql_1972=http://192.168.19.72:2380,pgsql_1973=http://192.168.19.73:2380

initial-cluster-token: etcd-cluster-token

initial-cluster-state: new

mkdir -p /usr/local/etcd/data/etc

vim /usr/local/etcd/conf.yml

name: pgsql_1973

data-dir: /usr/local/etcd/data/etcd

listen-client-urls: http://192.168.19.73:2379,http://127.0.0.1:2379

advertise-client-urls: http://192.168.19.73:2379,http://127.0.0.1:2379

listen-peer-urls: http://192.168.19.73:2380

initial-advertise-peer-urls: http://192.168.19.73:2380

initial-cluster: pgsql_1971=http://192.168.19.71:2380,pgsql_1972=http://192.168.19.72:2380,pgsql_1973=http://192.168.19.73:2380

initial-cluster-token: etcd-cluster-token

initial-cluster-state: new
3、启动并加入到开机自启中
加入开机自启里边

nohup /usr/local/etcd/etcd --config-file=/usr/local/etcd/conf.yml &
4、集群检查
netstat -lntup|grep etcd

/usr/local/etcd/etcdctl member list
四、patroni部署(三个节点)
1、更新postgresql.conf文件
postgresql.conf配置如下

max_connections = '500'

max_wal_senders = '10'

port = '5432'

listen_addresses = '*'

synchronous_commit = on

full_page_writes = on

wal_log_hints = on

synchronous_standby_names = '*'

max_replication_slots = 10

wal_level = replica
注:这两个参数会导致数据库执行呆滞,后来者欢迎留言看是怎么回事儿
2、更新pg_hba.conf文件
vim /data/pg_data/pg_hba.conf

清理最后配置的配置,新增以下

local   all             all                                     peer

host    all             all             127.0.0.1/32            md5

host    all             postgres        127.0.0.1/32            md5

host    all             all             192.168.19.0/24      md5

host    all             all             ::1/128                 md5

local   replication     replicator                                peer

host    replication     replicator        127.0.0.1/32            md5

host    replication     replicator        ::1/128                 md5

host    replication     replicator        192.168.19.71/32      md5

host    replication     replicator        192.168.19.72/32      md5

host    replication     replicator        192.168.19.73/32      md5
以上配置完成后,重启数据库
3、在主节点上创建复制槽,很重要,patroni会用到
postgres=# create user replicator replication login encrypted password '1qaz2wsx';
4、配置stream replication(在两个从节点操作)
systemctl stop postgresql
su - postgres

cd /data/ && rm -rf pg_data

/data/pgsql/bin/pg_basebackup -h 192.168.19.71 -D /data/pg_data -U replicator -v -P -R
启动数据库
systemctl start postgresql
5、安装patroni(三个节点)
yum install -y python3 python-psycopg2 python3-devel

pip3 install --upgrade pip

pip3 install psycopg2-binary -i http://pypi.douban.com/simple/ --trusted-host pypi.douban.com

pip3 install patroni[etcd] -i http://pypi.douban.com/simple/ --trusted-host pypi.douban.com

 验证是否安装成功

which patroni

patronictl --help
6、创建patroni配置文件
mkdir -p /usr/patroni/conf

 cd /usr/patroni/conf/
node1

scope: batman

namespace: /service/

name: postgresql1

restapi:

  listen: 192.168.19.71:8008

  connect_address: 192.168.19.71:8008

#  certfile: /etc/ssl/certs/ssl-cert-snakeoil.pem

#  keyfile: /etc/ssl/private/ssl-cert-snakeoil.key

#  authentication:

#    username: username

#    password: password

# ctl:

#   insecure: false # Allow connections to SSL sites without certs

#   certfile: /etc/ssl/certs/ssl-cert-snakeoil.pem

#   cacert: /etc/ssl/certs/ssl-cacert-snakeoil.pem

etcd:

  #Provide host to do the initial discovery of the cluster topology:

  host: 192.168.19.71:2379

  #Or use "hosts" to provide multiple endpoints

  #Could be a comma separated string:

  #hosts: host1:port1,host2:port2

  #host: 192.168.19.71:2379,192.168.19.71:2379,192.168.19.73:2379

  #or an actual yaml list:

  #hosts:

  #- host1:port1

  #- host2:port2

  #Once discovery is complete Patroni will use the list of advertised clientURLs

  #It is possible to change this behavior through by setting:

  #use_proxies: true

#raft:

#  data_dir: .

#  self_addr: 192.168.19.71:2222

#  partner_addrs:

#  - 192.168.19.71:2223

#  - 192.168.19.71:2224

bootstrap:

  # this section will be written into Etcd:/<namespace>/<scope>/config after initializing new cluster

  # and all other cluster members will use it as a `global configuration`

  dcs:

    ttl: 30

    loop_wait: 10

    retry_timeout: 10

    maximum_lag_on_failover: 1048576

#    master_start_timeout: 300

#    synchronous_mode: false

    #standby_cluster:

      #host: 192.168.19.71

      #port: 1111

      #primary_slot_name: patroni

    postgresql:

      use_pg_rewind: true

#      use_slots: true

      parameters:

#        wal_level: hot_standby

#        hot_standby: "on"

#        max_connections: 100

#        max_worker_processes: 8

#        wal_keep_segments: 8

#        max_wal_senders: 10

#        max_replication_slots: 10

#        max_prepared_transactions: 0

#        max_locks_per_transaction: 64

#        wal_log_hints: "on"

#        track_commit_timestamp: "off"

#        archive_mode: "on"

#        archive_timeout: 1800s

#        archive_command: mkdir -p ../wal_archive && test ! -f ../wal_archive/%f && cp %p ../wal_archive/%f

#      recovery_conf:

#        restore_command: cp ../wal_archive/%f %p

  # some desired options for 'initdb'

  initdb:  # Note: It needs to be a list (some options need values, others are switches)

  - encoding: UTF8

  - data-checksums

  pg_hba:  # Add following lines to pg_hba.conf after running 'initdb'

  # For kerberos gss based connectivity (discard @.*$)

  #- host replication replicator 192.168.19.71/32 gss include_realm=0

  #- host all all 0.0.0.0/0 gss include_realm=0

  - host replication replicator 192.168.19.71/32 md5

  - host all all 0.0.0.0/0 md5

#  - hostssl all all 0.0.0.0/0 md5

  # Additional script to be launched after initial cluster creation (will be passed the connection URL as parameter)

# post_init: /usr/local/bin/setup_cluster.sh

  # Some additional users users which needs to be created after initializing new cluster

  users:

    admin:

      password: admin

      options:

        - createrole

        - createdb

postgresql:

  listen: 192.168.19.71:5432

  connect_address: 192.168.19.71:5432

  data_dir: /data/pg_data

  bin_dir: /data/pgsql/bin

#  config_dir:

  pgpass: /tmp/pgpass0

  authentication:

    replication:

      username: replicator

      password: 1qaz2wsx

    superuser:

      username: postgres

      password: P@sswrd

    rewind:  # Has no effect on postgres 10 and lower

      username: postgres

      password: P@sswrd

  # Server side kerberos spn

#  krbsrvname: postgres

  parameters:

    # Fully qualified kerberos ticket file for the running user

    # same as KRB5CCNAME used by the GSS

#   krb_server_keyfile: /var/spool/keytabs/postgres

    unix_socket_directories: '.'

  # Additional fencing script executed after acquiring the leader lock but before promoting the replica

  #pre_promote: /path/to/pre_promote.sh

#watchdog:

#  mode: automatic # Allowed values: off, automatic, required

#  device: /dev/watchdog

#  safety_margin: 5

tags:

    nofailover: false

    noloadbalance: false

    clonefrom: false

    nosync: false

------------------------------------------------------------------------------

node2

scope: batman

namespace: /service/

name: postgresql2

restapi:

  listen: 192.168.19.72:8008

  connect_address: 192.168.19.72:8008

#  certfile: /etc/ssl/certs/ssl-cert-snakeoil.pem

#  keyfile: /etc/ssl/private/ssl-cert-snakeoil.key

#  authentication:

#    username: username

#    password: password

# ctl:

#   insecure: false # Allow connections to SSL sites without certs

#   certfile: /etc/ssl/certs/ssl-cert-snakeoil.pem

#   cacert: /etc/ssl/certs/ssl-cacert-snakeoil.pem

etcd:

  #Provide host to do the initial discovery of the cluster topology:

  host: 192.168.19.72:2379

  #Or use "hosts" to provide multiple endpoints

  #Could be a comma separated string:

  #hosts: host1:port1,host2:port2

  #host: 192.168.19.71:2379,192.168.19.72:2379,192.168.19.73:2379

  #or an actual yaml list:

  #hosts:

  #- host1:port1

  #- host2:port2

  #Once discovery is complete Patroni will use the list of advertised clientURLs

  #It is possible to change this behavior through by setting:

  #use_proxies: true

#raft:

#  data_dir: .

#  self_addr: 192.168.19.72:2222

#  partner_addrs:

#  - 192.168.19.72:2223

#  - 192.168.19.72:2224

bootstrap:

  # this section will be written into Etcd:/<namespace>/<scope>/config after initializing new cluster

  # and all other cluster members will use it as a `global configuration`

  dcs:

    ttl: 30

    loop_wait: 10

    retry_timeout: 10

    maximum_lag_on_failover: 1048576

#    master_start_timeout: 300

#    synchronous_mode: false

    #standby_cluster:

      #host: 192.168.19.72

      #port: 1111

      #primary_slot_name: patroni

    postgresql:

      use_pg_rewind: true

#      use_slots: true

      parameters:

#        wal_level: hot_standby

#        hot_standby: "on"

#        max_connections: 100

#        max_worker_processes: 8

#        wal_keep_segments: 8

#        max_wal_senders: 10

#        max_replication_slots: 10

#        max_prepared_transactions: 0

#        max_locks_per_transaction: 64

#        wal_log_hints: "on"

#        track_commit_timestamp: "off"

#        archive_mode: "on"

#        archive_timeout: 1800s

#        archive_command: mkdir -p ../wal_archive && test ! -f ../wal_archive/%f && cp %p ../wal_archive/%f

#      recovery_conf:

#        restore_command: cp ../wal_archive/%f %p

  # some desired options for 'initdb'

  initdb:  # Note: It needs to be a list (some options need values, others are switches)

  - encoding: UTF8

  - data-checksums

  pg_hba:  # Add following lines to pg_hba.conf after running 'initdb'

  # For kerberos gss based connectivity (discard @.*$)

  #- host replication replicator 192.168.19.72/32 gss include_realm=0

  #- host all all 0.0.0.0/0 gss include_realm=0

  - host replication replicator 192.168.19.72/32 md5

  - host all all 0.0.0.0/0 md5

#  - hostssl all all 0.0.0.0/0 md5

  # Additional script to be launched after initial cluster creation (will be passed the connection URL as parameter)

# post_init: /usr/local/bin/setup_cluster.sh

  # Some additional users users which needs to be created after initializing new cluster

  users:

    admin:

      password: admin

      options:

        - createrole

        - createdb

postgresql:

  listen: 192.168.19.72:5432

  connect_address: 192.168.19.72:5432

  data_dir: /data/pg_data

  bin_dir: /data/pgsql/bin

#  config_dir:

  pgpass: /tmp/pgpass0

  authentication:

    replication:

      username: replicator

      password: 1qaz2wsx

    superuser:

      username: postgres

      password: P@sswrd

    rewind:  # Has no effect on postgres 10 and lower

      username: postgres

      password: P@sswrd

  # Server side kerberos spn

#  krbsrvname: postgres

  parameters:

    # Fully qualified kerberos ticket file for the running user

    # same as KRB5CCNAME used by the GSS

#   krb_server_keyfile: /var/spool/keytabs/postgres

    unix_socket_directories: '.'

  # Additional fencing script executed after acquiring the leader lock but before promoting the replica

  #pre_promote: /path/to/pre_promote.sh

#watchdog:

#  mode: automatic # Allowed values: off, automatic, required

#  device: /dev/watchdog

#  safety_margin: 5

tags:

    nofailover: false

    noloadbalance: false

    clonefrom: false

    nosync: false

------------------------------------------------------------------------------

node3

scope: batman

namespace: /service/

name: postgresql3

restapi:

  listen: 192.168.19.73:8008

  connect_address: 192.168.19.73:8008

#  certfile: /etc/ssl/certs/ssl-cert-snakeoil.pem

#  keyfile: /etc/ssl/private/ssl-cert-snakeoil.key

#  authentication:

#    username: username

#    password: password

# ctl:

#   insecure: false # Allow connections to SSL sites without certs

#   certfile: /etc/ssl/certs/ssl-cert-snakeoil.pem

#   cacert: /etc/ssl/certs/ssl-cacert-snakeoil.pem

etcd:

  #Provide host to do the initial discovery of the cluster topology:

  host: 192.168.19.73:2379

  #Or use "hosts" to provide multiple endpoints

  #Could be a comma separated string:

  #hosts: host1:port1,host2:port2

  #host: 192.168.19.73:2379,192.168.19.73:2379,192.168.19.73:2379

  #or an actual yaml list:

  #hosts:

  #- host1:port1

  #- host2:port2

  #Once discovery is complete Patroni will use the list of advertised clientURLs

  #It is possible to change this behavior through by setting:

  #use_proxies: true

#raft:

#  data_dir: .

#  self_addr: 192.168.19.73:2222

#  partner_addrs:

#  - 192.168.19.73:2223

#  - 192.168.19.73:2224

bootstrap:

  # this section will be written into Etcd:/<namespace>/<scope>/config after initializing new cluster

  # and all other cluster members will use it as a `global configuration`

  dcs:

    ttl: 30

    loop_wait: 10

    retry_timeout: 10

    maximum_lag_on_failover: 1048576

#    master_start_timeout: 300

#    synchronous_mode: false

    #standby_cluster:

      #host: 192.168.19.73

      #port: 1111

      #primary_slot_name: patroni

    postgresql:

      use_pg_rewind: true

#      use_slots: true

      parameters:

#        wal_level: hot_standby

#        hot_standby: "on"

#        max_connections: 100

#        max_worker_processes: 8

#        wal_keep_segments: 8

#        max_wal_senders: 10

#        max_replication_slots: 10

#        max_prepared_transactions: 0

#        max_locks_per_transaction: 64

#        wal_log_hints: "on"

#        track_commit_timestamp: "off"

#        archive_mode: "on"

#        archive_timeout: 1800s

#        archive_command: mkdir -p ../wal_archive && test ! -f ../wal_archive/%f && cp %p ../wal_archive/%f

#      recovery_conf:

#        restore_command: cp ../wal_archive/%f %p

  # some desired options for 'initdb'

  initdb:  # Note: It needs to be a list (some options need values, others are switches)

  - encoding: UTF8

  - data-checksums

  pg_hba:  # Add following lines to pg_hba.conf after running 'initdb'

  # For kerberos gss based connectivity (discard @.*$)

  #- host replication replicator 192.168.19.73/32 gss include_realm=0

  #- host all all 0.0.0.0/0 gss include_realm=0

  - host replication replicator 192.168.19.73/32 md5

  - host all all 0.0.0.0/0 md5

#  - hostssl all all 0.0.0.0/0 md5

  # Additional script to be launched after initial cluster creation (will be passed the connection URL as parameter)

# post_init: /usr/local/bin/setup_cluster.sh

  # Some additional users users which needs to be created after initializing new cluster

  users:

    admin:

      password: admin

      options:

        - createrole

        - createdb

postgresql:

  listen: 192.168.19.73:5432

  connect_address: 192.168.19.73:5432

  data_dir: /data/pg_data

  bin_dir: /data/pgsql/bin

#  config_dir:

  pgpass: /tmp/pgpass0

  authentication:

    replication:

      username: replicator

      password: 1qaz2wsx

    superuser:

      username: postgres

      password: P@sswrd

    rewind:  # Has no effect on postgres 10 and lower

      username: postgres

      password: P@sswrd

  # Server side kerberos spn

#  krbsrvname: postgres

  parameters:

    # Fully qualified kerberos ticket file for the running user

    # same as KRB5CCNAME used by the GSS

#   krb_server_keyfile: /var/spool/keytabs/postgres

    unix_socket_directories: '.'

  # Additional fencing script executed after acquiring the leader lock but before promoting the replica

  #pre_promote: /path/to/pre_promote.sh

#watchdog:

#  mode: automatic # Allowed values: off, automatic, required

#  device: /dev/watchdog

#  safety_margin: 5

tags:

    nofailover: false

    noloadbalance: false

    clonefrom: false

    nosync: false
7、依次启动patroni服务
Postgres用户下启动

nohup patroni /usr/patroni/conf/patroni_postgresql.yml &
8、patroni配置启动脚本
为了方便开机自启,故配置成 patroni.service,3个node都需要进行配置,配置好patroni.service后就可以直接在root用户下切换Leader以及重启postgres节点等操作
[root@pgsql_1971 ~]$ vim /etc/systemd/system/patroni.service

[Unit]

Description=patroni - a high-availability PostgreSQL

Documentation=https://patroni.readthedocs.io/en/latest/index.html

After=syslog.target network.target etcd.target

Wants=network-online.target

[Service]

Type=simple

User=postgres

Group=postgres

PermissionsStartOnly=true

ExecStart=/usr/local/bin/patroni /usr/patroni/conf/patroni_postgresql.yml

ExecReload=/bin/kill -HUP $MAINPID

LimitNOFILE=65536

KillMode=process

KillSignal=SIGINT

Restart=on-abnormal

RestartSec=30s

TimeoutSec=0

[Install]

WantedBy=multi-user.target
9、禁用postgresql脚本采用patroni服务启动数据库
禁止 postgresql 的自启动,通过 patroni 来管理 postgresql

systemctl stop postgresql

systemctl status postgresql

systemctl disable postgresql

systemctl status patroni

systemctl start patroni

systemctl enable patroni
五、集群检查
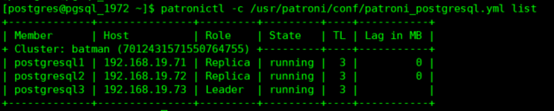
1、数据库集群检查
patronictl -c /usr/patroni/conf/patroni_postgresql.yml list
2、etcd检查
root@pgsql_1971 ~]# /usr/local/etcd/etcdctl ls /service/batman
root@pgsql_1971 ~]# /usr/local/etcd/etcdctl get /service/batman/members/postgresql1
六、haproxy部署(两个从节点)
七、keepalived部署(两个从节点)
postgresql高可用集群部署的更多相关文章
- hbase高可用集群部署(cdh)
一.概要 本文记录hbase高可用集群部署过程,在部署hbase之前需要事先部署好hadoop集群,因为hbase的数据需要存放在hdfs上,hadoop集群的部署后续会有一篇文章记录,本文假设had ...
- (十)RabbitMQ消息队列-高可用集群部署实战
原文:(十)RabbitMQ消息队列-高可用集群部署实战 前几章讲到RabbitMQ单主机模式的搭建和使用,我们在实际生产环境中出于对性能还有可用性的考虑会采用集群的模式来部署RabbitMQ. Ra ...
- RocketMQ的高可用集群部署
RocketMQ的高可用集群部署 标签(空格分隔): 消息队列 部署 1. RocketMQ 集群物理部署结构 Rocket 物理部署结构 Name Server: 单点,供Producer和Cons ...
- RabbitMQ的高可用集群部署
RabbitMQ的高可用集群部署 标签(空格分隔): 消息队列 部署 1. RabbitMQ部署的三种模式 1.1 单一模式 单机情况下不做集群, 仅仅运行一个RabbitMQ. # docker-c ...
- rocketmq高可用集群部署(RocketMQ-on-DLedger Group)
rocketmq高可用集群部署(RocketMQ-on-DLedger Group) rocketmq部署架构 rocketmq部署架构非常多,都是为了解决一些问题,越来越高可用,越来越复杂. 单ma ...
- MySQL MHA 高可用集群部署及故障切换
MySQL MHA 高可用集群部署及故障切换 1.概念 2.搭建MySQL + MHA 1.概念: a)MHA概念 : MHA(MasterHigh Availability)是一套优秀的MySQL高 ...
- Kubernetes容器集群 - harbor仓库高可用集群部署说明
之前介绍Harbor私有仓库的安装和使用,这里重点说下Harbor高可用集群方案的部署,目前主要有两种主流的Harbor高可用集群方案:1)双主复制:2)多harbor实例共享后端存储. 一.Harb ...
- 【转】harbor仓库高可用集群部署说明
之前介绍Harbor私有仓库的安装和使用,这里重点说下Harbor高可用集群方案的部署,目前主要有两种主流的Harbor高可用集群方案:1)双主复制:2)多harbor实例共享后端存储. 一.Harb ...
- Centos6.9下RocketMQ3.4.6高可用集群部署记录(双主双从+Nameserver+Console)
之前的文章已对RocketMQ做了详细介绍,这里就不再赘述了,下面是本人在测试和生产环境下RocketMQ3.4.6高可用集群的部署手册,在此分享下: 1) 基础环境 ip地址 主机名 角色 192. ...
随机推荐
- Jmeter教程 录制脚本
Jmeter 录制脚本 Jmeter中有2种方法可以录制脚本. 不过我个人非常不推荐录制脚本,录制的脚本混乱,需要再次加工才能使用. 像我这么精通HTTP协议的人. 一直都是使用Fiddler来抓包 ...
- Linkerd 2.10(Step by Step)—配置代理并发
Linkerd 2.10 系列 快速上手 Linkerd v2 Service Mesh(服务网格) 腾讯云 K8S 集群实战 Service Mesh-Linkerd2 & Traefik2 ...
- 巧用模糊实现视觉的 3D 效果
本文较短,将介绍巧用模糊实现视觉 3D 效果的技巧. 我们都知道,在正常的视觉效果中,离我们越近的通常我们会看的越清晰,而离我们较远则相对没那么清晰~ 我们可以利用清晰与模糊两种状态来构建视差效果.像 ...
- go语言调用everything的SDK接口
介绍 官方SDK地址 本项目会将官方dll编译到可执行程序中,运行时无需考虑dll问题. 根据官方介绍,使用SDK前需要运行everything程序. 执行go build -tag ASCII时编译 ...
- ubuntu安装glusterFS
以2台服务器为例: node1: 172.18.1.10 node2: 172.18.1.20 1) 修改主机名,修改hosts文件添加IP地址映射 hostname node1/node2vim / ...
- VUE005. 在data中使用 / 改变data,或在data中调用method函数
使用三方UI库时经常会遇到在data中写入方法的场景,如Element-UI的级联选择器(动态加载part)需要在data中写入lazyLoad. 但后端总会给出意想不到的需求: 通过接口调取一串数据 ...
- .Net性能调优-MemoryPool
简单用法 //获取MemoryPool实例,实际返回了一个ArrayMemoryPool<T> MemoryPool<char> Pool = MemoryPool<ch ...
- 源码编译安装LAMP
LAMP架构是目前成熟的企业网站应用模式之一,指的是协同工作的一整套系统和相关软件,能够提供动态Web站点服务及其应用开发环境.LAMP是一个缩写词,具体包括Linux操作系统.Apache网站服务器 ...
- IDEA weblogic远程调试
weblogic远程调试 这里我们使用vulhub的镜像作为初始构建镜像搭建漏洞环境 1. 搭建docker环境 新建一个目录,创建两个文件 DockerFile FROM vulhub/weblog ...
- Android使用百度语音识别api代码实现。
第一步 ① 创建平台应用 点击百度智能云进入,没有账号的可以先注册账号,这里默认都有账号了,然后登录. 然后左侧导航栏点击找到语音技术 然后会进入一个应用总览页面, 然后点击创建应用 立即创建 点击查 ...