整合Spring框架和MyBatis框架
------------------------siwuxie095
整合 Spring 框架和 MyBatis 框架
1、导入相关
jar 包(共 22 个)
(1)导入
Spring 的核心 jar 包和日志相关的 jar 包(6 个)

Commons Logging
下载链接:
http://commons.apache.org/proper/commons-logging/download_logging.cgi
LOG4J 下载链接:
https://www.apache.org/dist/logging/log4j/
(2)导入
Spring 的 AOP 开发的 jar 包(4 个)

AOP Alliance
下载链接:
http://mvnrepository.com/artifact/aopalliance/aopalliance
AspectJ Weaver
下载链接:
http://mvnrepository.com/artifact/org.aspectj/aspectjweaver
(3)导入
Spring 的
JDBC 开发的 jar 包(2 个)

(4)导入
Spring 整合 Web 项目的 jar 包(1 个)

(5)导入
MyBatis 的 jar 包(1 个)

(6)导入
MyBatis 所需的日志相关的 jar 包(2 个)

「MyBatis 也需要 LOG4J,但前面 Spring 已导入,不再重复导入」
(7)导入
MyBatis 分页相关的 jar 包(2 个)
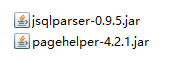
PageHelper 下载链接:
http://repo1.maven.org/maven2/com/github/pagehelper/pagehelper/
JSqlParser 下载链接:
http://repo1.maven.org/maven2/com/github/jsqlparser/jsqlparser/0.9.5/
(8)导入
MySQL 的 JDBC 驱动的 jar 包(1 个)

MySQL Connector/J
下载链接:
https://dev.mysql.com/downloads/connector/j/
(9)导入
Spring 整合 MyBatis 的 jar 包(1 个)

MyBatis-Spring 下载链接:
https://github.com/mybatis/spring/releases
(10)导入
BoneCP 的 jar 包和其依赖的 Guava 的 jar 包(2 个)

BoneCP 下载链接:
http://repo1.maven.org/maven2/com/jolbox/bonecp/
Guava 下载链接:
http://repo1.maven.org/maven2/com/google/guava/guava/
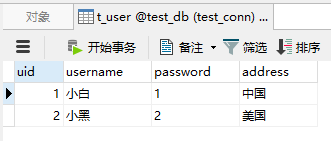
2、创建数据库和表
创建数据库
test_db, 再创建表 t_user,并插入若干数据,
其中:uid 为主键,且为自动增长
3、测试
(1)编写一个实体类
User.java:
|
package com.siwuxie095.entity; // 实体类 public class User {
private Integer uid; private String username; private String password; private String address;
public Integer getUid() { return uid; } public this.uid = uid; }
public String getUsername() { return username; } public this.username = username; }
public String getPassword() { return password; } public this.password = password; }
public String getAddress() { return address; } public this.address = address; }
@Override public String toString() { return ", password=" + password + ", address=" + address + "]"; }
} |
(2)编写一个映射器接口
UserMapper.java:
|
package com.siwuxie095.mapper; import org.apache.ibatis.annotations.Param; import com.siwuxie095.entity.User; // 映射器接口 public interface UserMapper { User getUser(@Param("uid") Integer uid);
} |
(3)在
MyBatis 映射配置文件中进行配置
|
<?xml <!DOCTYPE mapper PUBLIC "-//mybatis.org//DTD Mapper 3.0//EN" "http://mybatis.org/dtd/mybatis-3-mapper.dtd">
<mapper <select select * from t_user where uid = #{uid} </select>
</mapper> |
(4)在
MyBatis 核心配置文件中进行配置
|
<?xml <!DOCTYPE configuration PUBLIC "-//mybatis.org//DTD Config 3.0//EN" "http://mybatis.org/dtd/mybatis-3-config.dtd"> <configuration>
<settings> <!-- 开启自动驼峰命名规则映射 --> <setting </settings>
<!-- 配置类型别名 --> <typeAliases> <typeAlias </typeAliases>
<!-- 引入映射配置文件 --> <mappers> <package </mappers> </configuration> |
(5)在数据库连接信息的属性文件中进行配置
jdbc.properties:
|
jdbc.driverClassName=com.mysql.jdbc.Driver jdbc.url=jdbc:mysql:///test_db jdbc.username=root |
其中:
jdbc:mysql:///test_db 是 jdbc:mysql://localhost:3306/test_db 的简写
(6)在
Spring 核心配置文件中进行配置
applicationContext.xml:
|
<?xml <beans xmlns:xsi="http://www.w3.org/2001/XMLSchema-instance" xmlns:aop="http://www.springframework.org/schema/aop" xmlns:context="http://www.springframework.org/schema/context" xmlns:tx="http://www.springframework.org/schema/tx" xsi:schemaLocation=" http://www.springframework.org/schema/beans http://www.springframework.org/schema/beans/spring-beans.xsd http://www.springframework.org/schema/aop http://www.springframework.org/schema/aop/spring-aop.xsd http://www.springframework.org/schema/context http://www.springframework.org/schema/context/spring-context.xsd http://www.springframework.org/schema/tx http://www.springframework.org/schema/tx/spring-tx.xsd">
<!-- 使用spring自带的占位符替换功能 --> <bean
<!-- 允许JVM参数覆盖 --> <property
<!-- 忽略没有找到的资源文件 --> <property
<!-- 配置资源文件(也称 <property <list> <value>classpath:jdbc.properties</value> </list> </property>
</bean>
<!-- 配置 BoneCP 连接池 --> <bean
<!-- 数据库驱动 --> <property
<!-- 相应驱动的jdbcUrl --> <property
<!-- 数据库的用户名 --> <property
<!-- 数据库的密码 --> <property
,如果要取消则设置为0 --> <property
,如果要永远存活设置为0 --> <property
<!-- 每个分区最大的连接数 --> <property
<!-- 每个分区最小的连接数 --> <property
</bean>
<!-- 将 SqlSessionFactory 对象的创建交给 Spring 进行管理 --> <bean <!-- 指定数据源 --> <property <!-- 指定 MyBatis 核心配置文件的位置(路径) --> <property </bean>
<!-- 配置映射器接口(Mapper 接口)的扫描包 --> <bean <!-- 如有多个包,以逗号 <property </bean>
<!-- 配置映射器接口(以下方法二选一即可,这里选择法二):
法一:逐个配置:配置映射器接口(Mapper 接口)的对象
<bean id="userMapper" class="org.mybatis.spring.mapper.MapperFactoryBean"> <property name="mapperInterface" value="com.siwuxie095.mapper.UserMapper"/> <property name="sqlSessionFactory" ref="sqlSessionFactory"/> </bean>
法二:统一配置:配置映射器接口(Mapper 接口)的扫描包
<bean class="org.mybatis.spring.mapper.MapperScannerConfigurer"> <property name="basePackage" value="com.siwuxie095.mapper"/> </bean>
--> </beans> |
(7)编写一个单元测试类
UserMapperTest.java:
|
package com.siwuxie095.test; import org.junit.Test; import org.springframework.context.ApplicationContext; import org.springframework.context.support.ClassPathXmlApplicationContext; import com.siwuxie095.entity.User; import com.siwuxie095.mapper.UserMapper; public class UserMapperTest {
/** * 手动加上 @Test 以进行单元测试(将自动导入 JUnit 4 的 jar 包) * * 选中方法名,右键->Run As->JUint Test */ @Test public ApplicationContext applicationContext = new ClassPathXmlApplicationContext("applicationContext.xml");
UserMapper userMapper = (UserMapper) applicationContext.getBean(UserMapper.class);
User user = userMapper.getUser(1); System.out.println(user); }
} |
【made by siwuxie095】
整合Spring框架和MyBatis框架的更多相关文章
- Spring Boot从入门到精通(九)整合Spring Data JPA应用框架
JPA是什么? JPA全称Java Persistence API,是Sun官方提出的Java持久化规范.是JDK 5.0注解或XML描述对象-关系表的映射关系,并将运行期的实体对象持久化到数据库中. ...
- IDEA下创建Maven项目,并整合使用Spring、Spring MVC、Mybatis框架
项目创建 本项目使用的是IDEA 2016创建. 首先电脑安装Maven,接着打开IDEA新建一个project,选择Maven,选择图中所选项,下一步. 填写好GroupId和ArtifactId, ...
- spring、spring mvc、mybatis框架整合基本知识
学习了一个多月的框架知识了,这两天很想将它整合一下.网上看了很多整合案例,基本都是基于Eclipse的,但现在外面公司基本都在用Intellij IDEA了,所以结合所学知识,自己做了个总结,有不足之 ...
- spring boot集成mybatis框架
概述 中文官网:http://www.mybatis.cn 参考教程:https://www.w3cschool.cn/mybatis MyBatis Plus:http://mp.baomidou. ...
- Java框架之MyBatis框架(一)
一.框架介绍: MyBatis是一个优秀的持久层框架,它对jdbc的操作数据库的过程进行封装,使开发者只需要关注 SQL 本身,而不需要花费精力去处理例如注册驱动.创建connection.创建sta ...
- SSM框架-初学Mybatis框架
SSM(Spring+SpringMVC+Mybatis)是目前项目开发比较流行的一套组合框架,而Mybatis是负责数据库操作的那部分框架,具体 我也说不上来 传统的JDBC操作比较冗长而繁琐,而用 ...
- Hibernate框架与Mybatis框架的对比
学习了Hibernate和Mybatis,但是一直不太清楚他们两者的区别的联系,今天在网上翻了翻,就做了一下总结,希望对大家有帮助! 原文:http://blog.csdn.net/firejuly/ ...
- 整合spring,springmvc和mybatis
我创建的是maven项目,使用到的依赖架包有下面这些: <dependencies> <dependency> <groupId>org.springframewo ...
- Java框架之MyBatis框架(二)
Mybatis框架是相对于优化dao层的框架,其有效的减少了频繁的连接数据库(在配置文件xml中进行配置),将sql语句与java代码进行分离(写在XXXXmapper.xml文件中,一个表对应一个x ...
随机推荐
- solr 学习笔记(一)--搜索引擎简介
一 搜索引擎是什么一套可对大量结构化.半结构化数据.非结构化文本类数据进行实时搜索的专门软件最早应用于信息检索领域,经谷歌.百度等公司推出网页搜索而为大众广知.后又被各大电商网站采用来做网站的商品搜索 ...
- lambda函数的特性
lambda表达式可以理解为一种抽象的函数实现方法,这种方式只有最基本的三个步骤:给与参数,表达式实现,返回结果.这种方式非常干净,减少了内存的使用,整个程序少了函数的污染,代码格式也会更为简练.但在 ...
- laravel框架容器管理
来自http://www.cnblogs.com/chy1000/p/7072936.html 本文面向php语言的laravel框架的用户,介绍一些laravel框架里面容器管理方面的使用要点.文章 ...
- note 1 对象和数据类型
/#行注释 print "Hello World" 对象 五种基本类型 字符串 (string),简记为str 使用 ' ' 或 " " 括起来的一系列字符 整 ...
- iOS ReactiveCocoa的使用
一.ReactiveCocoa简介 reactiveCocoa简称RAC,它是一个三方框架,很多人把它叫做函数响应式编程框架,因为它具有函数式编程和响应式编程的特性. 由于该框架的编程思想,使得它具有 ...
- C常量与控制语句
在C语言中定义常量的两种方式 在C语言编程中定义常量有两种方法. const关键字 #define预处理器 1. const关键字 const关键字用于定义C语言编程中的常量. const float ...
- 保存数据到Excel中
调用的方法传值 Export(dt, "Cal_Report_" + DateTime.Now.ToString("yyyyMMddhhmmss") + &qu ...
- 普通PC机支持内存128G,单条32G内存
以前,不管是英特尔还是AMD的消费级平台支持内存容量大多都是64GB,这一现状被英特尔公司去年推出的第九代酷睿而改变.第九代酷睿最大支持128GB内存,虽然只是简单的提高了内存容量,对大多数电脑用户而 ...
- oracle自定义函数返回结果集
首先要弄两个type,不知道什么鬼: 1. create or replace type obj_table as object ( id ), name ), ) ) 2. create or re ...
- nginx 返回数据不完整
当nginx 代理解析大量数据流时,会把数据先放在自己的缓冲区,然后一并发给客户端 一次请求的数据量很大, 则会有一部分数据会被忽略掉 前端解析数据会有问题 致使页面白屏 nginx 返回数据不完整的 ...