SWT的TitleAreaDialog详解
转自:http://www.cnblogs.com/AllenYoung/archive/2006/10/05/521805.html
Dialog是SWT和JFace的一个重要的组成部分,我们在开发Plug-in或RCP的时候也经常会用到它们。这篇随笔不会介绍 SWT的Dialog,因为我想很多人都已经非常熟悉它了。在这里,我要讨论的是JFace的Dialog,或者更进一步说是JFace的 TitleAreaDialog。什么是TitleAreaDialog呢?想想我们常常用到的New XX Wizard就知道了。在我们创建一个Java Project或Class的时候,我们所使用的Wizard其实就是由TitleAreaDialog构成的。这种Dialog有如下所示的 TitleArea和一个标准的Button Bar:


正常的TitleArea 带有错误信息的TitleArea

标准的Button Bar
这种GUI的表现力要比SWT的Dialog强很多,而且JFace为该 Dialog封装了很多东西,这也使开发工作变得更加简单,所以我极力推荐使用TitleAreaDialog。那么让我们来看一个最基本的 TitleAreaDialog:
import org.eclipse.jface.dialogs.TitleAreaDialog;
import org.eclipse.swt.SWT;
import org.eclipse.swt.graphics.Point;
import org.eclipse.swt.layout.GridData;
import org.eclipse.swt.widgets.Composite;
import org.eclipse.swt.widgets.Control;
import org.eclipse.swt.widgets.Shell;
import org.jthin.jpssp.ide.configuration.Activator;
public class MyTitleAreaDialog extends TitleAreaDialog {
/**
* Create the dialog
*
* @param parentShell
*/
public MyTitleAreaDialog(Shell parentShell) {
super(parentShell);
}
/*
* (non-Javadoc)
*
* @see org.eclipse.jface.dialogs.TitleAreaDialog#createDialogArea(org.eclipse.swt.widgets.Composite)
*/
protected Control createDialogArea(Composite parent) {
Composite area = (Composite) super.createDialogArea(parent);
Composite container = new Composite(area, SWT.NONE);
container.setLayoutData(new GridData(GridData.FILL_BOTH));
// TitleArea中的Title
setTitle("My TitleAreaDialog");
// TitleArea中的Message
setMessage("This is a simple TitleAreaDialog example.");
// TitleArea中的Image
setTitleImage(ResourceManager.getPluginImage(Activator.getDefault(), "icons/Neptune.png"));
return area;
}
/*
* (non-Javadoc)
*
* @see org.eclipse.jface.dialogs.Dialog#createButtonsForButtonBar(org.eclipse.swt.widgets.Composite)
*/
protected void createButtonsForButtonBar(Composite parent) {
createButton(parent, IDialogConstants.OK_ID, IDialogConstants.OK_LABEL, true);
createButton(parent, IDialogConstants.CANCEL_ID, IDialogConstants.CANCEL_LABEL, false);
}
/*
* (non-Javadoc)
*
* @see org.eclipse.jface.dialogs.TitleAreaDialog#getInitialSize()
*/
protected Point getInitialSize() {
return new Point(500, 375);
}
/*
* (non-Javadoc)
*
* @see org.eclipse.jface.window.Window#configureShell(org.eclipse.swt.widgets.Shell)
*/
protected void configureShell(Shell newShell) {
super.configureShell(newShell);
// Dialog Title
newShell.setText("Test TitleAreaDialog Title");
// Dialog Icon
newShell.setImage(ResourceManager.getPluginImage(Activator.getDefault(), "icons/Neptune.png"));
}
}
这段代码非常容易理解,从方法签名中可以看出每个方法做了什么事情。注意createButtonsForButtonBar方法,其中用createButton方法创建了OK和Cancel这两个Button,并且把Button的默认点击事件也写好了,就是关闭该 Dialog。ResourceManager.getPluginImage是我自己编写的获得图片的helper method,这里就不讨论其实现了。这段代码会产生如下的Dialog:

有趣的是,我在这里故意使用了一个128×128的大图标, TitleAreaDialog不会自动缩小或裁减Image,而是调整TitleArea的大小来适应Image。
接下来我们要为OK Button编写我们自己的事件,例如把用户在Dialog中的输入保存到某处。有人可能会想到为OK Button添加SelectionListener,但实际上这样做是不对的,因为OK Button是JFace为Dialog封装好了的,同时JFace也提供了响应的callback:
* (non-Javadoc)
*
* @see org.eclipse.jface.dialogs.Dialog#okPressed()
*/
protected void okPressed() {
// implement your own function here
super.okPressed();
}
我们可以在这里实现我们自己的事件,不过最后一定要调用super.okPressed方法,否则Dialog就不会关闭了。
OK,以上就是TitleAreaDialog的基本Framework,非常容易理解,下面我们就来在 TitleArea中动态设置一些信息。你可以把这个scenario想象成在用户输入的同时提示用户输入的合法性。TitleAreaDialog提供了好3个方法可以动态设置TitleArea信息,具体如下:
- public void setErrorMessage(String newErrorMessage):显示传入的错误信息。(我们把用这个方法设置的信息叫做error message。)当前显示的信息会被保存起来,等到error message清空之后会再次显示,而清空error message要传入null,而不是传入空字符串。
- setMessage(String newMessage):显示传入的信息,等同于setMessage(String newMessage, IMessageProvider.NONE)。如果当前显示的是error message,那么newMessage会被保存起来,等到error message清空后再显示。
- setMessage(String newMessage, int newType):显示传入的信息,并显示指定的信息类型。可用的类型有NONE、INFORMATION、WARNING和ERROR。需要注意的是, setMessage(String newMessage, int IMessageProvider.ERROR)和setErrorMessage(String newErrorMessage)并不相同。后者会覆盖当前的任何信息,而前者只会覆盖当前的非error message,不会影响到error message(也就是说当error message清空后才会显示)。
这样,我们就可以为一些文本框添加ModifyListener,然后在其中设置TitleArea的信息了。
接着,再让我们来看看Button Bar。有些时候,我们希望把OK和Cancel这种默认的Button放置在Button Bar的右侧,而把其他Button放置在Button Bar的左侧,如下图中的Customize... Button:

这又如何实现呢?有人可能想到在 createButtonsForButtonBar方法中做一些手脚,但是遗憾的是这行不通,我们真正要覆写的是createButtonBar方法,下面是一个简单的例子:
* (non-Javadoc)
*
* @see org.eclipse.jface.dialogs.TrayDialog#createButtonBar(org.eclipse.swt.widgets.Composite)
*/
protected Control createButtonBar(Composite parent) {
Composite composite = new Composite(parent, SWT.NONE);
GridLayout layout = new GridLayout();
layout.numColumns = 0;
layout.marginHeight = convertVerticalDLUsToPixels(IDialogConstants.VERTICAL_MARGIN);
layout.marginWidth = convertHorizontalDLUsToPixels(IDialogConstants.HORIZONTAL_MARGIN);
layout.verticalSpacing = convertVerticalDLUsToPixels(IDialogConstants.VERTICAL_SPACING);
layout.horizontalSpacing = convertHorizontalDLUsToPixels(IDialogConstants.HORIZONTAL_SPACING);
composite.setLayout(layout);
composite.setLayoutData(new GridData(GridData.FILL_HORIZONTAL));
if (isHelpAvailable()) {
createHelpControl(composite);
}
createButton(composite, MyConstants.IMPORT_BUTTON_ID, "Import", false).addSelectionListener(new SelectionAdapter() {
public void widgetSelected(SelectionEvent e) {
MessageDialog.openInformation(MaintainModuleDialog.this.getShell(), "Information",
"\"Import\" button has not been implemented.");
}
});
createButton(composite, MyConstants.EXPORT_BUTTON_ID, "Export", false).addSelectionListener(new SelectionAdapter() {
public void widgetSelected(SelectionEvent e) {
MessageDialog.openInformation(MaintainModuleDialog.this.getShell(), "Information",
"\"Export\" button has not been implemented.");
}
});
createButton(composite, MyConstants.OTHER_BUTTON_ID, "Other", false).addSelectionListener(new SelectionAdapter() {
public void widgetSelected(SelectionEvent e) {
MessageDialog.openInformation(MaintainModuleDialog.this.getShell(), "Information",
"\"Other\" button has not been implemented.");
}
});
Label filler = new Label(composite, SWT.NONE);
filler.setLayoutData(new GridData(GridData.FILL_HORIZONTAL | GridData.GRAB_HORIZONTAL));
layout.numColumns++;
super.createButtonsForButtonBar(composite);
return composite;
}
正如你所见,我们实际上创建了自己的Button Bar,然后在上面添加了3个Button:Import、Export和Other,最后 super.createButtonsForButtonBar会创建OK和Cancel Button。filler是用来在两组Button见占位的。代码中用到的两个convert方法来自 org.eclipse.jface.dialogs.Dialog类,你还可以在这个类中找到一个getButton(int)方法,它可以根据传入的 ID返回用createButton创建的Button。这些都是非常实用的方法。
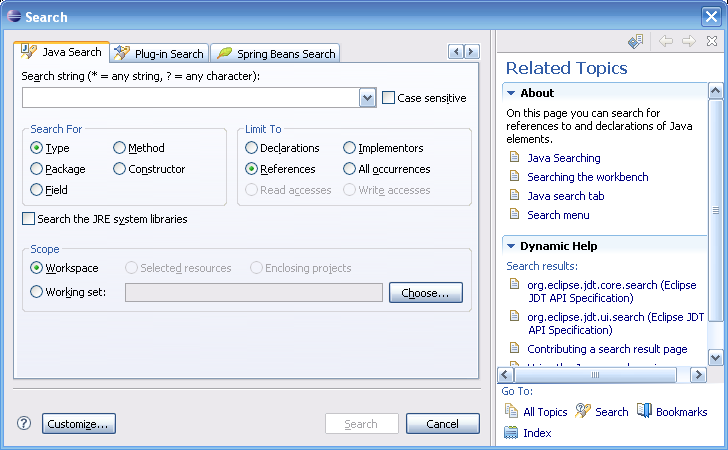
回头看一下上面那个完整的 TitleAreaDialog图片,你会看到在Dialog左下角有一个问号符号,这其实是一个Button,点击它可以显示帮助信息,当然帮助信息是由你来创建的。让我们看看Eclipse Search的TitleAreaDialog中的帮助信息吧:
如果我们也想实现这种帮助机制,那么就要实现如下方法:
* (non-Javadoc)
*
* @see org.eclipse.jface.dialogs.TrayDialog#createHelpControl(org.eclipse.swt.widgets.Composite)
*/
protected Control createHelpControl(Composite parent) {
// TODO Auto-generated method stub
return super.createHelpControl(parent);
}
如果不想实现帮助机制,那么最好不要在Dialog中显示出那个问号符号,你可以覆写如下方法并永远返回false,这样就不会显示问号符号了。
* (non-Javadoc)
*
* @see org.eclipse.jface.dialogs.TrayDialog#isHelpAvailable()
*/
public boolean isHelpAvailable() {
return false;
}
那么这个酷酷的帮助机制到底是个什么东西呢?实际上,它的学名叫做DialogTray。TitleAreaDialog继承了 org.eclipse.jface.dialogs.TrayDialog类,而TrayDialog就可以显示这种 DialogTray,是不是有点儿拗口呢?实际上,我们不仅仅可以添加帮助信息这一种DialogTray,还可以添加任意的DialogTray,现在就让我们动手实现一个最简单的吧。代码很简单,最主要的就是要实现一个DialogTray,代码如下:
import org.eclipse.swt.SWT;
import org.eclipse.swt.layout.GridData;
import org.eclipse.swt.layout.GridLayout;
import org.eclipse.swt.widgets.Composite;
import org.eclipse.swt.widgets.Control;
import org.eclipse.swt.widgets.Label;
import org.eclipse.swt.widgets.Text;
public class MyDialogTray extends DialogTray {
/*
* (non-Javadoc)
*
* @see org.eclipse.jface.dialogs.DialogTray#createContents(org.eclipse.swt.widgets.Composite)
*/
protected Control createContents(Composite parent) {
Composite container = new Composite(parent, SWT.NONE);
final GridLayout gridLayout = new GridLayout();
gridLayout.numColumns = 2;
container.setLayout(gridLayout);
final Label label = new Label(container, SWT.NONE);
label.setText("Name:");
final Text text = new Text(container, SWT.BORDER);
text.setLayoutData(new GridData(SWT.FILL, SWT.CENTER, true, false));
return container;
}
}
我们只在其中创建了一个Label和一个Text,这就足够了。最后,我们为MyTitleAreaDialog添加两个Button,用来打开和关闭MyDialogTray,代码如下:
openTrayButton.setText("Open Tray");
final Button closeTrayButton = new Button(container, SWT.NONE);
closeTrayButton.setText("Close Tray");
closeTrayButton.setEnabled(false);
openTrayButton.addSelectionListener(new SelectionAdapter() {
public void widgetSelected(final SelectionEvent e) {
// this method is from TrayDialog
openTray(new MyDialogTray());
openTrayButton.setEnabled(false);
closeTrayButton.setEnabled(true);
}
});
closeTrayButton.addSelectionListener(new SelectionAdapter() {
public void widgetSelected(final SelectionEvent e) {
// this method is from TrayDialog
closeTray();
openTrayButton.setEnabled(true);
closeTrayButton.setEnabled(false);
}
});
最后我们会得到如下对话框:

好了,就讲这么多吧。如果能把这些东东适当地用在你的Application中,那么效果一定非常棒。
SWT的TitleAreaDialog详解的更多相关文章
- 详解 SWT 中的 Browser.setUrl(String url, String postData, String[] headers) 的用法
http://hi.baidu.com/matrix286/item/b9e88b28b90707c9ddf69a6e ———————————————————————————————————————— ...
- JNI详解---从不懂到理解
转载:https://blog.csdn.net/hui12581/article/details/44832651 Chap1:JNI完全手册... 3 Chap2:JNI-百度百科... 11 C ...
- 【eclipse插件开发实战】 Eclipse插件开发6——eclipse在线翻译插件Translator开发实例详解
Eclipse插件开发6--eclipse在线翻译插件Translator开发实例详解 在上一篇文章中讲到了一个简单的eclipse插件开发实例,主要是对插件工程的基本创建步骤进行了讲解,这篇文章当中 ...
- 【插件开发】—— 10 JFace开发详解
前文回顾: 1 插件学习篇 2 简单的建立插件工程以及模型文件分析 3 利用扩展点,开发透视图 4 SWT编程须知 5 SWT简单控件的使用与布局搭配 6 SWT复杂空间与布局搭配 7 SWT布局详解 ...
- Linq之旅:Linq入门详解(Linq to Objects)
示例代码下载:Linq之旅:Linq入门详解(Linq to Objects) 本博文详细介绍 .NET 3.5 中引入的重要功能:Language Integrated Query(LINQ,语言集 ...
- 架构设计:远程调用服务架构设计及zookeeper技术详解(下篇)
一.下篇开头的废话 终于开写下篇了,这也是我写远程调用框架的第三篇文章,前两篇都被博客园作为[编辑推荐]的文章,很兴奋哦,嘿嘿~~~~,本人是个很臭美的人,一定得要截图为证: 今天是2014年的第一天 ...
- EntityFramework Core 1.1 Add、Attach、Update、Remove方法如何高效使用详解
前言 我比较喜欢安静,大概和我喜欢研究和琢磨技术原因相关吧,刚好到了元旦节,这几天可以好好学习下EF Core,同时在项目当中用到EF Core,借此机会给予比较深入的理解,这里我们只讲解和EF 6. ...
- Java 字符串格式化详解
Java 字符串格式化详解 版权声明:本文为博主原创文章,未经博主允许不得转载. 微博:厉圣杰 文中如有纰漏,欢迎大家留言指出. 在 Java 的 String 类中,可以使用 format() 方法 ...
- Android Notification 详解(一)——基本操作
Android Notification 详解(一)--基本操作 版权声明:本文为博主原创文章,未经博主允许不得转载. 微博:厉圣杰 源码:AndroidDemo/Notification 文中如有纰 ...
随机推荐
- 远光软件ASP.NET笔试题小汇总
ASP.NET笔试题是ASP.NET程序员面试必须经历的,一般会叫你填两个表 1个是你的详细信息表 1个是面试题答卷 两个都要注意反正面是否都有内容不要遗漏,如果考你机试一般也有两种,就是程序连接数据 ...
- 调用函数的ALV、面向对象的ALV设置带选择列
这个就是通过对应的选择列,实现对ALV数据的选择,在调用函数的ALV和面向对象的ALV实现方法存在差异,下面讲两者的方法:1)调用函数的ALV. 通过 SLIS_LAYOUT_ALV-BOX_FI ...
- StackOverFlow的2016统计
http://stackoverflow.com/research/developer-survey-2016
- PHP之操作数据库
数据库,顾名思义,是一个存放数据的容器.然后在使用过程中对数据库里面的数据增删改查,具体是怎么实现的呢? 这儿不得不提一下一个神奇的东西:SQL语句:结构化查询语言(Structured Query ...
- 在 SSIS package 中使用FTP
在ssis 包中使用FTP 实际上很简单, 直接拿一个FTP控制流(FTP 任务) ,配置一下FTP 服务器就可以了, 但是当我想在SQL Server Job 中使用这个功能时却报了个错(如下), ...
- 介绍SAP预留函数创建搜索帮助
紧接上一节介绍的SAP预定义的出口函数F4IF_SHLP_EXIT_EXAMPLE创建搜索帮助, 该函数主要有两个部分: Changing接口的参数属性如下: SHLP:搜索帮助的基础描述,包括搜索帮 ...
- Android菜鸟的成长笔记(6)——剖析源码学自定义主题Theme
原文:Android菜鸟的成长笔记(6)--剖析源码学自定义主题Theme 还记得在Android菜鸟的成长笔记(3)中我们曾经遇到了一个问题吗?"这个界面和真真的QQ界面还有点不同的就是上 ...
- 查找MobileSafari WebKit revision number的方法
Mobile Safari是开源的Mac Safari的iOS版本,然而iOS WebKit并不完全开源,只公开了部分的WebCore和JavaScriptCore.有时需要知道iOS Safari的 ...
- 关于iptables的u32匹配
前面一篇文章----阐释了iptables最新的bpf match,说它将多个matches并成了一个经过编译的解释型bytecode bpf match,早在bpf match之前,u32 matc ...
- javascript --- 事件托付
javascript 之 事件托付 长处:1.提高性能(仅仅须要对父级进行操作,子节点相同会拥有其相关属性和方法) 2.对于新加入的事件.也让其拥有父级事件的属性 <!doctype html& ...