MOEAD实现、基于分解的多目标进化、 切比雪夫方法-(python完整代码)
确定某点附近的点
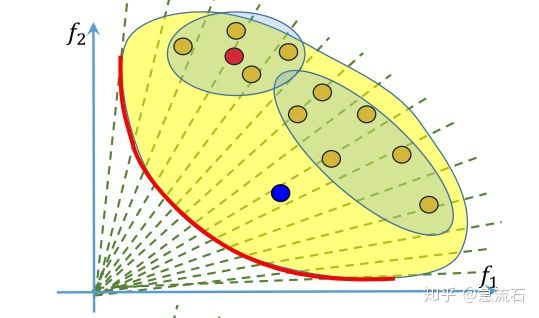
答:每个解对应的是一组权重,即子问题,红点附近的四个点,也就是它的邻居怎么确定呢?由权重来确定,算法初始化阶段就确定了每个权重对应的邻居,也就是每个子问题的邻居子问题。权重的邻居通过欧式距离来判断。取最近的几个。
取均匀分布向量
https://www.cnblogs.com/Twobox/p/16408751.html
MOEAD实现
算法理解与流程
https://www.zhihu.com/question/263555181?sort=created
其中两个回答都挺好的
1. 输入N m

# N表示取点密度 m表示问题维度

1.1 输入 T

# 表示取最近的T个作为邻居

2. 生成均匀分布权重向量

2.1 计算每个权重向量之间的欧拉距离

3. 权重向量个数即为:初始种群个数

4. 初始化种群,每个个体一一对应权重

4.1 更具权重之间距离,取前T个作为邻居person

5. EP = 空

# 维护成最优前沿

6. 计算最初的全局最优Z

# 把每个带入f1 f2中,取最小值 z1 z2

7. 开始循环N代

    7.1对于每个个体,在领域中选取2个个体进行交叉变异,获得2个新个体

    7.1.1更新全局解z

    7.2在领域中随机选择2个个体,用新个与旧个体进行对比

    # 新个体带入子目标问题,直接对比值即可

    7.3如果更优,则替换旧个体dna

    7.4更新EP

    # 如果有别接收的新解,将新解与EP每一个进行比较,删除被新解支配的,如果新解没有被旧解支配,那么加入EP
代码实现设计
# 分析
需要维护的数据结构:
某个体最近的T位邻居: 可以考虑采用对象列表即可
均匀分布的权重向量:一个二维ndarray数组即可
权重向量与个体对应关系:个体对象,直接保存权重向量数组
权重向量之间的距离矩阵:开局初始化,不变的
EP list,里面的个体是对象的引用
z list
目标函数集合,F list domain list # 接口设计
class Person
attribute:
dns:一维ndarray
weight_vector: 一维ndarray
neighbor: list<Person>
o_func:Objective_Function 目标函数
function:
mutation
cross_get_two_new_dna:返回2段新dna
compare#与子代比较
accept_new_dna
choice_two_person:p1,p2
class Moead_Util
attribute:
N
M
T:
o_func:Objective_Function
pm:变异概率 EP:[dna1,dna2,..]
weight_vectors:二维数组
Euler_distance:二维数组
pip_size
Z:[] # 这里面元素为一维ndarray数组,即dna,即解 function:
init_mean_vector:二维数组
init_Euler_distance:二维数组
init_population:[]
init_Z:一维属猪 update_ep
update_Z class Objective_Function:
attribute:
F:[]
domain:[[0,1],[],[]]
function:
get_one_function:Objective_Function
Person.py
 1 import numpy as np

 2

 3

 4 class Person:

 5     def __init__(self, dna):

 6         self.dna = dna

 7         self.weight_vector = None

 8         self.neighbor = None

 9         self.o_func = None  # 目标函数

10

11         self.dns_len = len(dna)

12

13     def set_info(self, weight_vector, neighbor, o_func):

14         self.weight_vector = weight_vector

15         self.neighbor = neighbor

16         self.o_func = o_func# 目标函数

17

18     def mutation_dna(self, one_dna):

19         i = np.random.randint(0, self.dns_len)

20         low = self.o_func.domain[i][0]

21         high = self.o_func.domain[i][1]

22         new_v = np.random.rand() * (high - low) + low

23         one_dna[i] = new_v

24         return one_dna

25

26     def mutation(self):

27         i = np.random.randint(0, self.dns_len)

28         low = self.o_func.domain[i][0]

29         high = self.o_func.domain[i][1]

30         new_v = np.random.rand() * (high - low) + low

31         self.dna[i] = new_v

32

33     @staticmethod

34     def cross_get_two_new_dna(p1, p2):

35         # 单点交叉

36         cut_i = np.random.randint(1, p1.dns_len - 1)

37         dna1 = p1.dna.copy()

38         dna2 = p2.dna.copy()

39         temp = dna1[cut_i:].copy()

40         dna1[cut_i:] = dna2[cut_i:]

41         dna2[cut_i:] = temp

42         return dna1, dna2

43

44     def compare(self, son_dna):

45         F = self.o_func.f_funcs

46         f_x_son_dna = []

47         f_x_self = []

48         for f in F:

49             f_x_son_dna.append(f(son_dna))

50             f_x_self.append(f(self.dna))

51         fit_son_dna = np.array(f_x_son_dna) * self.weight_vector

52         fit_self = np.array(f_x_self) * self.weight_vector

53         return fit_son_dna.sum() - fit_self.sum()

54

55     def accept_new_dna(self, new_dna):

56         self.dna = new_dna

57

58     def choice_two_person(self):

59         neighbor = self.neighbor

60         neighbor_len = len(neighbor)

61         idx = np.random.randint(0, neighbor_len, size=2)

62         p1 = self.neighbor[idx[0]]

63         p2 = self.neighbor[idx[1]]

64         return p1, p2
Objective_Function
 1 from collections import defaultdict

 2

 3 import numpy as np

 4

 5

 6 def zdt4_f1(x_list):

 7     return x_list[0]

 8

 9

10 def zdt4_gx(x_list):

11     sum = 1 + 10 * (10 - 1)

12     for i in range(1, 10):

13         sum += x_list[i] ** 2 - 10 * np.cos(4 * np.pi * x_list[i])

14     return sum

15

16

17 def zdt4_f2(x_list):

18     gx_ans = zdt4_gx(x_list)

19     if x_list[0] < 0:

20         print("????: x_list[0] < 0:", x_list[0])

21     if gx_ans < 0:

22         print("gx_ans < 0", gx_ans)

23     if (x_list[0] / gx_ans) <= 0:

24         print("x_list[0] / gx_ans<0:", x_list[0] / gx_ans)

25

26     ans = 1 - np.sqrt(x_list[0] / gx_ans)

27     return ans

28

29 def zdt3_f1(x):

30     return x[0]

31

32

33 def zdt3_gx(x):

34     if x[:].sum() < 0:

35         print(x[1:].sum(), x[1:])

36     ans = 1 + 9 / 29 * x[1:].sum()

37     return ans

38

39

40 def zdt3_f2(x):

41     g = zdt3_gx(x)

42     ans = 1 - np.sqrt(x[0] / g) - (x[0] / g) * np.sin(10 * np.pi * x[0])

43     return ans

44

45

46 class Objective_Function:

47     function_dic = defaultdict(lambda: None)

48

49     def __init__(self, f_funcs, domain):

50         self.f_funcs = f_funcs

51         self.domain = domain

52

53     @staticmethod

54     def get_one_function(name):

55         if Objective_Function.function_dic[name] is not None:

56             return Objective_Function.function_dic[name]

57

58         if name == "zdt4":

59             f_funcs = [zdt4_f1, zdt4_f2]

60             domain = [[0, 1]]

61             for i in range(9):

62                 domain.append([-5, 5])

63             Objective_Function.function_dic[name] = Objective_Function(f_funcs, domain)

64             return Objective_Function.function_dic[name]

65

66         if name == "zdt3":

67             f_funcs = [zdt3_f1, zdt3_f2]

68             domain = [[0, 1] for i in range(30)]

69             Objective_Function.function_dic[name] = Objective_Function(f_funcs, domain)

70             return Objective_Function.function_dic[name]
Moead_Util.py
  1 import numpy as np

  2

  3 from GA.MOEAD.Person import Person

  4

  5

  6 def distribution_number(sum, m):

  7     # 取m个数,数的和为N

  8     if m == 1:

  9         return [[sum]]

 10     vectors = []

 11     for i in range(1, sum - (m - 1) + 1):

 12         right_vec = distribution_number(sum - i, m - 1)

 13         a = [i]

 14         for item in right_vec:

 15             vectors.append(a + item)

 16     return vectors

 17

 18

 19 class Moead_Util:

 20     def __init__(self, N, m, T, o_func, pm):

 21         self.N = N

 22         self.m = m

 23         self.T = T  # 邻居大小限制

 24         self.o_func = o_func

 25         self.pm = pm  # 变异概率

 26

 27         self.Z = np.zeros(shape=m)

 28

 29         self.EP = []  # 前沿

 30         self.EP_fx = []  # ep对应的目标值

 31         self.weight_vectors = None  # 均匀权重向量

 32         self.Euler_distance = None  # 欧拉距离矩阵

 33         self.pip_size = -1

 34

 35         self.pop = None

 36         # self.pop_dna = None

 37

 38     def init_mean_vector(self):

 39         vectors = distribution_number(self.N + self.m, self.m)

 40         vectors = (np.array(vectors) - 1) / self.N

 41         self.weight_vectors = vectors

 42         self.pip_size = len(vectors)

 43         return vectors

 44

 45     def init_Euler_distance(self):

 46         vectors = self.weight_vectors

 47         v_len = len(vectors)

 48

 49         Euler_distance = np.zeros((v_len, v_len))

 50         for i in range(v_len):

 51             for j in range(v_len):

 52                 distance = ((vectors[i] - vectors[j]) ** 2).sum()

 53                 Euler_distance[i][j] = distance

 54

 55         self.Euler_distance = Euler_distance

 56         return Euler_distance

 57

 58     def init_population(self):

 59         pop_size = self.pip_size

 60         dna_len = len(self.o_func.domain)

 61         pop = []

 62         pop_dna = np.random.random(size=(pop_size, dna_len))

 63         # 初始个体的 dna

 64         for i in range(pop_size):

 65             pop.append(Person(pop_dna[i]))

 66

 67         # 初始个体的 weight_vector, neighbor, o_func

 68         for i in range(pop_size):

 69             # weight_vector, neighbor, o_func

 70             person = pop[i]

 71             distance = self.Euler_distance[i]

 72             sort_arg = np.argsort(distance)

 73             weight_vector = self.weight_vectors[i]

 74             # neighbor = pop[sort_arg][:self.T]

 75             neighbor = []

 76             for i in range(self.T):

 77                 neighbor.append(pop[sort_arg[i]])

 78

 79             o_func = self.o_func

 80             person.set_info(weight_vector, neighbor, o_func)

 81         self.pop = pop

 82         # self.pop_dna = pop_dna

 83

 84         return pop

 85

 86     def init_Z(self):

 87         Z = np.full(shape=self.m, fill_value=float("inf"))

 88         for person in self.pop:

 89             for i in range(len(self.o_func.f_funcs)):

 90                 f = self.o_func.f_funcs[i]

 91                 # f_x_i:某个体,在第i目标上的值

 92                 f_x_i = f(person.dna)

 93                 if f_x_i < Z[i]:

 94                     Z[i] = f_x_i

 95

 96         self.Z = Z

 97

 98     def get_fx(self, dna):

 99         fx = []

100         for f in self.o_func.f_funcs:

101             fx.append(f(dna))

102         return fx

103

104     def update_ep(self, new_dna):

105         # 将新解与EP每一个进行比较,删除被新解支配的

106         # 如果新解没有被旧解支配,则保留

107         new_dna_fx = self.get_fx(new_dna)

108         accept_new = True  # 是否将新解加入EP

109         # print(f"准备开始循环: EP长度{len(self.EP)}")

110         for i in range(len(self.EP) - 1, -1, -1):  # 从后往前遍历

111             old_ep_item = self.EP[i]

112             old_fx = self.EP_fx[i]

113             # old_fx = self.get_fx(old_ep_item)

114             a_b = True  # 老支配行

115             b_a = True  # 新支配老

116             for j in range(len(self.o_func.f_funcs)):

117                 if old_fx[j] < new_dna_fx[j]:

118                     b_a = False

119                 if old_fx[j] > new_dna_fx[j]:

120                     a_b = False

121             # T T : fx相等      直接不改变EP

122             # T F :老支配新     留老,一定不要新,结束循环.

123             # F T :新支配老     留新,一定不要这个老,继续循环

124             # F F : 非支配关系   不操作,循环下一个

125             # TF为什么结束循环,FT为什么继续循环,你们可以琢磨下

126             if a_b:

127                 accept_new = False

128                 break

129             if not a_b and b_a:

130                 if len(self.EP) <= i:

131                     print(len(self.EP), i)

132                 del self.EP[i]

133                 del self.EP_fx[i]

134                 continue

135

136         if accept_new:

137             self.EP.append(new_dna)

138             self.EP_fx.append(new_dna_fx)

139         return self.EP, self.EP_fx

140

141     def update_Z(self, new_dna):

142         new_dna_fx = self.get_fx(new_dna)

143         Z = self.Z

144         for i in range(len(self.o_func.f_funcs)):

145             if new_dna_fx[i] < Z[i]:

146                 Z[i] = new_dna_fx[i]

147         return Z
实现.py
import random import numpy as np from GA.MOEAD.Moead_Util import Moead_Util
from GA.MOEAD.Objective_Function import Objective_Function
from GA.MOEAD.Person import Person import matplotlib.pyplot as plt def draw(x, y):
plt.scatter(x, y, s=10, c="grey") # s 点的大小 c 点的颜色 alpha 透明度
plt.show() iterations = 1000 # 迭代次数
N = 400
m = 2
T = 40
o_func = Objective_Function.get_one_function("zdt3")
pm = 0.5 moead = Moead_Util(N, m, T, o_func, pm) moead.init_mean_vector()
moead.init_Euler_distance()
pop = moead.init_population()
moead.init_Z() for i in range(iterations):
print(i, len(moead.EP))
for person in pop:
p1, p2 = person.choice_two_person()
d1, d2 = Person.cross_get_two_new_dna(p1, p2) if np.random.rand() < pm:
p1.mutation_dna(d1)
if np.random.rand() < pm:
p1.mutation_dna(d2) moead.update_Z(d1)
moead.update_Z(d2)
t1, t2 = person.choice_two_person()
if t1.compare(d1) < 0:
t1.accept_new_dna(d1)
moead.update_ep(d1)
if t2.compare(d1) < 0:
t2.accept_new_dna(d2)
moead.update_ep(d1) # 输出结果画图
EP_fx = np.array(moead.EP_fx) x = EP_fx[:, 0]
y = EP_fx[:, 1]
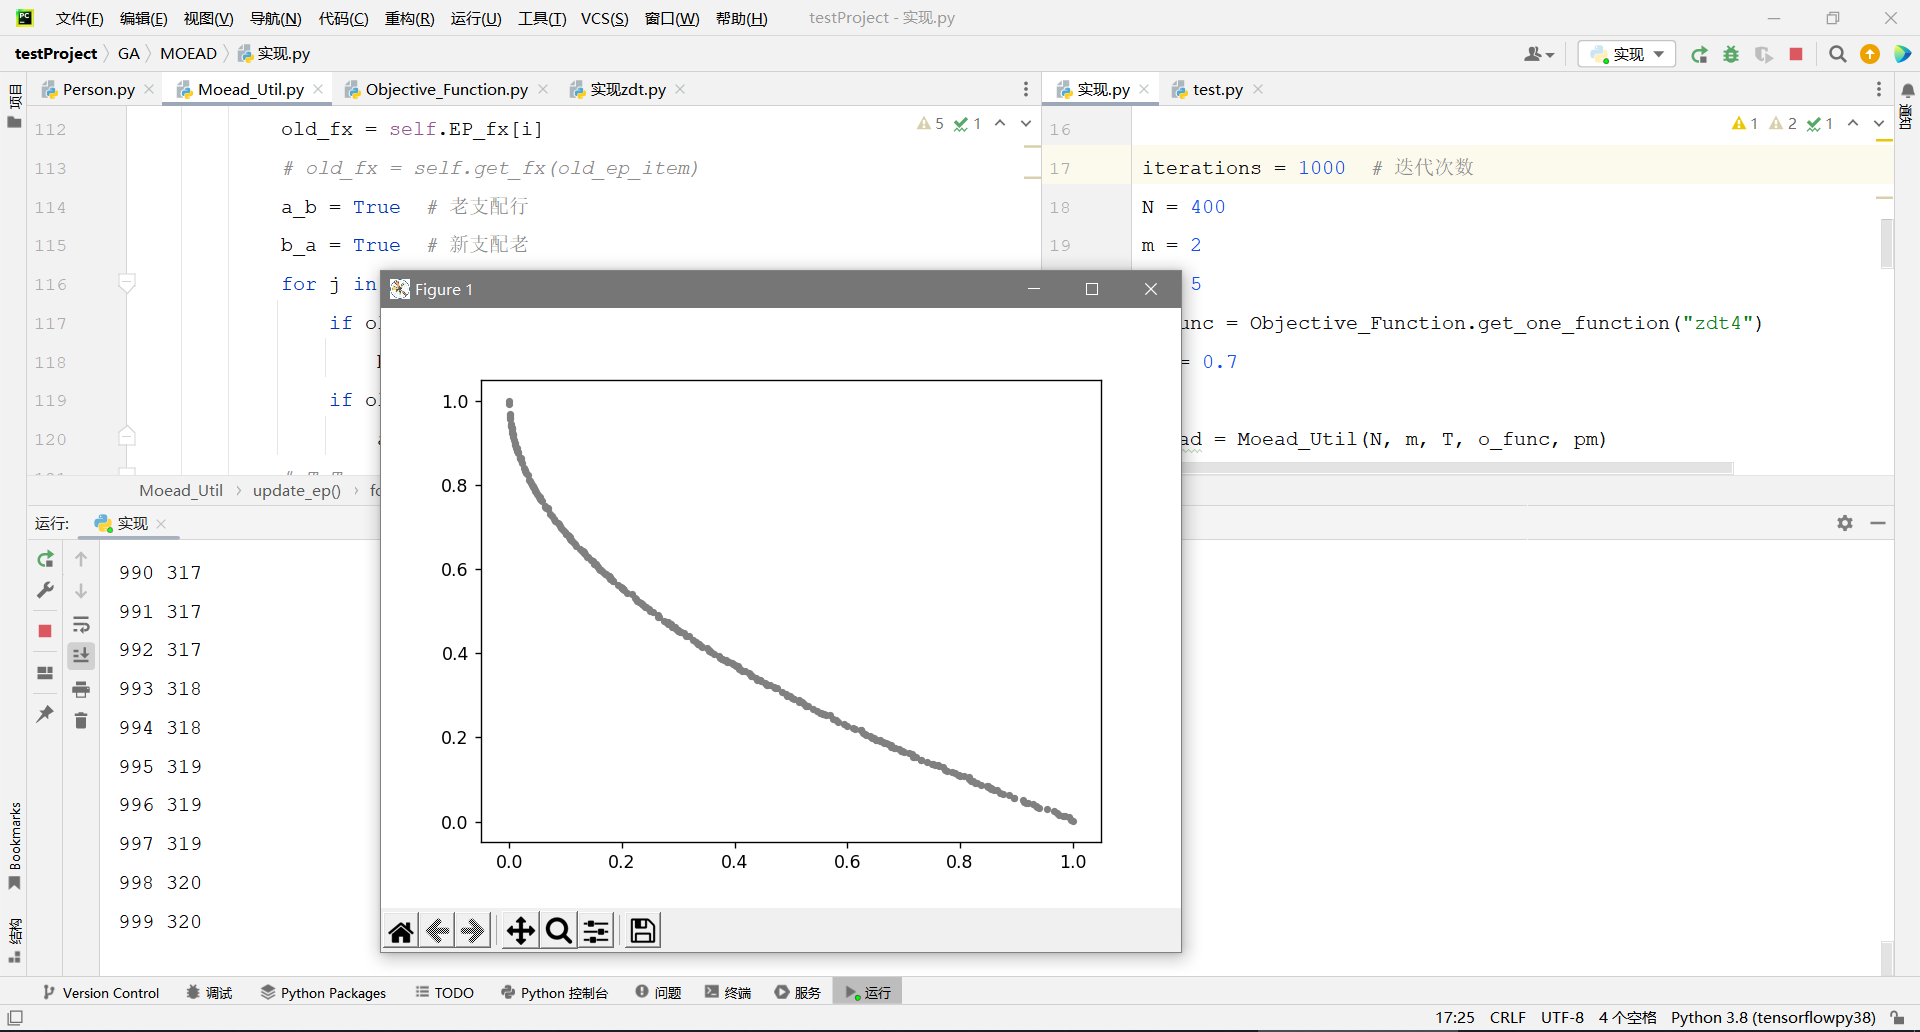
draw(x, y)
效果-ZDT4
本文原创作者:湘潭大学-魏雄,未经许可禁止转载
MOEAD实现、基于分解的多目标进化、 切比雪夫方法-(python完整代码)的更多相关文章
- 【毕业设计】基于Android的家校互动平台开发(内含完整代码和所有文档)——爱吖校推(你关注的,我们才推)
☆ 写在前面 之前答应大家的毕业答辩之后把所有文档贡献出来,现在答辩已过,LZ信守承诺,把所有文档开源到了GitHub(这个地址包含所有的代码和文档以及PPT,外层为简单的代码).还望喜欢的朋友们,不 ...
- AAAI2019 | 基于区域分解集成的目标检测 论文解读
Object Detection based on Region Decomposition and Assembly AAAI2019 | 基于区域分解集成的目标检测 论文解读 作者 | 文永亮 学 ...
- 基于深度学习的目标检测技术演进:R-CNN、Fast R-CNN,Faster R-CNN
基于深度学习的目标检测技术演进:R-CNN.Fast R-CNN,Faster R-CNN object detection我的理解,就是在给定的图片中精确找到物体所在位置,并标注出物体的类别.obj ...
- #Deep Learning回顾#之基于深度学习的目标检测(阅读小结)
原文链接:https://www.52ml.net/20287.html 这篇博文主要讲了深度学习在目标检测中的发展. 博文首先介绍了传统的目标检测算法过程: 传统的目标检测一般使用滑动窗口的框架,主 ...
- 第十九节、基于传统图像处理的目标检测与识别(词袋模型BOW+SVM附代码)
在上一节.我们已经介绍了使用HOG和SVM实现目标检测和识别,这一节我们将介绍使用词袋模型BOW和SVM实现目标检测和识别. 一 词袋介绍 词袋模型(Bag-Of-Word)的概念最初不是针对计算机视 ...
- 开源项目(9-0)综述--基于深度学习的目标跟踪sort与deep-sort
基于深度学习的目标跟踪sort与deep-sort https://github.com/Ewenwan/MVision/tree/master/3D_Object_Detection/Object_ ...
- 基于层级表达的高效网络搜索方法 | ICLR 2018
论文基于层级表达提出高效的进化算法来进行神经网络结构搜索,通过层层堆叠来构建强大的卷积结构.论文的搜索方法简单,从实验结果看来,达到很不错的准确率,值得学习 来源:[晓飞的算法工程笔记] 公众号 ...
- [信安Presentation]一种基于GPU并行计算的MD5密码解密方法
-------------------paper--------------------- 一种基于GPU并行计算的MD5密码解密方法 0.abstract1.md5算法概述2.md5安全性分析3.基 ...
- 一种基于RBAC模型的动态访问控制改进方法
本发明涉及一种基于RBAC模型的动态访问控制改进方法,属于访问控制领域.对原有RBAC模型进行了权限的改进和约束条件的改进,具体为将权限分为静态权限和动态权限,其中静态权限是非工作流的权限,动态权限是 ...
随机推荐
- uTools .SRT 转 .VTT 格式转换自动化小工具
不想用网上的转换工具,要有网,先上传,再下载,可能还要看广告.有些工具也不是很方便.打算配合uTools的自动化助手插件搞一个一键格式转换.
- JavaWeb学习day7-Response初学4
重定向和转发的区别 相同 页面都会实现跳转 不同 请求转发的时候url不会发生变化,编码是307 重定向的时候url会变化,编码是302
- defer综合
A "defer" statement invokes a function whose execution is deferred to the moment the surro ...
- el-transfer增加拖拽功能
el-transfer增加拖拽排序,左右互相拖拽功能: npm i sortablejs <template> <el-transfer ref="transfer&quo ...
- Java数组-2022年4月17日
目录 数组 数组Array 数组的常见异常 数组的遍历 数组的扩容 数组类型的返回值 可变长数组 排序算法 二维数组 测试代码 数组 数组Array ArrayList概念:一个连续的空间,存储多个相 ...
- Spring从入门到源码—IOC基本使用(二)
1.spring_helloworld 使用maven的方式来构建项目(Mavaen) 添加对应的pom依赖 pom.xml <dependencies> <!-- https:// ...
- 如何实现 antd table 自动调整可视高度(纵向滚动条,scrollY)
一.事情的起因 最近在做的项目中有大量的表格,正常的表格高度是没有限制的,数据量很大的时候会出现表格内容以及分页信息超出可视窗口, 为了查看超出的部分就需要滚动页面但是这样就会把查询条件等信息滚出可视 ...
- web前端 在 iOS下 input不能输入 以及获取焦点之后会出现蓝色的border轮廓
iOS下 input 不能获取焦点 获取焦点后:设置border:none无效果 .hb_content input{ display: inline-block; margin-left: 0.22 ...
- 手脱UPX(3.91)
1.使用Detect It Easy进行查壳: 2.使用x32dbg打开该带壳程序,在选项->选项->异常中添加区间设置0~FFFFFFFF全忽略: 3.我们F9运行到程序入口处,看到了p ...
- spring boot 集成 rabbitmq 指南
先决条件 rabbitmq server 安装参考 一个添加了 web 依赖的 spring boot 项目 我的版本是 2.5.2 添加 maven 依赖 <dependency> &l ...