NetScaler 10.1的配置以及结合StoreFront的部署
工作需要,所以英文+中文,绝壁不是装逼。。。(关于这点勿喷)
This post will cover only the basics for getting NetScaler up and running to support XenDesktop\XenApp. It in no way will help you do some other more advanced NetScaler stuff.
MIPS's and SNIP's and NSIP's and VIP's, Oh My!
Before we get started, let's get some terminology out of the way. The main thing to know is the four different IP addresses that the NetScaler uses.
MIP – Mapped IP address. You use MIP addresses to connect to the back-end servers and Reverse Network Address Translation (NAT). The MIP address is one of the NetScaler owned IP addresses. You must specify at least one MIP address when you configure the appliance for the first time.
SNIP – Subnet IP Address. This is an IP address that enables you to access a NetScaler appliance from an external host that exists on another subnet. When you add an SNIP address, the appliance adds an entry in the routing table. The SNIP enables the NetScaler appliance to connect to the subnet, which is different than that of the MIP and NSIP addresses, similar to local.
NSIP – NetScaler IP Address. The NSIP address is the IP address at which you access the NetScaler for management purposes. The NetScaler can have only one NSIP, which is also called the Management IP address network of the appliance.
VIP – Virtual Server IP Address. A VIP is the IP address associated with a virtual server. It is the public IP address to which clients connect. A NetScaler managing a wide range of traffic may have many VIPs configured.
天的试用版本的license文件,如何申请license文件,稍后会有一篇相关的文档.
我们可以根据Hypervisor的版本下载不同的VPX

这里我们下载的是for XenServer的版本,
我们将下载后的NetScaler VPX 导入到XenServer中,

选择正确的host为Citrix NetScaler:

选择合适的Storage:

选择所需要的NetWork: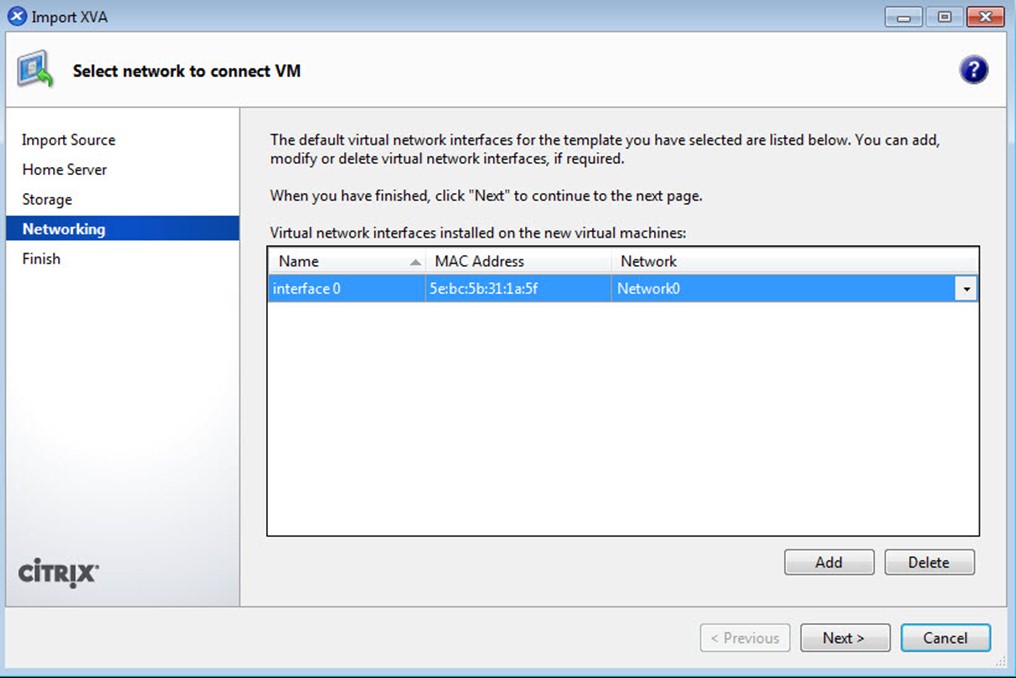
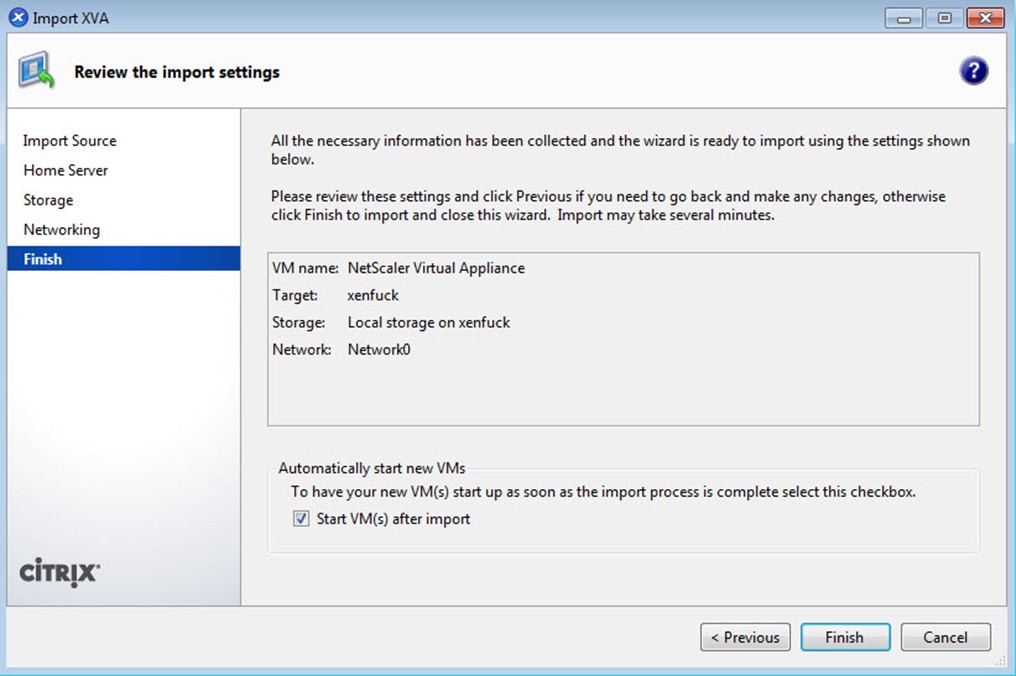
分钟,Citrix NetScaler VPX就会成功的导入到XenServer Host 中:
In order to access the appliance via the console remotely, it must have an IP first. Once IP'd all management is done via a web browser.
Go to the console of the newly created NetScaler virtual appliance. The console should be prompting for an Ipv4 address. The IP address it is looking for is the NSIP (NetScaler IP Address). This is the management IP of NetScaler.
Enter the desired IP, subnet mask, and default gateway of the NSIP. Once completed choose Option 4to Save and Quit.

Input associate information:

Once the NetScaler appliance has an IP, the rest of the NetScaler services will start. This takes about a minute or so. Once the console shows "Login:", that should indicate that you can now access the device through a web browser.
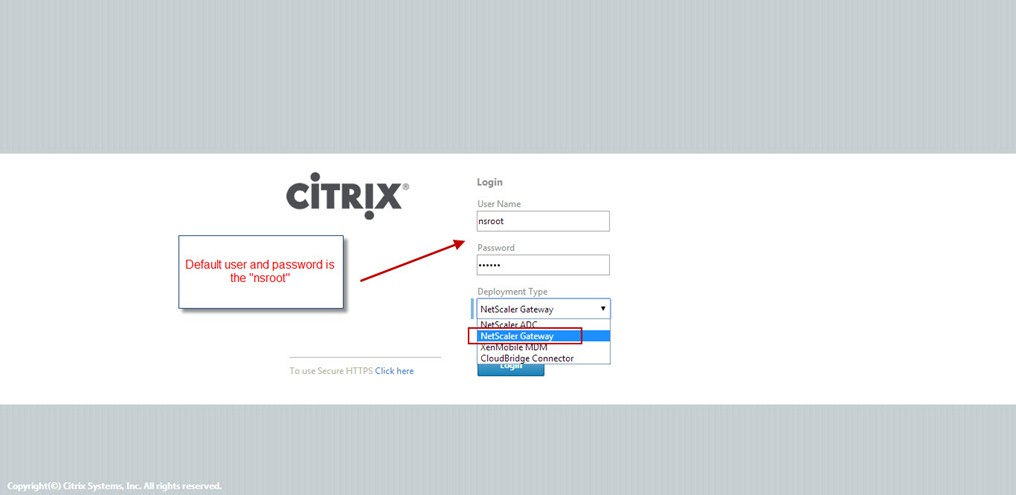
Open Internet Explorer and type the NSIP into the address bar. The default credentials for a NetScaler device is user nsroot for both username and password.
Note: The NetScaler web console requires a Java plug-in(Maybe JDK1.6+ is useful, don't use the latest JDK(7.x+)). If prompted by IE, allow the plug-in to run.
Once into the console, launch the Setup Wizard located towards the bottom of the web console

Import the License File:

Finish the wizard:

Reboot teh Citrix NetScaler:

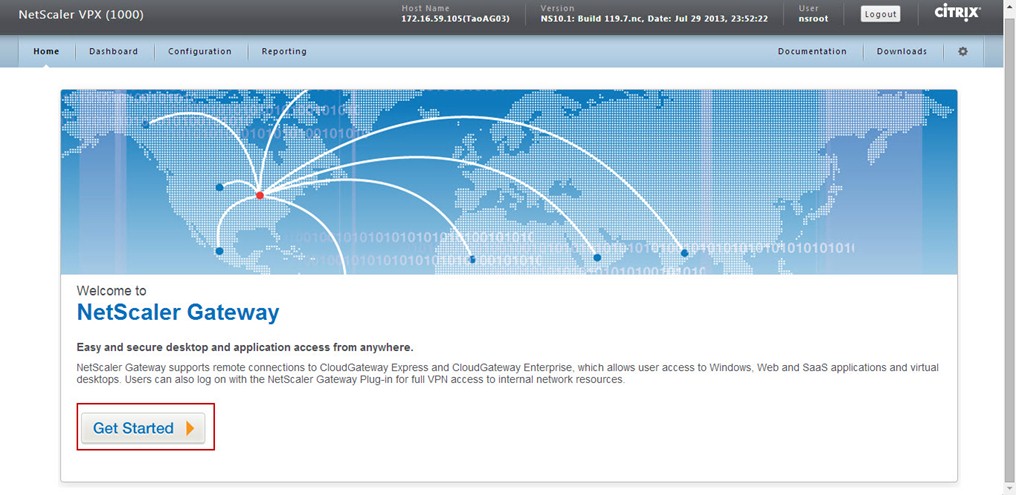
When NetScaler reboots and you login again by choosing 'NetScaler Gateway' option, an interface to configure NetScaler Gateway virtual server is presented. Click on 'Get Started' button.
Note – When you experience this wizard, it is advisable to go through each section and complete the wizard by clicking on 'Done' button at the end.
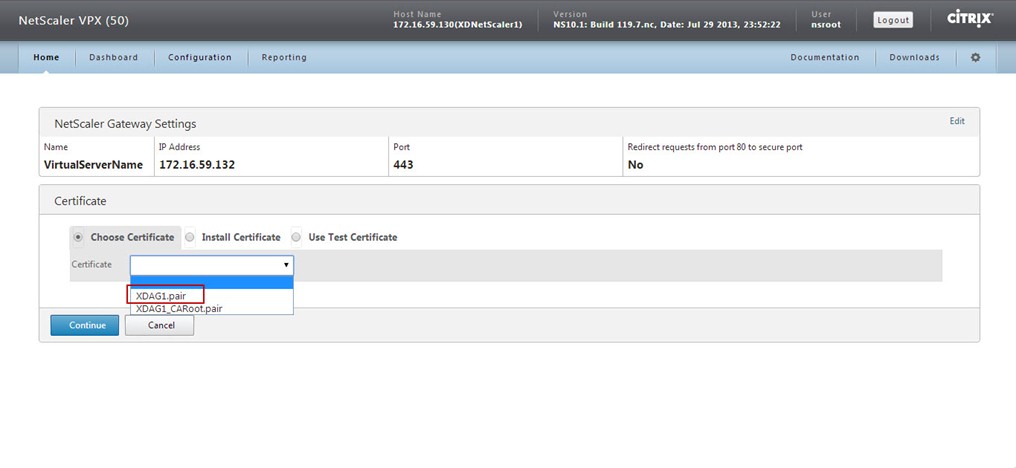
Configure the Certificate:
Certificates…The Bane of Every IT Person's Existence
When it comes to Access Gateway, the only way you can connect is via SSL (443) with a certificate. This means that any Access Gateway implementation must start with installing a certificate, and if necessary, the certificate chain.
For the purpose of this blog, I am going to use an internal Microsoft CA (Certificate Authority) for the certificate.
The first step is to create a certificate key. Navigate to SSL in the NetScaler GUI. Click on Create RSA Key. Use the following for inputting to the required fields:
Name: XDAG1.key (or anything that makes sense to you)
Key Size (bits): 2048
Key Format: PEM
PEM Encoding Algorithm: NONE

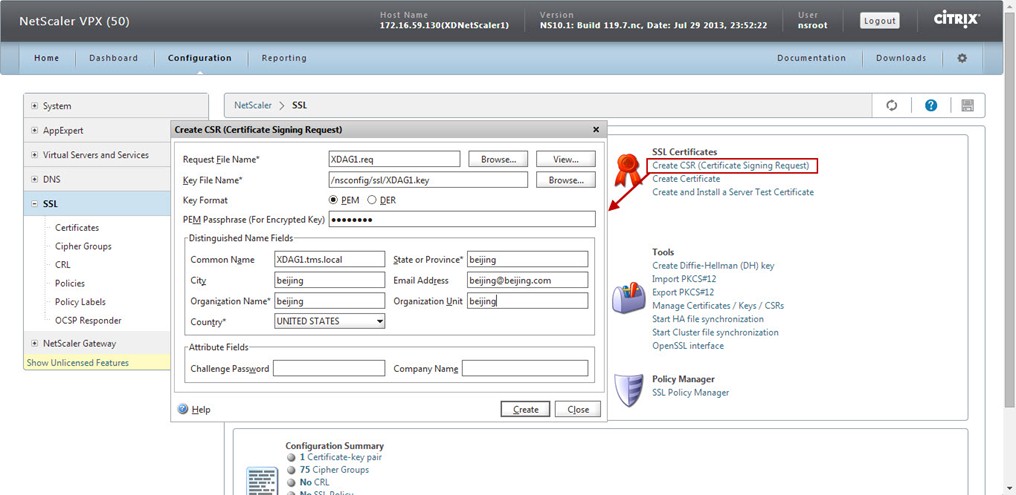
Next, we need to create a request that we are going to send over to the CA. Navigate to SSL in the NetScaler GUI. Click on Create CSR (Certificate Signing Request). Use the following for inputting to the required fields:
Request File Name: XDAG1.req (or anything that makes sense to you)
Key File Name: XDAG1.key (browse for the key created in previous step)
Key Format: PEM
PEM Passphrase: password (same password used to create the key in the previous step)
Common Name: XDAG1.tms.local (this is the name that users will type into their browsers)
Now, we need to download our request file to use for importing to the CA. Navigate to SSL in the NetScaler GUI. Click on Manage Certificates / Keys / CSRs (found under the Tools section). Find the request file (AG.req) created in the previous step then click Download. In the Download Files window click Browsethen save the file somewhere convenient.

Now, let's submit the request to the CA. Open a web browser and type in http://<yourCAname>/certsrv. Click on Request a certificate -> advanced certificate request -> submit a certificate request by using a base-64… Open the request file (AG.req) in notepad and copy all the contents. Paste the contents into the Saved Request box. Under Certificate Template select Web Server (If Web Server does not show try opening Internet Explorer as an "administrator"). Click Submit to continue.

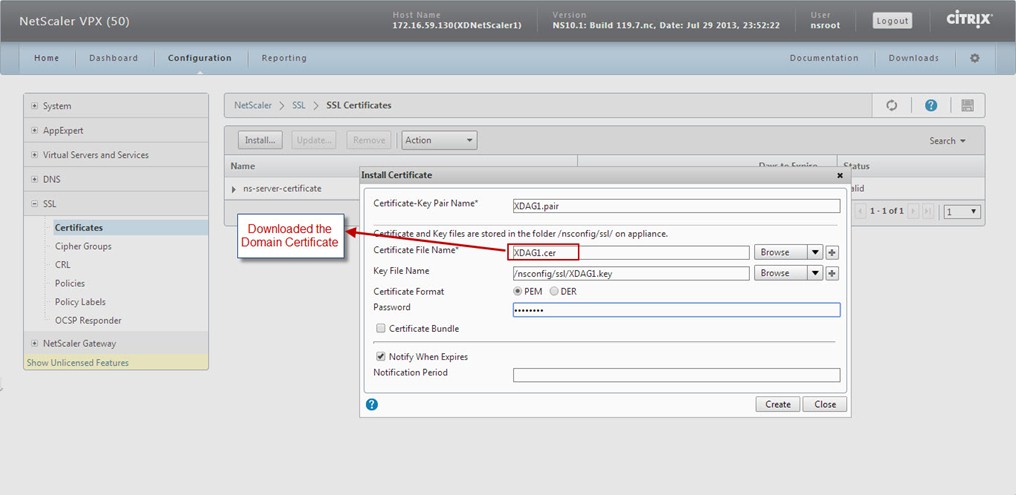
Now, time to download the certificate that the CA created for us. Click the radio button for Base 64 encoded, then click Download certificate.
And rename the file to "XDAG1.cer"
Install the Certificates:
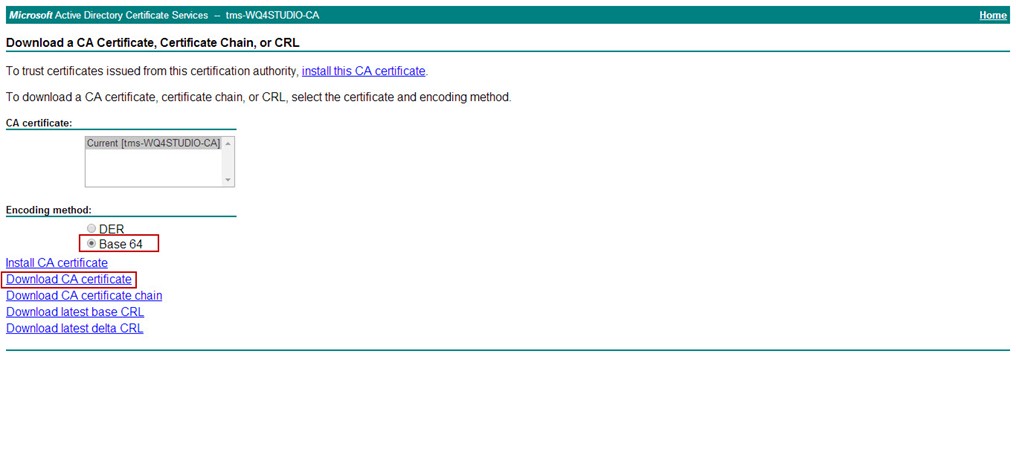
install the CA ROOT Certificate:
Open a web browser and type in http://<yourCAname>/certsrv. Click on Download a CA certificate, certificate chain, or CRL -> Download CA certificate, and rename the file to "XDAG1_CARoot.cer"
install the CA ROOT Certificate:


 NetScaler Gateway Session Policies and Profiles
 Profiles
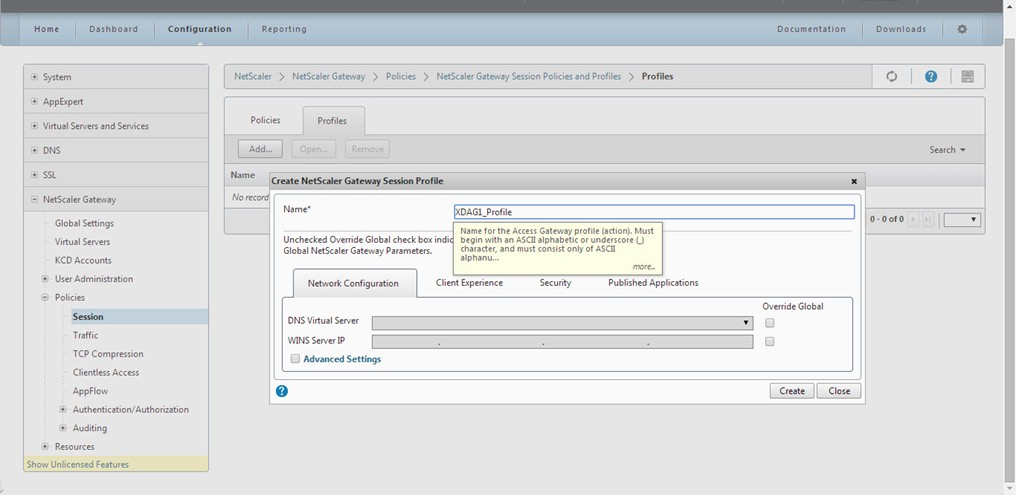


Create the Sessssion Policy:

Add the Expression:


 Servers
Let's Add Some Authentication…LDAP
To add LDAP to the Access Gateway virtual server, we start my creating an LDAP server on NetScaler. To do this, navigate to System -> Authentication. Click on the Servers tab then click Add at the bottom of the screen. Use the following for inputting to the required fields:
Name: AD (or whatever name you want to give it)
Authentication Type: LDAP
IP Address: 172.16.57.42 (use the IP address of one of your domain controllers)
Base DN: DC=tms,DC=local (use the DN for your domain)
Administrator Bind DN: xendesktop\UserAdmin (does not need to be an admin. Use domain\user for the format)
Administrator Password: password (the password to the above user)
Click the Retrieve Attributes link to test the connection.

Now, let's go create the LDAP policy that NetScaler needs to bind to the Access Gateway virtual server. To create the policy navigate to Authentication->LDAP. Click on the Policies tab then click Add at the bottom of the screen. Use the following for inputting to the required fields:
Name: XDAG1_ADPolicy (or any name that you like)
Authentication Type: LDAP
Server: AD (this is the server created in the previous step)
Expression: Match Any Expression -> General -> True value (then click Add Expression)

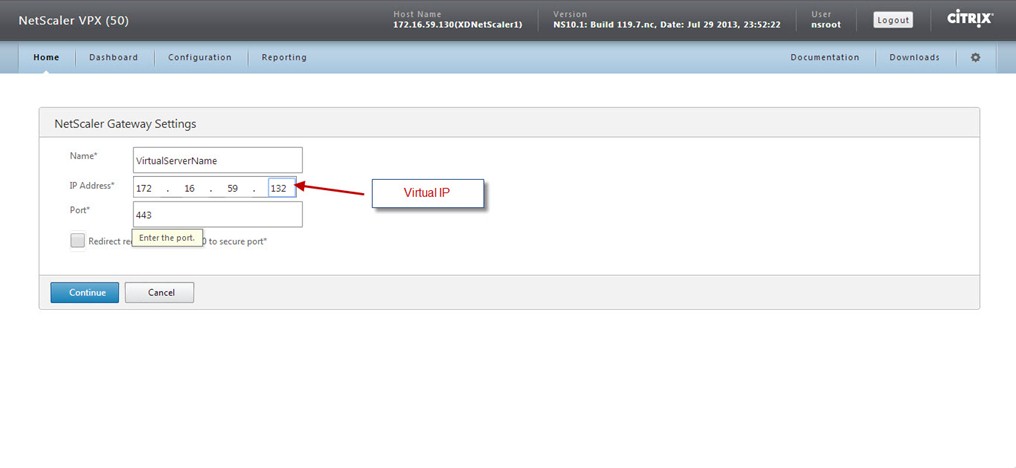
Define NetScaler Gateway virtual server name, IP Address (VIP) and Port. Also, you can enable NetScaler Gateway to redirect HTTP connection to HTTPS secure connection. Click 'Continue' to get next section.
Note – You cannot configure more than one virtual server with the same IP Address (VIP) but different Ports through this wizard.

Now, you get a section to define your deployment type and settings related to that deployment type.
- XenApp / XenDesktop– This allows configuring Web Interface or StoreFront deployment.
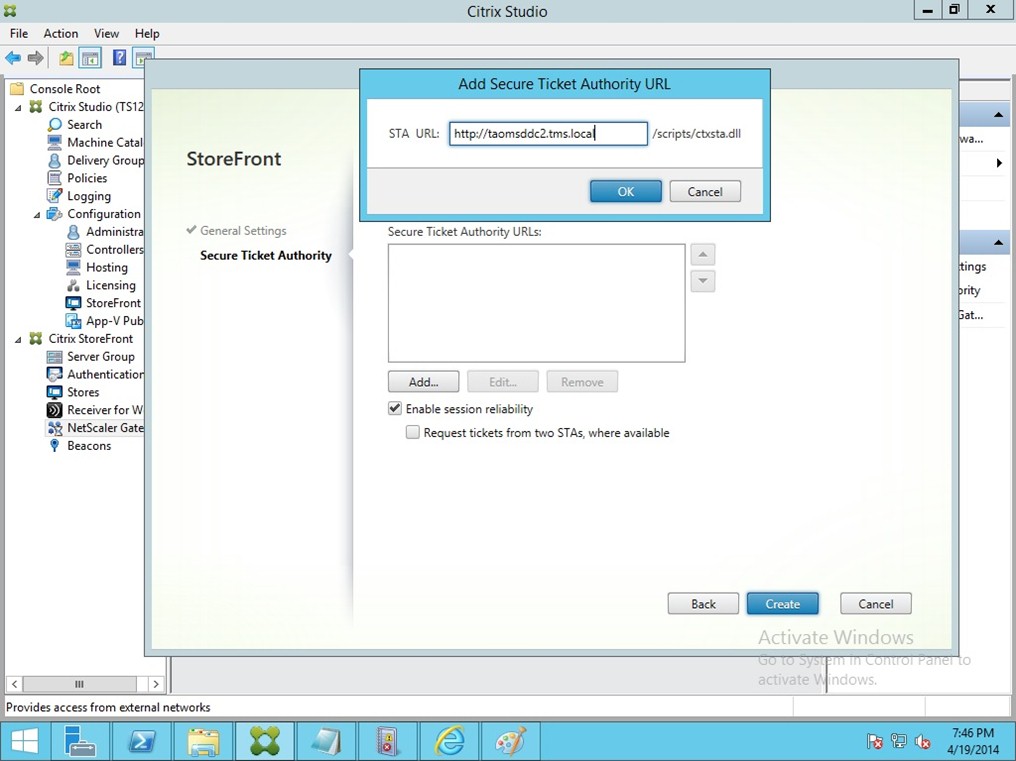
- In Web Interface deployment, enter the complete address of XenApp Site e.g.http://Xenapp1.systest.agee/Citrix/XenApp and XenApp Service Services Site e.g.http://Xenapp1.systest.agee/Citrix/PNAgent/Config.xml. Enter the Single Sign-on Domain and STA (Secure Ticket Authority) URL either using IP address or FQDN.
- In StoreFront deployment, enter the StoreFront FQDN, Receiver for Web Path, Single Sign-on Domain and STA (Secure Ticket Authority) URL either using IP address or FQDN.
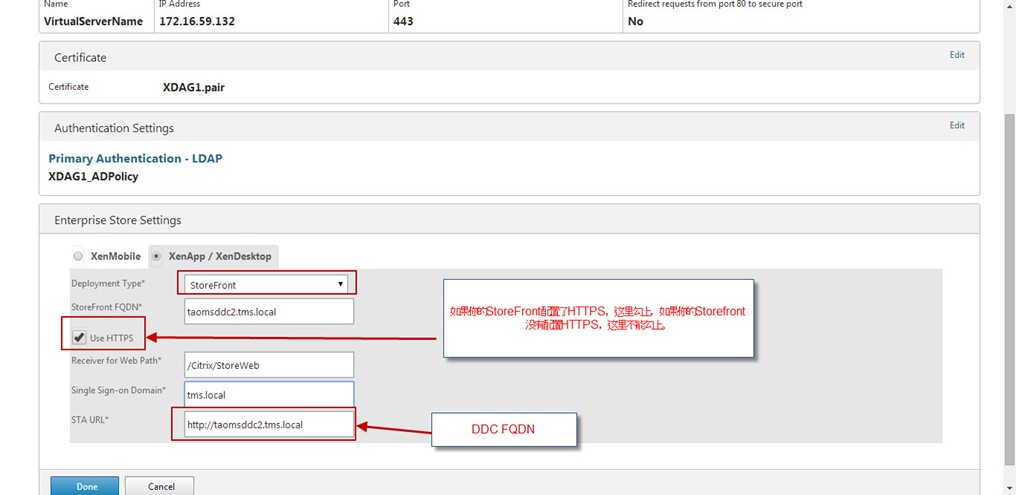
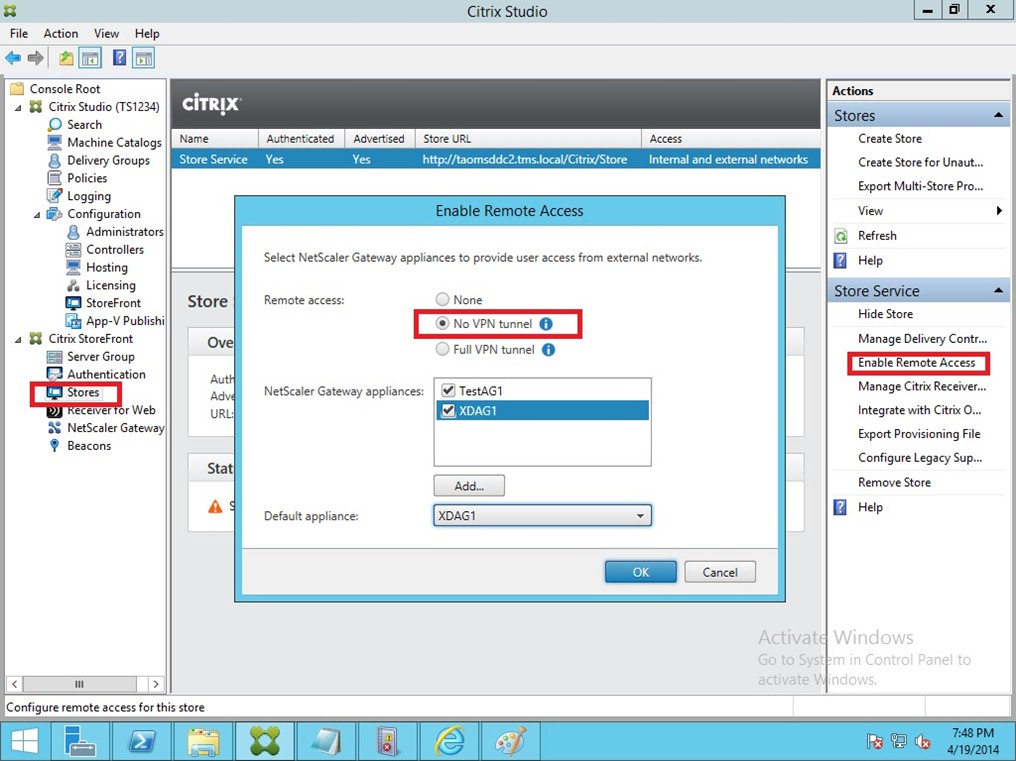
Configure the StoreFront

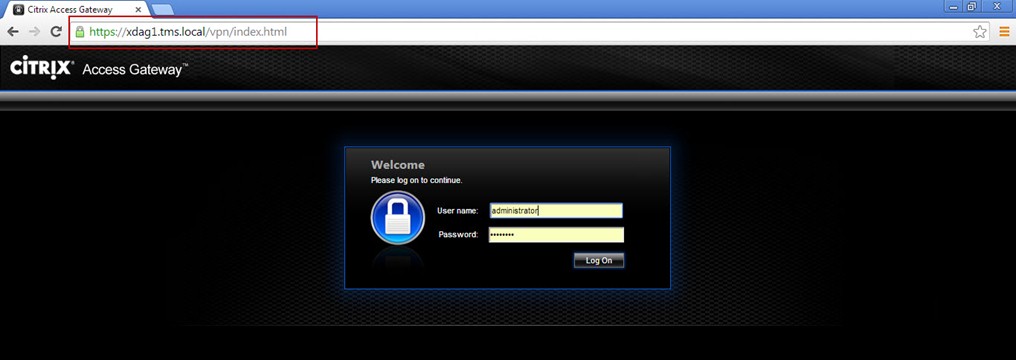
if your client is not in the Domain, you need add the virtual IP information into the Client Host File:

Note:
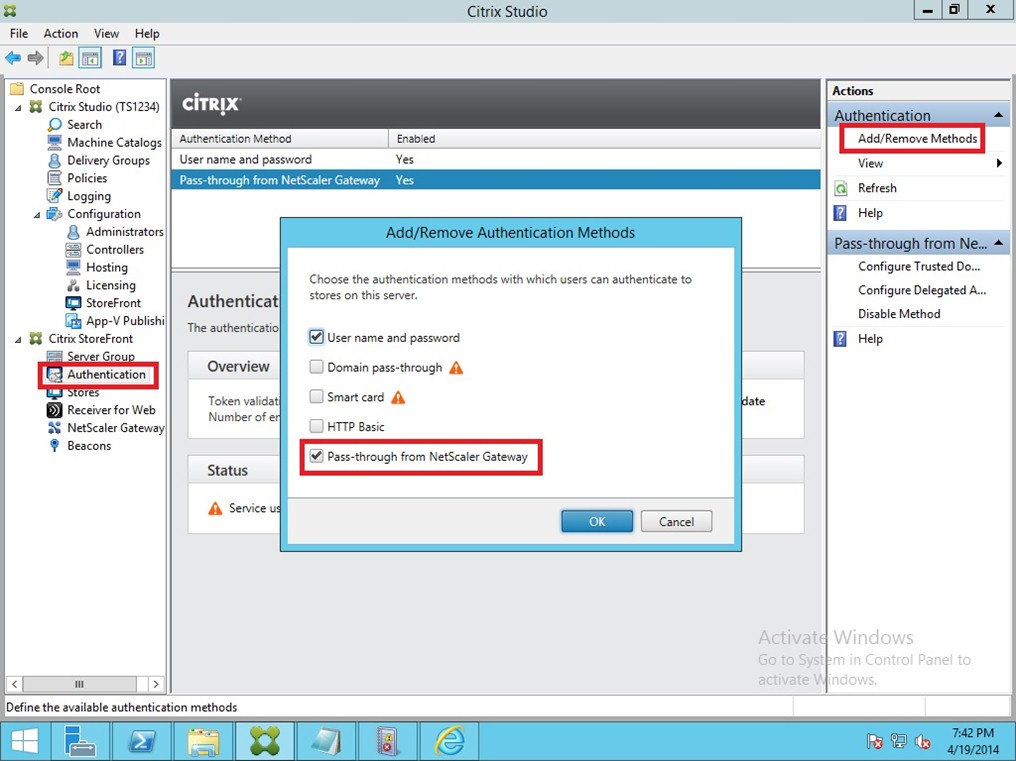
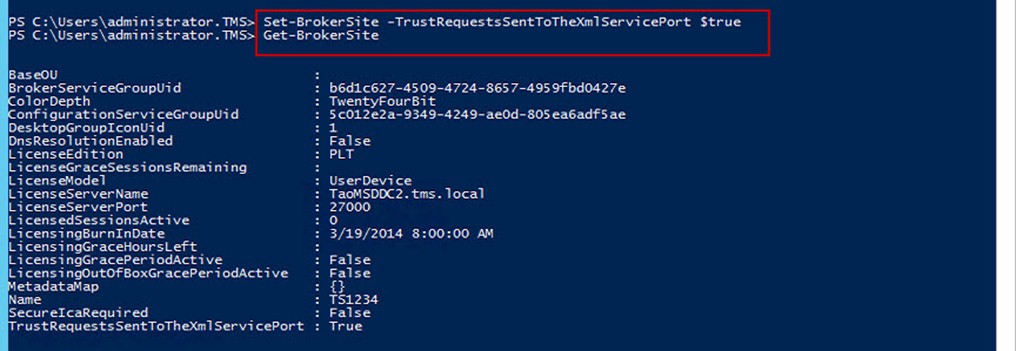
On the DDC, you need to edit the information
PS: 附加一些额外信息关于NetScaler拓扑图以及端口的调用图
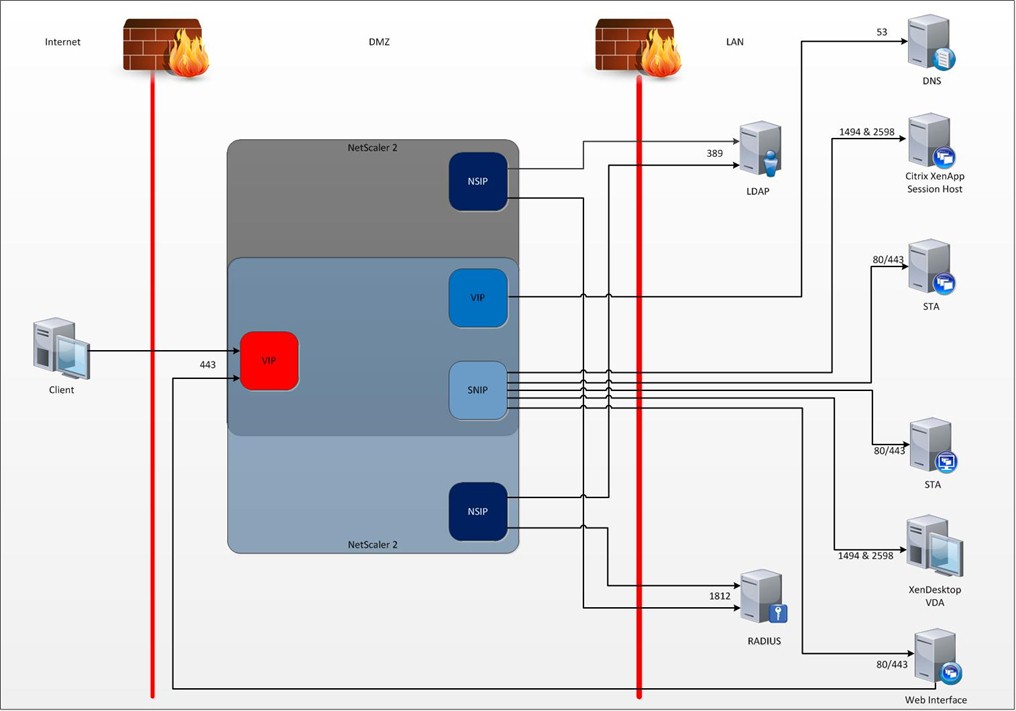
Firewall rule table
|
Source IP |
Destination IP |
Protocol |
Port |
Function |
|
Client IPs |
Access Gateway VIP |
TCP |
Secure traffic from internet clients to AGEE VIP |
|
|
NetScaler NSIP |
LDAP Servers 1 |
TCP |
LDAP authentication traffic from NetScaler IP to LDAP servers. |
|
|
NetScaler NSIP |
RADIUS servers |
TCP/UDP |
RADIUS traffic from Access Gateway to RADIUS server (for RSA dual factor authentication) |
|
|
NetScaler VIP2 |
DNS Servers |
TCP |
DNS traffic from VIP to DNS servers |
|
|
NetScaler SNIP |
Web Interface Servers |
TCP |
80/4433 |
Traffic from Access Gateway to Web Interface servers |
|
Web Interface Servers |
Access Gateway VIP |
TCP |
Web Interface call back traffic to Access Gateway VIP4 |
|
|
NetScaler SNIP |
All XenApp session host servers and all XenDesktop Desktops (virtual, physical etc) |
TCP |
1494 & 25986 |
ICA traffic from the Access Gateway to all Citrix XenApp or XenDesktop endpoints |
|
Management Server |
NetScaler SNIP |
TCP |
80/3010 |
Console and Java Applet traffic to NetScaler (for management |
1. In most cases these will be your Active Directory domain controllers – always use more than one.
2. Normally this comes from the NSIP but due to the fact that ICMP is used to verify if the DNS servers are available the DNS servers will show as down unless your security team allow ICMP through the firewall which is very unlikely. Therefore, setup an internal DNS load balancer with a DNS lookup monitor and point your NetScalers at the internal load balancer.
3. Normally port 80. Port 443 if you secure your Web Interface servers with a certificate
4. Ensure that from a browser on your Web Interface server you can type the FQDN of the AGEE and get the logon page with NO errors
5. Normally port 80. Port 443 if you secure your Web Interface servers with a certificate.
6. Port 2598 is for session reliability
Remember that if you have your NetScalers configured in an HA pair traffic originating from the NSIP can come from either NetScaler depending on which one is hosting the AGEE VIP at the time. For anything that comes from the NSIP you can load balance it using a VIP if you want the traffic to originate from one IP.
NetScaler 10.1的配置以及结合StoreFront的部署的更多相关文章
- 在Mac OS X 10.8中配置Apache + PHP + MySQL
在Mac OS X 10.8中配置Apache+PHP+MySQL的内容包括: 配置Apache 配置PHP 安装MySQL 配置PHPAdmin 设置数据库默认字符集 一. 配置Apache 1. ...
- 在Mac OS X 10.8中配置Apache+PHP+MySQL
在Mac OS X 10.8中配置Apache+PHP+MySQL的内容包括: 配置Apache 配置PHP 安装MySQL 配置PHPAdmin 设置数据库默认字符集 一. 配置Apache 1. ...
- 【转】在Mac OS X 10.8中配置Apache + PHP + MySQL
CHENYILONG Blog 在Mac OS X 10.8中配置Apache + PHP + MySQL 在Mac OS X 10.8中配置Apache+PHP+MySQL的内容包括: 配置Apac ...
- opencv学习(1.2) - Windows 10 安装OpenCV &配置VS 2015
windows 10 安装OpenCV&配置VS 2015 环境 系统:Windows 10 OpenCV版本:3.4.1 开发IDE:VS2015 社区版 下载安装 下载OpenCV 3.4 ...
- Mac OS X 10.10 Yosemite下配置 apache+php
自从系统从OS X Mavericks 10.9升级到OS X Yosemite 10.10 后之前配置apache和php均不能正常使用了, 重新设置配置如下: 首先,查看当前系统的apache版本 ...
- SNMP OID Reference - NetScaler 10
SNMP OID Reference - NetScaler 10 https://docs.citrix.com/content/dam/docs/en-us/netscaler/10/downlo ...
- 我的 Windows 10 的基本配置
Windows 10 的基本配置 功能性 开启 .Net Framework 3.5(包括 .NET 2.0 和 3.0) 旧版本 Windows 10 默认只安装了 .Net Framework 4 ...
- 基于winserver的Apollo配置中心分布式&集群部署实践(正确部署姿势)
基于winserver的Apollo配置中心分布式&集群部署实践(正确部署姿势) 前言 前几天对Apollo配置中心的demo进行一个部署试用,现公司已决定使用,这两天进行分布式部署的时候 ...
- Linux(CentOS 6.7)下配置Mono和Jexus并且部署ASP.NET MVC3、4、5和WebApi(跨平台)
1.开篇说明 a. 首先我在写这篇博客之前,已经在自己本地配置了mono和jexus并且成功部署了asp.net mvc项目,我也是依赖于在网上查找的各种资料来配置环境并且部署项目的,而其在网上也已有 ...
随机推荐
- 【转】网络安全——一图看懂HTTPS建立过程
阅读目录 准备工作(对应图中prepare1234) 发起链接 最后 关于网络安全加密的介绍可以看之前文章: 1. 网络安全——数据的加密与签名,RSA介绍2. Base64编码.MD5.SHA1-S ...
- 添加外键式异常 1215-cannot add foreign key constranint
添加外键时报错,原因是添加外键的表的字段的字段类型不一致 比如我的第一张表id是int类型,添加约束的dep_id是bigint类型,所以报错,只要把两张表添加约束的字段类型改成统一的即可 本人大学生 ...
- jumperserver docker部署
最近在考虑 系统安全问题,jumperserver 用docker 部署比较简单1. 安装redis2.安装mariadb create database jumpserver charset='ut ...
- MP实战系列(十三)之批量修改操作(前后台异步交互)
MyBatis的批量操作其实同MyBatis基本是一样的.并无多大区别,要说区别,除了封装的方法之外,主要就是注解方面的区别,比如@TableId.@TableField.@TableName等等区别 ...
- Blog Contents
This page is intently left for contents catalog of my articles. |----------------------------------- ...
- js阻止事件冒泡的两种方法
1.什么是JS事件冒泡 在一个对象上触发某类事件(比如单击onclick事件),如果此对象定义了此事件的处理程序,那么此事件就会调用这个处理程序,如果没有定义此事件处理程序或者事件返回true,那么这 ...
- Javascript跨浏览器的事件对象
一.跨浏览器的事件对象 var EventUtil = { ///添加事件 addHandler: function (element, type, handler) { if (element.ad ...
- .NET Core 对象到字节数组的序列化和反序列化
.NET Core中利用MemoryStream和BinaryFormatter可以实现对象到字节数组的序列化和反序列化: 定义ObjectSerializer类,实现对象到字节数组的序列化和反序列化 ...
- Eclipse安装Git插件(在线和离线)
在线安装: help-->install new software-->add location就是安装的地址:http://download.eclipse.org/egit/updat ...
- 2017-2018-2 20155230《网络对抗技术》实验5:MSF基础应用
基础问题回答 用自己的话解释什么是exploit,payload,encode. exploit 就是运行该模块吧,在msf的模块中配置好各项属性后exploit一下就开始运行使用该模块了 paylo ...