05_ssm基础(四)之Spring基础二
24.spring配置dbcp并完成CRUD操作
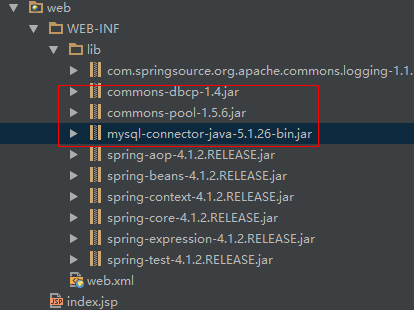
1.准备jar包
2.编辑Product模型
 package com.day02.ssm.spring.model;

 public class Product{

     private Integer id;

     private String productName;  //产品名称

     private Integer salePrice;

     private Integer costPrice;

     public Integer getId() {

         return id;

     }

     public void setId(Integer id) {

         this.id = id;

     }

     public String getProductName() {

         return productName;

     }

     public void setProductName(String productName) {

         this.productName = productName;

     }

     public Integer getSalePrice() {

         return salePrice;

     }

     public void setSalePrice(Integer salePrice) {

         this.salePrice = salePrice;

     }

     public Integer getCostPrice() {

         return costPrice;

     }

     public void setCostPrice(Integer costPrice) {

         this.costPrice = costPrice;

     }

 }
Product
3.编辑接口
 package com.day02.ssm.spring.dao;

 import com.day02.ssm.spring.model.Product;

 import java.sql.SQLException;

 /**

  * 课程笔记:http://www.cnblogs.com/newAndHui/category/1153640.html

  * 疑问咨询wx:851298348

  */

 public interface IProductDao {

     //增

     public void save(Product product) throws SQLException;

     //删

     public void delete(int id);

     //改

     public void update(Product product);

     //查

     public Product query(int id);

 }
IProductDao
4.编辑实现类
 package com.day02.ssm.spring.dao.impl;

 import com.day02.ssm.spring.dao.IProductDao;

 import com.day02.ssm.spring.model.Product;

 import org.apache.commons.dbcp.BasicDataSource;

 import java.sql.Connection;

 import java.sql.PreparedStatement;

 import java.sql.SQLException;

 /**

  * 课程笔记:http://www.cnblogs.com/newAndHui/category/1153640.html

  * 疑问咨询wx:851298348

  */

 public class ProductDao implements IProductDao {

     private BasicDataSource basicDataSource;

     @Override

     public void save(Product product) {

         try {

             //连接

             Connection connection = basicDataSource.getConnection();

             String sql = "INSERT INTO product (product_name,sale_price) VALUES (?,?)";

             //创建编译语句

             PreparedStatement preparedStatement = connection.prepareStatement(sql);

             preparedStatement.setString(1,product.getProductName());

             preparedStatement.setInt(2,product.getSalePrice());

             //执行

             preparedStatement.executeUpdate();

             //释放

             preparedStatement.close();

             connection.close();

         } catch (SQLException e) {

             e.printStackTrace();

         }

     }

     @Override

     public void delete(int id) {

     }

     @Override

     public void update(Product product) {

     }

     @Override

     public Product query(int id) {

         return null;

     }

     public BasicDataSource getBasicDataSource() {

         return basicDataSource;

     }

     public void setBasicDataSource(BasicDataSource basicDataSource) {

         this.basicDataSource = basicDataSource;

     }

 }
ProductDao
5.编写spring配置文件bdcp-config.xml
 <?xml version="1.0" encoding="UTF-8"?>

 <beans xmlns="http://www.springframework.org/schema/beans"

         xmlns:xsi="http://www.w3.org/2001/XMLSchema-instance"

         xsi:schemaLocation="http://www.springframework.org/schema/beans

         http://www.springframework.org/schema/beans/spring-beans.xsd">

      <!--配置dataSources-->

     <bean id="dataSource" class="org.apache.commons.dbcp.BasicDataSource">

         <property name="url" value="jdbc:mysql://localhost:3306/station_data"/>

         <property name="username" value="root"/>

         <property name="password" value="admin"/>

     </bean>

    <!-- ProductDao配置dao-->

     <bean id="productDao" class="com.day02.ssm.spring.dao.impl.ProductDao">

         <property name="basicDataSource" ref="dataSource"/>

     </bean>

 </beans>
dbcp-config.xml
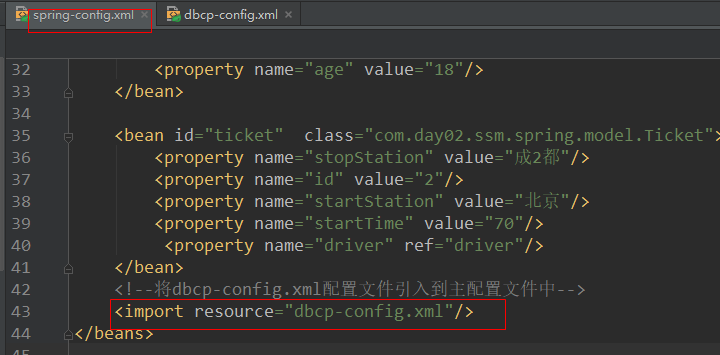
6.将bdcp-config.xml配置文件引入到主配置文件中(非常容易忘记)
7.测试dao
 package com.day02.ssm.spring.test;

 import com.day02.ssm.spring.dao.impl.ProductDao;

 import com.day02.ssm.spring.model.Product;

 import com.day02.ssm.spring.model.Ticket;

 import org.junit.Test;

 import org.junit.runner.RunWith;

 import org.springframework.beans.factory.BeanFactory;

 import org.springframework.beans.factory.annotation.Autowired;

 import org.springframework.test.context.ContextConfiguration;

 import org.springframework.test.context.junit4.SpringJUnit4ClassRunner;

 /**

  * 课程笔记:http://www.cnblogs.com/newAndHui/category/1153640.html

  * 疑问咨询wx:851298348

  */

 @RunWith(SpringJUnit4ClassRunner.class)//把junit加载到spring容器中去

 @ContextConfiguration("classpath:spring-config.xml")

 public class TestProductDao {

    // private ProductDao productDao=new ProductDao();

     @Autowired

     private ProductDao productDao;//从spring中获取dao对象

     @Test

     public void test(){

         Product product = new Product();

         product.setProductName("苹果");

         product.setSalePrice(89);

         productDao.save(product);

     }

 }
TestProductDao
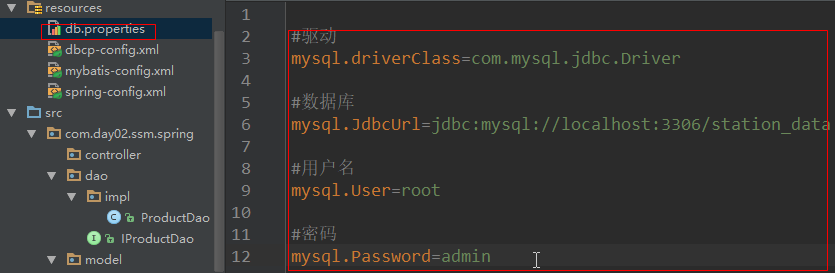
25.spring中的硬编码解决
1.配置文件
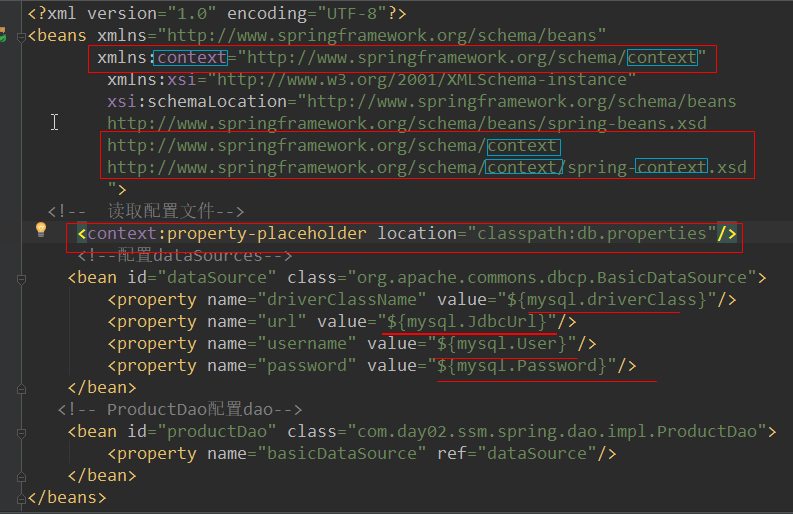
2.使用
26.spring中的继承使用

27.Autowired详细讲解
Autowired和Qualifier标签:
1.通过@Autowired标签可以让Spring自动的把属性需要的对象从Spring容器中找出来,并注入给该属性。(生产上就用这一招)
2.第三方程序:Spring3.0之前,需要手动配置@Autowired解析注解程序,Spring就会自动的加入针对@Autowired标签的解析程序。从Spring3.0开始,可以不再需要改配置了,但是只能在Spring容器中才生效.。
<context:annotation-config />,
无论使用哪一个版本,都得配置.
3.@Autowired标签贴在字段或者setter方法上。
4.@Autowired可以同时为一个属性注入多个对象。
public void setXxx(OtherBean1 other1,OtherBean2 other2) {}
5.使用@Autowired标签可以注入Spring内置的重要对象,比如BeanFactory,ApplicationContext。
@RunWith(SpringJUnit4ClassRunner.class)
@ContextConfiguration
public class SpringTest {
@Autowired
private ApplicationContext ctx;
}
6.默认情况下@Autowired标签必须要能找到对应的对象,否则报错。不过,可使用required=false来避免该问题:@Autowired(required=false)
7.@Autowired找bean的方式:
1)、首先按照依赖对象的类型找,如果找到则使用setter方法或者字段直接注入;
2)、如果在Spring上下文中找到多个匹配的类型,再按照名字去找,如果没有匹配则报错;
3)、可以通过使用@Qualifier("otherBean")标签来规定依赖对象按照bean的id+类型去找;
public class SomeBean {
@Autowired
private OtherBean1 other1;
@Autowired(required = false)
@Qualifier("otherbean2")
private OtherBean2 other2;
public String toString() {
return "SomeBean [other=" + other1 + ", other2=" + other2 + "]";
}
}
演示代码:
SomeBean
 package com.day02.ssm.spring.model2;

 import org.springframework.beans.factory.annotation.Autowired;

 import org.springframework.beans.factory.annotation.Qualifier;

 /**

  * 课程笔记:http://www.cnblogs.com/newAndHui/category/1153640.html

  * 疑问咨询wx:851298348

  */

 public class SomeBean {

     private String name;

     //添加OtherBean1对象

     @Autowired

     @Qualifier("otherBean11")

     private OtherBean1 otherBean1;

     private OtherBean2 otherBean2;

     public String getName() {

         return name;

     }

     public void setName(String name) {

         this.name = name;

     }

    // @Autowired

    /* public void setOtherBean1(OtherBean1 otherBean1) {

         this.otherBean1 = otherBean1;

     }*/

   /*  @Autowired

     public void setTwo(OtherBean1 otherBean1,OtherBean2 otherBean2) {

         System.out.println("==otherBean1=============otherBean2=====");

         this.otherBean1 = otherBean1;

         this.otherBean2 = otherBean2;

     }*/

 }
SomeBean
OtherBean1
 package com.day02.ssm.spring.model2;

 /**

  * 课程笔记:http://www.cnblogs.com/newAndHui/category/1153640.html

  * 疑问咨询wx:851298348

  */

 public class OtherBean1 {

     private String name;

     public String getName() {

         return name;

     }

     public void setName(String name) {

         this.name = name;

     }

 }
OtherBean1
OtherBean2
 package com.day02.ssm.spring.model2;

 /**

  * 课程笔记:http://www.cnblogs.com/newAndHui/category/1153640.html

  * 疑问咨询wx:851298348

  */

 public class OtherBean2 {

     private String name;

     public String getName() {

         return name;

     }

     public void setName(String name) {

         this.name = name;

     }

 }
OtherBean2
spring配置文件
 <?xml version="1.0" encoding="UTF-8"?>

 <beans xmlns="http://www.springframework.org/schema/beans"

        xmlns:xsi="http://www.w3.org/2001/XMLSchema-instance"

        xmlns:context="http://www.springframework.org/schema/context"

        xsi:schemaLocation="http://www.springframework.org/schema/beans

         http://www.springframework.org/schema/beans/spring-beans.xsd

          http://www.springframework.org/schema/context

           http://www.springframework.org/schema/context/spring-context.xsd">

     <!--开启注解-->

     <context:annotation-config/>

     <!--把someBean交给spring管理-->

     <bean id="someBean" class="com.day02.ssm.spring.model2.SomeBean">

         <property name="name" value="someBean-1"/>

     </bean>

     <!--把OtherBean1交给spring管理-->

     <bean id="otherBean17" class="com.day02.ssm.spring.model2.OtherBean1">

         <property name="name" value="otherBean1-1"/>

     </bean>

     <bean id="otherBean11" class="com.day02.ssm.spring.model2.OtherBean1">

         <property name="name" value="otherBean1-11"/>

     </bean>

     <!--把OtherBean2交给spring管理-->

     <bean id="otherBean2" class="com.day02.ssm.spring.model2.OtherBean2">

         <property name="name" value="otherBean2-2"/>

     </bean>

 </beans>
测试代码
 package com.day02.ssm.spring.model2;

 import org.junit.Test;

 import org.junit.runner.RunWith;

 import org.springframework.beans.factory.annotation.Autowired;

 import org.springframework.context.ApplicationContext;

 import org.springframework.test.context.ContextConfiguration;

 import org.springframework.test.context.junit4.SpringJUnit4ClassRunner;

 /**

  * 课程笔记:http://www.cnblogs.com/newAndHui/category/1153640.html

  * 疑问咨询wx:851298348

  */

 @RunWith(SpringJUnit4ClassRunner.class)//把junit加载到spring容器中去

 @ContextConfiguration("classpath:spring-config2.xml")

 public class TestSomeBean {

     @Autowired(required = false)

      private SomeBean  someBean;

    // @Autowired

    // private ApplicationContext ctx;

     @Test

     public void test() {

        // SomeBean someBean = (SomeBean) ctx.getBean("someBean11");

         System.out.println("someBean"+ someBean);

     }

 }
TestSomeBean
28.Resource标签
@Resource标签:
1,@Resource标签是JavaEE规范的标签;
2,@Resource标签也可以作用于字段或者setter方法;
3,也可以使用@Resource标签注入一些spring内置的重要对象,比如BeanFactory.ApplicationContext;
4,@Resource必须要求有匹配的对象;
5,<context:annotation-config>既引入了@Autowired标签的解析器,也引入了@Resource的解析器;
6,@Resource标签找bean的方式:
1),首先按照名字去找,如果找到,就使用setter或者字段注入;
2),如果按照名字找不到,再按照类型去找,但如果找到多个匹配类型,报错;
3),可以直接使用name属性指定bean的名称;但是,如果指定的name,就只能按照name去找,如果找不到,就不会再按照类型去找;
public class SomeBean {
@Resource(name="otherBean1")
private OtherBean1 other1;
@Resource(name="otherBean2")
private OtherBean2 other2;
public String toString() {
return "SomeBean [otherBean=" + other1 + ", otherBean2="
+ other2 + "]";
}
@Resource(name = "other1") 和 @Autowired ,@Qualifier("other1")选用:
1:使用Autowired标签,让代码和Spring耦合在一起,若某一天不使用Spring,就得改源代码. 重点:生产上一般使用:Autowired
2:Resource标签,本身就是javaEE的,本身不存在耦合问题.
随便使用哪一组,要求:都得掌握.
29.使用注解简化IoC
使用标签简化IoC:
1.使用标签来完成IoC,就必须有IoC标签的解析器
使用context:component-scan来扫描spring需要管理的bean
base-package就告诉spring,去哪些包及其子包里去扫描bean,如果有多个包需要被扫描;只需要用逗号隔开多个包即可
<!-- 扫描包-->
<context:component-scan base-package="com.day02.ssm.spring.model2" />
<!--开启注解-->
<context:annotation-config/>
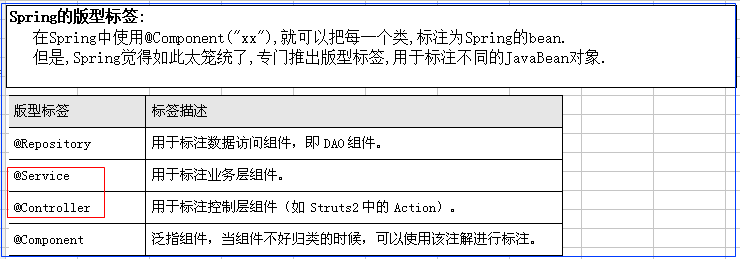
2.标注Bean的注解:@Component
默认情况,直接使用类的名字(首字母小写作为bean的名字)
如果要修改bean的名称;直接使用value属性来重新定义bean的名称
@Component("otherbean")
public class OtherBean {}
Spring的零配置

IoC和DI操作,选用注解还是XML?
1):使用XML,直观,侵入性低,统一配置.
2):使用注解,简单,快速,不是很直观,让配置分散.
有时候,只能使用xml,不能使用注解?
比如配置一个DataSource.
你不可能去DataSource类上去贴标签.
一般的,我们使用xml做统一的配置,若有特殊的配置,可以使用注解来辅助.
二者都得掌握.
05_ssm基础(四)之Spring基础二的更多相关文章
- 05_ssm基础(四)之Spring与持久层的整合
30.31.spring对jdbc的支持jdbcTemplate 使用Spring的JDBC准备: 1):拷贝jar: mysql-connector-java-5.1.11.jar:M ...
- 05_ssm基础(三)之Spring基础
11.spring入门引导 12.spring_HelloWord程序 实现步骤: 0.找到spring压缩包,并解压 1.拷贝jar包 2.添加主配置文件(官方文档约28页) 3.在测试中使用 13 ...
- Bootstrap<基础四> 代码
Bootstrap 允许您以两种方式显示代码: 第一种是 <code> 标签.如果您想要内联显示代码,那么您应该使用 <code> 标签. 第二种是 <pre> 标 ...
- spring cloud系列教程第四篇-Eureka基础知识
通过前三篇文章学习,我们搭建好了两个微服务工程.即:order80和payment8001这两个服务.有了这两个基础的框架之后,我们将要开始往里面添加东西了.还记得分布式架构的几个维度吗?我们要通过一 ...
- Spring基础系列-AOP源码分析
原创作品,可以转载,但是请标注出处地址:https://www.cnblogs.com/V1haoge/p/9560803.html 一.概述 Spring的两大特性:IOC和AOP. AOP是面向切 ...
- Spring基础系列-Spring事务不生效的问题与循环依赖问题
原创作品,可以转载,但是请标注出处地址:https://www.cnblogs.com/V1haoge/p/9476550.html 一.提出问题 不知道你是否遇到过这样的情况,在ssm框架中开发we ...
- Spring基础3
一.AOP 1)AOP简介: Aspect Oriented Programming,面向切面编程 通过预编译方式和动态代理实现程序功能的一种技术,AOP是OOP的延续,是函数式编程的一种衍生范例.利 ...
- Java基础-SSM之Spring的AOP编程
Java基础-SSM之Spring的AOP编程 作者:尹正杰 版权声明:原创作品,谢绝转载!否则将追究法律责任. Spring的本质说白了就是动态代理,接下来我们会体验AOP的用法.它是对OOP的 ...
- 基础知识(09) -- Spring 概述
Spring概述-------------------------------------------------------------------------主要内容: 1.Spring是什么 2 ...
随机推荐
- vuejs实现瀑布流布局(三)
前面写过vuejs实现的瀑布流布局,<vuejs实现瀑布流布局(一)>和<vuejs实现瀑布流布局(二)>也确实实现了瀑布流布局,但是这个是基于SUI-Mobile实现的无限滚 ...
- android 相对布局例子代码
<?xml version="1.0" encoding="utf-8"?> <LinearLayout xmlns:android=&quo ...
- LeetCode 12. Integer to RomanLeetCode
整数转罗马数字 first submission import math class Solution: def __init__(self): self.roman={1:'I',5:'V',10: ...
- [Unity插件]Lua行为树(四):条件节点和行为节点
条件节点和行为节点,这两种节点本身的设计比较简单,项目中编写行为树节点一般就是扩展这两种节点,而Decorator和Composite节点只需要使用内置的就足够了. 它们的继承关系如下: Condit ...
- iOS保存gif动态图
- (void)saveImageToPhotos:(NSData*)gifData { /***注意先倒入库 #import <AssetsLibrary/AssetsLibrary.h> ...
- python中strip、startswith、endswith
strip(rm)用来删除元素内的空白符: rm对应要删除空白符的元素,当rm为空(strip())时删除所有元素的空白符 startswith.endswith用来查找开头或结尾条件的元素 例子: ...
- ajax 406 Not Acceptable
搞了半天, 后面参照 http://www.th7.cn/web/ajax/201611/194702.shtml, 终于把问题解决了.. 使用ajax向后台请求时,前台报错406 Not Accep ...
- postgresql----COPY之表与文件之间的拷贝
postgresql提供了COPY命令用于表与文件(和标准输出,标准输入)之间的相互拷贝,copy to由表至文件,copy from由文件至表. 示例1.将整张表拷贝至标准输出 test=# cop ...
- springMVC源码学习地址
springmvc工作原理以及源码分析(基于spring3.1.0) 感谢作者 宏愿, 在此记录下,以便学习 SpringMVC源码分析(1):分析DispatcherServlet.doDispa ...
- 浅析USB HID ReportDesc (HID报告描述符)
在USB中,USB Host是通过各种描述符来识别识别设备的,一般在设备枚举的过程将会获取有设备描述符/配置描述符/接口描述符/端点描述符/字符串描述符等 现在我们来介绍一下HID ReportDes ...