【TensorFlow】获取object detection API训练模型的输出坐标
如下图,谷歌开源的object detection API提供了五种网络结构的fine-tuning训练权重,方便我们针对目标检测的需求进行模型训练,本文详细介绍下导出训练模型后,如何获得目标检测框的坐标。如果对使用object detection API训练模型的过程不了解,可以参考博文:https://www.cnblogs.com/White-xzx/p/9503203.html

新建一个测试文件object_detection_test.py,该脚本读取我们已经训练好的模型文件和测试图片,进行测试,代码如下,
 import numpy as np

 import os

 import six.moves.urllib as urllib

 import sys

 import tarfile

 import tensorflow as tf

 import zipfile

 from collections import defaultdict

 from io import StringIO

 from matplotlib import pyplot as plt

 from PIL import Image

 ## This is needed to display the images.

 #%matplotlib inline

 # This is needed since the notebook is stored in the object_detection folder.

 sys.path.append("..")

 from utils import label_map_util

 from utils import visualization_utils as vis_util

 # What model to download.

 #MODEL_NAME = 'ssd_mobilenet_v1_coco_2017_11_17'

 #MODEL_FILE = MODEL_NAME + '.tar.gz'

 #DOWNLOAD_BASE = #'http://download.tensorflow.org/models/object_detection/'

 MODEL_NAME = 'data'  # 训练过程中保存模型文件的文件夹路径

 # Path to frozen detection graph. This is the actual model that is used for the object detection.

 PATH_TO_CKPT = MODEL_NAME + '/frozen_inference_graph.pb' # 训练完成导出的pb模型文件

 # List of the strings that is used to add correct label for each box.

 PATH_TO_LABELS = 'E:/TensorFlow/Box-object-detection/data/label_map.pbtxt' # label_map.pbtxt文件

 NUM_CLASSES = 2   # 类别总数

 #Load a (frozen) Tensorflow model into memory. 加载模型

 detection_graph = tf.Graph()

 with detection_graph.as_default():

   od_graph_def = tf.GraphDef()

   with tf.gfile.GFile(PATH_TO_CKPT, 'rb') as fid:

     serialized_graph = fid.read()

     od_graph_def.ParseFromString(serialized_graph)

     tf.import_graph_def(od_graph_def, name='')

 #Loading label map 加载label_map

 label_map = label_map_util.load_labelmap(PATH_TO_LABELS)

 categories = label_map_util.convert_label_map_to_categories(label_map, max_num_classes=NUM_CLASSES, use_display_name=True)

 category_index = label_map_util.create_category_index(categories)

 #Helper code

 def load_image_into_numpy_array(image):

   (im_width, im_height) = image.size

   return np.array(image.getdata()).reshape(

       (im_height, im_width, 3)).astype(np.uint8)

 # For the sake of simplicity we will use only 2 images:

 # image1.jpg

 # image2.jpg

 # If you want to test the code with your images, just add path to the images to the TEST_IMAGE_PATHS.

 PATH_TO_TEST_IMAGES_DIR = 'test_images'   # 测试图片的路径

 #TEST_IMAGE_PATHS = [ os.path.join(PATH_TO_TEST_IMAGES_DIR, 'image{}.jpg'.format(i)) for i in range(1, 3) ]

 TEST_IMAGE = sys.argv[1]

 print("the test image is:", TEST_IMAGE)

 # Size, in inches, of the output images.

 IMAGE_SIZE = (12, 8)

 with detection_graph.as_default():

   with tf.Session(graph=detection_graph) as sess:

     #for image_path in TEST_IMAGE_PATHS:

     image = Image.open(TEST_IMAGE)  # 打开图片

     # the array based representation of the image will be used later in order to prepare the

     # result image with boxes and labels on it.

     image_np = load_image_into_numpy_array(image)

     # Expand dimensions since the model expects images to have shape: [1, None, None, 3]

     image_np_expanded = np.expand_dims(image_np, axis=0)

     image_tensor = detection_graph.get_tensor_by_name('image_tensor:0')   # 获取图片张量

     # Each box represents a part of the image where a particular object was detected.

     boxes = detection_graph.get_tensor_by_name('detection_boxes:0')   # 获取检测框张量

     # Each score represent how level of confidence for each of the objects.

     # Score is shown on the result image, together with the class label.

     scores = detection_graph.get_tensor_by_name('detection_scores:0')   # 获取每个检测框的分数,即概率

     classes = detection_graph.get_tensor_by_name('detection_classes:0')  # 获取类别名称id,与label_map中的ID对应

     num_detections = detection_graph.get_tensor_by_name('num_detections:0')  # 获取检测总数

     # Actual detection.

     (boxes, scores, classes, num_detections) = sess.run(

         [boxes, scores, classes, num_detections],

         feed_dict={image_tensor: image_np_expanded})

     # Visualization of the results of a detection.结果可视化

     vis_util.visualize_boxes_and_labels_on_image_array(

         image_np,

         np.squeeze(boxes),

         np.squeeze(classes).astype(np.int32),

         np.squeeze(scores),

         category_index,

         use_normalized_coordinates=True,

         line_thickness=8)

     print(boxes) # 打印检测框坐标

     print(scores)   #打印每个检测框的概率

     print(classes)   # 打印检测框对应的类别

     print(category_index)  # 打印类别的索引,其是一个嵌套的字典

     final_score = np.squeeze(scores)

     count = 0

     for i in range(100):

         if scores is None or final_score[i] > 0.5: # 显示大于50%概率的检测框

             count = count + 1

     print("the count of objects is: ", count )

     plt.figure(figsize=IMAGE_SIZE)

     plt.imshow(image_np)

     plt.show()
打开cmd,输入如下命令,
python object_detection_test.py ./test_images/2.png
运行结果如下,

目标检测框box的坐标,此处的坐标是坐标除以相应图片的长宽所得到的小数,排列顺序为[ymin , xmin , ymax , xmax],即box检测框左上角和右下角的坐标,
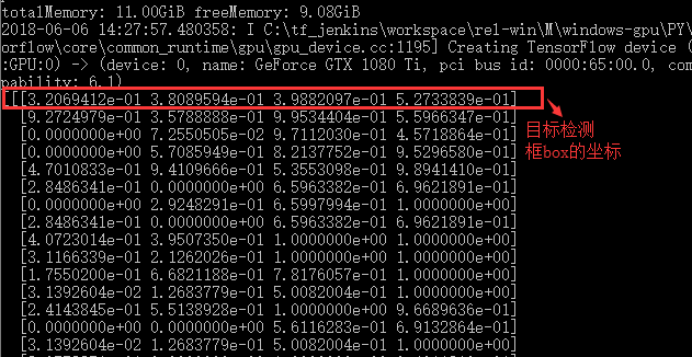
同时显示的是目标检测框box的概率:
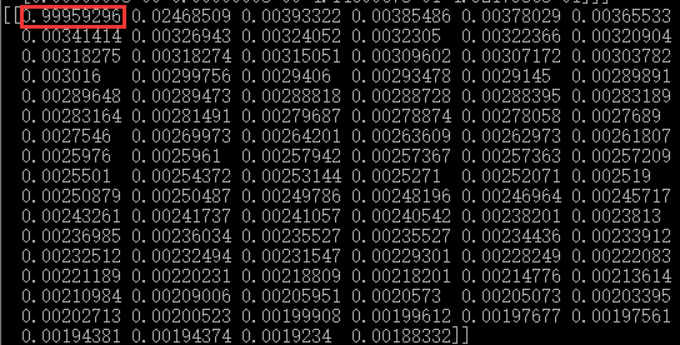
Box的标签索引和每个索引所代表的标签,如第一个box的索引为1,1的标签名为“box”,即检测框里的是“箱子”

检测图:
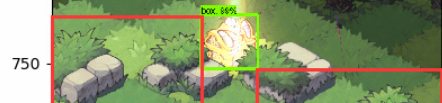
因为源码中将坐标与图片的长宽相除,所以显示的是小数,为了得到准确的坐标,只要乘上相应的长宽数值就可以得到坐标了,上图的检测图坐标由计算可得
[ymin , xmin , ymax , xmax] = [ 614.4 , 410.4 , 764.16 , 569.16 ],即在y轴的坐标和使用pyplot显示的坐标相近(图中红线标出)。
接下来,我们只要将上面的测试代码稍加修改即可得到我们想要的坐标,比如获得每个检测物体的中心坐标,代码如下:
import numpy as np
import os
import six.moves.urllib as urllib
import sys
import tarfile
import tensorflow as tf
import zipfile
import time from collections import defaultdict
from io import StringIO
from matplotlib import pyplot as plt
#plt.switch_backend('Agg')
from PIL import Image ## This is needed to display the images.
#%matplotlib inline # This is needed since the notebook is stored in the object_detection folder.
sys.path.append("..") from utils import label_map_util from utils import visualization_utils as vis_util
# What model to download.
#MODEL_NAME = 'ssd_mobilenet_v1_coco_2017_11_17'
#MODEL_FILE = MODEL_NAME + '.tar.gz'
#DOWNLOAD_BASE = #'http://download.tensorflow.org/models/object_detection/'
MODEL_NAME = 'E:/Project/object-detection-Game-2018-5-31/data-20180607' # model.ckpt路径,包括frozen_inference_graph.pb文件 # Path to frozen detection graph. This is the actual model that is used for the object detection.
PATH_TO_CKPT = MODEL_NAME + '/frozen_inference_graph.pb' # List of the strings that is used to add correct label for each box.
PATH_TO_LABELS = MODEL_NAME+'/label_map.pbtxt'
#E:/Project/object-detection-Game-2018-5-31 NUM_CLASSES = 6
start = time.time()
#Load a (frozen) Tensorflow model into memory.
detection_graph = tf.Graph()
with detection_graph.as_default():
od_graph_def = tf.GraphDef()
#loading ckpt file to graph
with tf.gfile.GFile(PATH_TO_CKPT, 'rb') as fid:
serialized_graph = fid.read()
od_graph_def.ParseFromString(serialized_graph)
tf.import_graph_def(od_graph_def, name='')
#Loading label map
label_map = label_map_util.load_labelmap(PATH_TO_LABELS)
categories = label_map_util.convert_label_map_to_categories(label_map, max_num_classes=NUM_CLASSES, use_display_name=True)
category_index = label_map_util.create_category_index(categories)
#Helper code
def load_image_into_numpy_array(image):
(im_width, im_height) = image.size
return np.array(image.getdata()).reshape(
(im_height, im_width, 3)).astype(np.uint8) # If you want to test the code with your images, just add path to the images to the TEST_IMAGE_PATHS.
#PATH_TO_TEST_IMAGES_DIR = 'test_images'
#TEST_IMAGE_PATHS = [ os.path.join(PATH_TO_TEST_IMAGES_DIR, 'image{}.jpg'.format(i)) for i in range(1, 3) ]
TEST_IMAGE = sys.argv[1]
print("the test image is:", TEST_IMAGE) # Size, in inches, of the output images.
IMAGE_SIZE = (12, 8)
with detection_graph.as_default():
with tf.Session(graph=detection_graph) as sess:
# Definite input and output Tensors for detection_graph
image_tensor = detection_graph.get_tensor_by_name('image_tensor:0')
# Each box represents a part of the image where a particular object was detected.
detection_boxes = detection_graph.get_tensor_by_name('detection_boxes:0')
# Each score represent how level of confidence for each of the objects.
# Score is shown on the result image, together with the class label.
detection_scores = detection_graph.get_tensor_by_name('detection_scores:0')
detection_classes = detection_graph.get_tensor_by_name('detection_classes:0')
num_detections = detection_graph.get_tensor_by_name('num_detections:0')
#for image_path in TEST_IMAGE_PATHS:
image = Image.open(TEST_IMAGE)
# the array based representation of the image will be used later in order to prepare the
# result image with boxes and labels on it.
image_np = load_image_into_numpy_array(image)
# Expand dimensions since the model expects images to have shape: [1, None, None, 3]
image_np_expanded = np.expand_dims(image_np, axis=0)
image_tensor = detection_graph.get_tensor_by_name('image_tensor:0')
# Each box represents a part of the image where a particular object was detected.
boxes = detection_graph.get_tensor_by_name('detection_boxes:0')
# Each score represent how level of confidence for each of the objects.
# Score is shown on the result image, together with the class label.
scores = detection_graph.get_tensor_by_name('detection_scores:0')
classes = detection_graph.get_tensor_by_name('detection_classes:0')
num_detections = detection_graph.get_tensor_by_name('num_detections:0')
# Actual detection.
(boxes, scores, classes, num_detections) = sess.run(
[boxes, scores, classes, num_detections],
feed_dict={image_tensor: image_np_expanded})
# Visualization of the results of a detection.
vis_util.visualize_boxes_and_labels_on_image_array(
image_np,
np.squeeze(boxes),
np.squeeze(classes).astype(np.int32),
np.squeeze(scores),
category_index,
use_normalized_coordinates=True,
line_thickness=8) #print(boxes)
# for i in range(len(scores[0])):
# if scores[0][i]>0.5:
# print(scores[0][i])
#print(scores)
#print(classes)
#print(category_index)
final_score = np.squeeze(scores)
count = 0
for i in range(100):
if scores is None or final_score[i] > 0.5:
count = count + 1
print()
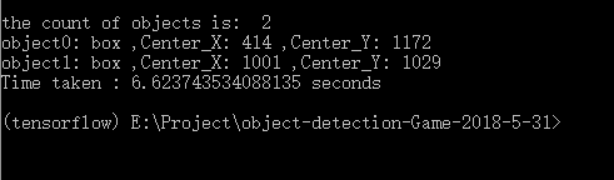
print("the count of objects is: ", count )
(im_width, im_height) = image.size
for i in range(count):
#print(boxes[0][i])
y_min = boxes[0][i][0]*im_height
x_min = boxes[0][i][1]*im_width
y_max = boxes[0][i][2]*im_height
x_max = boxes[0][i][3]*im_width
print("object{0}: {1}".format(i,category_index[classes[0][i]]['name']),
',Center_X:',int((x_min+x_max)/2),',Center_Y:',int((y_min+y_max)/2))
#print(x_min,y_min,x_max,y_max)
end = time.time()
seconds = end - start
print("Time taken : {0} seconds".format(seconds)) # plt.figure(figsize=IMAGE_SIZE)
# plt.imshow(image_np)
# plt.show()
运行结果如下,
转载请注明出处:https://www.cnblogs.com/White-xzx/p/9508535.html
【TensorFlow】获取object detection API训练模型的输出坐标的更多相关文章
- 使用Tensorflow object detection API——训练模型(Window10系统)
[数据标注处理] 1.先将下载好的图片训练数据放在models-master/research/images文件夹下,并分别为训练数据和测试数据创建train.test两个文件夹.文件夹目录如下 2. ...
- Install Tensorflow object detection API in Anaconda (Windows)
This blog is to explain how to install Tensorflow object detection API in Anaconda in Windows 10 as ...
- 基于TensorFlow Object Detection API进行迁移学习训练自己的人脸检测模型(二)
前言 已完成数据预处理工作,具体参照: 基于TensorFlow Object Detection API进行迁移学习训练自己的人脸检测模型(一) 设置配置文件 新建目录face_faster_rcn ...
- TensorFlow object detection API
cloud执行:https://github.com/tensorflow/models/blob/master/research/object_detection/g3doc/running_pet ...
- Tensorflow object detection API 搭建属于自己的物体识别模型
一.下载Tensorflow object detection API工程源码 网址:https://github.com/tensorflow/models,可通过Git下载,打开Git Bash, ...
- TensorFlow object detection API应用
前一篇讲述了TensorFlow object detection API的安装与配置,现在我们尝试用这个API搭建自己的目标检测模型. 一.准备数据集 本篇旨在人脸识别,在百度图片上下载了120张张 ...
- TensorFlow object detection API应用--配置
目标检测在图形识别的基础上有了更进一步的应用,但是代码也更加繁琐,TensorFlow专门为此开设了一个object detection API,接下来看看怎么使用它. object detectio ...
- TensorFlow Object Detection API中的Faster R-CNN /SSD模型参数调整
关于TensorFlow Object Detection API配置,可以参考之前的文章https://becominghuman.ai/tensorflow-object-detection-ap ...
- 使用TensorFlow Object Detection API+Google ML Engine训练自己的手掌识别器
上次使用Google ML Engine跑了一下TensorFlow Object Detection API中的Quick Start(http://www.cnblogs.com/take-fet ...
随机推荐
- BZOJ 3174 拯救小矮人(贪心+DP)
题意 一群小矮人掉进了一个很深的陷阱里,由于太矮爬不上来,于是他们决定搭一个人梯.即:一个小矮人站在另一小矮人的 肩膀上,知道最顶端的小矮人伸直胳膊可以碰到陷阱口.对于每一个小矮人,我们知道他从脚到肩 ...
- Eclipse中项目上有小红叉,但就是找不到报错文件(总结,持续更新)
1.jdk问题解决:jdk配置参考:http://blog.csdn.net/superit401/article/details/72847110 2.build path:项目右键——Build ...
- Codeforces914G Sum the Fibonacci(FWT)
FWT大杂烩.跟着模拟做很多次FWT即可. #include<iostream> #include<cstdio> #include<cmath> #include ...
- MT【107】立体几何中用阿波罗尼乌斯圆的一道题
分析:利用内外圆知识知道,B,C两点到 AD 的距离$\le4$. 利用体积公式$V=\frac{1}{3}S_{截面}|AD|\le2\sqrt{15}$
- 架构师成长之路1.1-系统监控工具htop
点击返回架构师成长之路 架构师成长之路1.1-系统监控工具htop htop 是Linux系统中的一个互动的进程查看器,一个文本模式的应用程序(在控制台或者X终端中),需要ncurses. 与Linu ...
- 关于程序设计中INF和MOD值的设定
在取模操作中,我们常把MOD设置为1000000007 模一个大数和模一个质数可以减少冲突 而1e9+7又有一个很好的特点,就是相加不会爆int,相乘不会爆long long 在设置无穷大值时中我们常 ...
- PyQt4 安装
安装PyQt4很简单,从官网下载相应的安装包即可. 需要注意的是:应该根据你电脑上已经装好的python版本选择相应的PyQt4安装包. PyQt4的安装目录一定要选python的安装目录,比如我的P ...
- apigateway-kong(四)负载均衡理论及实现
负载均衡(Load balancing)是一种计算机网络技术,用来在多个计算机(计算机集群).网络连接.CPU.磁盘驱动器或其他资源中分配负载,以达到最佳化资源使用.最大化吞吐率.最小化响应时间.同时 ...
- OpenStack 计算服务 Nova计算节点部署(八)
如果使用vmware虚拟机进行部署,需要开启虚拟化:如果是服务器需要在bios上开启. nova计算节点IP是192.168.137.12 环境准备 安装时间同步 yum install ntpdat ...
- Redis 学习小记
由于是学习笔记,我就不来各种啰嗦,介绍这个介绍那个,也不上交给国家,或者各种对比,相信如果你真心用 redis 的话,就不会去跟 MySql,Memcached,MongoDB 等做对比了. 我原先用 ...