[RSpec] LEVEL 2 CONFIGURATION & MATCHERS
Installing RSpec
In this level we'll start by getting you setup on a regular Ruby project, then move onto using RSpec within Rails. Let's start by installing the rspec gem from the console.
gem install rspec

Command Line
With the RSpec gem installed, you will have access to the command line tool, rspec.
RSpec has a few settings you can configure, so to help us get started, let's initialize this as an RSpec project. This will generate a placeholder for our RSpec configuration.
rspec --init
Rails Configuration
Using rspec --init will setup RSpec within a ruby project, but for the rest of this course we'll be using RSpec within a Rails project. Run the rails generator to install RSpec into the current Rails project.
rails generate rspec:install
Running specs from the command line
We now have a Rails project all setup and we've created spec/models/zombie_spec.rb for you. Run this spec from the command line with color on, and specify documentation format.
rspec --color --format documentation spec/models/zombie_spec.rb
Predicate Matchers
Refactor the following spec to use an include matcher.
class Zombie < ActiveRecord::Base

  validates :name, presence: true

  def genius?

    iq >= 3

  end

end
Answer:
describe Zombie do

  it 'includes a tweet' do

    tweet = Tweet.new

    zombie = Zombie.new(tweets: [tweet])

    zombie.tweets.should include tweet

  end

end
Change Matcher
In the following example, we're checking to see that a method changes the state of a zombie. We need to make sure the zombie was in a specific state before and after the method is called.
Refactor the following example to use the expect and change syntax.
class Zombie < ActiveRecord::Base

  validates :name, presence: true

  validates :iq, numericality: true

  def eat_brains

    self.iq += 3

  end

end
Answer:
describe Zombie do

  it 'gains 3 IQ points by eating brains' do

    zombie = Zombie.new

    #zombie.iq.should == 0

    #zombie.eat_brains

    #zombie.iq.should == 3

    expect {zombie.eat_brains}.to change {zombie.iq}.from(0).to(3)

  end

end

#what expect {zombie.eat_brains}.to change {zombie.iq}.from(0).to(3)

#is saying that:

#zombie eat_brains

#then change zombie.iq

#from 0 to 3

# format:

#expect {action}.to change {value}.by(num) #or form(num1).to(num2)

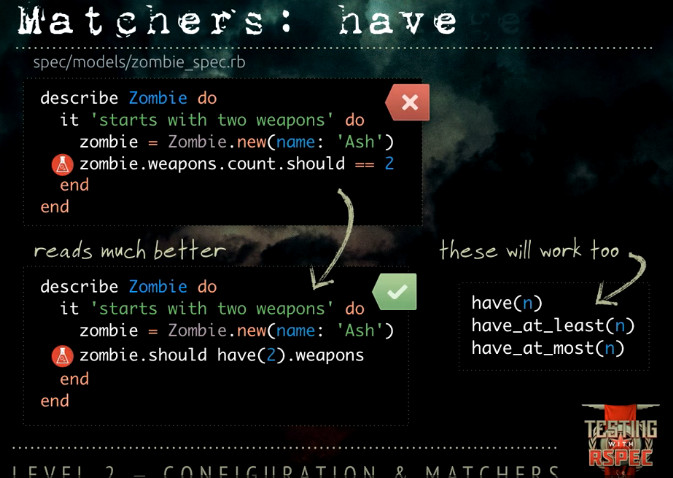
Have Matcher
We're verifying the count to be greater than 0, but we really could be using a have matcher here to verify that the zombie has exactly one tweet. Refactor the spec to use the have matcher.
describe Zombie do

  it 'increases the number of tweets' do

    zombie = Zombie.new(name: 'Ash')

    zombie.tweets.new(message: "Arrrgggggggghhhhh")

    #zombie.tweets.count.should > 0

    zombie.should have(1).tweets

  end

end
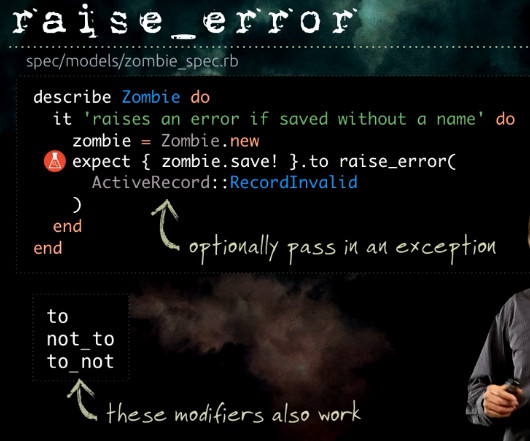
Raises an Error
Testing for exceptions is tricky business. Refactor the spec below to use the raise_error matcher with an expect block.
class Tweet < ActiveRecord::Base

  attr_accessible :message

  belongs_to :zombie

  validates :message, presence: true

end
class Zombie < ActiveRecord::Base

  validates :name, presence: true

  class NotSmartEnoughError < StandardError; end

  def genius?

    iq >= 3

  end

  def make_decision!

    raise NotSmartEnoughError unless genius?

    return true

  end

end
Answer:
describe Zombie do

  it 'raises a Zombie::NotSmartEnoughError if not able to make a decision' do

    zombie = Zombie.new

    #begin

     # zombie.make_decision!

    # rescue Zombie::NotSmartEnoughError => e

      # e.should be_an_instance_of(Zombie::NotSmartEnoughError)

    # end

    expect {zombie.make_decision!}.to raise_error(

      Zombie::NotSmartEnoughError

      )

  end

end
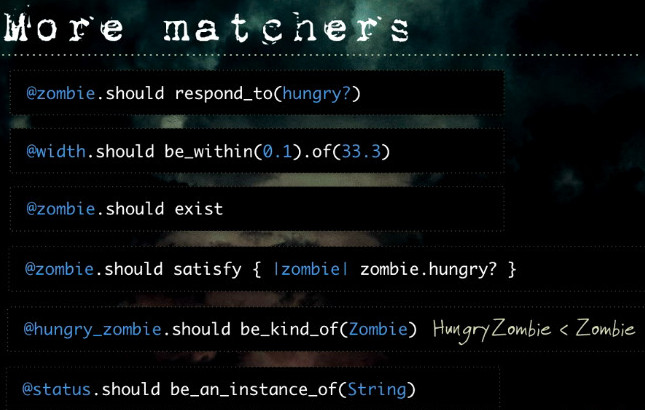
More matchers:
[RSpec] LEVEL 2 CONFIGURATION & MATCHERS的更多相关文章
- [RSpec] LEVEL 1: INTRODUCTION
Install RSpec: Describe Lets start writing a specification for the Tweet class. Write a describe blo ...
- Understanding JDBC Internals & Timeout Configuration
原版:http://www.cubrid.org/blog/dev-platform/understanding-jdbc-internals-and-timeout-configuration 中文 ...
- Spring boot参考指南
介绍 转载自:https://www.gitbook.com/book/qbgbook/spring-boot-reference-guide-zh/details 带目录浏览地址:http://ww ...
- @Async in Spring--转
原文地址:http://www.baeldung.com/spring-async 1. Overview In this article we’ll explore the asynchronous ...
- 日志框架只打印出Mybatis SQL的配置
项目比较大,各种乱七八糟的框架.Log4j配置的是INFO级别. 然而今天开发的时候我需要log4j打印出SQL的执行情况. 先改log4j的rootLogger级别到DEBUG......后果就是各 ...
- 一键式Spring集成工具 Spring Boot
最近公司使用Spring boot进行开发,稍微了解一下,不过自我感觉把集中式配置applicate.properties搞明白,注解用过Spring MVC的boot绝对没问题的 比如拦截器:@As ...
- Logback常用配置详解
logback是一套日志框架,由log4j的优化版,由同一个作者开发,在速度和性能上都超过其他日志框架,再结合slf4j,已成为当前最流行的日志框架. Logback最常用就是在classpath定义 ...
- java_log_02
配置 在第一部分,我们将介绍配置 logback 的各种方法,给出了很多配置脚本例子.在第二部分,我们将介绍 Joran,它是一个通用配置框架,你可以在自己的项目里使用 Joran 一.Logback ...
- Spring Boot Logback应用日志
e Spring Boot Logback应用日志 2015-09-08 19:57 7673人阅读 评论(0) 收藏 举报 . 分类: Spring Boot(51) . 目录(?)[+] 日志对于 ...
随机推荐
- 为什么我喜欢Java
我现在的老板使用一个在线测试系统来筛选在线申请职位的求职者.测试的第一个问题很浅显,仅仅是为了让求职者熟悉一下这个系统的提交和测试代码的流程.问题是这样的,写一个将标准输入拷贝到标准输出的流程.求职者 ...
- python 异步 select pooll epoll
概念: 首先列一下,sellect.poll.epoll三者的区别 select select最早于1983年出现在4.2BSD中,它通过一个select()系统调用来监视多个文件描述符的数组,当se ...
- poj 2096Collecting Bugs
题目链接 poj 2096Collecting Bugs 题解 dp[i][j]表示已经找到i种bug,并存在于j个子系统中,要达到目标状态的天数的期望. 显然,dp[n][s]=0,因为已经达到目标 ...
- AHOI2018训练日程(3.10~4.12)
(总计:共90题) 3.10~3.16:17题 3.17~3.23:6题 3.24~3.30:17题 3.31~4.6:21题 4.7~4.12:29题 ZJOI&&FJOI(6题) ...
- HDU 6141 I am your Father!(最小树形图)
[题目链接] http://acm.hdu.edu.cn/showproblem.php?pid=6141 [题目大意] 给出一个有向图,求1点为根的最小树形图使得第n个点的直接父亲编号最小 [题解] ...
- Mybatis分页插件PageHelper的实现
Mybatis分页插件PageHelper的实现 前言 分页这个概念在做web网站的时候很多都会碰到 说它简单吧 其实也简单 小型的网站,完全可以自己写一个,首先查出数据库总条数,然后按照分页大小分为 ...
- 检测使用内存memory_get_usage,执行时间microtime
最近经常用一些扩展,适当比较所占内存,还有一些扩展执行时间长,检测一下每步的执行时间,可以加以修正调整一下源码 查看运行时间 microtime() #返回当前 Unix 时间戳和微秒数. echo ...
- python开发_python文件操作
关于python文件操作的详细说明,大家可以参考:关于python的文件操作 官方API:os-Miscellaneous operating system interfaces 下面是我做的demo ...
- 几种OutOfMemoryError
JAVA虚拟机OutOfMemoryError主要包括以下四类:java.lang.OutOfMemoryError: Java heap spacejava.lang.OutOfMemoryErro ...
- FreeRTOS API
Task Creation xTaskCreate vTaskDelete Task Control vTaskDelay vTaskDelayUntil uxTaskPriorityGet vTas ...