Spring MVC 解读——<context:component-scan/>
转自:http://my.oschina.net/HeliosFly/blog/203149 作者:GoodLoser.
Spring MVC 解读---<context:component-scan/>
注解是骑士魂牵梦绕的美丽公主,也是骑士的无法摆脱的噩梦...
一、<context:component-scan/>
想必@Component,@Repository,@Service,@Controller几个常用的Type-Level的Spring MVC注解,大家都很清楚他们的意思跟用途。标记为@Component的类,在使用注解配置的情况下,系统启动时会被自动扫描,并添加到bean工厂中去(省去了配置文件中写bean定义了),另外三个分别表示MVC三层模式中不同层中的组件,他们都是被@Component标记的,所以也会被自动扫描。
|
1
2
3
4
5
6
7
8
9
10
11
12
13
14
15
16
17
18
19
20
21
22
23
|
@Target({ElementType.TYPE})@Retention(RetentionPolicy.RUNTIME)@Documented@Component//这里。。。public @interface Repository { String value() default "";}@Target({ElementType.TYPE})@Retention(RetentionPolicy.RUNTIME)@Documented@Component//这里。。。public @interface Service { String value() default "";}@Target({ElementType.TYPE})@Retention(RetentionPolicy.RUNTIME)@Documented@Component//这里。。。public @interface Controller { String value() default "";} |
为了达到以上效果,我们还需在xml配置文件中加入如下定义
|
1
|
<context:component-scan base-package="com.springrock..."/> |
这样Spring就可以正确的处理我们定义好的组件了,重要的是这些都是自动的,你甚至不知道他是怎么做的,做了什么?如果不了解反射,可能真的感到吃惊了,但即便如此,我也想知道它到底做了什么?什么时候做的?
二、BeanDefinitionParser
经过仔细的源码阅读,我找到了这个接口BeanDefinitionParser,文档描述说,它是一个用来处理自定义,顶级(<beans/>的直接儿子标签)标签的接口抽象。可以实现它来将自定义的标签转化为 BeanDefinition类。下面是它的接口定义
|
1
|
BeanDefinition parse(Element element, ParserContext parserContext); |
其中Element是Dom api 中的元素,ParserContext则是用来注册转换来的bean 工厂。
或许你开始恼火说这么多跟上面有什么关系,好吧,下面便是我真正要说的,我们来看下它有哪些实现类:

看到了吧,ComponentScanBeanDefinitionParser,正是我们想要的,他就是用来将<context:component-scan/>标签转化为bean 的解析类。那他做了什么呢?
|
1
2
3
4
5
6
7
8
9
10
11
12
|
public BeanDefinition parse(Element element, ParserContext parserContext) { String[] basePackages = StringUtils.tokenizeToStringArray( element.getAttribute(BASE_PACKAGE_ATTRIBUTE), ConfigurableApplicationContext.CONFIG_LOCATION_DELIMITERS); // Actually scan for bean definitions and register them. ClassPathBeanDefinitionScanner scanner = configureScanner(parserContext, element); Set<BeanDefinitionHolder> beanDefinitions = scanner.doScan(basePackages); registerComponents(parserContext.getReaderContext(), beanDefinitions, element); return null; } |
很明显他会获得<component-scan/>的base-package属性,然后解析所需解析的包路径,然后他会创建一个ClassPathBeanDefinitionScanner对象,并委托它来执行对路径下文件的扫描,然后将获得的BeanDefinitions注册到bean工厂中。是不是很清晰?
我想你会急切的知道ClassPathBeanDefinitionScanner 做了什么?
|
1
2
3
4
5
6
7
8
9
10
11
12
13
14
15
16
17
18
19
|
protected Set<BeanDefinitionHolder> doScan(String... basePackages) { Set<BeanDefinitionHolder> beanDefinitions = new LinkedHashSet<BeanDefinitionHolder>(); for (String basePackage : basePackages) { //这里是重点,找到候选组件 Set<BeanDefinition> candidates = findCandidateComponents(basePackage); for (BeanDefinition candidate : candidates) { //..... //..... if (checkCandidate(beanName, candidate)) { BeanDefinitionHolder definitionHolder = new BeanDefinitionHolder(candidate, beanName); beanDefinitions.add(definitionHolder); //注册到工厂中 registerBeanDefinition(definitionHolder, this.registry); } } } return beanDefinitions; } |
重点是继承自父类ClassPathScanningCandidateComponentProvider 的findCandidateComponents方法,意思就是找到候选组件,然后注册到工厂中,那么它是怎么找到候选组件的呢?
我们再看看
|
1
2
3
4
5
6
7
8
9
10
11
12
13
14
15
16
17
18
19
20
21
22
23
24
|
public Set<BeanDefinition> findCandidateComponents(String basePackage) { Set<BeanDefinition> candidates = new LinkedHashSet<BeanDefinition>(); try { String packageSearchPath = ResourcePatternResolver.CLASSPATH_ALL_URL_PREFIX + resolveBasePackage(basePackage) + "/" + this.resourcePattern; Resource[] resources = this.resourcePatternResolver.getResources(packageSearchPath); for (Resource resource : resources) { if (resource.isReadable()) { try { MetadataReader metadataReader = this.metadataReaderFactory. getMetadataReader(resource); if (isCandidateComponent(metadataReader)) { ScannedGenericBeanDefinition sbd = new ScannedGenericBeanDefinition(metadataReader); if (isCandidateComponent(sbd)){ candidates.add(sbd); } } } } } } return candidates; } |
首先获取路径下的资源Resource,然后判断资源是否可读,并且获取可读资源的MetadataReader对象,然后再调用isCandidateComponent(MetadataReader)判段是否是候选组件,如果是,则生成该metadataReader的ScannedGenericBeanDefinition对象。最后判断ScannedGenericBeanDefinition是否为候选的,如果是则添加到工厂中。
三、includeFilters,excludeFilters
可以看到经历了两次筛选,才找到最终的候选Bean,我们来看第一个过滤做了什么?
|
1
2
3
4
5
6
7
8
9
10
11
12
13
14
15
16
17
18
|
protected boolean isCandidateComponent(MetadataReader metadataReader) throws IOException { for (TypeFilter tf : this.excludeFilters) {//excludeFilters 是什么? if (tf.match(metadataReader, this.metadataReaderFactory)) { return false; } } for (TypeFilter tf : this.includeFilters) {//includeFilters 是什么? if (tf.match(metadataReader, this.metadataReaderFactory)) { AnnotationMetadata metadata = metadataReader.getAnnotationMetadata(); if (!metadata.isAnnotated(Profile.class.getName())) { return true; } AnnotationAttributes profile = MetadataUtils.attributesFor(metadata, Profile.class); return this.environment.acceptsProfiles(profile.getStringArray("value")); } } return false; } |
我们看到这里有两个实例变量excludeFilters, includeFilters,然后用他们两个去匹配传递进来的MetadataReader,如果与excludeFilter匹配成功返回false, 与includeFilter匹配成功返回true。那么这两个filter分别是什么呢?我们打上断点,调试运行发现
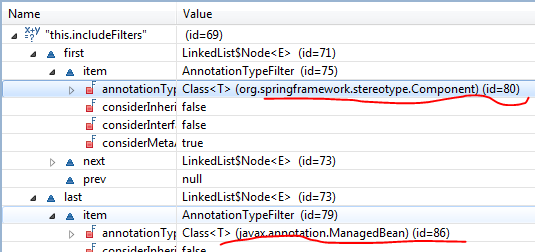
默认情况下includeFilters是一个含有两个值得List,分别是@Component注解和@ManageBean注解,而excludeFilter是个空List,好吧,现在豁然开朗了吧,原来就是它来筛选我们的@Component标记的类。当然我们可以自定义这两个filters,只需在<context:component-scan/>标签下加两个子标签即可, 像这样:
|
1
2
3
4
|
<context:component-scan base-package="com.springrock"> <context:exclude-filter type="annotation" expression="org.springframework.stereotype.Repository"/> <context:include-filter type="annotation" expression="com.springrock.whatever.youcustomized.annotation"/></context:component-scan> |
四、BeanDefinitionRegistry
上面代码中我们看到还有一个isCandidateComponent方法,它主要是判断当前类是否是具体的,而非抽象类和接口,以及是否是可以独立创建的没有依赖的?鉴于与我们目前讨论的主题不相关,所以略去,感兴趣的话,可以自己查看下源码。
好了,我们既然知道了Spring是怎样通过<context:component-scan/>来扫描,过滤我们的组件了,但是他是怎样将我们定义的组件收集起来供后面的请求处理呢?
我们来看下上面doScan方法中有
|
1
2
|
//注册到工厂中registerBeanDefinition(definitionHolder, this.registry); |
这样一行代码,很明显是将beanDefinition注册到,registry中了。那这个registry是什么呢?是一个BeanDefinitionRegistry,下面是它的接口定义及继承结构:
|
1
2
3
4
5
6
7
8
9
10
|
public interface BeanDefinitionRegistry extends AliasRegistry { void registerBeanDefinition(String beanName, BeanDefinition beanDefinition) throws BeanDefinitionStoreException; void removeBeanDefinition(String beanName) throws NoSuchBeanDefinitionException; BeanDefinition getBeanDefinition(String beanName) throws NoSuchBeanDefinitionException; boolean containsBeanDefinition(String beanName); String[] getBeanDefinitionNames(); int getBeanDefinitionCount(); boolean isBeanNameInUse(String beanName);} |

我们可以看到接口中定义了诸多beandefinition的注册,删除,获取等方法,并且Spring为我们提供了三个内部实现,那么运行时,使用了那个实现呢?DefaultListableBeanFactory,是的就是它。它就是SpringMVC 中管理Bean的工厂了,我们来看下,它的registerBeanDefinition是怎样实现的?
|
1
2
3
4
5
6
7
8
9
10
11
12
13
14
15
16
17
18
19
20
21
22
|
public void registerBeanDefinition(String beanName, BeanDefinition beanDefinition) throws BeanDefinitionStoreException { synchronized (this.beanDefinitionMap) { Object oldBeanDefinition = this.beanDefinitionMap.get(beanName); if (oldBeanDefinition != null) { if (!this.allowBeanDefinitionOverriding) { throw new BeanDefinitionStoreException(); } else { if (this.logger.isInfoEnabled()) { this.logger.info("Overriding bean definition '" + beanName + "]"); } } } else { this.beanDefinitionNames.add(beanName); this.frozenBeanDefinitionNames = null; } this.beanDefinitionMap.put(beanName, beanDefinition);//添加到beanDefinitionMap中了。 } resetBeanDefinition(beanName); } |
从上面的代码可以看出,所有的beanDefinition都由实例变量beanDefinitionMap来保存管理,他是一个ConcurrentHashMap,beanName作为键,beanDefinition对象作为值。到这我们知道了我们的bean是怎样被注册管理的了。但是问题又来了,我们的系统是在什么时候读取<context:component-scan/>标签,并且扫描我们的bean组件的呢?
当然是从ContextLoaderListener开始了入手分析了。
五、ContextLoader
我们查看源码(篇幅问题,不贴代码了,很简答)发现ContextLoaderListener将web application context的初始化动作委托给了ContextLoader了,那ContextLoader做了什么呢?
|
1
2
3
4
5
6
7
|
if (this.context == null) { this.context = createWebApplicationContext(servletContext);}if (this.context instanceof ConfigurableWebApplicationContext) { configureAndRefreshWebApplicationContext((ConfigurableWebApplicationContext)this.context, servletContext);} |
上面的代码片段便是ContextLoader中initWebApplicationContext方法中的关键一段。首先会创建一个WebApplicationContext对象,然后configure 并且refresh这个WebApplicactionContext对象,是不是在这个configureAndRefreshWebApplicationContext方法中进行了配置文件的加载和组件的扫描呢?必须是啊。。。
|
1
|
wac.refresh(); |
方法的最后有一个调用了wac的refresh方法,这个wac呢就是前面创建的WebApplicationContext对象,也就是我们这个Web应用的上下文对象。具体是什么呢?我们看一下createWebapplicationContext方法
|
1
2
3
4
5
6
|
protected WebApplicationContext createWebApplicationContext(ServletContext sc) { Class<?> contextClass = determineContextClass(sc);//这里是关键 ConfigurableWebApplicationContext wac = (ConfigurableWebApplicationContext) BeanUtils.instantiateClass(contextClass); return wac; } |
这个方法先确定我们context的类型,调用了determineContextClass方法,
|
1
2
3
4
5
6
7
8
9
10
11
12
13
14
15
|
protected Class<?> determineContextClass(ServletContext servletContext) { //public static final String CONTEXT_CLASS_PARAM = "contextClass"; String contextClassName = servletContext.getInitParameter(CONTEXT_CLASS_PARAM); if (contextClassName != null) { try { return ClassUtils.forName(contextClassName, ClassUtils.getDefaultClassLoader()); } } else {//defaultStrategies 是关键 contextClassName = defaultStrategies.getProperty(WebApplicationContext.class.getName()); try { return ClassUtils.forName(contextClassName, ContextLoader.class.getClassLoader()); } } } |
这个方法先判断我们servletContext中有没有contextClass这个初始化属性(在web.xml的init-param标签中配置),通常我们不会配置这个属性。那肯定是null了,所以它接着去查看defaultStrategy中有没有相应属性,那这个defaultStrategy是什么呢?下面是ContextLoader中一个静态代码块,也就说只要ContextLoader被加载,defaultStrategy便会被赋值。
|
1
2
3
4
5
6
7
8
|
static { try { //private static final String DEFAULT_STRATEGIES_PATH = "ContextLoader.properties"; ClassPathResource resource = new ClassPathResource(DEFAULT_STRATEGIES_PATH, ContextLoader.class); defaultStrategies = PropertiesLoaderUtils.loadProperties(resource); } } |
很明显,系统是去ClassPath下读取一个Context.properties的属性文件,并赋值给defaultStrategy,这个属性文件如下:
|
1
2
|
org.springframework.web.context.WebApplicationContext =org.springframework.web.context.support.XmlWebApplicationContext |
啊哈,终于找到了,原来是XmlWebApplicationContext啊,这就是我们的WebApplicationContext具体实现对象。
既然找到他了,那我们看看他的refresh()方法做了什么呢?
|
1
2
3
4
5
6
7
8
9
10
11
12
13
14
15
16
17
18
|
public void refresh() throws BeansException, IllegalStateException { synchronized (this.startupShutdownMonitor) { prepareRefresh(); ConfigurableListableBeanFactory beanFactory = obtainFreshBeanFactory(); prepareBeanFactory(beanFactory); try { postProcessBeanFactory(beanFactory); invokeBeanFactoryPostProcessors(beanFactory); registerBeanPostProcessors(beanFactory); initMessageSource(); initApplicationEventMulticaster(); onRefresh(); registerListeners(); finishBeanFactoryInitialization(beanFactory); finishRefresh(); } } } |
五、Bean Factory
这么多代码中,只有第二行与我们当前讨论的主题有关,这一行会尝试获取一个新鲜的BeanFactory,这个BeanFactory与我们之前说的那个BeanDefinitionRegistry有什么关系呢?继续看代码:
|
1
2
3
4
5
|
protected ConfigurableListableBeanFactory obtainFreshBeanFactory() { refreshBeanFactory(); ConfigurableListableBeanFactory beanFactory = getBeanFactory(); return beanFactory; } |
在getBeanFactory之前,先进行了一个refreshBeanFactory的操作来刷新当前的BeanFactory,我们以此来看一下:
|
1
2
3
4
5
6
7
8
9
10
11
12
13
14
15
16
|
@Override protected final void refreshBeanFactory() throws BeansException { if (hasBeanFactory()) { destroyBeans(); closeBeanFactory(); } try { DefaultListableBeanFactory beanFactory = createBeanFactory(); beanFactory.setSerializationId(getId()); customizeBeanFactory(beanFactory); loadBeanDefinitions(beanFactory); synchronized (this.beanFactoryMonitor) { this.beanFactory = beanFactory; } } } |
代码依旧很清晰,先判断有没有BeanFactory,如果有,销毁所有Bean,关闭BeanFactory,然后重新创建一个BeanFactory,并将其赋给beanFactory实例变量,有没有发现这个beanFactory是个DefaultListableBeanFactory啊?我们上边讲到的bean definition registry也是个DefaultListableBeanFactory记得吗?他们会不会是同一个呢?答案是yes。重点就在这个loadBeanDefinition(beanFactory)方法上了,很明显:加载Bean Definition到bean工厂中,是不是与我们上边讲到的对上了?
loadBeanDefinition中,Spring会读取xml配置文件,然后会读取里面的bean定义,这一切都是委托给了文章开头的BeanDefinitionParser来完成的,可以看到除了<context:component-scan/>的Parser,还有<mvc:annotation-driven/>的parser,还有<interceptors/>的parser等。是不是比较清晰了?
当然,我们的问题及好奇心远不止这些,这篇文章只是讲解了其中的一小个:系统的初始化做了什么,在什么时候加载我们定义的beans,我们定义的bean被放到了哪里? 等等,现在问题又来了,我们怎样使用我们的bean呢?或者说如果被标记为@Autowire的属性,是怎样被自动装配的呢?@RequestMapping怎样工作的呢?Spring怎样正确调用controller来处理请求呢?等等,后面的文章我们一一解答。
Spring MVC 解读——<context:component-scan/>的更多相关文章
- Spring MVC 解读——<mvc:annotation-driven/>(转)
转自:http://my.oschina.net/HeliosFly/blog/205343 Spring MVC 解读——<mvc:annotation-driven/> 一.Annot ...
- Spring MVC 解读——<mvc:annotation-driven/>
Spring MVC 解读——<mvc:annotation-driven/> 一.AnnotationDrivenBeanDefinitionParser 通常如果我们希望通过注解的方式 ...
- Spring MVC 解读——@RequestMapping (1)(转)
转自:http://my.oschina.net/HeliosFly/blog/212329 Spring MVC 解读——@RequestMapping 为了降低文章篇幅,使得文章更目标化,简洁化, ...
- Spring MVC 解读——@Autowired(转)
转自:http://my.oschina.net/HeliosFly/blog/203902 Spring MVC 解读——@Autowired 一.@Autowired 作为一个Spring开发者对 ...
- Spring MVC 解读——@Autowired、@Controller、@Service从原理层面来分析
目录(?)[+] Spring MVC 解读Autowired 一Autowired 二BeanPostProcessor 三磨刀砍柴 四Bean 工厂 五实例化与装配 六执行装配 七一切的开始 ...
- Spring MVC 解读——@RequestMapping (2)(转)
转自:http://my.oschina.net/HeliosFly/blog/214438 Spring MVC 解读——@RequestMapping 上一篇文章中我们了解了Spring如何处理@ ...
- 【转】Spring MVC 解读——<mvc:annotation-driven/>
转载自:http://my.oschina.net/HeliosFly/blog/205343 一.AnnotationDrivenBeanDefinitionParser 通常如果我们希望通过注解的 ...
- Spring MVC 解读——View,ViewResolver(转)
上一篇文章(1)(2)分析了Spring是如何调用和执行控制器方法,以及处理返回结果的,现在我们就分析下Spring如何解析返回的结果生成响应的视图. 一.概念理解 View ---View接口表示一 ...
- Spring MVC 起步
跟踪Spring MVC的请求 在请求离开浏览器时①,会带有用户所请求内容的信息,至少会包含请求的URL. 请求旅程的第一站是Spring的DispatcherServlet.与大多数基于Java的W ...
随机推荐
- C# StringExt 字符串扩展
using System;using System.Collections.Generic;using System.Linq;using System.Text;using System.Threa ...
- android下4G上网卡
架构: APP Call Trachker/SMS Dispatch/Service Tracker/Data Tracker ------------------------------------ ...
- proguard.cfg 配置文件
# ------------------------------------- # android 原始混淆模板 # ------------------------------------- # - ...
- WEB 中的一些名词解释
OOP: 面向对象编程(Object Oriented Programming,OOP,面向对象程序设计)是一种计算机编程架构. AOP: AOP为Aspect Oriented Programmin ...
- Devexpress 使用经验 —— ASPxGridView前后台交互写法推荐
这里的格式是仁者见仁智者见智,这篇随笔只是我在工作过程中总结出的阅读性高,对我来说效率较高的写法. ASPX: <dx:ASPxGridView ID="ASPxGridViewLin ...
- [DEncrypt] Encrypt--加密/解密/MD5加密 (转载)
点击下载 Encrypt.zip 这个类是关于加密,解密的操作,文件的一些高级操作1.Encrypt加密2.Encrypt解密3.Encrypt MD5加密看下面代码吧 /// <summar ...
- Oracle11g服务及实例
1Orcl服务说明 1) Oracle ORCL VSS Writer Service:Oracle卷映射拷贝写入服务,VSS(Volume Shadow Copy Service)能够让存储基础设备 ...
- Gtest打桩函数
假设Client的定义如下 class Client { ...... public: virtual bool GetData(std::string& data); ...... }; 我 ...
- c#写个基础的Socket通讯
晚上想写点东西,想想把我刚来公司学的Sockt通讯写上来吧.要写的简单易懂点,新人们可以借鉴下哦,用控制台写. 先得说说Socket,与TCP/UDP啥关系,一直讲什么Socket通讯,TCP通讯,都 ...
- Visual c++ 2012 软件错误
vs2012 未能正确加载"Visual C++ Language Manager Package"包 解决办法 如下图所示: 到官网下载更新即可. http://www.micr ...