关于Openssh版本升级问题及版本升级到最新版8.7p1流程(CentOS7系统)
前言:
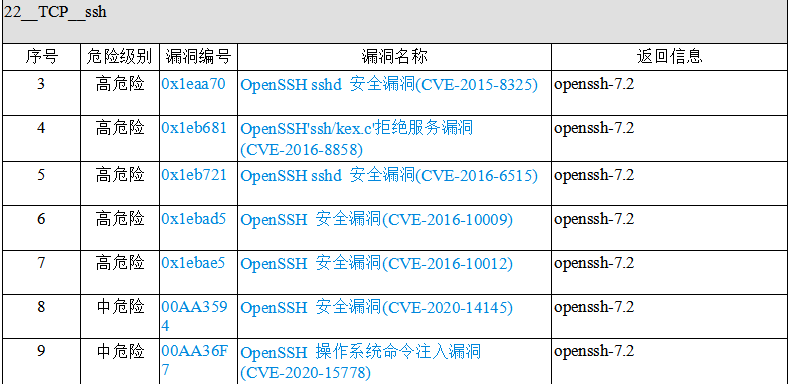
对linux服务器做过漏洞扫描的都知道,常常服务器会被扫出一大堆关于openssh的漏洞,诸如下面这些,而其中的原因就是因为openssh版本比较低。于是就需要升级openssh的版本。下面就来解决一下这些问题。网上关于openssh升级版本的教程很多,但在实际过程中总会出现这样那样的问题,导致升级失败,甚至会导致ssh无法连接,本篇综合各类教程,并搭建了相应的靶机进行实操,亲测成功!也算是对这些漏洞的修复画一个句号。
流程:
安装前,可以使用ssh -V以及openssl version查询一下当前版本:
[root@localhost openssl-1.1.1l]# ssh -V

OpenSSH_7.4p1, OpenSSL 1.0.2k-fips  26 Jan 2017

[root@localhost openssl-1.1.1l]# openssl version

OpenSSL 1.0.2k-fips  26 Jan 2017
1,安装telnet
先查看原服务器有无安装telnet:
rpm -qa | grep telnet
如果在返回中没有telnet-server,就代表并未安装telnet服务端,执行下面操作即可。
直接安装这三个软件:
yum -y install telnet telnet-server xinetd
进行一些配置:
systemctl enable xinetd.service

systemctl enable telnet.socket
启动telnet服务:
systemctl start telnet.socket

systemctl start xinetd
使用netstat -antpl | grep 23,如果有返回值,则说明安装成功
[root@localhost ~]# netstat -antpl | grep 23

tcp6       0      0 :::23                   :::*                    LISTEN      1/systemd
配置telnet连接方式:
vim /etc/securetty
然后在下面添加这几行:
pts/0

pts/1

pts/2

pts/3
配置完毕之后,使用如下命令,会看到的是这样:
[root@localhost ~]# tail -5 /etc/securetty

xvc0

pts/0

pts/1

pts/2

pts/3
在防火墙上开放23端口:
[root@localhost ~]# firewall-cmd --zone=public --add-port=23/tcp --permanent

success
重启防火墙:
[root@localhost ~]# firewall-cmd --reload

success
查看防火墙上开放的服务:
[root@localhost ~]# firewall-cmd --list-services

dhcpv6-client ssh telnet
可以看到,其中有telnet了。
退出ssh,使用telnet远程连接,以下均是在telnet连接下的操作。
2,备份
[root@localhost ~]# cp -r /etc/pam.d /etc/pam.d.bak

[root@localhost ~]# cp -af  /usr/bin/openssl  /usr/bin/openssl.old

[root@localhost ~]# cp -af  /etc/pki/ca-trust/extracted/openssl  /etc/pki/ca-trust/extracted/openssl.old

[root@localhost ~]# cp -af  /usr/lib64/openssl /usr/lib64/openssl.old

[root@localhost ~]# cp -af  /usr/lib64/libcrypto.so.10  /usr/lib64/libcrypto.so.10.old

[root@localhost ~]# cp -af  /usr/lib64/libssl.so.10  /usr/lib64/libssl.so.10.old

[root@localhost ~]# cp -arf /etc/ssh/ /etc/ssh_old
3,关闭selinux并重启
[root@localhost ~]# vim /etc/sysconfig/selinux
将其中的SELINUX=enforcing改为SELINUX=disabled
重启并getenforce:
[root@localhost ~]# reboot

[root@localhost ~]# getenforce

Disabled
4,升级openssl
下载openssl:https://ftp.openssl.org/source
从该网站下载最新版本的openssl-1.1.1l.tar.gz
拖到linux中,或者wget https://ftp.openssl.org/source/openssl-1.1.1l.tar.gz也可。
[root@localhost ~]# ls

openssl-1.1.1l.tar.gz
解压:
tar -zxvf openssl-1.1.1l.tar.gz
[root@localhost ~]# ls

openssl-1.1.1l  openssl-1.1.1l.tar.gz
进入openssl目录:
[root@localhost ~]# cd openssl-1.1.1l/

[root@localhost openssl-1.1.1l]# ls

ACKNOWLEDGEMENTS  CONTRIBUTING  INSTALL        os-dep

apps              crypto        LICENSE        README

appveyor.yml      demos         ms             README.ENGINE

AUTHORS           doc           NEWS           README.FIPS

build.info        engines       NOTES.ANDROID  ssl

CHANGES           e_os.h        NOTES.DJGPP    test

config            external      NOTES.PERL     tools

config.com        FAQ           NOTES.UNIX     util

Configurations    fuzz          NOTES.VMS      VMS

Configure         include       NOTES.WIN
清理旧文件并安装依赖包:
[root@localhost ~]# yum remove -y openssl

[root@localhost ~]# yum remove -y openssh

[root@localhost ~]# yum install -y gcc gcc-c++ glibc make autoconf openssl openssl-devel pcre-devel  pam-devel cpan

[root@localhost ~]# yum install -y pam* zlib* perl*
检查文件并移走备份:
[root@localhost openssl-1.1.1l]# ll /usr/bin/openssl

-rwxr-xr-x. 1 root root 555288 Aug  9  2019 /usr/bin/openssl

[root@localhost openssl-1.1.1l]# mv /usr/bin/openssl /usr/bin/openssl_bak

[root@localhost openssl-1.1.1l]# ls /usr/include/openssl

[root@localhost openssl-1.1.1l]# mv /usr/include/openssl /usr/include/openssl_bak
编译安装:
[root@localhost openssl-1.1.1l]# ./config --prefix=/usr/local --openssldir=/usr/local/openssl && make && make install
再次安装:
[root@localhost openssl-1.1.1l]# ./config shared && make && make install
检查编译安装结果,如果输出为0,则代表安装成功:
[root@localhost openssl-1.1.1l]# echo $?

0
配置openssl:
[root@localhost openssl-1.1.1l]# ln -s /usr/local/bin/openssl /usr/bin/openssl

[root@localhost openssl-1.1.1l]# ln -s /usr/local/include/openssl /usr/include/openssl

[root@localhost openssl-1.1.1l]# ll /usr/bin/openssl

lrwxrwxrwx. 1 root root 22 Sep 17 16:19 /usr/bin/openssl -> /usr/local/bin/openssl

[root@localhost openssl-1.1.1l]# ll /usr/include/openssl -ld

drwxr-xr-x. 2 root root 4096 Sep 17 16:19 /usr/include/openssl

[root@localhost openssl-1.1.1l]# echo "/usr/local/lib" >> /etc/ld.so.conf

[root@localhost openssl-1.1.1l]# echo "/usr/local/lib64/" >> /etc/ld.so.conf

[root@localhost openssl-1.1.1l]# /sbin/ldconfig

[root@localhost openssl-1.1.1l]# cp  libcrypto.so.1.1  libssl.so.1.1 /usr/lib64
安装成功,查看openssl版本:
[root@localhost openssl-1.1.1l]# openssl version

OpenSSL 1.1.1l  24 Aug 2021
5,升级openssh
下载openssh:https://openbsd.hk/pub/OpenBSD/OpenSSH/portable
这里下载最新版本:openssh-8.7p1.tar.gz
拖拽或者直接wget https://openbsd.hk/pub/OpenBSD/OpenSSH/portable/openssh-8.7p1.tar.gz均可。
[root@localhost ~]# ls

openssh-8.7p1.tar.gz  openssl-1.1.1l  openssl-1.1.1l.tar.gz
解压:
[root@localhost ~]# tar -zxvf openssh-8.7p1.tar.gz
[root@localhost ~]# ls

openssh-8.7p1         openssl-1.1.1l

openssh-8.7p1.tar.gz  openssl-1.1.1l.tar.gz
进入openssh目录:
[root@localhost ~]# cd openssh-8.7p1/

[root@localhost openssh-8.7p1]#
编译文件:
[root@localhost openssh-8.7p1]# ./configure --prefix=/usr --sysconfdir=/etc/ssh --with-md5-passwords --with-pam --with-ssl-dir=/usr/local/openssl --with-zlib=/usr/local/lib64 --without-hardening
最后应该为这个样子:
config.status: config.h is unchanged

OpenSSH has been configured with the following options:

                     User binaries: /usr/bin

                   System binaries: /usr/sbin

               Configuration files: /etc/ssh

                   Askpass program: /usr/libexec/ssh-askpass

                      Manual pages: /usr/share/man/manX

                          PID file: /var/run

  Privilege separation chroot path: /var/empty

            sshd default user PATH: /usr/bin:/bin:/usr/sbin:/sbin

                    Manpage format: doc

                       PAM support: yes

                   OSF SIA support: no

                 KerberosV support: no

                   SELinux support: no

              MD5 password support: yes

                   libedit support: no

                   libldns support: no

  Solaris process contract support: no

           Solaris project support: no

         Solaris privilege support: no

       IP address in $DISPLAY hack: no

           Translate v4 in v6 hack: yes

                  BSD Auth support: no

              Random number source: OpenSSL internal ONLY

             Privsep sandbox style: seccomp_filter

                   PKCS#11 support: yes

                  U2F/FIDO support: yes

              Host: x86_64-pc-linux-gnu

          Compiler: cc

    Compiler flags: -g -O2 -pipe -Wall -Wextra -Wpointer-arith -Wuninitialized -Wsign-compare -Wformat-security -Wsizeof-pointer-memaccess -Wno-pointer-sign -Wno-unused-parameter -Wno-unused-result -fno-strict-aliasing -fno-builtin-memset -fstack-protector-strong

Preprocessor flags: -I/usr/local/openssl -I/usr/local/lib64  -D_XOPEN_SOURCE=600 -D_BSD_SOURCE -D_DEFAULT_SOURCE

      Linker flags: -L/usr/local/openssl -L/usr/local/lib64  -fstack-protector-strong

         Libraries: -lcrypto -ldl -lutil -lz  -lcrypt -lresolv

         +for sshd:  -lpam

PAM is enabled. You may need to install a PAM control file

for sshd, otherwise password authentication may fail.

Example PAM control files can be found in the contrib/

subdirectory
检查输出结果:
[root@localhost openssh-8.7p1]# echo $?

0
为0说明编译正常。
安装:
[root@localhost openssh-8.7p1]# make

[root@localhost openssh-8.7p1]# echo $?

0
[root@localhost openssh-8.7p1]# chmod 600 /etc/ssh/ssh_host*

[root@localhost openssh-8.7p1]# make install
[root@localhost openssh-8.7p1]# echo $?
0
配置ssh并启动:
[root@localhost openssh-8.7p1]# echo "PermitRootLogin yes" >> /etc/ssh/sshd_config

[root@localhost openssh-8.7p1]# grep "^PermitRootLogin"  /etc/ssh/sshd_config

PermitRootLogin yes

[root@localhost openssh-8.7p1]# echo "UseDNS no" >> /etc/ssh/sshd_config

[root@localhost openssh-8.7p1]# grep  "UseDNS"  /etc/ssh/sshd_config

#UseDNS no

UseDNS no

[root@localhost openssh-8.7p1]# cp -a contrib/redhat/sshd.init /etc/init.d/sshd

[root@localhost openssh-8.7p1]# cp -a contrib/redhat/sshd.pam /etc/pam.d/sshd.pam

[root@localhost openssh-8.7p1]# chmod +x /etc/init.d/sshd

[root@localhost openssh-8.7p1]# chkconfig --add sshd

[root@localhost openssh-8.7p1]# systemctl enable sshd

sshd.service is not a native service, redirecting to /sbin/chkconfig.

Executing /sbin/chkconfig sshd on

[root@localhost openssh-8.7p1]# chkconfig sshd on
移走原先服务,有报错可以无视:
[root@localhost openssh-8.7p1]# mv /usr/lib/systemd/system/sshd.service  /home/

mv: cannot stat ‘/usr/lib/systemd/system/sshd.service’: No such file or directory
重启sshd:
[root@localhost openssh-8.7p1]# /etc/init.d/sshd restart

Restarting sshd (via systemctl):                           [  OK  ]
查看是否正常开放:
[root@localhost openssh-8.7p1]# netstat -antpl

Active Internet connections (servers and established)

Proto Recv-Q Send-Q Local Address           Foreign Address         State       PID/Program name

tcp        0      0 0.0.0.0:111             0.0.0.0:*               LISTEN      784/rpcbind

tcp        0      0 192.168.122.1:53        0.0.0.0:*               LISTEN      1804/dnsmasq

tcp        0      0 0.0.0.0:22              0.0.0.0:*               LISTEN      107261/sshd: /usr/s

tcp        0      0 127.0.0.1:631           0.0.0.0:*               LISTEN      1309/cupsd

tcp        0      0 127.0.0.1:25            0.0.0.0:*               LISTEN      1660/master

tcp6       0      0 :::111                  :::*                    LISTEN      784/rpcbind

tcp6       0      0 :::22                   :::*                    LISTEN      107261/sshd: /usr/s

tcp6       0      0 :::23                   :::*                    LISTEN      1/systemd

tcp6       0      0 ::1:631                 :::*                    LISTEN      1309/cupsd

tcp6       0      0 ::1:25                  :::*                    LISTEN      1660/master

tcp6       0      2 192.168.145.139:23      192.168.145.2:1205      ESTABLISHED 1/systemd
查看版本:
[root@localhost openssh-8.7p1]# ssh -V

OpenSSH_8.7p1, OpenSSL 1.1.1l  24 Aug 2021
使用ssh测试连通:
[C:\~]$ ssh 192.168.145.139

Connecting to 192.168.145.139:22...

Connection established.

To escape to local shell, press 'Ctrl+Alt+]'.

WARNING! The remote SSH server rejected X11 forwarding request.

Last login: Fri Sep 17 17:17:26 2021 from 192.168.145.2

[root@localhost ~]#
6,关闭并卸载telnet
[root@localhost ~]# systemctl disable xinetd.service

Removed symlink /etc/systemd/system/multi-user.target.wants/xinetd.service.

[root@localhost ~]# systemctl stop xinetd.service

[root@localhost ~]# systemctl disable telnet.socket

Removed symlink /etc/systemd/system/sockets.target.wants/telnet.socket.

[root@localhost ~]# systemctl stop telnet.socket

[root@localhost ~]# netstat -antpl

Active Internet connections (servers and established)

Proto Recv-Q Send-Q Local Address           Foreign Address         State       PID/Program name

tcp        0      0 0.0.0.0:111             0.0.0.0:*               LISTEN      750/rpcbind

tcp        0      0 192.168.122.1:53        0.0.0.0:*               LISTEN      1502/dnsmasq

tcp        0      0 0.0.0.0:22              0.0.0.0:*               LISTEN      1245/sshd: /usr/sbi

tcp        0      0 127.0.0.1:631           0.0.0.0:*               LISTEN      1191/cupsd

tcp        0      0 127.0.0.1:25            0.0.0.0:*               LISTEN      1509/master

tcp        0     36 192.168.145.139:22      192.168.145.2:15925     ESTABLISHED 1996/sshd: root@pts

tcp6       0      0 :::111                  :::*                    LISTEN      750/rpcbind

tcp6       0      0 :::22                   :::*                    LISTEN      1245/sshd: /usr/sbi

tcp6       0      0 ::1:631                 :::*                    LISTEN      1191/cupsd

tcp6       0      0 ::1:25                  :::*                    LISTEN      1509/master
结束!
关于Openssh版本升级问题及版本升级到最新版8.7p1流程(CentOS7系统)的更多相关文章
- mysql低版本升级到5.7
升级步骤 #安全的停止数据库的运行 /etc/init.d/mysql.server stop # 解压mysql tar包 tar zxf mysql-5.7.28-linux-glibc2.12- ...
- CentOS 6.9 升级OpenSSH版本 关闭ssh服务后门
最近用低版本的OpenSSH(5.9p1版本) 的漏洞给系统留了个后门 , 可以劫持root密码或者给root开启后门密码 : 利用Openssh后门 劫持root密码 如果公司还在用CentOS6的 ...
- CentOS6.9下升级默认的OpenSSH操作记录(升级到OpenSSH_7.6p1)
近期对IDC机房服务器做了一次安全漏洞扫描,漏扫结果显示服务器的OpenSSH版本太低(CentOS6默认是OpenSSH_5.3p1),存在漏洞隐患,安全部门建议升级到OpenSSH_7.6p1.升 ...
- CentOS 升级 openSSH
openSSH作为linux远程连接工具,容易受到攻击,必须更新版本来解决,低版本有如下等漏洞: a. OpenSSH 远程代码执行漏洞(CVE-2016-10009) b. OpenSSH aut ...
- CentOS 升级 openSSH+ sh脚本自动运维
升级前后对比 openSSH作为linux远程连接工具,容易受到攻击,必须更新版本来解决,低版本有如下等漏洞: OpenSSH 远程代码执行漏洞(CVE-2016-10009) OpenSSH au ...
- OpenSSH配置与基本使用
SSH访问远程 SSH常见分类: telnet-远程登录协议,23/TCP 明文认证.明文传输(不安全) ssh(Secure SHell)-应用层协议,22/TCP 通讯和认证过程加密.主机认证 用 ...
- 更新OpenSSH
1.安装必要组件: yum install -y gcc openssl-devel pam-devel rpm-build 2.下载OpenSSH最新版本: https://ftp.openbsd. ...
- ubuntu系统无法ssh登录--安装openssh
与红帽子系列的Linux发行版不同,Ubuntu系统安装后并不能直接进行ssh登录.需要手动安装openssh才行. Ubuntu安装openssh命令如下: sudo apt-get install ...
- CentOS 6.4下OpenSSH升级到6.7操作
一.升级前准备 1.下载openssh-6.7p1.tar.gz: cd /usr/local/src/wget http://ftp.openbsd.org/pub/OpenBSD/OpenSSH/ ...
- Centos6.5 离线 Openssh 升级
目录 OpenSSH 升级 一.基于 Dropbear 设置备用 ssh 服务器 二. Openssh 更新 2.1 ssh配置 备份 2.2 openssh 升级 Openssl 升级(由于Open ...
随机推荐
- 2022-09-24:以下go语言代码输出什么?A:1;B:3;C:13;D:7。 package main import ( “fmt“ “io/ioutil“ “net/
2022-09-24:以下go语言代码输出什么?A:1:B:3:C:13:D:7. package main import ( "fmt" "io/ioutil" ...
- Typo in static class property declarationeslint
eslint 检测提示 Typo in static class property declarationeslint 找了半天原来是propTypes 写成了PropTypes (就是一个首字母大写 ...
- Nodejs 应用编译构建提速建议
编译构建的整体过程 拉取编译镜像 拉取缓存镜像 拉取项目源码 挂载缓存目录 执行编译命令(用户自定义) 持久化缓存 上传编译镜像 为什么在本地构建就快, 但编译机上很慢 在编辑机上每次的构建环境都是全 ...
- LeetCode 周赛 348(2023/06/05)数位 DP 模板学会了吗
本文已收录到 AndroidFamily,技术和职场问题,请关注公众号 [彭旭锐] 加入知识星球提问! 往期回顾:LeetCode 单周赛第 347 场 · 二维空间上的 LIS 最长递增子序列问题 ...
- 有关 python 切片的趣事
哈喽大家好,我是咸鱼 今天来讲一个我在实现 python 列表切片时遇到的趣事 在正式开始之前,我们先来了解一下切片(slice) 切片操作是访问序列(列表.字符串......)中元素的另一种方法,它 ...
- 20200825 BAT批处理文件详细教程
原文链接:https://www.jb51.net/article/151923.htm 纯转载.侵删. 第一章 批处理基础 第一节 常用批处理内部命令简介 批处理定义:顾名思义,批处理文件是将一系列 ...
- 使用Mybatis生成树形菜单-适用于各种树形场景
开发中我们难免会遇到各种树形结构展示的场景.比如用户登录系统后菜单的展示,某些大型购物网站商品的分类展示等等,反正开发中会遇到各种树形展示的功能,这些功能大概处理的思路都是一样的,所以本文就总结一下树 ...
- SRE 的工作介绍
哈喽大家好,我是咸鱼 今天看到了一篇很不错的文章,作者是一名 SRE 工程师,在 Shopee 工作,base 新加坡 分享出来给大家看看 作者:卡瓦邦噶 原文链接:https://www.kawab ...
- 从JDK源码级深入剖析main方法的运行机制
如果你是一名Java应用开发工程师,你应该对"public static void main(String[] args)"这段代码再熟悉不过了,然而你是否了解main方法是如何调 ...
- Junit4 一直处于运行中的排查过程
新买了一个Macbook Pro . 之前的工程搬家过来, 这天要跑个单元测试. 发现Junit4 一直处于运行中.没有错误信息,没有用例执行结果.遂开始排查原因. 这里插一句,苹果芯片的Mbp还是很 ...