【Java学习】 Spring的基础理解 IOC、AOP以及事务
一、简介
<dependency>

    <groupId>org.springframework</groupId>

    <artifactId>spring-webmvc</artifactId>

    <version>5.2.0.RELEASE</version>

</dependency>

<!-- https://mvnrepository.com/artifact/org.springframework/spring-webmvc -->

<dependency>

    <groupId>org.springframework</groupId>

    <artifactId>spring-jdbc</artifactId>

    <version>5.2.0.RELEASE</version>

</dependency>
1.spring全家桶的结构构图: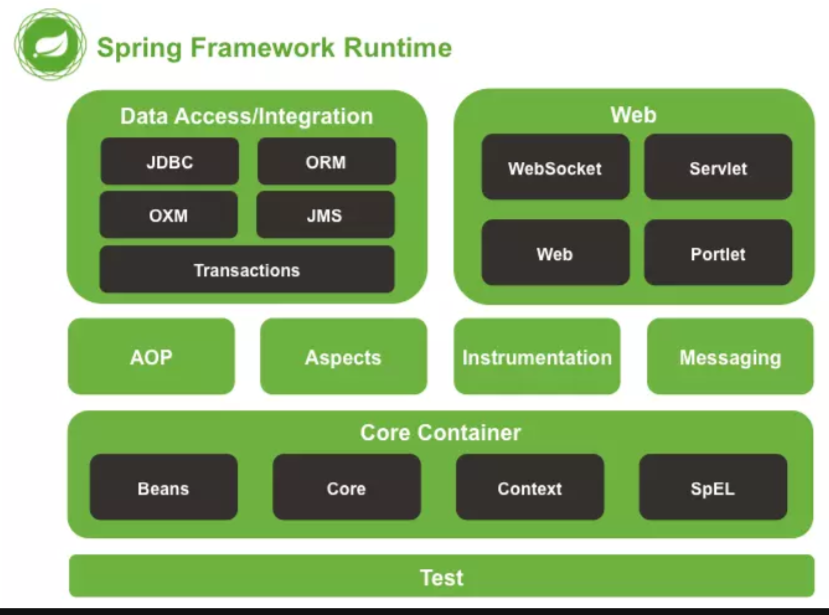
Core Container
- core:提供了框架的基本组成部分 包括ioc和依赖注入功能
- beans:提供了BeanFactory 实现了工厂模式。方便解耦
- context:上下文内容
- expression:提供了强大的表达式语言,用于在运行时查询和操作对象。
3.Data Access/Integration 数据访问/集成
- 该模块包含JDBC、ORM、OXM、JMS和事务处理模块
- JDBC:提供了JDBC的抽象层,可以更方便的处理数据库
- ORM:模块提供了流行的对象关系型映射的API的集成
- OXM:模块提供了对OXM实现的支持(啥是OXM)
- JMS:包含了生产和消费消息的功能
- 事务:毋庸置疑,可以实现特殊接口类以及所有的pojo支持编程式和声明式事务管理。
4.Web
- Web模块:提供面向web的基本功能和面向web的应用上下文
- Servlet模块:为web应用提供了模型视图看着(MVC)和RestWeb服务的实现。Spring的MVC框架可以将代码与web表单进行分离。
- Web-Socket
- Web-Portlet
二、IOC:
//1.引入jar包

//2.编辑配置文件

<?xml version="1.0" encoding="UTF-8" ?>

<beans xmlns="http://www.springframework.org/schema/beans"

       xmlns:xsi="http://www.w3.org/2001/XMLSchema-instance"

       xmlns:p="http://www.springframework.org/schema/p"

       xsi:schemaLocation="http://www.springframework.org/schema/beans

       http://www.springframework.org/schema/beans/spring-beans.xsd">

配置对象  id为唯一限定名 一般为类名的小写   class是类所在的位置

    <bean id="teacher" class="com.qiang.pojo.Teacher"></bean>

</beans>

//3.测试

@Test

public void testTeacherCreate(){

    //加载配置文件

    ApplicationContext ac=new ClassPathXmlApplicationContext("applicationConfig.xml");

    Teacher teacher = ac.getBean("teacher", Teacher.class);

    System.out.println(teacher);

}

//在以上代码中  如果使用的是ApplicationContext 则在进行加载配置文件时 就已经在IOC容器中创建好了teacher对象

//如果是使用的是 BeanFactory ac 创建对象,则在getbean时才会创建对象(不可操作,因为该接口不对开发人员透明)
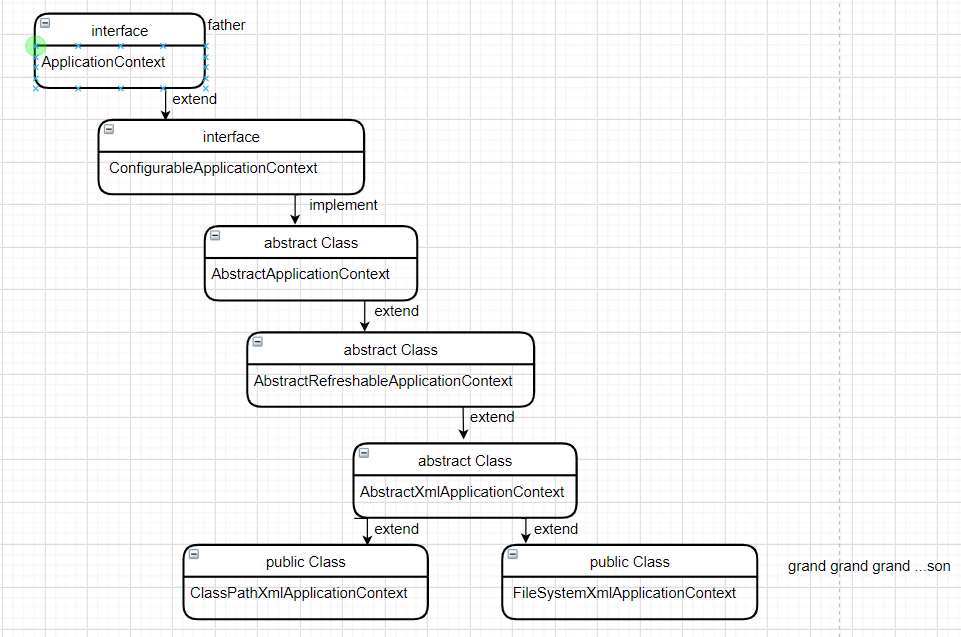
2.2.3 ApplicationContext接口的实现类的继承关系
<bean id="唯一标识" class="类的全限定名"> </bean>
B :使用普通工厂类创建bean实例
1.建立普通类teacher,包含个别属性,并添加get、set方法

2.创建工厂类

public class SchoolFactory {

    Teacher teacher=new Teacher();

    public  Teacher getInstance(){

        return teacher;

    }

}

在工厂类中实例化对象,并添加一个普通方法可以获取到对象

3.配置文件

<!--    普通工厂类创建bean实例-->

    <bean id="factory" class="com.qiang.pojo.factory.SchoolFactory" ></bean>

    <bean id="teacher1" factory-bean="factory" factory-method="getInstance"></bean>

第一个bean是一个实例化的对象也就是对象工厂

第二个bean 是利用对象工厂来创建的对象实例化

            factory标签指的是  是哪个工厂对象,对应上边的id

            factory-method指的是调用可以获取对象实例的方法(普通方法)

4.测试:

/**

* 测试普通工厂类创建bean实例

*/

@Test

public void testTeacherFactory1(){

    //加载配置文件

    ApplicationContext ac=new ClassPathXmlApplicationContext("applicationConfig.xml");

    Teacher teacher1 = ac.getBean("teacher1", Teacher.class);

    System.out.println(teacher1);

}
如果在程序中可能需要频繁的创建某个类的实例对象,采用工厂模式会更好
public class Student {

    private String sname;

    private int age;

    private String sex;

    public Student(String sname, int age, String sex) {

        this.sname = sname;

        this.age = age;

        this.sex = sex;

        System.out.println("这是三个参数的无参构造");

    }

    public Student(String sname, int age) {

        this.sname = sname;

        this.age = age;

        System.out.println("这是第一个属性为name的两个参数的构造");

    }

    public Student( int age,String sname) {

        this.sname = sname;

        this.age = age;

        System.out.println("这是第一个属性为age的两个参数的构造");

    }

    public Student() {

        System.out.println("这是无参构造");

    }

    public String getSname() {

        return sname;

    }

    public void setSname(String sname) {

        this.sname = sname;

    }

    public int getAge() {

        return age;

    }

    public void setAge(int age) {

        this.age = age;

    }

    public String getSex() {

        return sex;

    }

    public void setSex(String sex) {

        this.sex = sex;

    }

    @Override

    public String toString() {

        return "Student{" +

                "sname='" + sname + '\'' +

                ", age=" + age +

                ", sex='" + sex + '\'' +

                '}';

    }

}
<bean id="stu1" class="com.qiang.pojo.Student">

    <constructor-arg name="sname" value="zs"></constructor-arg>

    <constructor-arg name="age" value="15"></constructor-arg>

</bean>

看我们的实体类中就可以发现,我们的含有两个参数的构造器,有两个,在这个时候我们使用的构造器的构造函数就不知道使用的是哪个带参的构造器

因此我们可以使用 index来标识下标 就可以指定先执行那个代餐的构造

    其中constructor-arg中也可以使用type来标识参数类型来确定属性

        如果是八大基本数据类型,则可以直接写关键字,如果是其他类型,则需要添加类的全限定路径

    如果其中还含有其他对象类型的参数,

    如此时的student类中包含属性  private Grade grade;

    构造器:

        <bean>

        <construct-arg type="com.qiang.Grade" ref="grade"></construct-arg>

        </bean>

        <bean id="grade" class="com.qiang.Grade"></bean>
B set方法注入 此时需要在类中对属性添加set方法 以及无参构造
<bean id="student2" class="com.qiang.pojo.Student">

        <property name="id" value="2"></property>

        <property name="name" value="李四"></property>

    </bean>
C :p标签注入 此时就要添加对应的set方法以及无参构造 以及添加头文件
D:也可以set注入和构造器注入 混合使用 但是需要有对应的构造方法
实体类

public class Order {

    private String [] cources;

    private List<String> lists;

    private Map<String,String> maps;

    private Set<String> sets;
配置文件

<!--    测试不同属性类型的属性注入-->

    <bean id="order" class="com.qiang.pojo.Order">

<!--        数组集合使用array标签-->

        <property name="cources">

            <array>

                <value>美羊羊</value>

                <value>兰羊羊</value>

            </array>

        </property>

<!--        list集合类型使用list标签-->

        <property name="lists">

            <list>

                <value>舒克</value>

                <value>贝塔</value>

            </list>

        </property>

<!--        set集合使用set标签-->

        <property name="sets">

            <set>

                <value>mysql</value>

                <value>javase</value>

                <value>javaweb</value>

            </set>

        </property>

        <property name="maps">

            <map>

                <entry key="java" value="我们在学习的语言"></entry>

                <entry key="web" value="前端的"></entry>

            </map>

        </property>
- singleton:默认值 单例模式 每次获取的bean都是同一个对象
- prototype:每次获取bean都会被重新实例化
- request:每次请求都会重新实例化对象,但是在同一请求下获取的情况下的bean是单例的
- session 每次会话内的bean是单例的
- application:整个应用程序对象内的bean实例都是单例模式的
- websocket:同一个websocket对象内的对象是单例的。
Singleton

<!--    测试单例模式-->

    <bean id="stu3" class="com.qiang.pojo.Student" scope="singleton"></bean>

测试类:

@Test

public void testStudent3(){

    //加载配置文件

    BeanFactory ac=new ClassPathXmlApplicationContext("applicationConfig2.xml");

    Student stu1 = ac.getBean("stu3", Student.class);

    System.out.println(stu1);

    Student stu2 = ac.getBean("stu3", Student.class);

    System.out.println(stu2);

    System.out.println(stu1==stu2);

}

结果:

com.qiang.pojo.Student@10a035a0

com.qiang.pojo.Student@10a035a0

true
prototype

<!--    测试多例模式-->

<bean id="stu4" class="com.qiang.pojo.Student" scope="prototype"></bean>

测试类

@Test

public void testStudent4(){

    //加载配置文件

    BeanFactory ac=new ClassPathXmlApplicationContext("applicationConfig2.xml");

    Student stu1 = ac.getBean("stu4", Student.class);

    System.out.println(stu1);

    Student stu2 = ac.getBean("stu4", Student.class);

    System.out.println(stu2);

    System.out.println(stu1==stu2);

}

结果:

com.qiang.pojo.Student@10a035a0

com.qiang.pojo.Student@67b467e9

false
- 通过构造器创建bean实【此时执行的是无参构造】
- 为bean属性设置值以及对其他的bean的引用【set注入】
- 调用bean的初始化方法,在配置文件中配置
- bean对象可以使用了 【已经获取到了对象】
- 当容器关闭时,调用bean的销毁方法【在配置文件中配置】
实体类对象

public class People implements Serializable {

    private String oid;

    public People() {

        System.out.println("第一步:执行无参构造");

    }

    public String getOid() {

        return oid;

    }

    public void setOid(String oid) {

        this.oid = oid;

        System.out.println("第二步: 调用set方法给属性设置值......");

    }

    public void initMethod(){

        System.out.println("第三步:执行初始化方法............");

    }

    public void destroyMethod(){

        System.out.println("第五步:执行销毁方法............");

    }

    @Override

    public String toString() {

        return "People{" +

                "oid='" + oid + '\'' +

                '}';

    }

}
配置文件  添加初始化方法 和销毁方法

<bean id="people" class="com.qiang.pojo.People"

    init-method="initMethod"

    destroy-method="destroyMethod">

</bean>

其中的标签init-method、destroy-method 中的方法是在实体类中自定义的

 测试类

/**

* 测试bean的生命周期

*/

@Test

public void testBeanLive(){

    //加载配置文件

    ClassPathXmlApplicationContext ac=new ClassPathXmlApplicationContext("applicationConfig2.xml");

    //获取bean实例

    People people = ac.getBean("people", People.class);

    System.out.println("第四步:获取bean实例对象 。。。");

    System.out.println(people);

    //手动销毁

    ac.close();

}

结果:

第一步:执行无参构造

第三步:执行初始化方法............

第四步:获取bean实例对象 。。。

People{oid='null'}

第五步:执行销毁方法............
- 第一步:执行无参数的构造方法 。。。
- 第二步: 调用set方法给属性设置值......
- 在初始化之前执行的方法
- 第三步:执行初始化方法............
- 在初始化之后执行的方法
- 第四步:获取bean实例对象 。。。
- 第五步:执行销毁方法............
在实体类中 实现了BeanPostProcessor接口

    并重写了

@Override

public Object postProcessAfterInitialization(Object bean, String beanName) throws BeansException {

    System.out.println("在初始化之前执行的方法");

    return bean;

}

@Override

public Object postProcessBeforeInitialization(Object bean, String beanName) throws BeansException {

    System.out.println("在初始化之后执行的方法");

    return bean;

}
实体类Dog

private String color;

private int age;

配置文件

<bean id="d1" class="com.qiang.pojo.Dog" autowire="byName">

    <property name="age" value="15"></property>

</bean>

测试类:

@Test

public void testDog1(){

    ApplicationContext ac=new ClassPathXmlApplicationContext("applicationConfig.xml");

    Dog d1 = ac.getBean("d1", Dog.class);

    System.out.println(d1.getAge());

}

结果:

15
B.byType 按类型自动装配
配置文件

<bean id="d1" class="com.qiang.pojo.Dog" autowire="byType">

    <property name="age" value="21"></property>

</bean>

测试类:

@Test

public void testDog1(){

    ApplicationContext ac=new ClassPathXmlApplicationContext("applicationConfig.xml");

    Dog d1 = ac.getBean(Dog.class);

    System.out.println(d1.getAge());

}

结果:

21
- Autowired是自动注入,自动从spring的上下文找到合适的bean来注入。
- Resource用来指定名称注入。
- Qualifier和Autowired配合使用,指定bean的名称。
- Service,Controller,Repository分别标记类是Service层类,Controller层类,Dao层的类,spring扫描注解配置时,会标记这些类要生成bean。
- Component是一种泛指,标记类是组件,spring扫描注解配置时,会标记这些类要生成bean。
分析:  由于注解@Autowired是默认按类型装配的,一个类型的可能会有多个实现方法

        因此在演示的时候 就可以选择一个接口,有多个实现类来作为演示

1.构建一个接口

public interface TeacherService {

    public void sayName();

    public void saysex();

}

2.创建多个实现类(以三个举例)

@Component

public class TeacherServiceImpl1 implements TeacherService {

    @Override

    public void sayName() {

        System.out.println("A");

    }

}

@Component

public class TeacherServiceImpl1 implements TeacherService {

    @Override

    public void sayName() {

        System.out.println("B");

    }

}

@Component

public class TeacherServiceImpl1 implements TeacherService {

    @Override

    public void sayName() {

        System.out.println("C");

    }

}

3.创建两外一个类,可以调用该类的实现类

public class TeacherController {

    @Autowired

    //创建对象

    private TeacherService teacherService;

    public void soutResult(){

        teacherService.sayName();

    }

}

4.修改配置文件 开启扫描

<!--    测试注解开发-->

    <context:component-scan base-package="com.qiang"></context:component-scan>

5.测试:

@Test

public void testAopAno(){

    ApplicationContext ac=new ClassPathXmlApplicationContext("applicationConfig.xml");

    TeacherController contro = ac.getBean("teacherController", TeacherController.class);

    contro.soutResult();

}

6.观察结果:

org.springframework.beans.factory.UnsatisfiedDependencyException: Error creating bean with name 'teacherController': Unsatisfied dependency expressed through field 'teacherService'; nested exception is org.springframework.beans.factory.NoUniqueBeanDefinitionException: No qualifying bean of type 'com.qiang.service.TeacherService' available: expected single matching bean but found 3: teacherServiceImpl1,teacherServiceImpl2,teacherServiceImpl3

分析:由于在service接口有多个实现类,使用autowired是按类型注入,可能会找不到使用哪个  因此可以搭配使用@Qualifier注解

修改第三步:

public class TeacherController {

    @Autowired

    @Qualifier("teacherServiceImpl1")

    //创建对象

    private TeacherService teacherService;

    public void soutResult(){

        teacherService.sayName();

    }

}

继续进行测试  结果为:

A

结果显示正常

继续修改第三步:

public class TeacherController {

   @Resource(name = "teacherServiceImpl1")

    //创建对象

    private TeacherService teacherService;

    public void soutResult(){

        teacherService.sayName();

    }

}

继续进行测试  结果为:

A

结果显示正常
1.添加jar包

2.建造实体类和代理对象类

    普通类应包含一个普通方法,该普通方法也就是要增强的那个方法

public class Student implements Serializable {

    public void add(){

        System.out.println("这个只是一个普通的方法");

    }

}

public class StudentProxy {

    //配置前置通知

    public void before(){

        System.out.println("前置通知。。。。。");

    }

    //配置后置返回通知

    public void afterreturning(){

        System.out.println("后置返回通知....");

    }

    //配置最终通知

    public void after(){

        System.out.println("最终通知....");

    }

    //配置环绕通知

    public void around(ProceedingJoinPoint proceedingJoinPoint) throws Throwable {

        System.out.println("环绕通知前");

        proceedingJoinPoint.proceed();

        System.out.println("环绕通知后....");

    }

    //配置异常通知

    public void afterThrow(){

        System.out.println("异常通知....");

    }

}

3.修改配置文件

在修改配置文件时应注意,头文件也需要进行修改

xmlns:aop="http://www.springframework.org/schema/aop"

xsi:http://www.springframework.org/schema/aop

    https://www.springframework.org/schema/aop/spring-aop.xsd"

//注入

<bean id="student" class="com.qiang.pojo.Student"></bean>

<bean id="studentProxy" class="com.qiang.pojo.StudentProxy"></bean>

<aop:config >

    <!--切入点-->

    <aop:pointcut id="pc" expression="execution(* com.qiang.pojo.Student.add(..))"/>

    <!--配置切面-->

    <aop:aspect ref="studentProxy">

        <!--将增强应用到具体的方法上-->

        <!--前置通知-->

        <aop:before method="before" pointcut-ref="pc"></aop:before>

        <!--后置返回通知-->

       <aop:after-returning method="afterreturning" pointcut-ref="pc"></aop:after-returning>

        <!--最终通知-->

        <aop:after method="after" pointcut-ref="pc"></aop:after>

        <!--环绕通知-->

        <aop:around method="around" pointcut-ref="pc"></aop:around>

    </aop:aspect>

以上没有演示异常通知,异常通知在程序发生异常时才会发生。

测试:

@Test

public void testAopXmlDemo1(){

    ApplicationContext ac=new ClassPathXmlApplicationContext("applicationConfig.xml");

    Student student = ac.getBean("student", Student.class);

    student.add();

}

结果:

前置通知。。。。。

环绕通知前

这个只是一个普通的方法

环绕通知后....

最终通知....

后置返回通知....
1.引入jar包

2.创建实体类

@Component

public class User {

    public void add(){

        System.out.println("这是一个普通方法");

    }

}

3.创建代理类

@Component

@Aspect //生成代理对象

public class UserProxy {

    //前置通知

    @Before(value = "execution(* org.qiang.aop.anno.pojo.User.add(..))")

    public void before(){

        System.out.println("前置通知。。。");

    }

    //后置返回通知

    @AfterReturning(value = "execution(* org.qiang.aop.anno.pojo.User.add(..))")

    public void afterReturning(){

        System.out.println("后置返回通知afterReturning....");

    }

    //环绕通知

    @Around(value = "execution(* org.qiang.aop.anno.pojo.User.add(..))")

    public void around(ProceedingJoinPoint proceedingJoinPoint) throws Throwable{

        System.out.println("环绕之前....");

        // 被增强的方法执行了

        proceedingJoinPoint.proceed();

        System.out.println("环绕之后....");

    }

//    //异常通知 只有手动创造了异常才可以触发这个通知

//    @AfterThrowing(value = "execution(* org.qiang.aop.anno.pojo.User.add(..))")

//    public void afterThrowing(){

//        System.out.println("异常通知 afterThrowing......");

//    }

//最终通知

    @After(value = "execution(* org.qiang.aop.anno.pojo.User.add(..))")

    public void after(){

        System.out.println("最终通知....");

    }

}

//修改配置文件

<!--    开启组件扫描-->

    <context:component-scan base-package="org.qiang.aop.anno"></context:component-scan>

<!--    开启Aspect生成代理对象-->

<aop:aspectj-autoproxy></aop:aspectj-autoproxy>

//测试:

@Test

public void testAopAnno(){

    ApplicationContext ac=new ClassPathXmlApplicationContext("applicationConfig2.xml");

    User user = ac.getBean("user", User.class);

    user.add();

}

结果:

环绕之前....

前置通知。。。

这是一个普通方法

环绕之后....

最终通知....

后置返回通知afterReturning....
C:第三种方式抽取重复代码
只需要修改代理类对象就可以了

@Component

@Aspect //生成代理对象

public class UserProxy {

//    抽取切入点

    @Pointcut(value = "execution(* org.qiang.aop.anno.pojo.User.add(..))")

    public void pointcutDemo(){

    }

    //前置通知

    @Before(value = "pointcutDemo()")

    public void before(){

        System.out.println("前置通知。。。");

    }

    //后置返回通知

    @AfterReturning(value = "pointcutDemo()")

    public void afterReturning(){

        System.out.println("后置返回通知afterReturning....");

    }

    //环绕通知

    @Around(value = "pointcutDemo()")

    public void around(ProceedingJoinPoint proceedingJoinPoint) throws Throwable{

        System.out.println("环绕之前....");

        // 被增强的方法执行了

        proceedingJoinPoint.proceed();

        System.out.println("环绕之后....");

    }

//    //异常通知 只有手动创造了异常才可以触发这个通知

//    @AfterThrowing(value = "pointcutDemo()")

//    public void afterThrowing(){

//        System.out.println("异常通知 afterThrowing......");

//    }

    //最终通知

    @After(value = "pointcutDemo()")

    public void after(){

        System.out.println("最终通知....");

    }

}
public void testdemo1() throws SQLException {

    Connection conn= DriverManager.getConnection("","","");

    //关闭自动提交

    conn.setAutoCommit(false);

    try {

        PreparedStatement ptst=conn.prepareStatement("insert into bank  values=(?,?)");

        ptst.executeUpdate();

    }catch (Exception e){

    //再发生异常时,就会进行事务的回滚

        conn.rollback();

    }

}
在org.springframework.jdbc.datasource.DataSourceTransactionManager 中的

方法:

protected void doBegin(){

    conn.setAutoCommit(false)

}

protected void doBegin() {

}

protected void doRollback() {

}
添加事务通知:
<tx:advice id="tt" transaction-manager="transactionmanager">

    <tx:attributes>

            <tx: method name="方法名">

    </tx:attributes>

</ tx: advice>

<aop:config>

              <aop:pointcut id="pt"  expression="execution(* 类的全路径.方法(. .))" />

            <aop:advisor advice-ref="tt"  pointcut-ref="pt"> </aop:advisor>

</aop:config>
【Java学习】 Spring的基础理解 IOC、AOP以及事务的更多相关文章
- 白话Spring(基础篇)---AOP(execution表达式)
作为AOP的最后一节内容,我们来简单总结一下切面表达式上见的书写方法.下面的那内容有参考其他博文,在此先对开源博客的各位大神表示感谢! -------------------------------- ...
- 白话Spring(基础篇)---AOP(execution表达式)(转)
[一知半解,就是给自己挖坑] 作为AOP的最后一节内容,我们来简单总结一下切面表达式上见的书写方法.下面的那内容有参考其他博文,在此先对开源博客的各位大神表示感谢! ----------------- ...
- Java学习笔记之---基础语法
Java学习笔记之---基础语法 一. Java中的命名规范 (一)包名 由多个单词组成时,所有字母小写(例如:onetwo) (二)类名和接口 由多个单词组成时,所有单词首字母大写(例如:OneTw ...
- java框架之Spring(2)-注解配置IOC&AOP配置
注解配置IoC 准备 1.要使用注解方式配置 IoC,除了之前引入的基础 jar 包,还需要引入 spring-aop 支持包,如下: 2.在 applicationContext.xml 中引入 c ...
- spring(一)IOC & AOP
参考文档: spring详解:http://www.cnblogs.com/ysocean/p/7466191.html(可以说非常详细了) aop源码详解:https://www.cnblogs.c ...
- 【JavaEE】SSH+Spring Security基础上配置AOP+log4j
Spring Oauth2大多数情况下还是用不到的,主要使用的还是Spring+SpringMVC+Hibernate,有时候加上SpringSecurity,因此,本文及以后的文章的example中 ...
- Spring 框架基础(04):AOP切面编程概念,几种实现方式演示
本文源码:GitHub·点这里 || GitEE·点这里 一.AOP基础简介 1.切面编程简介 AOP全称:Aspect Oriented Programming,面向切面编程.通过预编译方式和运行期 ...
- Java学习1——计算机基础知识
本文包含了一些计算机基础知识:计算机组成:Windows常用快捷键:DOS常用命令:计算机语言发展史.
- Java学习之旅基础知识篇:数据类型及流程控制
经过开篇对Java运行机制及相关环境搭建,本篇主要讨论Java程序开发的基础知识点,我简单的梳理一下.在讲解数据类型之前,我顺便提及一下Java注释:单行注释.多行注释以及文档注释,这里重点强调文档注 ...
- java学习笔记之基础篇
java选择语句之switch //switch可以用于等值判断 switch (e) //int ,或则可以自动转化成int 的类型,(byte char short)枚举jdk 7中可以防止字 ...
随机推荐
- 全网最详细中英文ChatGPT-GPT-4示例文档-信息智能提取从0到1快速入门——官网推荐的48种最佳应用场景(附python/node.js/curl命令源代码,小白也能学)
目录 Introduce 简介 setting 设置 Prompt 提示 Sample response 回复样本 API request 接口请求 python接口请求示例 node.js接口请求示 ...
- 这样也行,在lambda表达式中优雅的处理checked exception
目录 简介 lambda表达式中的checked exception lambda中的unchecked exception 对lambda的最终改造 总结 简介 最近发现很多小伙伴还不知道如何在la ...
- Java并发(二)----初次使用多线程并行提高效率
1.并行 并行代表充分利用多核 cpu 的优势,提高运行效率. 想象下面的场景,执行 3 个计算,最后将计算结果汇总. 计算 1 花费 10 ms 计算 2 花费 11 ms 计算 3 花费 ...
- 一文吃透Elasticsearch
本文已经收录到Github仓库,该仓库包含计算机基础.Java基础.多线程.JVM.数据库.Redis.Spring.Mybatis.SpringMVC.SpringBoot.分布式.微服务.设计模式 ...
- VUE项目 启动提示 npn ERRT nissing script: dev解决办法
VUE项目 启动提示 npn ERRT nissing script: dev 提示 丢失 dev 解决办法 首先 查看项目目录里面的 package.json 文件, 文件内容如下: 发现红框这里是 ...
- 【踩坑】.NET异步方法不标记async,Task<int> 返回值 return default问题
在.NET中,返回类型为 Task<T> 的方法并不一定要标记为 async.这是因为 async 关键字只是用来告诉编译器该方法中包含异步操作,并且可以使用 await 和其他异步特 ...
- ts中接口
前言:ts定义接口的任意一个属性 interface IPerson { name: string age: number family?: any[] // Error,因为不是任意类型的子集 [p ...
- Python 遍历整个列表
操作列表 遍历整个列表,无论列表有多长,循环让列表中的每一个元素都采取一个或一系列相同的措施,从而高效地处理任何长度的列表,包含数以千至数百万个元素的列表. 遍历整个列表 通过for循环解决遍历 从列 ...
- ArcGIS Desktop发布地形高程服务(DEM/DSM)
在做ArcGIS三维时,地形服务的发布与普通地图服务的发布不一样,需要发布成ImageServer,切片格式选择LERC. 本文示例使用软件: ArcGIS Desktop10.3.1 注:ArcGI ...
- day10-好友关注
功能05-好友关注 6.功能05-好友关注 6.1关注和取关 6.1.1需求分析 在探店图文的详情页面中,可以关注发布笔记的作者: 关注和取关:点击关注按钮就会发出请求(上图):http://127. ...