
ios中沙盒
打开模拟器沙盒目录
下面看看模拟器的沙盒文件夹在mac电脑上的什么位置。
文件都在个人用户名文件夹下的一个隐藏文件夹里,中文叫资源库,他的目录其实是Library。
2.1 方法1、可以设置显示隐藏文件,然后在Finder下直接打开。设置查看隐藏文件的方法如下:打开终端,输入命名
显示Mac隐藏文件的命令:defaults write com.apple.finder AppleShowAllFiles -bool true
隐藏Mac隐藏文件的命令:defaults write com.apple.finder AppleShowAllFiles -bool false
输完单击Enter键,退出终端,
重新启动Finder就可以了重启Finder:鼠标单击窗口左上角的苹果标志-->强制退出-->Finder-->
现在能看到资源库文件夹了。
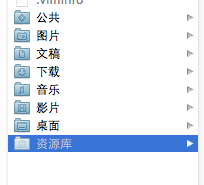
打开资源库后找到/Application Support/iPhone Simulator/文件夹。这里面就是模拟器的各个程序的沙盒目录了。
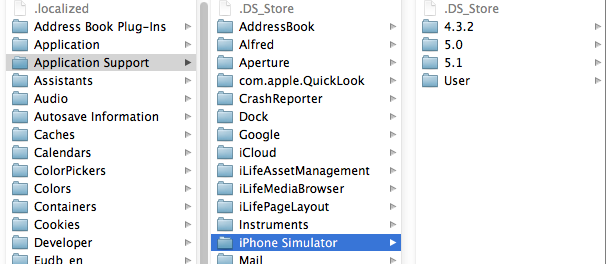
2.2 方法2、这种方法更方便,在Finder上点->前往->前往文件夹,输入/Users/username/Library/Application Support/iPhone Simulator/ 前往。
username这里写你的用户名。
目录结构
默认情况下,每个沙盒含有3个文件夹:Documents, Library 和 tmp。因为应用的沙盒机制,应用只能在几个目录下读写文件
1.Documents:苹果建议将程序中建立的或在程序中浏览到的文件数据保存在该目录下,iTunes备份和恢复的时候会包括此目录
2。Library:存储程序的默认设置或其它状态信息;
Library/Caches:存放缓存文件,iTunes不会备份此目录,此目录下文件不会在应用退出删除
3.tmp:提供一个即时创建临时文件的地方。
iTunes在与iPhone同步时,备份所有的Documents和Library文件。
iPhone在重启时,会丢弃所有的tmp文件。
获取沙盒目录
 // 获取沙盒主目录路径

 NSString *homeDir = NSHomeDirectory();

 // 获取Documents目录路径

 NSArray *paths = NSSearchPathForDirectoriesInDomains(NSDocumentDirectory, NSUserDomainMask, YES);

 NSString *docDir = [paths objectAtIndex:];

 // 获取Caches目录路径

 NSArray *paths = NSSearchPathForDirectoriesInDomains(NSCachesDirectory, NSUserDomainMask, YES);

 NSString *cachesDir = [paths objectAtIndex:];

 // 获取tmp目录路径

 NSString *tmpDir =  NSTemporaryDirectory();
 // 获取当前程序包中一个图片资源(apple.png)路径

 NSString *imagePath = [[NSBundle mainBundle] pathForResource:@"apple" ofType:@"png"];

 UIImage *appleImage = [[UIImage alloc] initWithContentsOfFile:imagePath];
写文件
 NSArray *paths = NSSearchPathForDirectoriesInDomains(NSDocumentDirectory, NSUserDomainMask, YES);

 NSString *docDir = [paths objectAtIndex:];

 if (!docDir) {

      NSLog(@"Documents 目录未找到");

 }

 NSArray *array = [[NSArray alloc] initWithObjects:@"内容",@"content",nil];

 NSString *filePath = [docDir stringByAppendingPathComponent:@"testFile.txt"];

 [array writeToFile:filePath atomically:YES];
注:我们在真机上也运行一下,把文件写入,下一步从真机上把内容读取出来。
写入输入 array ,里面是两个字符串,一会我们读出来打印。
写入我们在程序沙盒目录下看到文件 testFile.txt

打开文件看到的内容是这样的,是个xml格式的plist文件,数据格式保存了内容。
<?xml version="1.0" encoding="UTF-8"?>

<!DOCTYPE plist PUBLIC "-//Apple//DTD PLIST 1.0//EN" "http://www.apple.com/DTDs/PropertyList-1.0.dtd">

<plist version="1.0">

<array>

    <string>内容</string>

    <string>content</string>

</array>

</plist>
读取文件
SArray *paths = NSSearchPathForDirectoriesInDomains(NSDocumentDirectory, NSUserDomainMask, YES);

NSString *docDir = [paths objectAtIndex:];

NSString *filePath = [docDir stringByAppendingPathComponent:@"testFile.txt"];

NSArray *array = [[NSArray alloc]initWithContentsOfFile:filePath];

NSLog(@"%@", array);
NSFileManager
我们看看NSFileManager如何使用。包括创建文件,目录,删除,遍历目录等。
1、在Documents里创建目录
创建一个叫test的目录,先找到Documents的目录,
NSArray *paths = NSSearchPathForDirectoriesInDomains(NSDocumentDirectory, NSUserDomainMask, YES);

NSString *documentsDirectory = [paths objectAtIndex:];

NSLog(@"documentsDirectory%@",documentsDirectory);

NSFileManager *fileManager = [NSFileManager defaultManager];

NSString *testDirectory = [documentsDirectory stringByAppendingPathComponent:@"test"];

// 创建目录

[fileManager createDirectoryAtPath:testDirectory withIntermediateDirectories:YES attributes:nil error:nil];
启动程序,这时候目录就创建了:
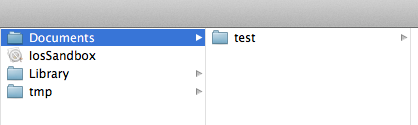
2、在test目录下创建文件
创建文件怎么办呢?接着上面的代码 testPath 要用stringByAppendingPathComponent拼接上你要生成的文件名,比如test00.txt。这样才能在test下写入文件。
testDirectory是上面代码生成的路径哦,不要忘了。我往test文件夹里写入三个文件,test00.txt ,test22.txt,text.33.txt。内容都是写入内容,write String。
实现代码如下:
NSString *testPath = [testDirectory stringByAppendingPathComponent:@"test00.txt"];

NSString *testPath2 = [testDirectory stringByAppendingPathComponent:@"test22.txt"];

NSString *testPath3 = [testDirectory stringByAppendingPathComponent:@"test33.txt"];

NSString *string = @"写入内容,write String";

[fileManager createFileAtPath:testPath contents:[string  dataUsingEncoding:NSUTF8StringEncoding] attributes:nil];

[fileManager createFileAtPath:testPath2 contents:[string  dataUsingEncoding:NSUTF8StringEncoding] attributes:nil];

[fileManager createFileAtPath:testPath3 contents:[string  dataUsingEncoding:NSUTF8StringEncoding] attributes:nil];
看下面的图,三个文件都出来了,内容也对。

在Documents目录下创建就更简单了,不用加test就ok了
3、获取目录列里所有文件名
两种方法获取:subpathsOfDirectoryAtPath 和 subpathsAtPath
    NSArray *paths = NSSearchPathForDirectoriesInDomains(NSDocumentDirectory, NSUserDomainMask, YES);

    NSString *documentsDirectory = [paths objectAtIndex:];

    NSLog(@"documentsDirectory%@",documentsDirectory);

    NSFileManager *fileManage = [NSFileManager defaultManager];

    NSString *myDirectory = [documentsDirectory stringByAppendingPathComponent:@"test"];

    NSArray *file = [fileManage subpathsOfDirectoryAtPath: myDirectory error:nil];

    NSLog(@"%@",file);

    NSArray *files = [fileManage subpathsAtPath: myDirectory ];

    NSLog(@"%@",files);
获取上面刚才test文件夹里的文件名
打印结果
-- ::19.684 IosSandbox[:f803] fileList:(

    ".DS_Store",

    "test00.txt",

    "test22.txt",

    "test33.txt"

)

-- ::19.686 IosSandbox[:f803] fileLit(

    ".DS_Store",

    "test00.txt",

    "test22.txt",

    "test33.txt"

)
两个方法都可以,隐藏的文件也打印出来了。
4、fileManager使用操作当前目录
//创建文件管理器

    NSFileManager *fileManager = [NSFileManager defaultManager];

    NSArray *paths = NSSearchPathForDirectoriesInDomains(NSDocumentDirectory, NSUserDomainMask, YES);

    NSString *documentsDirectory = [paths objectAtIndex:];

    //更改到待操作的目录下

    [fileManager changeCurrentDirectoryPath:[documentsDirectory stringByExpandingTildeInPath]];

    //创建文件fileName文件名称,contents文件的内容,如果开始没有内容可以设置为nil,attributes文件的属性,初始为nil

    NSString * fileName = @"testFileNSFileManager.txt";

    NSArray *array = [[NSArray alloc] initWithObjects:@"hello world",@"hello world1", @"hello world2",nil];

    [fileManager createFileAtPath:fileName contents:array attributes:nil];
这样就创建了testFileNSFileManager.txt并把三个hello world写入文件了
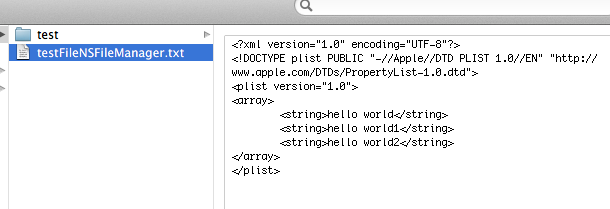
changeCurrentDirectoryPath目录更改到当前操作目录时,做文件读写就很方便了,不用加上全路径
5、删除文件
接上面的代码,remove就ok了。
[fileManager removeItemAtPath:fileName error:nil];
6、混合数据的读写
用NSMutableData创建混合数据,然后写到文件里。并按数据的类型把数据读出来
6.1写入数据:
    NSString * fileName = @"testFileNSFileManager.txt";

    NSArray *paths = NSSearchPathForDirectoriesInDomains(NSDocumentDirectory, NSUserDomainMask, YES);

    NSString *documentsDirectory = [paths objectAtIndex:];

    //获取文件路径

    NSString *path = [documentsDirectory stringByAppendingPathComponent:fileName];

    //待写入的数据

    NSString *temp = @"nihao 世界";

    int dataInt = ;

    float dataFloat = 3.14f;

    //创建数据缓冲

    NSMutableData *writer = [[NSMutableData alloc] init];

    //将字符串添加到缓冲中

    [writer appendData:[temp dataUsingEncoding:NSUTF8StringEncoding]];

    //将其他数据添加到缓冲中

    [writer appendBytes:&dataInt length:sizeof(dataInt)];

    [writer appendBytes:&dataFloat length:sizeof(dataFloat)];

    //将缓冲的数据写入到文件中

    [writer writeToFile:path atomically:YES];
我们看看数据怎么样了:

我们看到后面的是乱码,那是中文被转成了NSData后,还有int float的二进制
6.2读取刚才写入的数据:
//读取数据:

    int intData;

    float floatData = 0.0;

    NSString *stringData;

    NSData *reader = [NSData dataWithContentsOfFile:path];

    stringData = [[NSString alloc] initWithData:[reader subdataWithRange:NSMakeRange(, [temp length])]

                                   encoding:NSUTF8StringEncoding];

    [reader getBytes:&intData range:NSMakeRange([temp length], sizeof(intData))];

    [reader getBytes:&floatData range:NSMakeRange([temp length] + sizeof(intData), sizeof(floatData))];

    NSLog(@"stringData:%@ intData:%d floatData:%f", stringData, intData, floatData);
打印出来的结果:
2012-06-17 23:51:14.723 IosSandbox[1285:f803] stringData:nihao hello! intData:1234332 floatData:3.140000
这里把写入的汉字改成了 hello。因为[temp length]算长度是,把中文算成一位了,出来的结果有误。
ios中沙盒的更多相关文章
- 关于ios项目沙盒中的文件和Xcode项目创建的文件
//1.1获取在Xcode项目打开的情况下创建的Plist文件 NSString *path = [[NSBundle mainBundle]pathForResource:@"Profes ...
- iOS路径沙盒文件管理(转载)
iOS路径沙盒文件管理,看到博主总结的很好,转载过来,原文:http://www.aichengxu.com/view/35264 一.iOS中的沙盒机制 iOS应用程序只能对自己创建的文件系统读取文 ...
- IOS的沙盒机制
ios的沙盒(bandbox)机制:一种安全体系,ios应用程序只能对自己创建的应用程序进行读取文件,这个独立.封闭.安全的空间,就我们说的沙盒.它里面一般存放着你的程序需要的文件,数据持久化的一些文 ...
- 【iOS系列】-iOS查看沙盒文件图文教程(真机+模拟器)
[iOS系列]-iOS查看沙盒文件图文教程(真机+模拟器) 1:模拟器 1.1 方法1: 程序中打印一下的地址,能直接前往沙盒路径. NSString *path = [NSSearchPathFor ...
- Xcode6与Xcode5中沙盒的变动以及偏好设置目录的变动
1.Xcode6模拟器路径与Xcode5模拟器路径对比: (1)Xcode5中模拟器路径为:/Users/用户名/Library/Application Support/iPhone Simulato ...
- iOS开发 沙盒路径和使用
1.模拟器沙盒目录文件都在个人用户名文件夹下的一个隐藏文件夹里,中文叫资源库,他的目录其实是Library.因为应用是在沙箱(sandbox)中的,在文件读写权限上受到限制,只能在几个目录下读写文件: ...
- IOS应用沙盒文件操作
iOS沙盒机制 iOS应用程序只能在为该改程序创建的文件系统中读取文件,不可以去其它地方访问,此区域被成为沙盒,所以所有的非代码文件都要保存在此,例如图像,图标,声音,映像,属性列表,文本文件等. 1 ...
- iOS之沙盒机制和如何获取沙盒路径
iOS APP可以在自己的沙盒里读写文件,但是,不可以访问其他APP的沙盒.每一个APP都是一个信息孤岛,相互是不可以进行通信的,唯独可以通过URL Scheme.沙盒里面的文件可以是照片.声音文件. ...
- 【转】【iOS系列】-iOS查看沙盒文件图文教程(真机+模拟器)
原文网址:http://www.cnblogs.com/fengtengfei/p/5090276.html 1:模拟器 1.1 方法1: 程序中打印一下的地址,能直接前往沙盒路径. NSString ...
随机推荐
- LaTeX 图片插入
一般格式: \begin{figure} \centering \includegraphics[scale=0.2]{Figure211.png} \caption{In the case of a ...
- 使用Wifi连接ADB调试App
前提:你的手机ROOT过,做Android开发的,别跟人说你的手机不是ROOT的. 步骤: 1.在手机上把ADB服务进程的TCP端口设置为5555,这是Android ADB的默认调试商品.这需要 ...
- QTP 无法识别web 大全
说明:这里以一个登陆框为例,展示了各种方式供你选择. 假设你喜欢对象的话.也能够手动加入对象webedit. watermark/2/text/aHR0cDovL2Jsb2cuY3Nkbi5uZXQv ...
- nginx vhosts rewrite 独立文件的方式出现
[root@web01 /]# cat /app/server/nginx/conf/nginx.conf user www www; worker_processes ; error_log /ap ...
- Ubuntu 的 apt-get 代理设置(zhuan)
url: http://qixinglu.com/post/ubuntu_apt-get_proxy_setup.html 升级到 Ubuntu10.04 后,发现 apt-get 的代理设置有改变了 ...
- POJ 1962-Corporative Network (并查集)
题目有2种操作, 一种是查询,一种是设置. 设置为将u的父亲设置为v,然后他们之间的距离为|u-v|%1000 查询为该点到根点的距离 用并查集做,做的时候注意维护即可,注意取余操作. 代码: #in ...
- ajax回调数据 Structs has detected an unhandled exception 问题
Structs has detected an unhandled exception 今天算倒霉了,用maven写的一个项目,竟然出现了以下低级的错误,在用ajax修改密码时,回调的数据竟然是以下的 ...
- sql命令大全
1.连接Mysql 格式: mysql -h主机地址 -u用户名 -p用户密码 1.连接到本机上的MYSQL.首先打开DOS窗口,然后进入目录mysql\bin,再键入命令mysql -u root ...
- linux内核开机logo显示调试
要使内核支持开机logo显示需要配置内核 配置如下: make menuconfig: Device Drivers ---> Graphics support ---> ...
- uva11383 Golden Tiger Claw 深入理解km算法
/** 题目: uva11383 Golden Tiger Claw 深入理解km算法 链接:https://vjudge.net/problem/UVA-11383 题意:lv 思路:lrj训练指南 ...