JMS消息中间件之ActiveMQ学习
1、下载
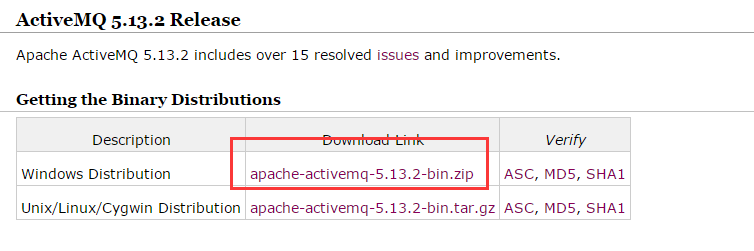
下载二进制bin文件:http://activemq.apache.org/activemq-5132-release.html
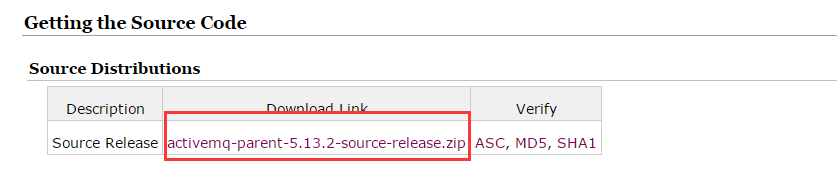
下载源码:
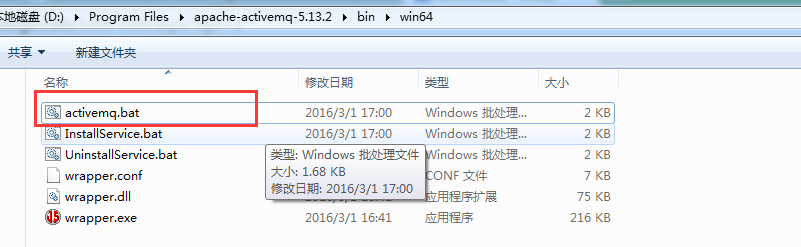
2、启动:
解压任意路径:
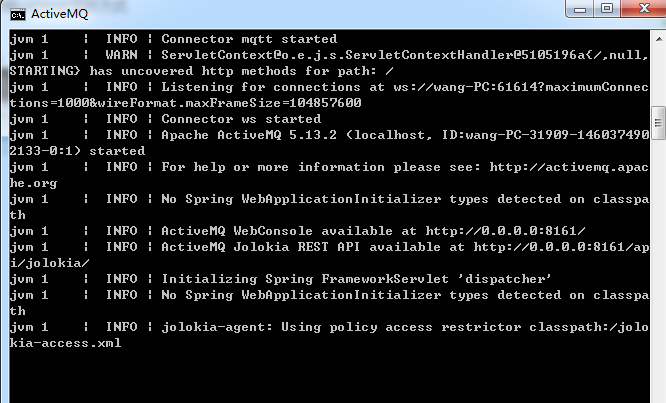
启动后:
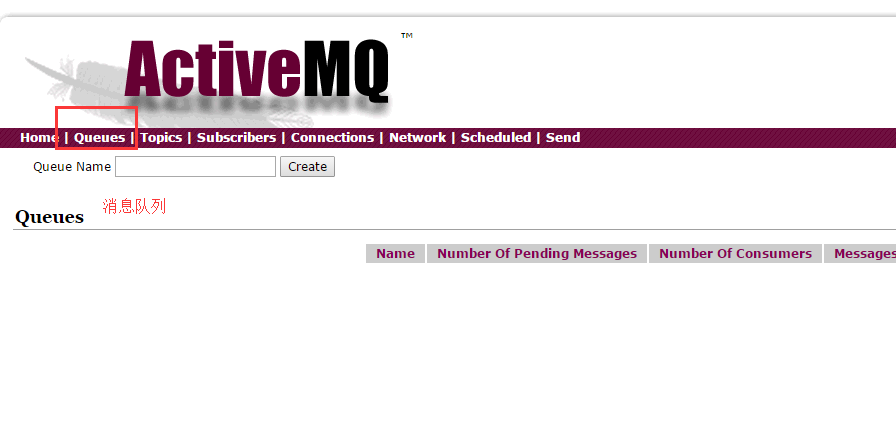
3、访问:
访问http://localhost:8161/admin/ 用户名&密码:admin
4、主要应用:
5、点对点消息发送&接收
首先是producer方:
package com.activemq.test;

import javax.jms.Connection;

import javax.jms.ConnectionFactory;

import javax.jms.Destination;

import javax.jms.JMSException;

import javax.jms.MessageProducer;

import javax.jms.Session;

import javax.jms.TextMessage;

import org.apache.activemq.ActiveMQConnectionFactory;

/**

 * 消息生产者

 *

 * @author Administrator

 *

 */

public class JMSProducer {

    private static final String USERNAME = ActiveMQConnectionFactory.DEFAULT_USER; // 默认连接用户

    private static final String PASSWORD = ActiveMQConnectionFactory.DEFAULT_PASSWORD; // 默认连接密码

    private static final String BROKERURL = ActiveMQConnectionFactory.DEFAULT_BROKER_URL; // 默认消息总线

    private static final int SENDNUM = 10; // 发送消息总量

    public static void main(String[] args) {

        ConnectionFactory connectionFactory = null; // 连接工厂

        Connection connection = null; // 连接对象

        Session session = null; // 会话级session,接收或发送消息的线程

        Destination destination = null; // 消息发送的目的地

        MessageProducer messageProducer = null; // 消息生产者

        connectionFactory = new ActiveMQConnectionFactory(JMSProducer.USERNAME, JMSProducer.PASSWORD,

                JMSProducer.BROKERURL);

        try {

            connection = connectionFactory.createConnection();

            connection.start(); // 启动连接

            session = connection.createSession(true, Session.AUTO_ACKNOWLEDGE); // 创建session,true表示添加事务

            destination = session.createQueue("FirstQueue"); // 创建消息队列

            messageProducer = session.createProducer(destination); // 创建消息生产者

            sendMessage(session, messageProducer);

            session.commit();            //commit提交

        } catch (Exception e) {

            e.printStackTrace();

        }finally {

            if(connection != null){

                try {

                    connection.close();

                } catch (JMSException e) {

                    e.printStackTrace();

                }

            }

        }

    }

    /**

     * 发送消息

     *

     * @param session

     * @param messageProducer

     * @throws Exception

     */

    public static void sendMessage(Session session, MessageProducer messageProducer) throws Exception {

        for (int i = 0; i < SENDNUM; i++) {

            TextMessage textMessage = session.createTextMessage("Active MQ消息"+i);        //文本消息

            System.out.println("发送消息: Active MQ消息"+i);

            messageProducer.send(textMessage);

        }

    }

}
然后是消费方实现,主要有两种,一种是直接receive方法接收消息,一种是通过监听实现:
receive:
package com.activemq.test;

import javax.jms.Connection;

import javax.jms.ConnectionFactory;

import javax.jms.Destination;

import javax.jms.JMSException;

import javax.jms.MessageConsumer;

import javax.jms.Session;

import javax.jms.TextMessage;

import org.apache.activemq.ActiveMQConnectionFactory;

/**

 * 消息消费者

 * 普通receive方式接收消息

 * @author Administrator

 *

 */

public class JMSConsumer {

    private static final String USERNAME = ActiveMQConnectionFactory.DEFAULT_USER; // 默认连接用户

    private static final String PASSWORD = ActiveMQConnectionFactory.DEFAULT_PASSWORD; // 默认连接密码

    private static final String BROKERURL = ActiveMQConnectionFactory.DEFAULT_BROKER_URL; // 默认消息总线

    public static void main(String[] args) {

        ConnectionFactory connectionFactory = null; // 连接工厂

        Connection connection = null; // 连接对象

        Session session = null; // 会话级session,接收或发送消息的线程

        Destination destination = null; // 消息发送的目的地

        MessageConsumer messageConsumer = null;        //消息消费者

        connectionFactory = new ActiveMQConnectionFactory(JMSConsumer.USERNAME, JMSConsumer.PASSWORD,

                JMSConsumer.BROKERURL);

        try {

            connection = connectionFactory.createConnection();

            connection.start(); // 启动连接

            session = connection.createSession(false, Session.AUTO_ACKNOWLEDGE); // 创建session,false表示不添加事务

            destination = session.createQueue("FirstQueue"); // 创建消息队列

            messageConsumer = session.createConsumer(destination); // 创建消息消费者

            while (true) {

                TextMessage textMessage = (TextMessage)messageConsumer.receive(100000);        //接收消息(文本消息)

                if(textMessage != null){

                    System.out.println("接收到的消息:"+textMessage.getText());

                }else{

                    break;

                }

            }

        } catch (JMSException e) {

            e.printStackTrace();

        }

    }

}
监听方式:
package com.activemq.test;

import javax.jms.JMSException;

import javax.jms.Message;

import javax.jms.MessageListener;

import javax.jms.TextMessage;

/**

 * 消息监听

 * @author Administrator

 *

 */

public class Listener implements MessageListener{

    @Override

    public void onMessage(Message message) {

        try {

            System.out.println("接收到的消息:"+((TextMessage)message).getText());

        } catch (JMSException e) {

            e.printStackTrace();

        }

    }

}
package com.activemq.test;

import javax.jms.Connection;

import javax.jms.ConnectionFactory;

import javax.jms.Destination;

import javax.jms.JMSException;

import javax.jms.MessageConsumer;

import javax.jms.Session;

import org.apache.activemq.ActiveMQConnectionFactory;

/**

 * 消息消费者

 * 普通receive方式接收消息

 * @author Administrator

 *

 */

public class JMSConsumer2 {

    private static final String USERNAME = ActiveMQConnectionFactory.DEFAULT_USER; // 默认连接用户

    private static final String PASSWORD = ActiveMQConnectionFactory.DEFAULT_PASSWORD; // 默认连接密码

    private static final String BROKERURL = ActiveMQConnectionFactory.DEFAULT_BROKER_URL; // 默认消息总线

    public static void main(String[] args) {

        ConnectionFactory connectionFactory = null; // 连接工厂

        Connection connection = null; // 连接对象

        Session session = null; // 会话级session,接收或发送消息的线程

        Destination destination = null; // 消息发送的目的地

        MessageConsumer messageConsumer = null;        //消息消费者

        connectionFactory = new ActiveMQConnectionFactory(JMSConsumer2.USERNAME, JMSConsumer2.PASSWORD,

                JMSConsumer2.BROKERURL);

        try {

            connection = connectionFactory.createConnection();

            connection.start(); // 启动连接

            session = connection.createSession(false, Session.AUTO_ACKNOWLEDGE); // 创建session,false表示不添加事务

            destination = session.createQueue("FirstQueue"); // 创建消息队列

            messageConsumer = session.createConsumer(destination); // 创建消息消费者

            messageConsumer.setMessageListener(new Listener());        //注册监听

        } catch (JMSException e) {

            e.printStackTrace();

        }

    }

}
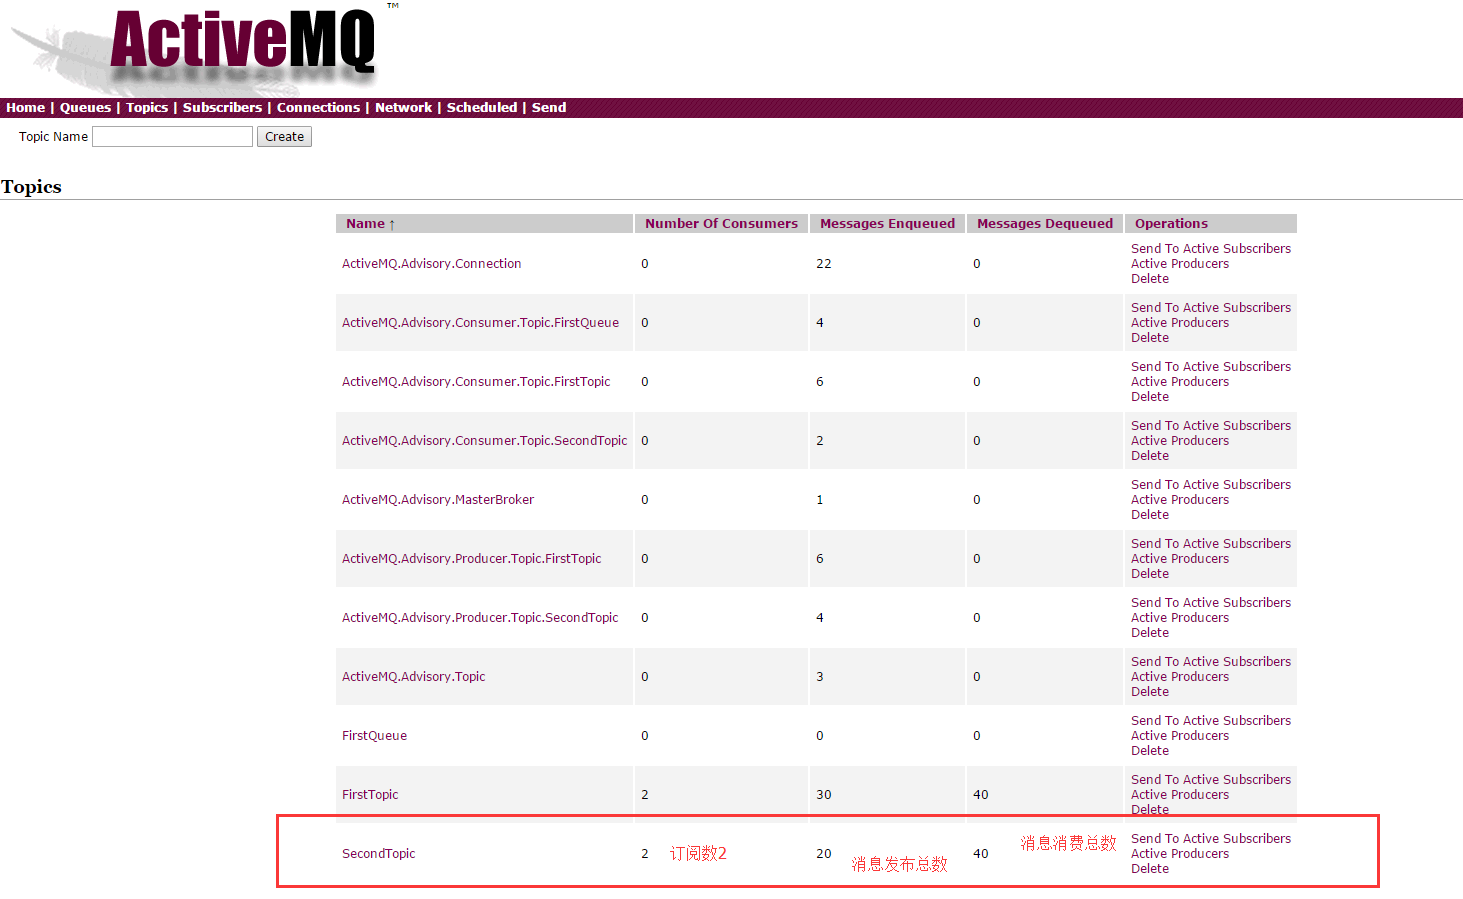
几轮测试下来,消费生产记录:

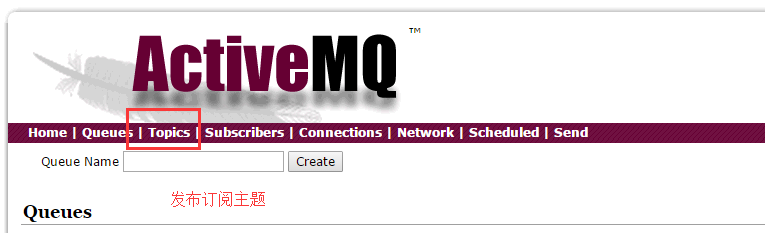
6、发布订阅模式
新建订阅1:
package com.activemq.test2;

import javax.jms.Connection;

import javax.jms.ConnectionFactory;

import javax.jms.Destination;

import javax.jms.JMSException;

import javax.jms.MessageConsumer;

import javax.jms.Session;

import org.apache.activemq.ActiveMQConnectionFactory;

/**

 * 消息消费者    -- 消息订阅者1

 * 普通receive方式接收消息

 * @author Administrator

 *

 */

public class JMSConsumer {

    private static final String USERNAME = ActiveMQConnectionFactory.DEFAULT_USER; // 默认连接用户

    private static final String PASSWORD = ActiveMQConnectionFactory.DEFAULT_PASSWORD; // 默认连接密码

    private static final String BROKERURL = ActiveMQConnectionFactory.DEFAULT_BROKER_URL; // 默认消息总线

    public static void main(String[] args) {

        ConnectionFactory connectionFactory = null; // 连接工厂

        Connection connection = null; // 连接对象

        Session session = null; // 会话级session,接收或发送消息的线程

        Destination destination = null; // 消息发送的目的地

        MessageConsumer messageConsumer = null;        //消息消费者

        connectionFactory = new ActiveMQConnectionFactory(JMSConsumer.USERNAME, JMSConsumer.PASSWORD,

                JMSConsumer.BROKERURL);

        try {

            connection = connectionFactory.createConnection();

            connection.start(); // 启动连接

            session = connection.createSession(false, Session.AUTO_ACKNOWLEDGE); // 创建session,false表示不添加事务

            destination = session.createTopic("SecondTopic"); // 创建消息订阅

            messageConsumer = session.createConsumer(destination); // 创建消息消费者

            messageConsumer.setMessageListener(new Listener());        //注册监听

        } catch (JMSException e) {

            e.printStackTrace();

        }

    }

}
package com.activemq.test2;

import javax.jms.JMSException;

import javax.jms.Message;

import javax.jms.MessageListener;

import javax.jms.TextMessage;

/**

 * 消息监听-消息订阅者1的监听

 * @author Administrator

 *

 */

public class Listener implements MessageListener{

    @Override

    public void onMessage(Message message) {

        try {

            System.out.println("订阅者1接收到的消息:"+((TextMessage)message).getText());

        } catch (JMSException e) {

            e.printStackTrace();

        }

    }

}
订阅2:
package com.activemq.test2;

import javax.jms.Connection;

import javax.jms.ConnectionFactory;

import javax.jms.Destination;

import javax.jms.JMSException;

import javax.jms.MessageConsumer;

import javax.jms.Session;

import org.apache.activemq.ActiveMQConnectionFactory;

/**

 * 消息消费者    -- 消息订阅者2

 * 普通receive方式接收消息

 * @author Administrator

 *

 */

public class JMSConsumer2 {

    private static final String USERNAME = ActiveMQConnectionFactory.DEFAULT_USER; // 默认连接用户

    private static final String PASSWORD = ActiveMQConnectionFactory.DEFAULT_PASSWORD; // 默认连接密码

    private static final String BROKERURL = ActiveMQConnectionFactory.DEFAULT_BROKER_URL; // 默认消息总线

    public static void main(String[] args) {

        ConnectionFactory connectionFactory = null; // 连接工厂

        Connection connection = null; // 连接对象

        Session session = null; // 会话级session,接收或发送消息的线程

        Destination destination = null; // 消息发送的目的地

        MessageConsumer messageConsumer = null;        //消息消费者

        connectionFactory = new ActiveMQConnectionFactory(JMSConsumer2.USERNAME, JMSConsumer2.PASSWORD,

                JMSConsumer2.BROKERURL);

        try {

            connection = connectionFactory.createConnection();

            connection.start(); // 启动连接

            session = connection.createSession(false, Session.AUTO_ACKNOWLEDGE); // 创建session,false表示不添加事务

            destination = session.createTopic("SecondTopic"); // 创建消息订阅

            messageConsumer = session.createConsumer(destination); // 创建消息消费者

            messageConsumer.setMessageListener(new Listener2());        //注册监听

        } catch (JMSException e) {

            e.printStackTrace();

        }

    }

}
package com.activemq.test2;

import javax.jms.JMSException;

import javax.jms.Message;

import javax.jms.MessageListener;

import javax.jms.TextMessage;

/**

 * 消息监听-消息订阅者1的监听

 * @author Administrator

 *

 */

public class Listener2 implements MessageListener{

    @Override

    public void onMessage(Message message) {

        try {

            System.out.println("订阅者2接收到的消息:"+((TextMessage)message).getText());

        } catch (JMSException e) {

            e.printStackTrace();

        }

    }

}
消息一定要先订阅,然后producer再发布,否则先发布再订阅的话后边才订阅的一方是收不到之前发布的消息的!
然后是发布方:
package com.activemq.test2;

import javax.jms.Connection;

import javax.jms.ConnectionFactory;

import javax.jms.Destination;

import javax.jms.JMSException;

import javax.jms.MessageProducer;

import javax.jms.Session;

import javax.jms.TextMessage;

import org.apache.activemq.ActiveMQConnectionFactory;

/**

 * 消息生产者

 *

 * @author Administrator

 *

 */

public class JMSProducer {

    private static final String USERNAME = ActiveMQConnectionFactory.DEFAULT_USER; // 默认连接用户

    private static final String PASSWORD = ActiveMQConnectionFactory.DEFAULT_PASSWORD; // 默认连接密码

    private static final String BROKERURL = ActiveMQConnectionFactory.DEFAULT_BROKER_URL; // 默认消息总线

    private static final int SENDNUM = 10; // 发送消息总量

    public static void main(String[] args) {

        ConnectionFactory connectionFactory = null; // 连接工厂

        Connection connection = null; // 连接对象

        Session session = null; // 会话级session,接收或发送消息的线程

        Destination destination = null; // 消息发送的目的地

        MessageProducer messageProducer = null; // 消息生产者

        connectionFactory = new ActiveMQConnectionFactory(JMSProducer.USERNAME, JMSProducer.PASSWORD,

                JMSProducer.BROKERURL);

        try {

            connection = connectionFactory.createConnection();

            connection.start(); // 启动连接

            session = connection.createSession(true, Session.AUTO_ACKNOWLEDGE); // 创建session,true表示添加事务

            destination = session.createTopic("SecondTopic"); // 创建发布主题

            messageProducer = session.createProducer(destination); // 创建消息发布者

            sendMessage(session, messageProducer);

            session.commit(); // commit提交

        } catch (Exception e) {

            e.printStackTrace();

        } finally {

            if (connection != null) {

                try {

                    connection.close();

                } catch (JMSException e) {

                    e.printStackTrace();

                }

            }

        }

    }

    /**

     * 发送消息

     *

     * @param session

     * @param messageProducer

     * @throws Exception

     */

    public static void sendMessage(Session session, MessageProducer messageProducer) throws Exception {

        for (int i = 0; i < SENDNUM; i++) {

            TextMessage textMessage = session.createTextMessage("Active MQ发布消息" + i); // 文本消息

            System.out.println("发送消息: Active MQ 发布的消息" + i);

            messageProducer.send(textMessage);

        }

    }

}
运行效果查看:
JMS消息中间件之ActiveMQ学习的更多相关文章
- JMS消息中间件系列[ActiveMQ](一)
版本5.13.3的特性: 1.Supports a variety of Cross Language Clients and Protocols from Java, C, C++, C#, Rub ...
- ActiveMQ学习笔记(5)——使用Spring JMS收发消息
摘要 ActiveMQ学习笔记(四)http://my.oschina.net/xiaoxishan/blog/380446 中记录了如何使用原生的方式从ActiveMQ中收发消息.可以看出,每次 ...
- 【ActiveMQ】Spring Jms集成ActiveMQ学习记录
Spring Jms集成ActiveMQ学习记录. 引入依赖包 无论生产者还是消费者均引入这些包: <properties> <spring.version>3.0.5.REL ...
- 学习笔记-记ActiveMQ学习摘录与心得(一)
这两天在看开源的MQ技术,趁着晚上安静,把这两天学的东西摘录下.在公司学东西效率真心捉鸡,心里总觉得别扭,拿了公司的钱不干活还在那学习,表示心情不淡定,效率不行啊...晚上时间是我的,下班还是蛮开心的 ...
- ActiveMQ学习教程/1.简要介绍与安装
ActiveMQ学习教程(一)——简要介绍与安装 一.名词: 1.JMS:即Java消息服务(Java Message Service)应用程序接口,是一个Java平台中关于面向消息中间件(MOM)的 ...
- ActiveMQ学习总结(一)
自己写的网上商城项目中使用了ActiveMQ,虽然相比于RabbitMQ,kafka,RocketMQ等相比,ActiveMQ可能性能方面不是最好的选择,不过消息队列其实原理区别不大,这里对学过的关于 ...
- 手把手教你如何玩转消息中间件(ActiveMQ)
手把手教你如何玩转消息中间件(ActiveMQ) 2018年07月15日 18:07:39 Cs_hnu_scw 阅读数 12270 标签: 中间件消息中间件ActiveMQ分布式集群 更多 个人分类 ...
- ActiveMQ学习总结------原生实战操作(下)03
本篇将继续延续上一篇的内容,作为知识补充篇,为接下来我们学习spring整合ActiveMQ打好基础 本篇主要学习内容: 1.ActiveMQ 队列服务监听 2.ActiveMQ Topic模型 回顾 ...
- ActiveMQ学习教程/2.简单示例
ActiveMQ学习教程(二)——简单示例 一.应用IDEA构建Maven项目 File->New->Module...->Maven->勾选->选择->Next ...
随机推荐
- 自己实现一个shell
用C实现一个简单的交互式shell,要求:当用户输入一行命令时,识别程序名和参数并调用适当的exec函数执行程序,等待执行完成后给出提示符. exec函数实际上是六种以exec开头的函数,统称exec ...
- Archlinux下virtualbox报错'/sbin/rcvboxdrv setup'
因为刚刚换成archlinux系统,安装virtualbox的时候报错了.如下图: 可是怎么解决呢?我看了很多资料大多数是ubuntu的,没有archlinux的. 但是原理都差不多我借着也就研究出来 ...
- 【随记】WPF中xaml输入中文乱码问题解决
在Visual Studio中开发WPF应用程序时,在XMAL文档编写界面输入中文时变为乱码.可能的原因之一是VS中安装了VAssistX插件,导致编码冲突,使中文输入乱码.解决方法是在VAssist ...
- 理解webpack中的publicPath
outPut中的publicPath 默认值: 空字符串. publicPath是非常有必要配置的,他是项目中引入静态资源(js.css)时的基础路径. 例如: outPut.publicPath = ...
- 04. H5标签有哪些?行内元素有哪些?块级元素有哪些?空(void)元素有哪些?行内元素和块级元素有什么区别?你工作中常用标签有什么?
4. H5标签有哪些? 2)行内元素有哪些? a - 锚点 em - 强调 img - 图片 font - 字体设定 ( 不推荐 ) i - 斜体 input - 输入框 3)块级元素有哪些? add ...
- 【医学影像】《Identifying Medical Diagnoses and Treatable Diseases by Image-Based Deep Learning》论文笔记
这篇论文的作者是张康教授为首的团队,联合国内外众多医院及科研机构,合力完成,最后发表在cell上,实至名归. 从方法的角度上来说,与上一篇博客中的论文很相似,采用的都是InceptionV3模型,同时 ...
- Git sparse-checkout 检出指定目录或文件
根据网上资料整理而来,git 1.7版本后支持的sparse checkout特性,可以指定需要checkout的目录或者文件. # 设置允许git克隆子目录 git config core.spar ...
- koa的中间件compose
用到的知识点: 1.bind函数 2.函数递归调用自身 3.promise 'use strict' /** * Expose compositor. */ module.exports = comp ...
- Linux I2C驱动程序设计
1. Linux I2C子系统架构 (1)I2C核心(I2C-Core):I2C 总线和I2C 设备驱动的中间枢纽,它提供了I2C 总线驱动和设备驱动的注册.注销方法等 (2)I2C控制器驱动(ada ...
- pip和conda安装源更改
pip和conda安装源更改 python模块安装,使用国内源可以提高下载速度. pip源更改: pip源有好几个,我一直用的清华的pip源,它5分钟同步一次. 临时使用: pip 后加参数 -i h ...