
VMware12 安装 CentOS 6.5 64位
前言:本人在配置Hadoop的过程中,需要搭建Cent OS 64 环境,借此,顺便将Cent OS 64 的安装在此记录,方便自己,也方便大家学习。本次是在VM12虚拟机中实现Cent OS 64 的安装以及配置,后续还会有Hadoop的安装配置教程,我们先来进行第一步。
一、VMware 12 Install CentOS 64(Linux)OS
create a new vm->there I screenshot my settings in the next steps->
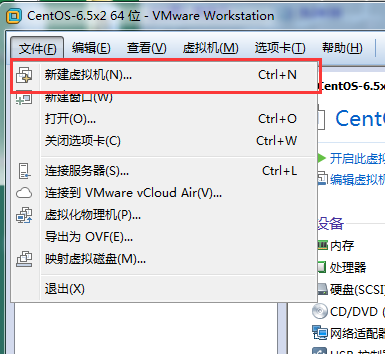

keep next step->
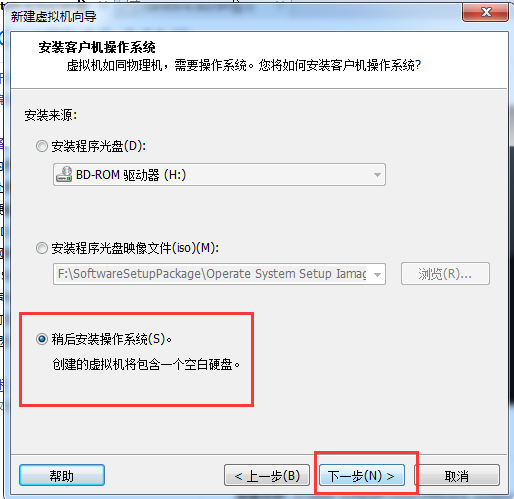

the os name at will,if you understand it->the position choose a folder that you like->next->

next as deault,my computer`s RAM is 8G so i choose 1G that default>next
the net mode choose NAT,then we set IP address to connect the internet->

steps the default->
there I remove the audio card and the printer that impossible use them->accomplish!

the the vm will apper in the left list->

click the centOS 64 hadoop-master,we set the os install cd/DVD Path->
in the position we set the install cd/DVD ,choose the install source that we have upload CentOS64(CentOS6.5)
you can get the centos in the internet->

then we power start the vm cent os 64->
choose the first option install or upgrade an existing system->

OK

default ok that can show the step of check disks->

if check complete choose OK->

OK->Continue

if have a problem below we can learn from internet that we should reboot the vm , then choose skip->

next we reboot the system->
wait a minute show a confirm we choose skip;then it`s can found the install resource,auto install !->
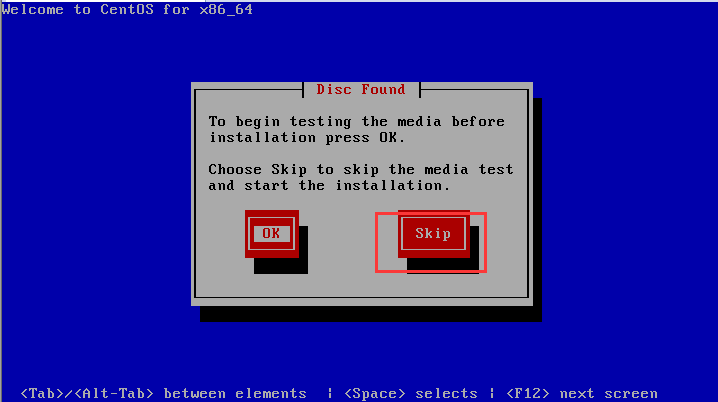
into the view settings->

Choose language, there we choose English(English)->next


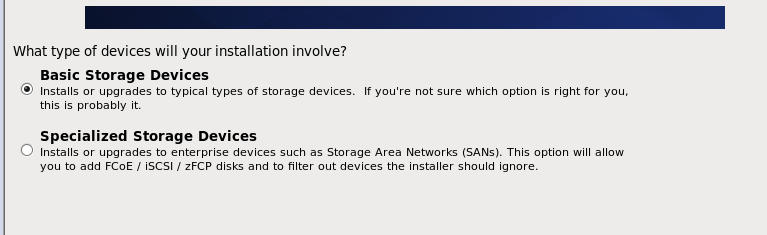
choose much next step we get there->
we choose Yes,discard any data->next->

input HostName,i set the master as HostName->next->

next->
The position we choose ShangHai->next

there we must confirm the window that tell us input the password and confirm(Don`t forget that pwd)->next->
there we choose Replace Existing Linux System->next

then choose Write Changes to disk->

next->

The System will progress the install progress->
OK->we Reboot the system

oh welcom view->forward

Yes,I agree to the license Agreement(you known)->
then input your Username and password as will you like and dont`t forget them->

forward

if you get error in the Kdump step neglect it and click finish->

Then Reboot -> wait a minute we can input the password into the system CentOS->

OK The CentOS64`s Install is complete ! Congratulation To you !
Then we set the net to the VM ->
choose the vpn connections -> Configure VPN->
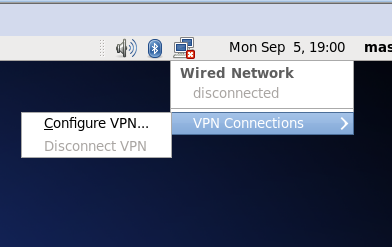
Add->

Create->

RName the connection name we named master ->

let find the settings options there->

Then choose VMnet8->'NAT设置'->
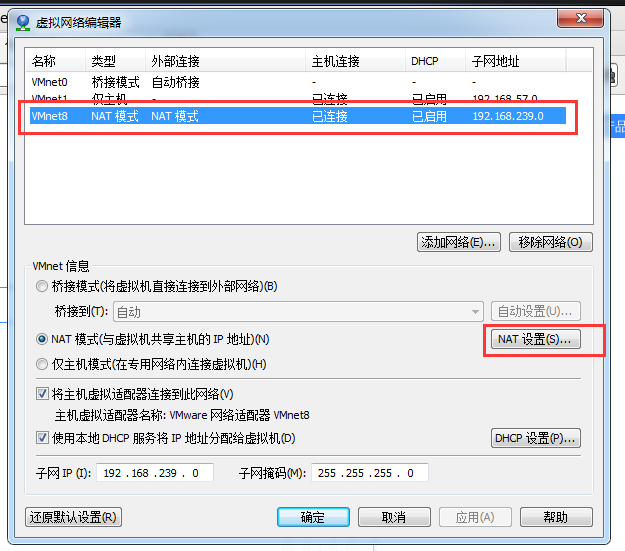

We can get the Net GateWay and NetMask etc...
then we set the net work->

The Address input as will but cant repeat with other !
if we don`t known the DNS servers we input the chorm`s DNS 8.8.8.8;
then we into the vm-> set the IPv4 Settings:
Method:Manual(static address);
Address:192.168.239.128;
NetMask:255.255.255.0;
GateWay:192.168.239.2;
DNS server:8.8.8.8
Apply ->
You should start your VMware NAT Service if you want VM to connection the internet via conputer !

Then we find the network ico is have not the error ico ;

We can ping the host 192.168.239.1

you can see it`s successful !
let we test->start the Firfox explorer->input the url www.baidu.com->enter->

That you can see the vm CentOS can surf the internet !
Then let we configurate the Hadoop install and configuration !
VMware12 安装 CentOS 6.5 64位的更多相关文章
- 安装CentOS 6.4 64 位操作系统
1.安装 CentOS 6.4 64位操作系统的一些困境: 1.1 CentOS 6.4 64位操作系统的ISO文件有4G多,通过U盘安装的方式已经不可取(FAT32 只支持最大4G文件); 1.2 ...
- CentOS 6.3 64位下MySQL5.1.54源码安装配置详解
安装环境:CentOS 6.3 64位 一:先安装依赖包(不然配置的时候会报错的!) yum -y install ncurses* libtermcap* 新建mysql用户 [root@clien ...
- CentOS 6.5 64位下安装Redis3.0.2的具体流程
系统环境:CentOS 6.5 64位 安装方式:编译安装 防火墙:开启 Redis版本:Redis 3.0.2 一.环境准备 1.安装 gcc gcc-c++ [root@iZ94ebgv853Z ...
- 使用centos 5.x 64位系统安装astgo 2014 v7.3教程(含全套安装文件)
版本特色: 全自动安装 安装过程中不用频繁输入yes或回车 自带完整号码归属地数据库 自带触屏版WAP ·首先确定你需要使用astgo 2014 7.0还是7.3: astgo 2014 v 7.0 ...
- linux CentOs 7.4 64位 系统下 nuxt部署 、nginx 安装、node环境及软连接,pm2软连接
一.nginx安装 1.安装依赖包 //一键安装上面四个依赖 yum -y install gcc zlib zlib-devel pcre-devel openssl openssl-devel 2 ...
- 在 CentOS 7.5 64位上使用 yum 安装 MySQL 8.0
前段时间在 CentOS 7.5 64位上安装 MySQL 8.0.查了些资料,在这里记录一下详细的安装和设置步骤. 一.安装 使用yum安装MySQL之前需要先下载对应的.rpm文件,下载方法: 去 ...
- sqlServer2014安装说明(windows7 64位)
SqlServer2014安装说明(windows7 64位) 地址:https://www.microsoft.com/zh-cn/download/details.aspx?id=42299 1, ...
- CentOS X64上64位Oracle 11gR2 静默安装
CentOS 6.2 X64上64位Oracle 11gR2 静默安装 www.linuxidc.com/Linux/2012-03/56606p4.htm HP-UX静默安装oracle11g过程 ...
- Centos 6.5(64位) vim 8.0 安装
转自:https://blog.csdn.net/sdoyuxuan/article/details/78825912 1 先得安装nurses库 yum list | grep "ncur ...
随机推荐
- JAVA设计模式之桥梁模式
在阎宏博士的<JAVA与模式>一书中开头是这样描述桥梁(Bridge)模式的: 桥梁模式是对象的结构模式.又称为柄体(Handle and Body)模式或接口(Interface)模式. ...
- Linux刷新DNS缓存
网上查了下,发现linux刷新dns的缓存方法都是: sudo /etc/init.d/nscd restart 但是在我的机器上,发现提示命令找不到: sudo /etc/init.d/nscd: ...
- windows8.1+centos7双系统(装完centos后无win8引导)
原先系统为windows8.1后来装上centos7后无win8系统引导, 打开电脑进入引导界面按C 进入grub界面 输入“cat (hd0,” 按tab可查看到windows8 地址为“hd0, ...
- maven 打包 spring 项目
在程序中使用到了springframework控件(主要是为了使用Mybatis-spring操作数据库,省事). 使用maven管理项目的构建,现在需要生成一个jar包,包含所有依赖的jar包,并可 ...
- SQL SELECT语句
基本SQL SELECT语句 1. 下面的语句是否可以执行成功 select ename , job , sal as salary from emp; 2. 下面的语句 ...
- ---ps 命令
ps 的命令真复杂啊! 值得注意的是选项的 -e e 这两个是不同的 -e的选项和x的意思相当 而e 的意思是改变显示栏目内容了 我个人用单字母的比较多 ps f -eo pid,uid,gid,us ...
- SHELL脚本攻略(学习笔记)--2.4 find
转载请注明出处:http://www.cnblogs.com/f-ck-need-u/p/5916657.html 超级强大的find命令. find搜索是从磁盘搜索,而不是从数据库搜索. 2.4 ...
- Web前端之html_day1
1.html结构 1 2 3 4 5 6 7 8 9 10 <!DOCTYPE html> <html lang="en"> <head> ...
- Javascript类型
Javascript 有两中类型:原始类型和对象类型. 原始类型包括:数字,字符串,布尔值,null和undefined.其余的都是对象类型. 原始类型 数字.Javascript采用IEEE754标 ...
- Spring3 url匹配规则
Spring3 url匹配规则 Wildcard Description ? 匹配任何单字符 * 匹配0或者任意数量的字符 ** 匹配0或者更多的目录 宝贝网址: