
Android自定义指示器时间轴
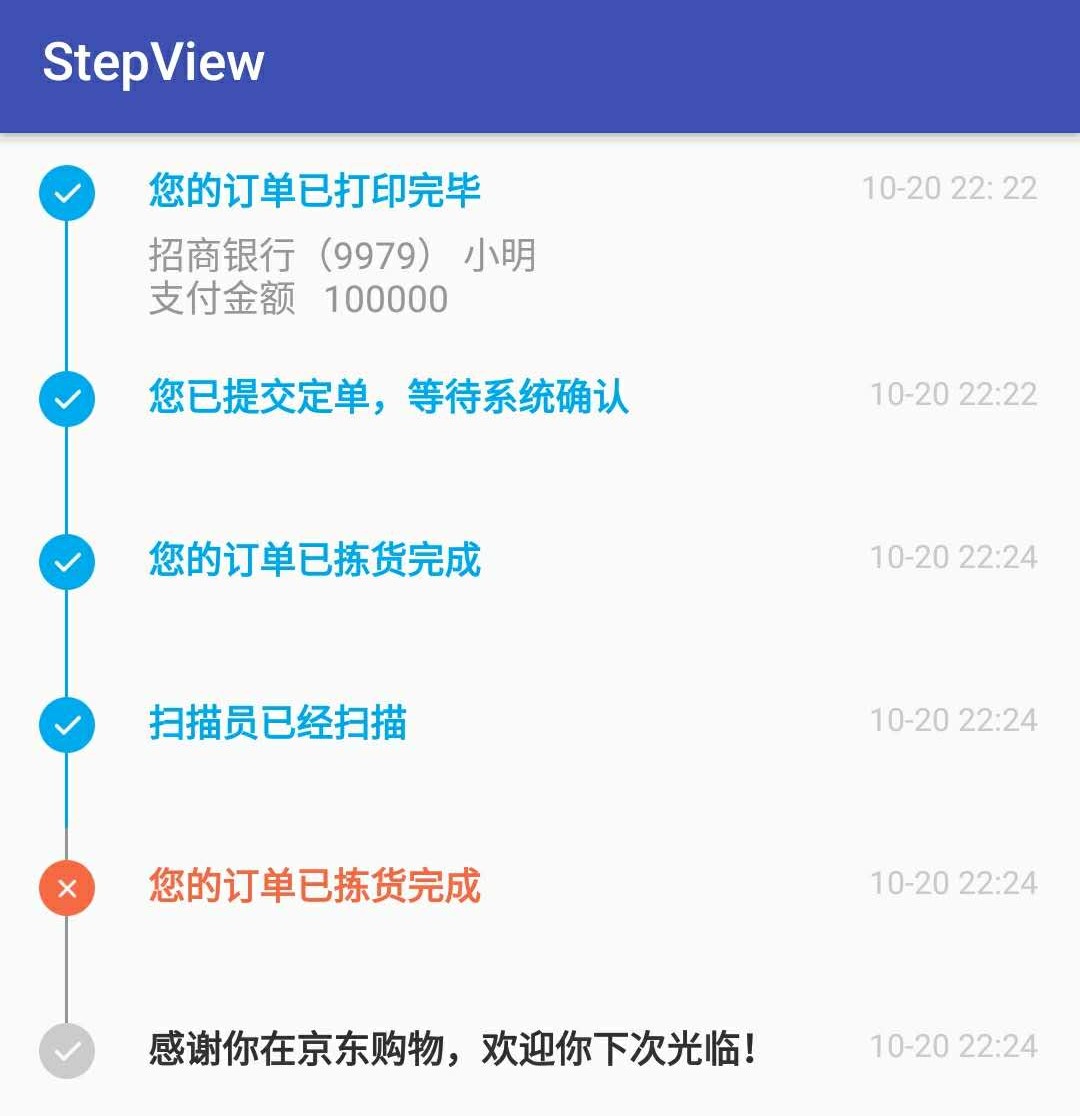
    <ListView
        android:id="@+id/lvTrace"
        android:layout_width="match_parent"
        android:layout_height="wrap_content"
        android:clickable="false"
        android:divider="@null"
        android:dividerHeight="0dp"
        android:listSelector="@android:color/transparent" />
内容的布局,物流信息是一个RelativeLayout,为了不使两个列表项的文本靠得太近,在RelativeLayout中设置其paddingBottom和paddingTop属性。
时间轴的布局,时间轴的布局也是一个RelativeLayout,为了使时间轴的圆点和显示时间的文本对齐,我们需要在圆点之上再放置一条竖线,所以整体的布局就是 线 - 点 - 线。为了让线可以正好对准圆点的中心,我们让线和点都水平居中,即android:layout_centerHorizontal="true"
<?xml version="1.0" encoding="utf-8"?>
<LinearLayout xmlns:android="http://schemas.android.com/apk/res/android"
    android:layout_width="match_parent"
    android:layout_height="match_parent"
    android:gravity="center"
    android:orientation="horizontal">

    <RelativeLayout
        android:id="@+id/rlTimeline"
        android:layout_width="wrap_content"
        android:layout_marginLeft="15dp"
        android:layout_height="match_parent">

        <TextView
            android:id="@+id/tvTopLine"
            android:layout_width="1.2dp"
            android:layout_height="12dp"
            android:layout_centerHorizontal="true"
            android:background="#999" />

        <TextView
            android:id="@+id/tvDot"
            android:layout_width="wrap_content"
            android:layout_height="wrap_content"
            android:layout_below="@id/tvTopLine"
            android:layout_centerHorizontal="true"
            android:background="@drawable/state_get_huankuan" />

        <TextView
            android:layout_width="1.2dp"
            android:id="@+id/tvLine"
            android:layout_height="match_parent"
            android:layout_below="@id/tvDot"
            android:layout_centerHorizontal="true"
            android:background="#999" />
    </RelativeLayout>

    <RelativeLayout
        android:id="@+id/rlCenter"
        android:layout_width="match_parent"
        android:layout_height="match_parent"
        android:paddingBottom="6dp"
        android:paddingRight="10dp"
        android:layout_marginLeft="20dp"
        android:paddingTop="12dp">

        <TextView
            android:id="@+id/step_tv_time"
            android:layout_width="wrap_content"
            android:layout_height="wrap_content"
            android:layout_alignParentRight="true"
            android:layout_marginRight="6dp"
            android:text="10-20 22:22"
            android:textColor="#cccccc"
            android:textSize="12sp" />

        <TextView
            android:id="@+id/step_tv_des"
            android:layout_width="wrap_content"
            android:layout_height="wrap_content"
            android:layout_alignParentLeft="true"
            android:layout_marginRight="15dp"
            android:textStyle="bold"
            android:layout_toLeftOf="@+id/step_tv_time"
            android:text="fffffff" />

        <TextView
            android:id="@+id/step_tv_des_below"
            android:layout_width="wrap_content"
            android:layout_height="wrap_content"
            android:layout_alignParentLeft="true"
            android:layout_below="@+id/step_tv_des"
            android:layout_marginTop="5dp"
            android:text=""
            android:textColor="#999999" />
    </RelativeLayout>
</LinearLayout>
public class StepViewAdapter extends BaseAdapter {
    private Context context;
    private List<StepViewBean> traceList = new ArrayList<>();
    private static final int TYPE_FINISH = 101;
    private static final int TYPE_UNFINISH = 102;
    private static final int TYPE_ERROR = 103;

    public StepViewAdapter(Context context, List<StepViewBean> traceList) {
        this.context = context;
        this.traceList = traceList;
    }

    @Override
    public int getCount() {
        return traceList.size();
    }

    @Override
    public StepViewBean getItem(int position) {
        return traceList.get(position);
    }

    @Override
    public long getItemId(int position) {
        return position;
    }

    @Override
    public View getView(int position, View convertView, ViewGroup parent) {
        ViewHolder holder;
        final StepViewBean trace = getItem(position);
        if (convertView != null) {
            holder = (ViewHolder) convertView.getTag();
        } else {
            holder = new ViewHolder();
            convertView = LayoutInflater.from(context).inflate(R.layout.stepview_adapter, parent, false);
            holder.tvTopLine = (TextView) convertView.findViewById(R.id.tvTopLine);
            holder.tvDot = (TextView) convertView.findViewById(R.id.tvDot);
            holder.tvLine = (TextView) convertView.findViewById(R.id.tvLine);
            holder.tvAcceptStation = (TextView) convertView.findViewById(R.id.step_tv_des);
            holder.tvAcceptTime = (TextView) convertView.findViewById(R.id.step_tv_time);
            holder.tvAcceptStationBelow = (TextView) convertView.findViewById(R.id.step_tv_des_below);
            holder.rlTimeline = (RelativeLayout) convertView.findViewById(rlTimeline);

            convertView.setTag(holder);
        }
        if (position == 0) {
            holder.tvTopLine.setVisibility(View.INVISIBLE);
        }
        if (position == traceList.size() - 1) {
            holder.tvLine.setVisibility(View.GONE);
        } else {
            holder.tvLine.setVisibility(View.VISIBLE);
        }
        switch (getItemViewType(position)) {
            case TYPE_FINISH:
                holder.tvAcceptStation.setTextColor(context.getResources().getColor(R.color.crt_completed));
                holder.tvDot.setBackgroundResource(R.drawable.state_get_huankuan);
                holder.tvLine.setBackgroundColor(context.getResources().getColor(R.color.crt_completed));
                holder.tvTopLine.setBackgroundColor(context.getResources().getColor(R.color.crt_completed));
                break;
            case TYPE_UNFINISH:
                holder.tvAcceptStation.setTextColor(context.getResources().getColor(R.color.crt_uncompleted_text));
                holder.tvDot.setBackgroundResource(R.drawable.state_normal_huankuan);
                holder.tvLine.setBackgroundColor(context.getResources().getColor(R.color.crt_text_hint_color));
                break;
            case TYPE_ERROR:
                holder.tvTopLine.setVisibility(View.VISIBLE);
                holder.tvAcceptStation.setTextColor(context.getResources().getColor(R.color.crt_error_text));
                holder.tvDot.setBackgroundResource(R.drawable.state_lose_huankuan);
                break;
        }

        holder.tvAcceptTime.setText(trace.getAcceptTime());
        holder.tvAcceptStation.setText(trace.getAcceptStation());
        if (!TextUtils.isEmpty(trace.getAcceptStation())) {
            holder.tvAcceptStationBelow.setText(trace.getAcceptStationBelow());
        }
        return convertView;
    }

    @Override
    public int getItemViewType(int id) {
          if(id==(traceList.size()-2)){
              return TYPE_ERROR;
          }
          if(id==(traceList.size()-1)){
              return TYPE_UNFINISH;
          }
          return TYPE_FINISH;
    }

    static class ViewHolder {
        public TextView tvAcceptTime, tvAcceptStation, tvLine, tvAcceptStationBelow;
        public TextView tvTopLine, tvDot;
        public RelativeLayout rlTimeline;

    }
}
StepViewBean
public class StepViewBean {
    /** 时间 */
    private String acceptTime;
    /** 描述 */
    private String acceptStation;
    /** 描述下方*/
    private String acceptStationBelow;

    public String getAcceptStationBelow() {
        return acceptStationBelow;
    }

    public void setAcceptStationBelow(String acceptStationBelow) {
        this.acceptStationBelow = acceptStationBelow;
    }

    public StepViewBean() {
    }

    public StepViewBean(String acceptTime, String acceptStation) {
        this.acceptTime = acceptTime;
        this.acceptStation = acceptStation;
    }

    public StepViewBean(String acceptTime, String acceptStation, String acceptStationBelow) {
        this.acceptTime = acceptTime;
        this.acceptStation = acceptStation;
        this.acceptStationBelow = acceptStationBelow;

    }

    public String getAcceptTime() {
        return acceptTime;
    }

    public void setAcceptTime(String acceptTime) {
        this.acceptTime = acceptTime;
    }

    public String getAcceptStation() {
        return acceptStation;
    }

    public void setAcceptStation(String acceptStation) {
        this.acceptStation = acceptStation;
    }
}
public class MainActivity extends AppCompatActivity {
    private List<StepViewBean> traceList = new ArrayList<>();

    @Override
    protected void onCreate(Bundle savedInstanceState) {
        super.onCreate(savedInstanceState);
        setContentView(R.layout.activity_main);
        ListView lvTrace= (ListView) findViewById(R.id.lvTrace);
        traceList.add(new StepViewBean("10-20 22: 22", "您的订单已打印完毕", "招商银行(9979) 小明\n支付金额   100000"));
        traceList.add(new StepViewBean("10-20 22:22", "您已提交定单,等待系统确认"));
        traceList.add(new StepViewBean("10-20 22:24", "您的订单已拣货完成"));
        traceList.add(new StepViewBean("10-20 22:24", "扫描员已经扫描"));
        traceList.add(new StepViewBean("10-20 22:24", "您的订单已拣货完成"));
        traceList.add(new StepViewBean("10-20 22:24", "感谢你在京东购物,欢迎你下次光临!"));
        StepViewAdapter adapter = new StepViewAdapter(this, traceList);
        lvTrace.setAdapter(adapter);
    }
}
Android自定义指示器时间轴的更多相关文章
- HighCharts 图表插件 自定义绑定 时间轴数据
HighCharts 图表插件 自定义绑定 时间轴数据,解决时间轴自动显示数据与实际绑定数据时间不对应问题! 可能要用到的源码片段:http://code.662p.com/list/14_1.htm ...
- Android 类似时间轴的实现
想要实现图片中的的时间轴的效果,设定了三种颜色,但是出来的只有一个黑色,还不是设定好的,而且长度很长的话不能滚动,下面上代码: 布局文件: <LinearLayout xmlns:android ...
- Android 时间轴
最近开发的app中要用到时间轴这东西,需要实现的效果如下: 想想这个东西应该可以用listview实现吧.然后最近就模拟着去写了: 首先写 listview的item的布局: listview_it ...
- android 简易时间轴(实质是ListView)
ListView的应用 1.在很多时候是要用到时间轴的,有些处理的时间轴比较复杂,这里就给出一个比较简单的时间轴,其实就是ListView里面的Item的设计. 直接上代码: ListView,ite ...
- Android实训案例(三)——实现时间轴效果的ListView,加入本地存储,实现恋爱日记的效果!
Android实训案例(三)--实现时间轴效果的ListView,加入本地存储,实现恋爱日记的效果! 感叹离春节将至,也同时感叹时间不等人,一年又一年,可是我依然是android道路上的小菜鸟,这篇讲 ...
- Android 时间轴的实现
时间轴 时间轴,顾名思义就是将发生的事件按照时间顺序罗列起来,给用户带来一种更加直观的体验.京东和淘宝的物流顺序就是一个时间轴(如图),想必大家都不陌生. 时间轴的初探 初次见到这种UI,感觉整个布局 ...
- Android实现时间轴
昨天群里有讨论时间轴的项目,没有接触过,以为非常吊,研究之后才知道表面都是忽悠人的,使用listview就能实现了,也没有什么新奇的东西 废话少说,直接上图 图片和文字都能够私人订制 没什么好说的,直 ...
- android项目解刨之时间轴
近期开发的app中要用到时间轴这东西.须要实现的效果例如以下: 想想这个东西应该能够用listview实现吧. 然后近期就模拟着去写了: 首先写 listview的item的布局: listview ...
- Android时间轴效果,直接使用在你的项目中
近期开发app搞到历史查询,受腾讯qq的启示,搞一个具有时间轴效果的ui,看上去还能够,然后立即想到分享给小伙伴,,大家一起来看看,先上效果图吧 watermark/2/text/aHR0cDovL2 ...
随机推荐
- 【转】缓存淘汰算法系列之1——LRU类
原文地址:http://www.360doc.com/content/13/0805/15/13247663_304901967.shtml 参考地址(一系列关于缓存的,后面几篇也都在这里有):htt ...
- C++点滴20130802
1.sprintf与printf,fprintf为三兄弟.其中printf输出到屏幕,fprintf输出到文件,而sprintf输出到字符串中.通常情况下,屏幕是可以输出的,文件也可以写的(除非磁盘满 ...
- Xuan.UWP.Framework
开篇博客,以前总是懒,不喜欢写博客什么,其实都是给自己找理由,从今天开始有空就写写博客.新手博客,写得不好轻喷,哈哈! 开始正题,微软移动平台,从WP7开始,经历了WP8,然后WP8.1,到目前得Wi ...
- C基本类型
C基本类型有: char:8位,可添加修改符signed或是unsigned short:16位,同有singed和unsigned int:32位,同有singed和unsigned long:在3 ...
- 我们的代码为什么要压缩成7z?
代码为什么要压缩成7z? a. 代码的复制速度是非常慢的. 几M或几KB都是常事. b. 压缩成7z格式后,压缩速度迅速提高上百倍 网页为什么要压缩成7z? 怎么使用7z压缩(以好压2345为例子) ...
- CodePath Android CliffNotes 之 Effective Java for Android 翻译
概述: 这篇文章的目的是作为这篇博文的开源版本,而netcyrax是该指南的原始文章的唯一作者. 请在下面添加您自己的在Android中Java最佳实践.技巧和巧妙! 建造者模式 当你拥有一个需要超过 ...
- Xilinx ISE 14.1利用Verilog产生clock
<一>建立如下的Verilog Module module myClock( input clock ); endmodule <二>建立 Verilog Test Fixtu ...
- Being a Good Boy in Spring Festival(尼姆博弈)
Being a Good Boy in Spring Festival Time Limit: 1000/1000 MS (Java/Others) Memory Limit: 32768/32768 ...
- 基于node的websocket示例
websocket:用语服务器端主动向客户端推送消息 本例基于koa框架编写用例:服务器端需要安装相关模块 koa koa-socket co等 服务器端脚本:(需要安装相关模块 koa koa-so ...
- Grunt参考
Grunt参考: http://www.cnblogs.com/yexiaochai/p/3603389.html http://blog.csdn.net/wangfupeng1988/articl ...