Spring基础学习(二)—详解Bean(上)
在Spring配置文件中,用户不但可以将String、int等字面值注入Bean中,还可以将集合、Map等类型注入Bean中,此外还可以注入配置文件中其他定义的Bean。
一、字面值
(1)可用字符串表示的值,可以通过<value>元素标签或value属性进行注入。
(2)基本数据类型及其封装类、Stting类型都可以采用字面值注入的方式。
(3)若字面值包含特殊字符,可以使用<![CDATA[]]>把字面值包裹起来。
<bean id="car" class="com.kiwi.domain.Car">

        <property name="brand" >

            <value><![CDATA[BMW&x5]]></value>

        </property>

        <property name="color" value="Black"/>

        <property name="price" value="800000"/>

        <property name="maxSpeed" value="200"/>

    </bean>
由于brand属性包含了一个XML的特殊符号,因此特意在属性值外添加一个XML特殊处理标签<![CDATA[]]>,这个标签的作用就是让XML解析器将标签中的字符串当作普通文本对待,以防止某些字符对XML格式造成破坏。
二、引用其他Bean
(1)要使Bean能相互访问,就必须在Bean的配置文件中指定对Bean的引用。
(2)在Bean的配置文件中,可以通过<ref>属性或元素配置。
(3)也可以在属性内部包含Bean的声明,这样的Bean称为内部Bean。
(4)内部Bean不能被外部使用。
Person.java
public class Person{

	private String name;

	private int age;

	private Car car;

	@Override

	public String toString(){

		return "Person [name=" + name + ", age=" + age + ", car=" + car + "]";

	}

	//省略get set...

}
applicationContext.xml
<?xml version="1.0" encoding="UTF-8"?>

<beans xmlns="http://www.springframework.org/schema/beans"

    xmlns:xsi="http://www.w3.org/2001/XMLSchema-instance"

    xsi:schemaLocation="http://www.springframework.org/schema/beans http://www.springframework.org/schema/beans/spring-beans.xsd">

    <bean id="car" class="com.kiwi.domain.Car">

        <property name="brand" value="BMW"/>

        <property name="color" value="Black"/>

        <property name="price" value="800000"/>

        <property name="maxSpeed" value="200"/>

    </bean>

    <bean id="person" class="com.kiwi.domain.Person">

        <property name="name" value="Tom"/>

        <property name="age" value="26"/>

        <!-- 使用ref属性建立bean之间的引用关系 -->

        <property name="car" ref="car"/>

    </bean>

</beans>
Test.java
	@Test

	public void testCar(){

		ApplicationContext context = new ClassPathXmlApplicationContext("applicationContext.xml");

		Person person = (Person)context.getBean("person");

		System.out.println(person);

	}
结果:
Person [name=Tom, age=26, car=Car [brand=BMW, color=Black, price=800000.0, maxSpeed=200]]
如果不引用外部的Bean,可以在内部声明一个内部Bean,这个内部Bean不能被其他外部Bean引用。
<?xml version="1.0" encoding="UTF-8"?>

<beans xmlns="http://www.springframework.org/schema/beans"

    xmlns:xsi="http://www.w3.org/2001/XMLSchema-instance"

    xsi:schemaLocation="http://www.springframework.org/schema/beans http://www.springframework.org/schema/beans/spring-beans.xsd">

    <bean id="car" class="com.kiwi.domain.Car">

        <property name="brand" value="BMW" />

        <property name="color" value="Black" />

        <property name="price" value="800000" />

        <property name="maxSpeed" value="200" />

    </bean>

    <bean id="person" class="com.kiwi.domain.Person">

        <property name="name" value="Tom" />

        <property name="age" value="26" />

        <!-- 定义一个内部bean,内部bean外面不能引用 -->

        <property name="car">

            <bean class="com.kiwi.domain.Car">

                <property name="brand" value="Audi" />

                <property name="color" value="Black" />

                <property name="price" value="300000" />

                <property name="maxSpeed" value="250" />

            </bean>

        </property>

    </bean>

</beans>
结果:
Person [name=Tom, age=26, car=Car [brand=Audi, color=Black, price=300000.0, maxSpeed=250]]
也可以为级联属性赋值。
<?xml version="1.0" encoding="UTF-8"?>

<beans xmlns="http://www.springframework.org/schema/beans"

    xmlns:xsi="http://www.w3.org/2001/XMLSchema-instance"

    xsi:schemaLocation="http://www.springframework.org/schema/beans http://www.springframework.org/schema/beans/spring-beans.xsd">

    <bean id="car" class="com.kiwi.domain.Car">

        <property name="brand" value="BMW" />

        <property name="color" value="Black" />

        <property name="price" value="800000" />

        <property name="maxSpeed" value="200" />

    </bean>

    <bean id="person" class="com.kiwi.domain.Person">

        <property name="name" value="Tom" />

        <property name="age" value="26" />

        <property name="car" ref="car"/>

        <!-- 为级联属性赋值,前提是属性先初始化然后才可以为其级联属性赋值 -->

        <property name="car.maxSpeed" value="250"/>

    </bean>

</beans>
结果:
Person [name=Tom, age=26, car=Car [brand=BMW, color=Black, price=800000.0, maxSpeed=250]]
三、集合属性
1.List和Set
(1)配置List需要指定<list>标签,标签里包含一些元素,这些元素可以通过<value>指定简单的常量值,也可以使用<ref>指定对其他Bean的引用。
(2)配置set需要使用<set>标签,其他属性和List一样。
Person.java
public class Person{

	private String name;

	private int age;

	private List<Car> cars;

	//省略get set...

}
applicationContext.xml
<?xml version="1.0" encoding="UTF-8"?>

<beans xmlns="http://www.springframework.org/schema/beans"

    xmlns:xsi="http://www.w3.org/2001/XMLSchema-instance"

    xsi:schemaLocation="http://www.springframework.org/schema/beans http://www.springframework.org/schema/beans/spring-beans.xsd">

    <bean id="car" class="com.kiwi.domain.Car">

        <property name="brand" value="BMW" />

        <property name="color" value="Black" />

        <property name="price" value="800000" />

        <property name="maxSpeed" value="300" />

    </bean>

    <bean id="car2" class="com.kiwi.domain.Car">

        <property name="brand" value="Audi" />

        <property name="color" value="Black" />

        <property name="price" value="400000" />

        <property name="maxSpeed" value="250" />

    </bean>

    <bean id="person" class="com.kiwi.domain.Person">

        <property name="name" value="Tom" />

        <property name="age" value="26" />

        <!-- 配置集合属性List -->

        <property name="cars">

            <list>

                <ref bean="car"/>

                <ref bean="car2"/>

            </list>

        </property>

    </bean>

</beans>
结果:
Person [name=Tom, age=26, cars=[Car [brand=BMW, color=Black, price=800000.0, maxSpeed=300], Car [brand=Audi, color=Black, price=400000.0, maxSpeed=250]]]
2.Map
(1)通过<map>标签定义,子标签使用<entry>标签。
(2)在<entry>标签里可以使用key、key-ref、value、value-ref属性。
Person.java
public class Person{

	private String name;

	private int age;

	private Map<String,Car> cars;

	//省略get set...

}
applicationContext.xml
<?xml version="1.0" encoding="UTF-8"?>

<beans xmlns="http://www.springframework.org/schema/beans"

    xmlns:xsi="http://www.w3.org/2001/XMLSchema-instance"

    xsi:schemaLocation="http://www.springframework.org/schema/beans http://www.springframework.org/schema/beans/spring-beans.xsd">

    <bean id="car" class="com.kiwi.domain.Car">

        <property name="brand" value="BMW" />

        <property name="color" value="Black" />

        <property name="price" value="800000" />

        <property name="maxSpeed" value="300" />

    </bean>

    <bean id="car2" class="com.kiwi.domain.Car">

        <property name="brand" value="Audi" />

        <property name="color" value="Black" />

        <property name="price" value="400000" />

        <property name="maxSpeed" value="250" />

    </bean>

    <bean id="person" class="com.kiwi.domain.Person">

        <property name="name" value="Tom" />

        <property name="age" value="26" />

        <!-- 配置集合属性Map -->

        <property name="cars">

            <map>

                <entry key="1" value-ref="car"/>

                <entry key="2" value-ref="car2"/>

            </map>

        </property>

    </bean>

</beans>
结果:
Person [name=Tom, age=26, cars={1=Car [brand=BMW, color=Black, price=800000.0, maxSpeed=300], 2=Car [brand=Audi, color=Black, price=400000.0, maxSpeed=250]}]
3.Properties
Properties类型可以看作Map类型的特例,Map元素的键和值可以是任何类型的对象,而Properties的键和值只能是字符串。
Boss.java
public class Boss{

	private Properties mails;

	@Override

	public String toString(){

		return "Boss [mails=" + mails + "]";

	}

	public Properties getMails(){

		return mails;

	}

	public void setMails(Properties mails){

		this.mails = mails;

	}

}
applicationContext.xml
<bean name="boss" class="com.kiwi.domain.Boss">

        <property name="mails">

            <props>

                <prop key="jobMail">123@126.com</prop>

                <prop key="lifeMail">789@qq.com</prop>

            </props>

        </property>

    </bean>
结果:
Boss [mails={lifeMail=789@qq.com, jobMail=123@126.com}]
4.配置集合类型的Bean
(1)使用基本集合标签定义集合时,不能将集合作为独立的Bean定义,导致其他Bean无法引用该集合,所以无法在不同Bean直接共享集合。
(2)如果希望配置一个集合类型的Bean,而非一个集合类型的属性,则可以通过util命名空间进行配置。
(3)必须先引用util命名空间才能使用。
<?xml version="1.0" encoding="UTF-8"?>

<beans xmlns="http://www.springframework.org/schema/beans"

    xmlns:xsi="http://www.w3.org/2001/XMLSchema-instance"

    xmlns:util="http://www.springframework.org/schema/util"

    xsi:schemaLocation="http://www.springframework.org/schema/beans http://www.springframework.org/schema/beans/spring-beans.xsd

                        http://www.springframework.org/schema/util http://www.springframework.org/schema/util/spring-util.xsd">

    <bean id="car" class="com.kiwi.domain.Car">

        <property name="brand" value="BMW" />

        <property name="color" value="Black" />

        <property name="price" value="800000" />

        <property name="maxSpeed" value="300" />

    </bean>

    <bean id="car2" class="com.kiwi.domain.Car">

        <property name="brand" value="Audi" />

        <property name="color" value="Black" />

        <property name="price" value="400000" />

        <property name="maxSpeed" value="250" />

    </bean>

    <!-- 定义一个公共的Map其他Bean能够直接引用它 -->

    <util:map id="cars">

        <entry key="1" value-ref="car"/>

        <entry key="2" value-ref="car2"/>

    </util:map>

    <bean id="person" class="com.kiwi.domain.Person">

        <property name="name" value="Tom" />

        <property name="age" value="26" />

        <!-- 引用公共的Map -->

        <property name="cars" ref="cars"/>

    </bean>

</beans>
四、使用p命名空间
为了简化XML文件的配置,越来越多的XML文件采用属性而非子元素配置信息。
applicationContext.xml
<?xml version="1.0" encoding="UTF-8"?>

<beans xmlns="http://www.springframework.org/schema/beans"

    xmlns:xsi="http://www.w3.org/2001/XMLSchema-instance"

    xmlns:util="http://www.springframework.org/schema/util"

    xmlns:p="http://www.springframework.org/schema/p"

    xsi:schemaLocation="http://www.springframework.org/schema/beans http://www.springframework.org/schema/beans/spring-beans.xsd

                        http://www.springframework.org/schema/util http://www.springframework.org/schema/util/spring-util.xsd">

    <bean id="car" class="com.kiwi.domain.Car"

                   p:brand="AuDi" p:color="Silver"

                   p:price="500000" p:maxSpeed="3000"/>

    <bean id="person" class="com.kiwi.domain.Person"

          p:name="Tom" p:age="27"  p:car-ref="car"/>

</beans>
这样写省略了<property>的子标签,使配置文件更加简洁。
五、自动装配
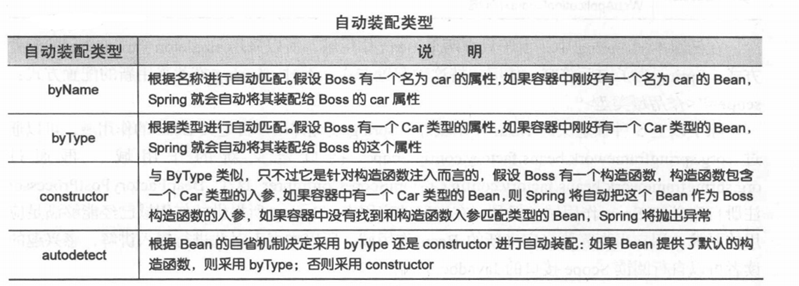
<bean>元素提供了一个指定自动装配类型的属性:atuowire。Spring提供了4种自动装配类型。
Person.java
public class Person{

	private String name;

	private Car car;

	private Address address;

	//...

}
applicationContext.xml
<?xml version="1.0" encoding="UTF-8"?>

<beans xmlns="http://www.springframework.org/schema/beans"

    xmlns:xsi="http://www.w3.org/2001/XMLSchema-instance"

    xmlns:util="http://www.springframework.org/schema/util"

    xmlns:p="http://www.springframework.org/schema/p"

    xsi:schemaLocation="http://www.springframework.org/schema/beans http://www.springframework.org/schema/beans/spring-beans.xsd

                        http://www.springframework.org/schema/util http://www.springframework.org/schema/util/spring-util.xsd">

    <bean id="car" class="com.kiwi.domain.Car"

          p:brand="LandRover"

          p:price="1200000"

        />

    <bean id="address" class="com.kiwi.domain.Address"

          p:province="BJ"

          p:city="CangPing"

        />

    <!--

        可以使用autowire属性指定自动装配的方式 。

        byName: 根据名称自动装配,必须将目标bean的名称和属性名设置的完全相同。

        byType: 根据类型自动装配,若IOC容器中有多个与目标 bean类型一致的 bean,

                在这种情况下,Spring 将无法判定哪个bean最合适该属性,所以不能执行自动装配。

    -->

    <bean id="person" class="com.kiwi.domain.Person"

          p:name="Tom"

          autowire="byName"

    />

</beans>
结果:
Person [name=Tom, car=Car [brand=LandRover, price=1200000.0], address=Address [province=BJ, city=CangPing]]
一般情况下,在实际的项目中很少使用自动装配功能,因为和自动装配功能所带来的好处比起来,明确清晰的配置文档更有说服力一些。
六、Bean之间的关系
Bean直接存在两种关系: 继承、依赖。
1.继承
(1)Spring允许继承bean的配置,被继承的bean称为父bean。
(2)子bean从父bean继承配置,包括属性配置,也可以覆盖父bean的配置。
(3)若只想把父bean作为模板,可以设置其属性abstract属性为true,这样Spring将不会实例化这个bean。
(4)并不是<bean>所有的属性都会被继承,比如:autowire、abstract。
applicationContext.xml
<bean id="address" class="com.kiwi.domain.Address"

          p:province="BJ"

          p:city="CangPingQu"

        />

    <bean id="address2" parent="address"

          p:city="HaiDianQu"

        />
结果:
Address [province=BJ, city=CangPingQu]
Address [province=BJ, city=HaiDianQu]
2.依赖
depend-on: 表示一个bean的实例化依靠另一个bean先实例化。如果在一个bean A上定义了depend-on B那么就表示:A 实例化前先实例化 B。这种情况下,A可能根本不需要持有一个B对象。
七、Bean的作用域
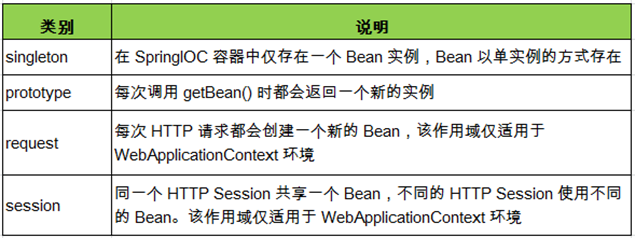
(1)在Spring中,可以在<bean>元素的scope属性设置Bean的作用域。
(2)默认情况下,Spring只为每个IOC容器里声明Bean创建唯一的一个实例,整个IOC容器都能共享该实例,该作用域为默认的singleton。
applicationContext.xml
<!--

        使用bean的scope属性来配置bean的作用域

        singleton: 默认值。容器初始化时创建bean实例,在整个容器生命周期内只创建这一个bean,单例的。

        prototype: 容器初始化时不创建bean的实例,而在每次getBean()时都创建一个实例。

     -->

    <bean id="car" class="com.kiwi.domain.Car"

          p:brand="LandRover"

          p:price="1200000"

          scope="singleton"

        />
Test.java
	@Test

	public void testCar(){

		ApplicationContext context = new ClassPathXmlApplicationContext("applicationContext.xml");

		Car car = (Car)context.getBean("car");

		Car car2 = (Car)context.getBean("car");

		System.out.println(car == car2);

	}
结果:
true
如果修改为scope="prototype",结果将返回false。
Spring基础学习(二)—详解Bean(上)的更多相关文章
- Spring基础学习(三)—详解Bean(下)
一.Bean的生命周期 1.概述 Spring IOC容器可以管理Bean的生命周期,Spring 允许在Bean的生命周期的特定点执行定制的任务. Spring IOC容器对Be ...
- 框架基础学习之--详解web+maven+spring+mybatis+struts框架文件夹作用
详解web+maven+spring+mybatis+struts框架文件夹作用 1.程序名 2.Mybatis,mybatis是数据持久层,就是和对象类有关系的东西 3.存放java文件,xml,p ...
- C#基础表达式语句详解(上)
本节内容: 1.表达式的定义: 2.各类表达式概览: 3.语句的定义: 4.语句详解: 1.表达式的定义: 1.1什么是表达式: (定义见下图)各类编程语言对表达式的实现不尽相同,但大体上都符合这个定 ...
- Spring框架系列(8) - Spring IOC实现原理详解之Bean实例化(生命周期,循环依赖等)
上文,我们看了IOC设计要点和设计结构:以及Spring如何实现将资源配置(以xml配置为例)通过加载,解析,生成BeanDefination并注册到IoC容器中的:容器中存放的是Bean的定义即Be ...
- Spring第三天,详解Bean的生命周期,学会后让面试官无话可说!
点击下方链接回顾往期 不要再说不会Spring了!Spring第一天,学会进大厂! Spring第二天,你必须知道容器注册组件的几种方式!学废它吊打面试官! 今天讲解Spring中Bean的生命周期. ...
- iOS 开发之照片框架详解之二 —— PhotoKit 详解(上)
转载自:http://kayosite.com/ios-development-and-detail-of-photo-framework-part-two.html 一. 概况 本文接着 iOS 开 ...
- spring框架 AOP核心详解
AOP称为面向切面编程,在程序开发中主要用来解决一些系统层面上的问题,比如日志,事务,权限等待,Struts2的拦截器设计就是基于AOP的思想,是个比较经典的例子. 一 AOP的基本概念 (1)Asp ...
- Spring框架系列(6) - Spring IOC实现原理详解之IOC体系结构设计
在对IoC有了初步的认知后,我们开始对IOC的实现原理进行深入理解.本文将帮助你站在设计者的角度去看IOC最顶层的结构设计.@pdai Spring框架系列(6) - Spring IOC实现原理详解 ...
- Spring框架系列(7) - Spring IOC实现原理详解之IOC初始化流程
上文,我们看了IOC设计要点和设计结构:紧接着这篇,我们可以看下源码的实现了:Spring如何实现将资源配置(以xml配置为例)通过加载,解析,生成BeanDefination并注册到IoC容器中的. ...
随机推荐
- 智能打印SDK-源码剖析
开源地址:http://www.dnnode.com/ 软件下载地址:http://www.dnnode.com/在线展示:http://www.dnnode.com/help.html 前面的文章, ...
- 【转】Hibernate和IBatis对比
原文地址:http://blog.csdn.net/ya2dan/article/details/7396598 项目也做过几个, 使用IBatis就做一个项目, 基本上都是使用Hibernate, ...
- angular 2 animate 笔记
好久没有在这里写点笔记了.时隔已久,angular1 去 angular2 咯 笔记来源:https://angular.cn/docs/ts/latest/guide/animations.html ...
- RunTime.getRuntime().exec()运行脚本命令介绍和阻塞
java在企业级项目开发中,无论是强制性的功能需要,还是为了简便java的实现,需要调用服务器命令脚本来执行.在java中,RunTime.getRuntime().exec()就实现了这个功能. ...
- 1671: [Usaco2005 Dec]Knights of Ni 骑士
1671: [Usaco2005 Dec]Knights of Ni 骑士 Time Limit: 5 Sec Memory Limit: 64 MBSubmit: 254 Solved: 163 ...
- intellij idea打jar包时的注意事项
intellij idea项目在打包maven项目时,数据路径很容易出现问题.在IDE内直接运行不会报错,但打成jar包运行就会报错. intellij打包的几种方式:http://www.cnblo ...
- android 透明状态栏方法及其适配键盘上推(二)
在上一篇文章中介绍了一种设置透明状态栏及其适配键盘上推得方法.但是上一篇介绍的方法中有个缺点,就是不能消除掉statusbar的阴影.很多手机如(三星,Nexus都带有阴影).即使我用了: <a ...
- 纯Jquery前端分页
---恢复内容开始--- 由于之前自己做过jquery分页,就是调用jni接口时,只能用前台分页解决显示问题.最近看到有人提这样的问题:一个请求传过来上万个数据怎么办?于是萌生了写这篇博客的想法. 效 ...
- java中有符号和无符号数据类型发生转换
package com.itheima.test01;/* * byte short int long float double 是有符号位的数 * char boolean 是无符号位的数 * 补码 ...
- 关于数组和集合的冒泡排序中容易出现的IndexOutOfBoundsException
数组只能存错一种相同的数据类型,集合只能存储引用数据类型(用泛型),集合的底层就是一个可变的数组. 数组的冒泡排序: public static void arrayMaxPaiXu(int[] ar ...