u-boot v2018.01 启动流程分析
https://blog.csdn.net/weixin_39655765/article/details/80058644#jump1
make smdkc100_defconfig
以被默认支持的smdkc100单板为背景分析u-boot v2018.01
参考图1可知uboot
code链接顺序:
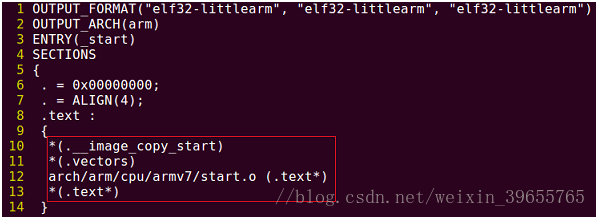
图1
u-boot.lds
一、sections.c (arch\arm\lib)
第24行:
char __image_copy_start[0]
__attribute__((section(".__image_copy_start")));
不占内存空间,可在u-boot镜像开始位置生成标签__image_copy_start。
二、vectors.S (arch\arm\lib)
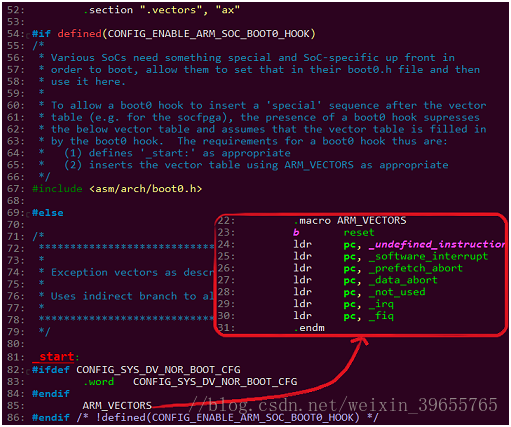
图2
.vectors段头部
_start:建立异常向量表。
某些SOC要求Bootloader头部有hook数据用来指导BL0(固化在iROM)将Nand flash中的BootLoader加载到iRAM中。
此时需定义CONFIG_ENABLE_ARM_SOC_BOOT0_HOOK,及定义asm/arch/boot0.h
文件,参考arch\arm\include\asm\arch-bcm281xx\boot0.h
三、start.S (arch\arm\cpu\armv7)
reset:
1. 设置CPSR:CPU为SVC模式,禁止IRQ/FIQ;
2. 通过SCTLR和VBAR设置异常向量表的地址到_start;
3. cpu_init_cp15: 失效TLB、L1 icache、BP数组;关MMU、dcache,开icache和分支预测;将CPU的
variant + revision存于R2;
4. cpu_init_crit: 调用lowlevel_init(board\samsung\smdkc100\lowlevel_init.S):
① 关闭看门狗;
② 设置SRAM;
③ 禁止所有中断线,并设为IRQ及清除标志位;
④ 初始化uart的引脚;
⑤ 初始化tzpc为关闭;
5. 跳到_main。
四、crt0.S (arch\arm\lib)
_main:
1. 设置sp为0x2f000000;
crt0.S:
===========================================================
#if defined(CONFIG_SPL_BUILD) && defined(CONFIG_SPL_STACK)
ldr r0, =(CONFIG_SPL_STACK)
#else
ldr r0, =(CONFIG_SYS_INIT_SP_ADDR)
#endif
bic r0, r0, #7 /* 8-byte
alignment for ABI compliance */
mov sp, r0
===========================================================
CONFIG_SYS_INIT_SP_ADDR=0x20000+0x30000-208=0x4ff30
include/configs/fmxx-common.h
#define CONFIG_SYS_INIT_SP_ADDR (CONFIG_SYS_INIT_RAM_ADDR
+ \
CONFIG_SYS_INIT_RAM_SIZE - GENERATED_GBL_DATA_SIZE)
#define CONFIG_SYS_INIT_RAM_ADDR 0x20000 #AXI SRAM addr
0x0002_0000~0x0005_FFFF
#define CONFIG_SYS_INIT_RAM_SIZE 0x30000
#define GENERATED_GBL_DATA_SIZE 208 /* (sizeof(struct global_data) + 15) &
~15 @ */ #include/generated/generic-asm-offsets.h
设置sp为0x4ff30
2. 调用board_init_f_alloc_reserve (top=0x2f000000)(common\init\board_init.c):返回top =
(0x2f000000 - 1KB(malloc) -
sizeof(struct global_data) ) & ~0xF ;
===================================================
common/init/board_init.c
ulong board_init_f_alloc_reserve(ulong top)
{
/* Reserve early malloc arena */
#if CONFIG_VAL(SYS_MALLOC_F_LEN)
top -= CONFIG_VAL(SYS_MALLOC_F_LEN);
#endif
/* LAST : reserve GD (rounded up to a multiple of 16 bytes)
*/
top = rounddown(top-sizeof(struct global_data), 16);
return top;
}
=====================================================
CONFIG_SYS_MALLOC_F_LEN=0x800
#configs/fmxx_common_defconfig
top=(0x4ff30-0x800-sizeof(struct global_data) ) & ~0xF
3. r9(gd) = sp = top;
======================================
mov sp, r0
/* set up gd here, outside any C code */
mov r9, r0
=======================================
4. 调用board_init_f_init_reserve
(base=top):struct global_data清0,gd->malloc_base设在
struct global_data之上;
common/init/board_init.c base=top=(0x4ff30-0x800-sizeof(struct
global_data) )
& ~0xF
==============================================================
void board_init_f_init_reserve(ulong base)
{
struct global_data *gd_ptr;
/*
* clear GD entirely and set it up.
* Use gd_ptr, as gd may not be properly set yet.
*/
gd_ptr = (struct global_data *)base;
/* zero the area */
memset(gd_ptr, '\0', sizeof(*gd));
/* set GD unless architecture did it already */
#if !defined(CONFIG_ARM)
arch_setup_gd(gd_ptr);
#endif
/* next alloc will be higher by one GD plus 16-byte
alignment */
base += roundup(sizeof(struct global_data), 16);
/*
* record early malloc arena start.
* Use gd as it is now properly set for all
architectures.
*/
#if CONFIG_VAL(SYS_MALLOC_F_LEN)
/* go down one 'early malloc arena' */
gd->malloc_base = base;
/* next alloc will be higher by one 'early malloc arena'
size */
base += CONFIG_VAL(SYS_MALLOC_F_LEN);
#endif
}
=========================================================
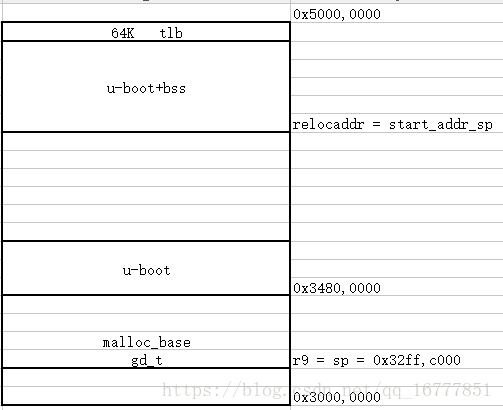
如下图所示为建立C语言运行环境的内存分布:

图3
C运行环境建立
5. 调用board_init_f (boot_flags=0)(common\board_f.c):gd->flags = 0,gd->have_console = 0,执行
init_sequence_f[]中的函数:
=====================
mov r0, #0
bl board_init_f
common/board_f.c
void board_init_f(ulong boot_flags)
{
gd->flags = boot_flags;
gd->have_console = 0;
if (initcall_run_list(init_sequence_f))
hang();
#if !defined(CONFIG_ARM) && !defined(CONFIG_SANDBOX) && \
!defined(CONFIG_EFI_APP) &&
!CONFIG_IS_ENABLED(X86_64) && \
!defined(CONFIG_ARC)
/* NOTREACHED - jump_to_copy() does not return */
hang();
#endif
}
initcall_run_list @ include/initcall.h
static inline int initcall_run_list(const init_fnc_t init_sequence[])
{
const init_fnc_t *init_fnc_ptr;
for (init_fnc_ptr = init_sequence; *init_fnc_ptr;
++init_fnc_ptr) {
unsigned long reloc_ofs = 0;
int ret;
/*
* Sandbox is relocated by the
OS, so symbols always appear at
* the relocated address.
*/
if (IS_ENABLED(CONFIG_SANDBOX) ||
(gd->flags & GD_FLG_RELOC))
reloc_ofs =
gd->reloc_off;
#ifdef CONFIG_EFI_APP
reloc_ofs = (unsigned
long)image_base;
#endif
debug("initcall: %p",
(char *)*init_fnc_ptr - reloc_ofs);
if (reloc_ofs)
debug("
(relocated to %p)\n", (char *)*init_fnc_ptr);
else
debug("\n");
ret = (*init_fnc_ptr)();
if (ret) {
printf("initcall sequence %p failed at call %p (err=%d)\n",
init_sequence,
(char *)*init_fnc_ptr - reloc_ofs, ret);
return -1;
}
}
return 0;
}
common/board_f.c
static const init_fnc_t init_sequence_f[]
= {
setup_mon_len,
#ifdef CONFIG_OF_CONTROL
fdtdec_setup,
#endif
#ifdef CONFIG_TRACE
trace_early_init,
#endif
initf_malloc,
log_init,
initf_bootstage, /* uses its own timer, so
does not need DM */
initf_console_record,
#if defined(CONFIG_HAVE_FSP)
arch_fsp_init,
#endif
arch_cpu_init, /* basic
arch cpu dependent setup */
mach_cpu_init, /*
SoC/machine dependent CPU setup */
initf_dm,
arch_cpu_init_dm,
#if defined(CONFIG_BOARD_EARLY_INIT_F)
board_early_init_f,
#endif
#if defined(CONFIG_PPC) || defined(CONFIG_SYS_FSL_CLK) || defined(CONFIG_M68K)
/* get CPU and bus clocks according to the environment
variable */
get_clocks, /* get CPU
and bus clocks (etc.) */
#endif
#if !defined(CONFIG_M68K)
timer_init, /*
initialize timer */
#endif
#if defined(CONFIG_BOARD_POSTCLK_INIT)
board_postclk_init,
#endif
env_init, /* initialize
environment */
init_baud_rate, /*
initialze baudrate settings */
serial_init, /* serial
communications setup */
console_init_f, /*
stage 1 init of console */
display_options, /* say that we are here
*/
display_text_info, /* show debugging info
if required */
#if defined(CONFIG_PPC) || defined(CONFIG_SH) || defined(CONFIG_X86)
checkcpu,
#endif
#if defined(CONFIG_DISPLAY_CPUINFO)
print_cpuinfo, /*
display cpu info (and speed) */
#endif
#if defined(CONFIG_DTB_RESELECT)
embedded_dtb_select,
#endif
#if defined(CONFIG_DISPLAY_BOARDINFO)
show_board_info,
#endif
INIT_FUNC_WATCHDOG_INIT
#if defined(CONFIG_MISC_INIT_F)
misc_init_f,
#endif
INIT_FUNC_WATCHDOG_RESET
#if defined(CONFIG_SYS_I2C)
init_func_i2c,
#endif
#if defined(CONFIG_VID) && !defined(CONFIG_SPL)
init_func_vid,
#endif
#if defined(CONFIG_HARD_SPI)
init_func_spi,
#endif
announce_dram_init,
dram_init, /* configure
available RAM banks */
#ifdef CONFIG_POST
post_init_f,
#endif
INIT_FUNC_WATCHDOG_RESET
#if defined(CONFIG_SYS_DRAM_TEST)
testdram,
#endif /* CONFIG_SYS_DRAM_TEST */
INIT_FUNC_WATCHDOG_RESET
#ifdef CONFIG_POST
init_post,
#endif
INIT_FUNC_WATCHDOG_RESET
/*
* Now that we have DRAM mapped and working, we can
* relocate the code and continue running from DRAM.
*
* Reserve memory at end of RAM for (top down in that
order):
* - area that won't get touched by U-Boot and Linux
(optional)
* - kernel log buffer
* - protected RAM
* - LCD framebuffer
* - monitor code
* - board info struct
*/
setup_dest_addr,
#ifdef CONFIG_PRAM
reserve_pram,
#endif
reserve_round_4k,
#ifdef CONFIG_ARM
reserve_mmu,
#endif
reserve_video,
reserve_trace,
reserve_uboot,
reserve_malloc,
reserve_board,
setup_machine,
reserve_global_data,
reserve_fdt,
reserve_bootstage,
reserve_arch,
reserve_stacks,
dram_init_banksize,
show_dram_config,
#if defined(CONFIG_M68K) || defined(CONFIG_MIPS) || defined(CONFIG_PPC) || \
defined(CONFIG_SH)
setup_board_part1,
#endif
#if defined(CONFIG_PPC) || defined(CONFIG_M68K)
INIT_FUNC_WATCHDOG_RESET
setup_board_part2,
#endif
display_new_sp,
#ifdef CONFIG_OF_BOARD_FIXUP
fix_fdt,
#endif
INIT_FUNC_WATCHDOG_RESET
reloc_fdt,
reloc_bootstage,
setup_reloc,
#if defined(CONFIG_X86) || defined(CONFIG_ARC)
copy_uboot_to_ram,
do_elf_reloc_fixups,
clear_bss,
#endif
#if defined(CONFIG_XTENSA)
clear_bss,
#endif
#if !defined(CONFIG_ARM) && !defined(CONFIG_SANDBOX) && \
!CONFIG_IS_ENABLED(X86_64)
jump_to_copy,
#endif
NULL,
};
=====================
(1) setup_mon_len():设gd->mon_len为__bss_end-_start; uboot的总长度
有没有想过__bss_end-_start是怎么来的,我分析到setup_reloc
gd->reloc_off = gd->relocaddr - (unsigned long)__image_copy_start; //计算偏移
纳闷__image_copy_start是多少,哪里来的。
反过来看to_run_away 的博客
所以这篇文章的大前提是u-boot已经被拷贝到CONFIG_SYS_TEXT_BASE指定的地址。
to_run_away 的博客 没有fsbl 我重新梳理了一遍,是在lowlevel_init添加了ddr的初始化和搬移
- bl mem_ctrl_asm_init
- bl mmc_relocate
- /* 打印出搬移完的uboot的前四个字节数据 */
- ldr r0, =0x34800000
- bl uart_print_hex
只不过zynq的初始化和搬移是在fsbl中做的,都是软件的工作。
(2) fdtdec_setup():gd->fdt_blob设 在_end(CONFIG_OF_SEPARATE=> u-boot.bin = uboot+dtb),或用
default_environment的"fdtcontroladdr"覆盖其值;检查设备树的header;
CONFIG_OF_EMBED gd->fdt_blob = __dtb_dt_begin;
(3) initf_malloc():设gd->malloc_limit为(1KB),gd->malloc_ptr = 0;board_init_f
========================================
common/dlmalloc.c
int initf_malloc(void)
{
#if CONFIG_VAL(SYS_MALLOC_F_LEN)
assert(gd->malloc_base); /* Set up by
crt0.S */
gd->malloc_limit = CONFIG_VAL(SYS_MALLOC_F_LEN);
gd->malloc_ptr = 0;
#endif
return 0;
}
=========================================
CONFIG_SYS_MALLOC_F_LEN=0x800
#configs/fmxx_common_defconfig
gd->malloc_limit=0x800
gd->malloc_ptr = 0
(4) log_init(),initf_bootstage(), initf_console_record():空;
见另一篇博客u-boot log_init函数分析
log_init的主要功能是将.u_boot_list_2_log_driver_3和.u_boot_list_2_log_driver_1之间的所有struct log_driver结构体都加入到了gd->log_head的循环链表中,并初始化gd->default_log_level和gd->log_fmt
(增加)initf_bootstage initf_bootstage的主要作用就是为gd->bootstage分配空间,并初始化gd->bootstage,增加两条gd->bootstage->record,一条是reset,一条是board_init_f
(增加)initf_console_record
static int initf_console_record(void)
{
#if defined(CONFIG_CONSOLE_RECORD) &&
CONFIG_VAL(SYS_MALLOC_F_LEN)
//CONFIG_CONSOLE_RECORD在.config中设置为未定义,不执行
return console_record_init();
#else
return 0;
#endif
}
initf_console_record函数什么也没做
(5) arch_cpu_init():读PRO_ID寄存器内容解析出CPU id到全局变量s5p_cpu_id; fmxx 空
(6) mach_cpu_init():空;
(7) initf_dm():初始化dm资源,绑定dm驱动到gd中,扫描设备树中dm设备内容;
见另一篇博客uboot initf_dm函数分析
(8) arch_cpu_init_dm():空;
(增加)board_early_init_f @board.c
int board_early_init_f(void)
{
#ifdef CONFIG_XXX_PS_INIT
ps_init();
#endif
#ifdef CONFIG_DEBUG_UART
debug_uart_init();
#endif
clocks_init();
return 0;
}
这是调试阶段为了方便将ps_init放在此处,正式使用时候ps_init放在fsbl中。
(9) timer_init():初始化定时器和gd->arch中的定时器成员;
不知道到底用的是哪个文件里的这个函数,那就grep一下
u-boot目录下grep出太多了,有些在board目录下,有些架构不对。
缩小下范围,u-boot-2018.07-fmxx/arch/arm/cpu/armv7
grep -nwr "timer_init"
发现了arch_timer.c:24:int timer_init(void)
于是进入u-boot-2018.07-fmxx/arch/arm/cpu/armv7下的Makefile
obj-$(CONFIG_SYS_ARCH_TIMER) += arch_timer.o
再去defconfig里找,确实有CONFIG_SYS_ARCH_TIMER=y
bingo
#ifdef CONFIG_SYS_HZ_CLOCK
gd->arch.timer_rate_hz = CONFIG_SYS_HZ_CLOCK;
#else
gd->arch.timer_rate_hz =
read_cntfrq();
#endif
#ifndef CONFIG_SYS_HZ_CLOCK
static inline u32 read_cntfrq(void)
{
u32 frq;
asm volatile("mrc p15, 0, %0, c14, c0, 0" :
"=r" (frq));
return frq;
}
#endif
(10) env_init():通过默认env_driver初始化env或者gd->env_addr =
(ulong)&default_environment[0];,
gd->env_valid = ENV_VALID;
(11) init_baud_rate():gd->baudrate设为env中"baudrate"的值;
static int init_baud_rate(void)
{
gd->baudrate = env_get_ulong("baudrate", 10,
CONFIG_BAUDRATE);
return 0;
}
CONFIG_BAUDRATE 在.config中定义,是make
menuconfig默认的定义(defconfig和config.h中都不必要再定义了)
(12) serial_init()(drivers\serial\serial-uclass.c):在设备树中找"stdout-path"的节点,用节点找
UCLASS_SERIAL类设备probe起来,gd->cur_serial_dev
= dev;,gd->flags |= GD_FLG_SERIAL_READY;
serial_init在serial-uclass.c和serial.c中都有定义,到底用的哪一个,来看Makefile,
ifdef CONFIG_DM_SERIAL
obj-y += serial-uclass.o
else
obj-y += serial.o
endif
.config中定义了CONFIG_DM_SERIAL serial-uclass.c
(13) console_init_f():gd->have_console =
1,用CONFIG_SILENT_CONSOLE可让控制台“沉默”;
(14) display_options():打印u-boot版本信息;
(15) display_text_info():开debug时,打印u-boot code的内存地址;
(16) print_cpuinfo()(arch\arm\cpu\armv7\s5p-common\cpu_info.c):打印设备树"cpu-model"标签的data,
或字符串S5P和s5p_cpu_id变量值;打印CPU主频;
\u-boot-2018.07-fmxx\arch\arm\mach-fmxx\cpu.c,自己写的。
(17) show_board_info():打印设备树"model"的data和单板名;
(18) announce_dram_init(),dram_init():初始化gd->ram_size为通过写读SDRAM校验后得到的实际大小;
Now
that we have DRAM mapped and working, we can relocate the code and continue
running from DRAM.
gd->ram_size=1023MB
(19) setup_dest_addr():gd->ram_top,gd->relocaddr设为SDRAM末尾:
#ifdef CONFIG_SYS_SDRAM_BASE
gd->ram_top = CONFIG_SYS_SDRAM_BASE;
#endif
gd->ram_top += get_effective_memsize();
gd->ram_top = board_get_usable_ram_top(gd->mon_len);
gd->relocaddr = gd->ram_top;
debug("Ram top: %08lX\n", (ulong)gd->ram_top);
在这里卡了很久,其实是自己没看清
gd->ram_top += get_effective_memsize();
get_effective_memsize搜遍整个u-boot,没有自己定义./common/memsize.c
phys_size_t __weak
get_effective_memsize(void)
{
#ifndef CONFIG_VERY_BIG_RAM
return gd->ram_size;
#else
/* limit stack to what we can reasonable map */
return ((gd->ram_size > CONFIG_MAX_MEM_MAPPED) ?
CONFIG_MAX_MEM_MAPPED :
gd->ram_size);
#endif
}
所以用了这个默认的。一直没看清最上面是ifndef以为要用到下面的,就想,这个CONFIG_MAX_MEM_MAPPED没有定义,怎么编译通过的呢。
实在没办法,打开debug,include/log.h中在ifdef DEBUG上面加上#define DEBUG 打开debug能输出很多信息
在else分支加入打印信息并没有打印出来,说明没有跑到这个分支。
但是在u-boot.map中看到
get_effective_memsize确实在common/built-in.o中。
终极大法:arm-linux-gnueabihf-objdump -S u-boot >u-boot.S
看看反汇编
bl 4024ef0 <get_effective_memsize>
phys_size_t __weak get_effective_memsize(void)
{
#ifndef CONFIG_VERY_BIG_RAM
return gd->ram_size;
4024ef0: e5990038 ldr r0, [r9,
#56] ; 0x38
return ((gd->ram_size > CONFIG_MAX_MEM_MAPPED) ?
CONFIG_MAX_MEM_MAPPED : gd->ram_size);
#endif
}
#ifdef CONFIG_SYS_SDRAM_BASE
gd->ram_top = CONFIG_SYS_SDRAM_BASE;
#endif
gd->ram_top += get_effective_memsize();
gd->ram_top=0x3ff00000,gd->relocaddr=0x3ff00000
(20) reserve_round_4k():gd->relocaddr调整为4KB对齐;
/* Round memory pointer down to next 4 kB limit */
static int reserve_round_4k(void)
{
gd->relocaddr &= ~(4096 - 1);
return 0;
}
gd->relocaddr=0x3ff00000
(21) reserve_mmu():gd->arch.tlb_size设为16KB,SDRAM为TLB预留空间,设置gd->arch.tlb_addr;
gd->relocaddr -=gd->arch.tlb_size
gd->relocaddr
&= ~(0x10000 - 1);
gd->arch.tlb_addr = gd->relocaddr;
(22) reserve_video():依赖CONFIG_LCD(未定义),为显存预留内存,初始化gd->fb_base;
空
(23) reserve_trace():依赖CONFIG_TRACE(未定义),初始化gd->trace_buff;
空
(24) reserve_uboot():预留gd->mon_len个字节给u-boot code,地址存于gd->relocaddr;
static int reserve_uboot(void)
{
if (!(gd->flags & GD_FLG_SKIP_RELOC)) {
/*
* reserve memory for U-Boot
code, data & bss
* round down to next 4 kB
limit
*/
gd->relocaddr -= gd->mon_len;
gd->relocaddr &= ~(4096 - 1);
#if defined(CONFIG_E500) || defined(CONFIG_MIPS)
/* round down to next 64 kB limit so
that IVPR stays aligned */
gd->relocaddr &= ~(65536 -
1);
#endif
debug("Reserving %ldk for
U-Boot at: %08lx\n",
gd->mon_len >> 10, gd->relocaddr);
}
gd->start_addr_sp =
gd->relocaddr;
return 0;
}
(25) reserve_malloc():预留malloc和env区;
gd->start_addr_sp =
gd->start_addr_sp - TOTAL_MALLOC_LEN;
#define TOTAL_MALLOC_LEN (CONFIG_SYS_MALLOC_LEN +
CONFIG_ENV_SIZE)
#if defined(CONFIG_ENV_IS_EMBEDDED)
#define TOTAL_MALLOC_LEN CONFIG_SYS_MALLOC_LEN
#elif ( ((CONFIG_ENV_ADDR+CONFIG_ENV_SIZE) < CONFIG_SYS_MONITOR_BASE) || \
(CONFIG_ENV_ADDR >=
(CONFIG_SYS_MONITOR_BASE + CONFIG_SYS_MONITOR_LEN)) ) || \
defined(CONFIG_ENV_IS_IN_NVRAM)
#define TOTAL_MALLOC_LEN (CONFIG_SYS_MALLOC_LEN +
CONFIG_ENV_SIZE)
#else
#define TOTAL_MALLOC_LEN CONFIG_SYS_MALLOC_LEN
#endif
参考被定义了,但它却被定义为未定义——有趣的宏定义
CONFIG_ENV_ADDR和CONFIG_SYS_MONITOR_BASE都未被定义,所以相等。
(26) reserve_board():预留struct
bd_info的空间并清零,地址存于gd->bd;
gd->start_addr_sp -= sizeof(bd_t);
gd->bd = (bd_t *)map_sysmem(gd->start_addr_sp, sizeof(bd_t));
memset(gd->bd, '\0', sizeof(bd_t));
vi include/mapmem.h
static inline void *map_sysmem(phys_addr_t paddr, unsigned long len)
{
return (void *)(uintptr_t)paddr;
}
返回指针值的函数
类型名 *函数名(参数列表)
int *a(int x, int y)
int (*p)(int, int) p是指向函数的指针变量
(27) setup_machine():依赖CONFIG_MACH_TYPE(未定义),设置gd->bd->bi_arch_number;
static int setup_machine(void)
{
#ifdef CONFIG_MACH_TYPE
gd->bd->bi_arch_number = CONFIG_MACH_TYPE; /* board id
for Linux */
#endif
return 0;
}
(28) reserve_global_data():预留struct
global_data的空间,地址存于gd->new_gd;
static int reserve_global_data(void)
{
gd->start_addr_sp -=
sizeof(gd_t);
gd->new_gd = (gd_t
*)map_sysmem(gd->start_addr_sp, sizeof(gd_t));
debug("Reserving %zu Bytes for Global Data at:
%08lx\n",
sizeof(gd_t),
gd->start_addr_sp);
return 0;
}
(29) reserve_fdt():预留存放设备树的内存,设置gd->fdt_size和gd->new_fdt;
gd->fdt_size =
ALIGN(fdt_totalsize(gd->fdt_blob) + 0x1000, 32);
gd->start_addr_sp -= gd->fdt_size;
gd->new_fdt = map_sysmem(gd->start_addr_sp, gd->fdt_size);
(30) reserve_bootstage():依赖CONFIG_BOOTSTAGE(未定义),预留存放struct bootstage_data的内存,设置
gd->new_bootstage;
#ifdef CONFIG_BOOTSTAGE
int size = bootstage_get_size();
gd->start_addr_sp -= size;
gd->new_bootstage = map_sysmem(gd->start_addr_sp,
size);
debug("Reserving %#x Bytes for bootstage at:
%08lx\n", size,
gd->start_addr_sp);
#endif
(31) reserve_arch(): 空;
(32) reserve_stacks():设置gd->irq_sp(需16B对齐),预留为4个word的地址记到gd->start_addr_sp;
gd->start_addr_sp -= 16;
gd->start_addr_sp &=
~0xf;
return arch_reserve_stacks();
函数(19)到(32)进行的内存划分结果如图4所示:

图4 重定位前内存划分
(33) dram_init_banksize():初始化gd->bd->bi_dram;
在vi board/xxx/board.c中定义,如果没找到定义的就找__weak
(34) show_dram_config():打印DRAM的大小;
common/board_f.c
size = gd->ram_size;
(35) display_new_sp():打印gd->start_addr_sp的值;
(36) reloc_fdt():将gd->fdt_blob地址的设备树重定位到gd->new_fdt地址上,更新gd->fdt_blob;
static int reloc_fdt(void)
{
#ifndef CONFIG_OF_EMBED
if (gd->flags & GD_FLG_SKIP_RELOC)
return 0;
if (gd->new_fdt) {
memcpy(gd->new_fdt, gd->fdt_blob, gd->fdt_size);
gd->fdt_blob = gd->new_fdt;
}
#endif
return 0;
}
(37) reloc_bootstage():依赖CONFIG_BOOTSTAGE(未定义),重定位gd->bootstage内容到
gd->new_bootstage,更新gd->bootstage;
static int reloc_bootstage(void)
{
#ifdef CONFIG_BOOTSTAGE
if (gd->flags & GD_FLG_SKIP_RELOC)
return 0;
if (gd->new_bootstage) {
int size = bootstage_get_size();
debug("Copying bootstage from %p to %p, size %x\n",
gd->bootstage, gd->new_bootstage, size);
memcpy(gd->new_bootstage, gd->bootstage, size);
gd->bootstage = gd->new_bootstage;
}
#endif
return 0;
}
(38) setup_reloc():初始化gd->reloc_off为重定位目标地址与链接地址之差,重定位gd_t内容到
gd->new_gd;
gd->reloc_off = gd->relocaddr - (unsigned long)__image_copy_start; //计算偏移
memcpy(gd->new_gd, (char *)gd, sizeof(gd_t));
gd->relocaddr见上图, reserve_uboot
在分析relocate_code之前我们先分析一下uboot中各个段的含义

6. 执行sp = gd->start_addr_sp,r9(gd) = gd->new_gd,记录重定位代码后的here地址到lr,执行
relocate_code (gd->relocaddr)(arch\arm\lib\relocate.S),如图5所示:
ldr r0, [r9, #GD_START_ADDR_SP] /* sp =
gd->start_addr_sp */
bic r0, r0, #7 /* 8-byte alignment for ABI compliance
*/
mov sp, r0
ldr r9, [r9,
#GD_BD] /* r9 = gd->bd */
sub r9, r9,
#GD_SIZE /* new GD is below bd */
adr lr, here
ldr r0, [r9, #GD_RELOC_OFF] /* r0 =
gd->reloc_off */
add lr, lr, r0
#if defined(CONFIG_CPU_V7M)
orr lr,
#1
/* As required by Thumb-only */
#endif
ldr r0, [r9, #GD_RELOCADDR] /* r0 =
gd->relocaddr */
b relocate_code
① 将地址__image_copy_start至__image_copy_end的u-boot code 重定位到地址gd->relocaddr;
② 通过.rel.dyn段确定u-boot code中所有符号索引的内存地址,用重定位偏移校正符号索引的值[1];
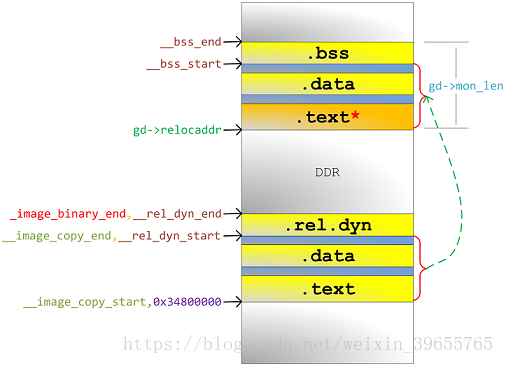
图5
动态重定位
跳转到重定位后的u-boot code执行以下代码:
here:
ENTRY(relocate_code)
ldr r1, =__image_copy_start /* r1 <- SRC &__image_copy_start */
subs r4, r0, r1 /* r4 <- relocation offset */
beq relocate_done /* skip relocation */
r0 = gd->relocaddr __image_copy_start 这两个相等就跳过relocate
7. 调用relocate_vectors()设置VBAR重定位异常向量表地址到gd->relocaddr;
arch/arm/lib/relocate.S
ldr r0, [r9, #GD_RELOCADDR] /* r0 =
gd->relocaddr */
mcr p15, 0, r0, c12, c0, 0 /*
Set VBAR */
c_runtime_cpu_setup()
(arch\arm\cpu\armv7\start.S)失效icache内容,数据同步内存屏障(DSB),指令同步内存屏障(ISB);
mcr p15, 0, r0, c7, c5, 0 @ invalidate
icache
mcr p15, 0, r0, c7, c10, 4 @
DSB
mcr p15, 0, r0, c7, c5,
4 @ ISB
执行memset(__bss_start,__bss_end,__bss_end-__bss_start)清零BSS段;
总结:可以看到uboot的前半部分主要是把定位在0x34800000地址的uboot搬移到DDR的顶部位置,同时初始化了一些底层的配置,把板子的一些参数保存进了gd中,方便后面使用。
8. coloured_LED_init(),red_led_on(),空;
9. 执行 board_init_r (gd, gd->relocaddr);正式进入bootloader第二阶段。
/* call board_init_r(gd_t *id, ulong dest_addr) */
mov r0, r9 /* gd_t */
ldr r1, [r9, #GD_RELOCADDR] /* dest_addr */
/* call board_init_r */
ldr pc, =board_init_r /* this is auto-relocated! */
五、board_init_r(gd, gd->relocaddr) (common/board_r.c)
1. gd->flags &= ~GD_FLG_LOG_READY;:指示log系统未初始化;
2. 调用init_sequence_r[]中函数,打印函数指针链接地址和重定位地址(需开DEBUG):
(1) initr_trace():依赖CONFIG_TRACE(未定义),trace system函数未实现;
(2) initr_reloc():gd->flags |=
GD_FLG_RELOC | GD_FLG_FULL_MALLOC_INIT;标志重定位完成;
/* tell others: relocation done */
gd->flags |= GD_FLG_RELOC |
GD_FLG_FULL_MALLOC_INIT;
(3) initr_caches():调用arch/arm/mach-s5pc1xx/cache.c函数,开dcache (undef CONFIG_SYS_DCACHE_OFF);
为什么要关闭cache?*catch和MMU是通过CP15管理的,刚上电的时候,CPU还不能管理他们。所以上电的时候MMU必须关闭,指令cache可关闭,可不关闭,但数据cache一定要关闭
*否则可能导致刚开始的代码里面,去取数据的时候,从catch里面取,而这时候RAM中数据还没有cache过来,导致数据预取异常
static int initr_caches(void)
{
/* Enable caches */
enable_caches();
return 0;
}
enable_caches 在 arch/arm/mach-fmxx/cpu.c
或者arch/arm/lib/cache.c 里有个weak版本
(4) initr_reloc_global_data():重定位全局变量:monitor_flash_len,gd->fdt_blob(CONFIG_OF_EMBED),
EFI的扩展固件(CONFIG_EFI_LOADER);
#ifdef __ARM__ #不明白在哪里定义了这个
monitor_flash_len = _end -
__image_copy_start;
#ifdef CONFIG_OF_EMBED
/*
* The fdt_blob needs to be moved to new relocation
address
* incase of FDT blob is embedded with in image
*/
gd->fdt_blob +=
gd->reloc_off;
#endif
reloc_fdt()中:
#ifndef CONFIG_OF_EMBED #所以没有进行以下操作
if (gd->flags & GD_FLG_SKIP_RELOC)
return 0;
if (gd->new_fdt) {
memcpy(gd->new_fdt,
gd->fdt_blob, gd->fdt_size);
gd->fdt_blob = gd->new_fdt;
}
#endif
- dtb集成到uboot的bin文件内部
- 如何使能
需要打开CONFIG_OF_EMBED宏来使能。 - 编译说明
在这种方式下,在编译uboot的过程中,也会编译dtb。 - 最终位置
注意:最终dtb是包含到了uboot的bin文件内部的。
dtb会位于uboot的.dtb.init.rodata段中,并且在代码中可以通过__dtb_dt_begin符号获取其符号。
因为这种方式不够灵活,文档上也不推荐,所以后续也不具体研究,简单了解一下即可。
_end:
char _end[0] __attribute__((section(".__end")));
.rel_dyn_end :
{
*(.__rel_dyn_end)
}
.end :
{
*(.__end)
}
_image_binary_end = .;
(5) initr_barrier():空;
(6) initr_malloc():初始化malloc功能和清零malloc区;
debug("Pre-reloc malloc() used %#lx bytes (%ld KB)\n", gd->malloc_ptr,
gd->malloc_ptr / 1024);
Pre-reloc malloc() used 0x258 bytes (0 KB) ???
malloc_start = gd->relocaddr -
TOTAL_MALLOC_LEN;
mem_malloc_init((ulong)map_sysmem(malloc_start, TOTAL_MALLOC_LEN),
TOTAL_MALLOC_LEN);
(7) log_init():依赖CONFIG_LOG(未定义),初始化log驱动;
(8) initr_bootstage():设进度为BOOTSTAGE_ID_START_UBOOT_R,并记到bootstage(依赖CONFIG_BOOTSTAGE
-未定义),show_boot_progress()(未实现)提示进度,枚举bootstage_id罗列了进度id;
(9) initr_console_record():依赖CONFIG_CONSOLE_RECORD(未定义),给console record功能分配内存;
(10) bootstage_relocate():依赖CONFIG_BOOTSTAGE(未定义),重定位gd->bootstage的内容;
(11) initr_of_live():依赖CONFIG_OF_LIVE(未定义),用gd->fdt_blob在堆上建立设备树;
(12) initr_dm():依赖CONFIG_DM,初始化驱动模型,绑定所有设备(使用U_BOOT_DEVICE或设备树中声明)和
驱动(U_BOOT_DRIVER声明)并probe;
(13) board_init():smc9115连到SOC接口和对应SROMC的初始化,保存机器ID到gd->bd->bi_arch_number,
设置gd->bd->bi_boot_params保存引导操作系统的启动参数;
int board_init(void)
{
smc_init();
return 0;
}
(14) efi_memory_init():依赖CONFIG_EFI_LOADER,初始化EFI功能及分配内存;
(15) stdio_init_tables():初始化标准输入输出设备链表;
(16) initr_serial():调用drivers/serial/serial-uclass.c(依赖CONFIG_DM_SERIAL),在设备树alias节点
获得属性"stdout-path"或"console",从而得到作为标准输入输出的设备节点,生成UCLASS_SERIAL类的
udevice来匹配兼容的驱动及probe;该串行设备记录到gd->cur_serial_dev;标志GD_FLG_SERIAL_READY;;
static int initr_serial(void)
{
serial_initialize();
return 0;
}
serial-uclass.c
void serial_initialize(void)
{
serial_init();
}
int serial_init(void)
{
serial_find_console_or_panic();
gd->flags |= GD_FLG_SERIAL_READY;
return 0;
}
(17) initr_announce():打印u-boot重定位后起始地址(需开DEBUG);
(18) power_init_board():空;
(增加) initr_flash
flash_size = flash_init();
bd->bi_flashsize = flash_size;
(19) initr_nand():依赖CONFIG_CMD_NAND,调用nand硬件驱动之board_nand_init()填充nand_chip的成员,
架构层通过nand驱动扫描外部nand设备,从而完善MTD原始设备mtd_info并注册到MTD子系统;打印nand
的容量;
(增加)initr_mmc
(20) initr_env():通用env层(env/env.c)调用env硬件驱动层(若定义CONFIG_ENV_IS_IN_NAND则在env/nand.c),
加载nand中CONFIG_ENV_OFFSET开始的env数据到栈中,检查crc成功则将其(失败则使用default_environment
)复制到堆中,内存地址记录进env_htab,标志置位GD_FLG_ENV_READY或GD_FLG_ENV_DEFAULT;插入或设置环
境变量fdtcontroladdr为gd->fdt_blob;
(21) initr_secondary_cpu():空;
(22) stdio_add_devices():调用drv_xxx_init()(需开CONFIG_XXX),如drv_lcd_init()(需定义CONFIG_LCD),
drv_system_init()则关于串口;驱动通用层填充stdio_dev并注册添加到标准输入输出链表上,在硬件驱动
层做硬件初始化;
(23) initr_jumptable():为函数跳转表(struct
jt_funcs定义)分配内存并记录内存地址到gd->jt;
(24) console_init_r():定义CONFIG_SILENT_CONSOLE和环境变量"silent"可标志GD_FLG_SILENT,在标准输入输
出设备表(stdio_add_devices()生成,common/console.c)将首个标志为DEV_FLAGS_INPUT或DEV_FLAGS_OUTPUT作
为控制台io设备,设置环境变量”stdxxx”为设备名,标志GD_FLG_DEVINIT;
(25) interrupt_init(),initr_enable_interrupts:关于irq栈的设置;
(26) initr_ethaddr():设置gd->bd->bi_enetaddr为环境变量"ethaddr"的值;
(27) initr_net():通过网络设备驱动通用层(net/eth_legacy.c)调用硬件驱动层smc911x_initialize()初始化网
路设备,检测环境变量"ethaddr"值有效性,为空则生成随机MAC地址(需开CONFIG_NET_RANDOM_ETHADDR),
网络设备名记录到环境变量"ethact";
(28) run_main_loop():初始化hush解析器(CONFIG_HUSH_PARSER),用环境变量"bootdelay"或设备树节点config
的属性bootdelay作为启动延迟时间,通过hush解析控制台输入的内容打断倒计时并进入命令行;倒计时期间
控制台无输入则执行环境变量或设备树/config节点的bootcmd,最后执行命令bootm 0x30007FC0;
六、bootm 0x30007FC0 (cmd/bootm.c)
1. do_bootm(...)执行该命令,作命令的解析;
2. do_bootm_states(...),如下内容:
3. bootm_start():环境变量verify决定后续是否对kernel镜像进行校验和检查,lmb(logical memory blocks)相关内
容的初始化;
4. bootm_find_os():
(1) boot_get_kernel():获取kernel镜像格式为IMAGE_FORMAT_LEGACY,验证镜像hcrc,打印镜像的名字、类型、数
据大小、加载地址和入口地址,验证dcrc(依赖env的verify),判断arch是否支持;
(2) 解析镜像的结果填充images.os的成员,kernel入口地址记到images.ep,镜像头部地址记到images.os.start;
5. bootm_find_other():
(1) boot_get_ramdisk():解析ramdisk镜像,bootm第三个参数为其地址(如bootm
xxx yyy,yyy为对应地址);
(2) boot_get_fdt():获取和解析设备树镜像内容,设备树镜像的起始地址需在bootm命令第四个参数指明,如
bootm xxx yyy zzz,zzz为对应地址;
6. bootm_load_os():解压os数据或移动到images->os.load地址,所以kernel应有Load Address=Entry Point;
7. boot_ramdisk_high():重新定位并初始化ramdisk,需定义CONFIG_SYS_BOOT_RAMDISK_HIGH;
8. bootm_os_get_boot_func(images->os.os)根据os类型获得启动函数boot_fn = do_bootm_linux;
9. do_bootm_linux(BOOTM_STATE_OS_PREP, argc, argv, images): boot_prep_linux():若未指定传递给kernel的设
备树地址,则建立各种tag到地址gd->bd->bi_boot_params;
10. boot_selected_os():通过函数指针boot_fn调用do_bootm_linux(BOOTM_STATE_OS_GO, ...),进而调用
boot_jump_linux(images, BOOTM_STATE_OS_GO):
(1) 通过gd->bd->bi_arch_number或者环境变量machid获得机器码;
(2) announce_and_cleanup():打印提示开始启动内核,注销驱动模型下设备驱动;调用cleanup_before_linux():
关L1/2 D-cache和MMU,冲刷掉dcache内数据;关I-cache,失效I-cache内条目,失效整个分支预测器阵列;
执行数据和指令内存屏障,确保前面的操作完成;
(3) kernel_entry(0, machid, r2):参数r2传递启动参数(tag或设备树)的内存地址,正式跳转到kernel。
参考文献
[1] fireaxe. PIC(与位置无关代码)在u-boot上的实现[EB/OL]. ChinaUnix,2014
http://blog.chinaunix.net/uid-20528014-id-4445271.html
u-boot v2018.01 启动流程分析的更多相关文章
- u-boot v2018.01 启动流程分析 简单版(转)
版权声明:本文为博主原创文章,遵循 CC 4.0 BY-SA 版权协议,转载请附上原文出处链接和本声明.本文链接:https://blog.csdn.net/weixin_39655765/artic ...
- Spring Boot 应用程序启动流程分析
SpringBoot 有两个关键元素: @SpringBootApplicationSpringApplication 以及 run() 方法 SpringApplication 这个类应该算是 Sp ...
- u-boot启动流程分析(1)_平台相关部分
转自:http://www.wowotech.net/u-boot/boot_flow_1.html 1. 前言 本文将结合u-boot的“board—>machine—>arch—> ...
- Uboot启动流程分析(转载)
最近一段时间一直在做uboot移植相关的工作,需要将uboot-2016-7移植到单位设计的ARMv7的处理器上.正好元旦放假三天闲来无事,有段完整的时间来整理下最近的工作成果.之前在学习uboot时 ...
- 【转】Netty 拆包粘包和服务启动流程分析
原文:https://www.cnblogs.com/itdragon/archive/2018/01/29/8365694.html Netty 拆包粘包和服务启动流程分析 通过本章学习,笔者希望你 ...
- imx6 uboot启动流程分析
参考http://blog.csdn.net/skyflying2012/article/details/25804209 这里以imx6平台为例,分析uboot启动流程对于任何程序,入口函数是在链接 ...
- SpringBoot启动流程分析(五):SpringBoot自动装配原理实现
SpringBoot系列文章简介 SpringBoot源码阅读辅助篇: Spring IoC容器与应用上下文的设计与实现 SpringBoot启动流程源码分析: SpringBoot启动流程分析(一) ...
- Android5 Zygote 与 SystemServer 启动流程分析
Android5 Zygote 与 SystemServer 启动流程分析 Android5 Zygote 与 SystemServer 启动流程分析 前言 zygote 进程 解析 zygoterc ...
- SpringBoot启动流程分析(二):SpringApplication的run方法
SpringBoot系列文章简介 SpringBoot源码阅读辅助篇: Spring IoC容器与应用上下文的设计与实现 SpringBoot启动流程源码分析: SpringBoot启动流程分析(一) ...
随机推荐
- 【转】How-to: Enable User Authentication and Authorization in Apache HBase
With the default Apache HBase configuration, everyone is allowed to read from and write to all table ...
- emqtt emq 的用户密码认证
MQTT 认证设置 EMQ 消息服务器认证由一系列认证插件(Plugin)提供,系统支持按用户名密码.ClientID 或匿名认证. 系统默认开启匿名认证(anonymous),通过加载认证插件可开启 ...
- VirtualBox-5.2.8-121009-Win,虚拟机指令ifconfig不显示ip解决方法
- java:struts框架5(Converter,Validation,Tags(Object-Graph Navigation Language))
1.Converter: struts.xml: <?xml version="1.0" encoding="UTF-8"?> <!DOCTY ...
- Elasticsearch 安装 Head 插件
引子:在上一篇文章Elasticsearch入门(一):CentOS 7.6 安装ES 7.0.0中,我们讲了如何在CentOS 7.6环境下安装 Elasticsearch 7.0.下面,我将讲一讲 ...
- python学习之迭代器
4.5 迭代器 4.5.1 可迭代对象 **字面意思分析**:可以重复的迭代的实实在在的东西. list,dict(keys(),values(),items()),tuple,str,set,ran ...
- USACO2.1 Hamming Codes【枚举+二进制处理+输出格式+题意理解】
这道题加了2个看起来奇奇怪怪的$tag$ 1.输出格式:不得不说这个格式输出很恶心,很像$UVA$的风格,细节稍微处理不好就会出错. 因为这个还$WA$了一次: ,m=n; ) { ;i<=t+ ...
- Java基础/网络经验
一.Java新特性好文--掘金 1.Java8 新特性指导手册 2.Java 11 已发布,String 还能这样玩 二.Java避坑 1.为什么阿里巴巴不建议在for循环中使用"+&quo ...
- poj3191(负进位制)
题目链接:https://vjudge.net/problem/POJ-3191 题意:将一个int范围的整数用-2进制表示并输出. 思路:将十进制转换成-2进制,原理也类似于短除法.但不同的是不是简 ...
- Maven - Maven3实战学习笔记(1)Maven使用入门
1.maven安装 1>http://maven.apache.org/download.cgi下载apache-maven-3.6.1 2>解压缩安装包到指定的文件夹,如C:\fyliu ...