在linux 下安装git
① 安装 Git
Linux 做为服务器端系统,Windows 作为客户端系统,分别安装 Git
服务器端:
#yum install -y git
安装完后,查看 Git 版本
[root@localhost ~]# git --version

git version 1.7.1
服务器端创建 git 用户,用来管理 Git 服务,并为 git 用户设置密码
[root@localhost home]# id git

id: git:无此用户

[root@localhost home]# useradd git

[root@localhost home]# passwd git
③ 服务器端创建 Git 仓库
设置 /home/data/git/gittest.git 为 Git 仓库
然后把 Git 仓库的 owner 修改为 git
[root@localhost home]# mkdir -p data/git/gittest.git

[root@localhost home]# git init --bare data/git/gittest.git

Initialized empty Git repository in /home/data/git/gittest.git/

[root@localhost home]# cd data/git/

[root@localhost git]# chown -R git:git gittest.git/
Gitlab是什么?
GitLab是一个利用 Ruby on Rails 开发的开源应用程序,实现一个自托管的Git项目仓库,可通过Web界面进行访问公开的或者私人项目。
它拥有与Github类似的功能,能够浏览源代码,管理缺陷和注释。可以管理团队对仓库的访问,它非常易于浏览提交过的版本并提供一个文件历史库。它还提供一个代码片段收集功能可以轻松实现代码复用,便于日后有需要的时候进行查找。
GitLab 5.0以前版本要求服务器端采用 Gitolite 搭建,5.0版本以后不再使用 Gitolite ,采用自己开发的 gitlab-shell 来实现。如果你觉得安装麻烦可以使用 GitLab Installers 一键安装程序。
Gitlab文档
gitlab英文官网:https://about.gitlab.com/
gitlab中文官网:https://www.gitlab.com.cn/
gitlab使用手册:https://docs.gitlab.com.cn/ce/README.html
Gitlab如何搭建?
1.安装gitlab所需要的依赖
sudo yum install curl policycoreutils openssh-server openssh-clients
发现出现错误:
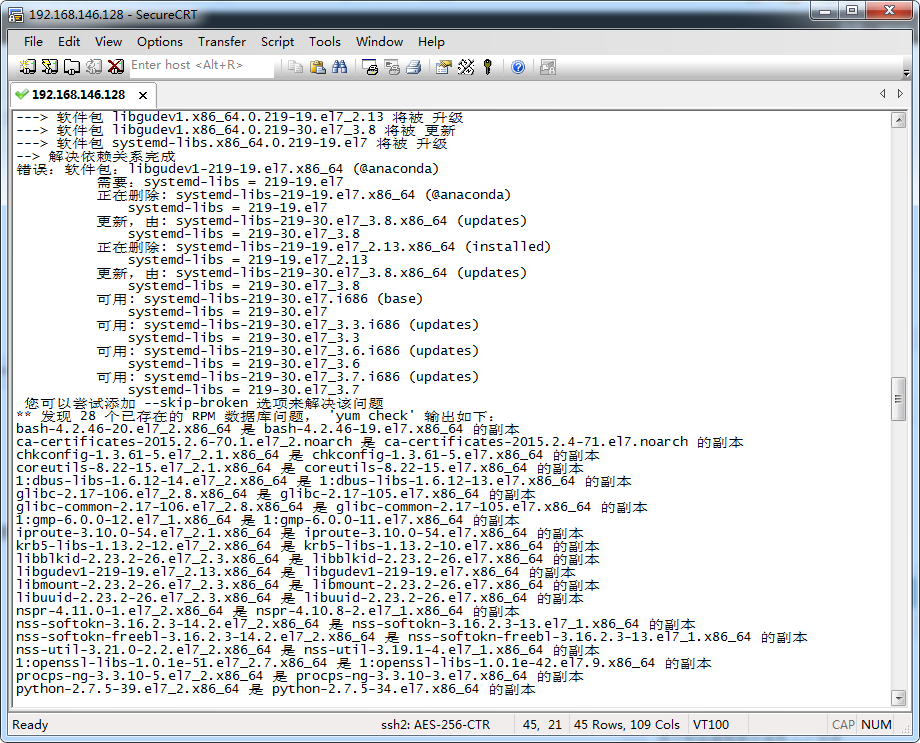
根据提示可以选择按照以下进行依赖安装
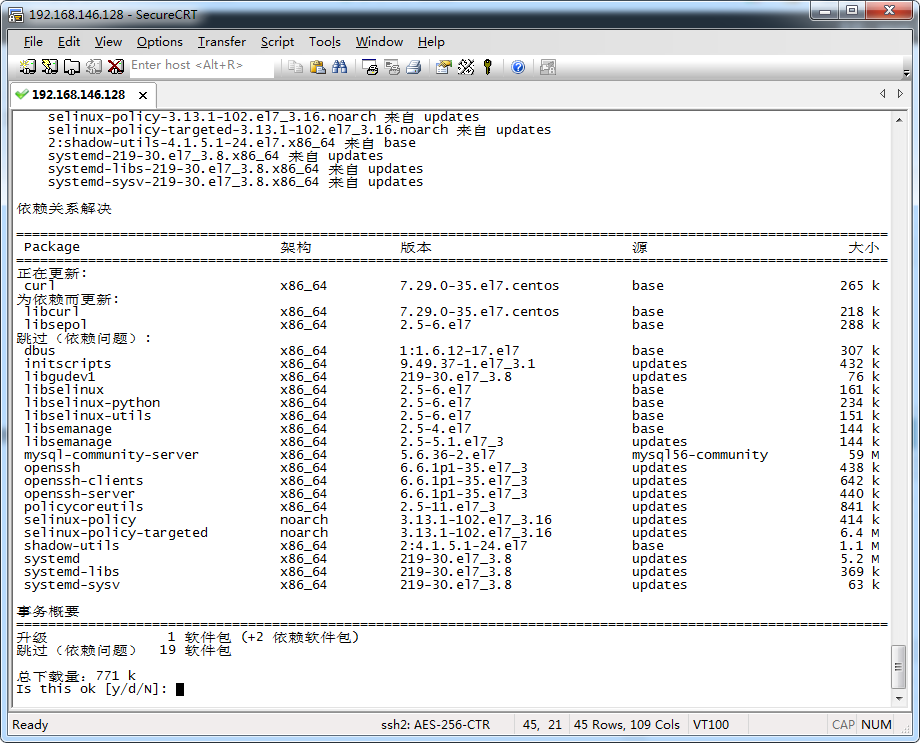
sudo yum install curl policycoreutils openssh-server openssh-clients --skip-broken
选择y
2.使sshd服务自动启动
sudo systemctl enable sshd
3.启动sshd服务
sudo systemctl start sshd
4.安装邮件服务器
sudo yum install postfix
5.使邮件服务器postfix自启动
sudo systemctl enable postfix
6. 启动邮件服务器postfix
sudo systemctl start postfix
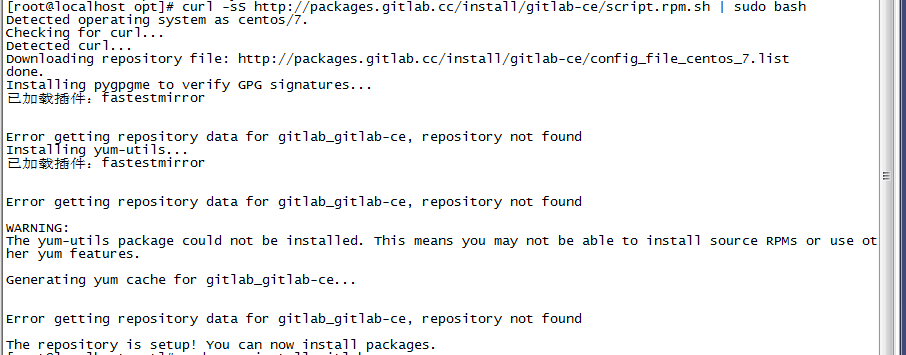
7. 添加GitLab仓库,并安装到服务器上
curl -sS http://packages.gitlab.cc/install/gitlab-ce/script.rpm.sh | sudo bash
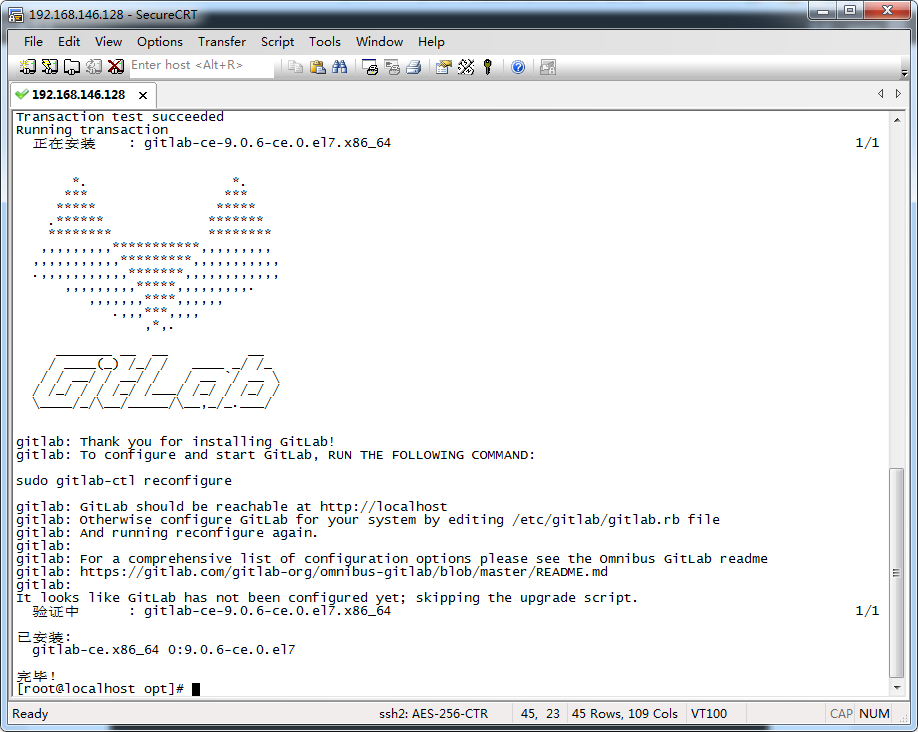
8.安装gitlab
sudo yum install gitlab-ce
安装完毕
如何启动GitLab?
1.启动,配置
sudo gitlab-ctl reconfigure
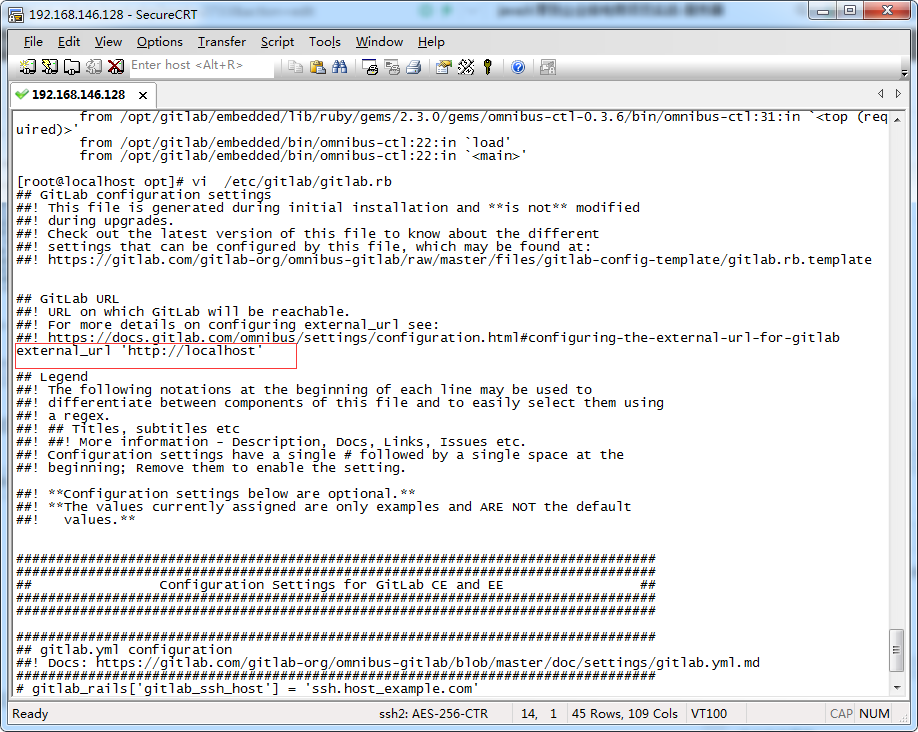
2.修改gitlab配置文件指定服务器ip和自定义端口
vi /etc/gitlab/gitlab.rb
3.重置并启动GitLab
重新配置
gitlab-ctl reconfigure
重启
gitlab-ctl restart
访问gitlab:http://192.168.146.128:8888/
4. 处理502错误的方案
如果出现502的错误,那可能是端口的占用,导致启动不了应用。
Job for postfix.service failed because the control process exited with error code. See "systemctl status postfix.service" and "journalctl -xe" for details.
vim /etc/postfix/main.cf
把
inet_protocols = all
改成
inet_protocols = ipv4
在linux 下安装git的更多相关文章
- 环境部署(三):Linux下安装Git
Git是一个开源的分布式版本控制系统,可以有效.高速的处理从很小到非常大的项目版本管理,是目前使用范围最广的版本管理工具. 这篇博客,介绍下Linux下安装Git的步骤,仅供参考,当然,还是yum安装 ...
- Linux下安装Git
Ubuntu12.04中默认没有安装Git.需要自行安装. 1. 安装Git 1.1 Ubuntu12.04下 可以使用apt-get方式安装,也可以下载源代码安装[1],我们这里使用apt-git安 ...
- [v]Linux下安装Git
Ubuntu12.04中默认没有安装Git.需要自行安装. 1. 安装Git 1.1 Ubuntu12.04下 可以使用apt-get方式安装,也可以下载源代码安装[1],我们这里使用apt-git安 ...
- 关于在linux下安装git,以及在idea上将项目部署到码云上
GIT 基于对linux感兴趣,并且也考虑到以后从事开发后也会用到linux,着实在闲余之际学学linux.最近在用VM虚拟机环境下学做一个项目,在git上卡了一点时间,但同时也收获 了不少,下面写 ...
- Linux下安装git本地库与服务器端远程库
1. git是一个分布式版本管理系统,关于该工具的详细介绍,我认为廖雪峰老师介绍的非常全面:https://www.liaoxuefeng.com/wiki/896043488029600. 不 ...
- git常用命令和linux下安装git教程
Debian/Ubuntu下使用apt-get安装git #安装libz-dev libssl-dev $ apt-get install libcurl4-gnutls-dev libexpat1- ...
- linux 下安装git的步骤方法
①.获取github最新的Git安装包下载链接,进入Linux服务器,执行下载,命令为: wget https://github.com/git/git/archive/v2.17.0.tar.gz ...
- linux下安装Git并生成SSH key
系统:contens7.4 1.下载源码解压 wget https://github.com/git/git/archive/v2.3.0.zip unzip v2.3.0.zip cd git-2. ...
- Linux下安装{Git}
环境 { "操作系统":"CentOS 7.5 64位", "CPU":"1核", "内存":&qu ...
随机推荐
- python解析库
BeautifulSoup示例: #!/usr/bin/env python # -*- coding: utf-8 -*- # author: imcati html_doc = "&qu ...
- 【Spring 基础】通过注解注入Bean
原课程:通过注解注入Bean 注入bean知识点思维导图 Spring 4.x推荐使用基于构造器的方式进行bean注入7.4.1 Dependency Injection spring为什么推荐使用构 ...
- [转帖]jdk8 Metaspace 调优
jdk8 Metaspace 调优 https://blog.csdn.net/bolg_hero/article/details/78189621 转帖 简介 从JDK8开始,永久代(PermGen ...
- tensorflow 使用tfrecords创建自己数据集
直接采用矩阵方式建立数据集见:https://www.cnblogs.com/WSX1994/p/10128338.html 制作自己的数据集(使用tfrecords) 为什么采用这个格式? TFRe ...
- oa_mvc_easyui_删除(6)
1.删除列,添加a标签,绑定参数 <a href="javascript:void(0)" class="delete" ids="@newli ...
- LOJ题解#136. 最小瓶颈路 DFS+Kruskal
题目链接: https://loj.ac/problem/136 思路: 在我的这篇博客中已经讲到什么是最短瓶颈路,同时给出了一个用Kruskal求最短瓶颈路的一个简洁易懂的方法,然而这道题目可以看作 ...
- JavaScript斑马线表格制作
//实现斑马线表格 //方法1: document.write('<table border="1">'); for(var i=1; i<11; i++){ i ...
- 03 python3常见内置函数
数学相关 abs(a) : 求取绝对值.abs(-1) max(list) : 求取list最大值.max([1,2,3]) min(list) : 求取list最小值.min([1,2,3]) su ...
- $store.getters调用不执行
$store.getters调用不执行 api:https://vuex.vuejs.org/zh/guide/getters.html 场景: 在登录时将登录得到的用户信息存储在vuex的state ...
- input在获得焦点时外边框不变色
input:focus{ ouline:none; }