Netty内存管理器ByteBufAllocator及内存分配
ByteBufAllocator 内存管理器:
Netty 中内存分配有一个最顶层的抽象就是ByteBufAllocator,负责分配所有ByteBuf 类型的内存。功能其实不是很多,主要有以下几个重要的API:
public interface ByteBufAllocator {/**分配一块内存,自动判断是否分配堆内内存或者堆外内存。

     * Allocate a {@link ByteBuf}. If it is a direct or heap buffer depends on the actual implementation.

     */

    ByteBuf buffer();/**尽可能地分配一块堆外直接内存,如果系统不支持则分配堆内内存。

     * Allocate a {@link ByteBuf}, preferably a direct buffer which is suitable for I/O.

     */

    ByteBuf ioBuffer();/**分配一块堆内内存。

     * Allocate a heap {@link ByteBuf}.

     */

    ByteBuf heapBuffer();/**分配一块堆外内存。

     * Allocate a direct {@link ByteBuf}.

     */

    ByteBuf directBuffer();/**组合分配,把多个ByteBuf 组合到一起变成一个整体。

     * Allocate a {@link CompositeByteBuf}.If it is a direct or heap buffer depends on the actual implementation.

     */

    CompositeByteBuf compositeBuffer();

 }
到这里有些小伙伴可能会有疑问,以上API 中为什么没有前面提到的8 中类型的内存分配API?下面我们来看ByteBufAllocator 的基本实现类AbstractByteBufAllocator,重点分析主要API 的基本实现,比如buffer()方法源码如下:
public abstract class AbstractByteBufAllocator implements ByteBufAllocator {

    @Override

    public ByteBuf buffer() {
        //判断是否默认支持directBuffer

        if (directByDefault) {

            return directBuffer();

        }

        return heapBuffer();

    }

}
我们发现buffer()方法中做了判断,是否默认支持directBuffer,如果支持则分配directBuffer,否则分配heapBuffer。directBuffer()方法和heapBuffer()方法的实现逻辑几乎一致,来看directBuffer()方法:
@Override

public ByteBuf directBuffer() {
 //分配大小,初始大小256  默认最大capacity为Integer.MAX

    return directBuffer(DEFAULT_INITIAL_CAPACITY, DEFAULT_MAX_CAPACITY);
}
@Override
public ByteBuf directBuffer(int initialCapacity, int maxCapacity) {
    if (initialCapacity == 0 && maxCapacity == 0) {
        return emptyBuf;
    }//校验初始化大小和最大大小
    validate(initialCapacity, maxCapacity);
    return newDirectBuffer(initialCapacity, maxCapacity);
}
/**
 * Create a direct {@link ByteBuf} with the given initialCapacity and maxCapacity.
 */
protected abstract ByteBuf newDirectBuffer(int initialCapacity, int maxCapacity);
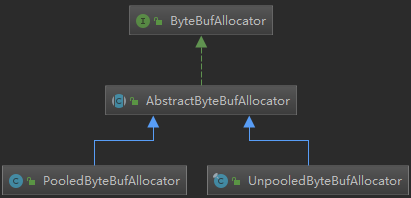
directBuffer()方法有多个重载方法,最终会调用newDirectBuffer()方法,我们发现newDirectBuffer()方法其实是一个抽象方法,最终,交给AbstractByteBufAllocator 的子类来实现。同理,我们发现heapBuffer()方法最终是调用newHeapBuffer()方法,而newHeapBuffer()方法也是抽象方法,具体交给AbstractByteBufAllocator 的子类实现。AbstractByteBufAllocator 的子类主要有两个:PooledByteBufAllocator 和UnpooledByteBufAllocator,下面我们来看AbstractByteBufAllocator 子类实现的类结构图:
到这里,其实我们还只知道directBuffer、heapBuffer 和pooled、unpooled 的分配规则,那unsafe 和非unsafe是如何判别的呢?其实,是Netty 自动帮我们判别的,如果操作系统底层支持unsafe 那就采用unsafe 读写,否则采用非unsafe 读写。我们可以从UnpooledByteBufAllocator 的源码中验证一下,来看源码:
public final class UnpooledByteBufAllocator extends AbstractByteBufAllocator implements ByteBufAllocatorMetricProvider {
  @Override
  protected ByteBuf newHeapBuffer(int initialCapacity, int maxCapacity) {
      return PlatformDependent.hasUnsafe() ? new UnpooledUnsafeHeapByteBuf(this, initialCapacity, maxCapacity)
              : new UnpooledHeapByteBuf(this, initialCapacity, maxCapacity);
  }

  @Override
  protected ByteBuf newDirectBuffer(int initialCapacity, int maxCapacity) {
      ByteBuf buf = PlatformDependent.hasUnsafe() ?
              UnsafeByteBufUtil.newUnsafeDirectByteBuf(this, initialCapacity, maxCapacity) :
              new UnpooledDirectByteBuf(this, initialCapacity, maxCapacity);
      return disableLeakDetector ? buf : toLeakAwareBuffer(buf);
  }
}
我们发现在newHeapBuffer()方法和newDirectBuffer()方法中,分配内存判断PlatformDependent 是否支持Unsafa,如果支持则创建Unsafe 类型的Buffer,否则创建非Unsafe 类型的Buffer。由Netty 帮我们自动判断了。
Unpooled 非池化内存分配:
堆内内存的分配:
现在我们来看UnpooledByteBufAllocator 的内存分配原理。首先,来看heapBuffer 的分配逻辑,进入newHeapBuffer()方法源码:
public final class UnpooledByteBufAllocator extends AbstractByteBufAllocator implements ByteBufAllocatorMetricProvider {
  protected ByteBuf newHeapBuffer(int initialCapacity, int maxCapacity) {
     //是否unsafe是由jdk底层去实现的,如果能够获取到unsafe对象,就使用unsafe
      return PlatformDependent.hasUnsafe() ? new UnpooledUnsafeHeapByteBuf(this, initialCapacity, maxCapacity)
            : new UnpooledHeapByteBuf(this, initialCapacity, maxCapacity);
  }

}
通过调用PlatformDependent.hasUnsafe() 方法来判断操作系统是否支持Unsafe , 如果支持Unsafe 则创建UnpooledUnsafeHeapByteBuf 类,否则创建UnpooledHeapByteBuf 类。我们先进入UnpooledUnsafeHeapByteBuf的构造器看看会进行哪些操作?
final class UnpooledUnsafeHeapByteBuf extends UnpooledHeapByteBuf {
  ....

  UnpooledUnsafeHeapByteBuf(ByteBufAllocator alloc, int initialCapacity, int maxCapacity) {

    super(alloc, initialCapacity, maxCapacity);//父类构造器 如下

  }....

}
public UnpooledUnsafeHeapByteBuf(ByteBufAllocator alloc, int initialCapacity, int maxCapacity) {
    super(alloc, initialCapacity, maxCapacity);//父类构造器 如下
}
public UnpooledHeapByteBuf(ByteBufAllocator alloc, int initialCapacity, int maxCapacity) {
    super(maxCapacity);//父类构造器 如下
    checkNotNull(alloc, "alloc");
    if (initialCapacity > maxCapacity) {
        throw new IllegalArgumentException(String.format(
                "initialCapacity(%d) > maxCapacity(%d)", initialCapacity, maxCapacity));
    }
    this.alloc = alloc;
   //把默认分配的数组new byte[initialCapacity]赋值给全局变量array。
    setArray(allocateArray(initialCapacity));
    setIndex(0, 0);
}
protected AbstractReferenceCountedByteBuf(int maxCapacity) {
    super(maxCapacity);//父类构造器 如下
}
protected AbstractByteBuf(int maxCapacity) {
    checkPositiveOrZero(maxCapacity, "maxCapacity");
    this.maxCapacity = maxCapacity;
}
有一段关键方法就是setArray()方法,里面的实现也非常简单,就是把默认分配的数组new byte[initialCapacity]赋值给全局变量array。紧接着就是调用了setIndex()方法,最终在setIndex0()方法中初始化readerIndex 和writerIndex:
@Override

public ByteBuf setIndex(int readerIndex, int writerIndex) {

        if (checkBounds) {//校验3者大小关系

            checkIndexBounds(readerIndex, writerIndex, capacity());

        }

        setIndex0(readerIndex, writerIndex);

        return this;

    }
//AbstractByteBuf 设置读写指针位置

final void setIndex0(int readerIndex, int writerIndex) {

        this.readerIndex = readerIndex;

        this.writerIndex = writerIndex;

}
既然,UnpooledUnsafeHeapByteBuf 和UnpooledHeapByteBuf 调用的都是UnpooledHeapByteBuf 的构造方法,那么它们之间到底有什么区别呢?其实根本区别在于IO 的读写,我们可以分别来看一下它们的getByte()方法了解二者的区别。先来看UnpooledHeapByteBuf 的getByte()方法实现:
@Override

public byte getByte(int index) {

   ensureAccessible();

   return _getByte(index);

}

@Override

protected byte _getByte(int index) {

   return HeapByteBufUtil.getByte(array, index);

}
final class HeapByteBufUtil {
   //直接用数组索引取值
    static byte getByte(byte[] memory, int index) {
        return memory[index];
    }
}
再来看UnpooledUnsafeHeapByteBuf 的getByte()方法实现:
@Override

public byte getByte(int index) {

    checkIndex(index);

    return _getByte(index);

}

@Override

protected byte _getByte(int index) {

    return UnsafeByteBufUtil.getByte(array, index);

}//调用底层Unsafe去进行IO操作数据

static byte getByte(byte[] array, int index) {

        return PlatformDependent.getByte(array, index);

}
通过这样一对比我们基本已经了解UnpooledUnsafeHeapByteBuf 和UnpooledHeapByteBuf 的区别了。
堆外内存的分配:
还是回到UnpooledByteBufAllocator 的newDirectBuffer()方法:
@Override

protected ByteBuf newDirectBuffer(int initialCapacity, int maxCapacity) {

    ByteBuf buf = PlatformDependent.hasUnsafe() ?

            UnsafeByteBufUtil.newUnsafeDirectByteBuf(this, initialCapacity, maxCapacity) :

            new UnpooledDirectByteBuf(this, initialCapacity, maxCapacity);

    return disableLeakDetector ? buf : toLeakAwareBuffer(buf);

}
跟分配堆内内存一样,如果支持Unsafe 则调用UnsafeByteBufUtil.newUnsafeDirectByteBuf() 方法, 否则创建UnpooledDirectByteBuf 类。我们先看一下UnpooledDirectByteBuf 的构造器:
protected UnpooledDirectByteBuf(ByteBufAllocator alloc, int initialCapacity, int maxCapacity) {

        super(maxCapacity);//父类构造器 如下

     // check paramthis.alloc = alloc;
        //调用了ByteBuffer.allocateDirect.allocateDirect()通过JDK 底层分配一个直接缓冲区,主要就是做了一次赋值。

        setByteBuffer(ByteBuffer.allocateDirect(initialCapacity));

}
private void setByteBuffer(ByteBuffer buffer) {
    ByteBuffer oldBuffer = this.buffer;
    if (oldBuffer != null) {
        if (doNotFree) {
            doNotFree = false;
        } else {
            freeDirect(oldBuffer);
        }
    }
    this.buffer = buffer;
    tmpNioBuf = null;
   //返回剩余的可用长度,此长度为实际读取的数据长度
    capacity = buffer.remaining();
}
protected AbstractReferenceCountedByteBuf(int maxCapacity) {
    super(maxCapacity);//父类构造器 如下
}
protected AbstractByteBuf(int maxCapacity) {
    if (maxCapacity < 0) {
        throw new IllegalArgumentException("maxCapacity: " + maxCapacity + " (expected: >= 0)");
    }
    this.maxCapacity = maxCapacity;
}
下面我们继续来UnsafeByteBufUtil.newUnsafeDirectByteBuf()方法,看它的逻辑:
static UnpooledUnsafeDirectByteBuf newUnsafeDirectByteBuf(

        ByteBufAllocator alloc, int initialCapacity, int maxCapacity) {

    if (PlatformDependent.useDirectBufferNoCleaner()) {

        return new UnpooledUnsafeNoCleanerDirectByteBuf(alloc, initialCapacity, maxCapacity);

    }

    return new UnpooledUnsafeDirectByteBuf(alloc, initialCapacity, maxCapacity);

}
protected UnpooledUnsafeDirectByteBuf(ByteBufAllocator alloc, int initialCapacity, int maxCapacity) {
    super(maxCapacity);//父类构造器 如下
   //check param
    this.alloc = alloc;
    setByteBuffer(allocateDirect(initialCapacity), false);
}
protected AbstractReferenceCountedByteBuf(int maxCapacity) {
    super(maxCapacity);//父类构造器 如下
}
protected AbstractByteBuf(int maxCapacity) {
    if (maxCapacity < 0) {
        throw new IllegalArgumentException("maxCapacity: " + maxCapacity + " (expected: >= 0)");
    }//设置Buf最大大小
    this.maxCapacity = maxCapacity;
}
它的逻辑和UnpooledDirectByteBuf 构造器的逻辑是相似的, 所以我们关注setByteBuffer() 方法:
final void setByteBuffer(ByteBuffer buffer, boolean tryFree) {

    if (tryFree) {

        ByteBuffer oldBuffer = this.buffer;

        if (oldBuffer != null) {

            if (doNotFree) {

                doNotFree = false;

            } else {

                freeDirect(oldBuffer);

            }

        }

    }

    this.buffer = buffer;

    memoryAddress = PlatformDependent.directBufferAddress(buffer);

    tmpNioBuf = null;
   //返回剩余的可用长度,此长度为实际读取的数据长度

    capacity = buffer.remaining();

}
同样还是先把创建从JDK 底层创建好的buffer 保存, 接下来有个很重要的操作就是调用了PlatformDependent.directBufferAddress()方法获取的buffer 真实的内存地址,并保存到memoryAddress 变量中。我们进入PlatformDependent.directBufferAddress()方法一探究竟。
public static long directBufferAddress(ByteBuffer buffer) {

    return PlatformDependent0.directBufferAddress(buffer);

}

static long directBufferAddress(ByteBuffer buffer) {

    return getLong(buffer, ADDRESS_FIELD_OFFSET);

}

private static long getLong(Object object, long fieldOffset) {

    return UNSAFE.getLong(object, fieldOffset);

}
可以看到,调用了UNSAFE 的getLong()方法,这个方法是一个native 方法。它是直接通过buffer 的内存地址加上一个偏移量去取数据,。到这里我们已经基本清楚UnpooledUnsafeDirectByteBuf 和UnpooledDirectByteBuf 的区别,非unsafe 是通过数组的下标取数据,而unsafe 是直接操作内存地址,相对于非unsafe 来说效率当然要更高。
Pooled 池化内存分配:
现在开始, 我们来分析Pooled 池化内存的分配原理。我们首先还是找到AbstractByteBufAllocator 的子类PooledByteBufAllocator 实现的分配内存的两个方法newDirectBuffer()方法和newHeapBuffer()方法,我们以newDirectBuffer()方法为例看看:
public class PooledByteBufAllocator extends AbstractByteBufAllocator {

  ......

    @Override

    protected ByteBuf newDirectBuffer(int initialCapacity, int maxCapacity) {

        PoolThreadCache cache = threadCache.get();

        PoolArena<ByteBuffer> directArena = cache.directArena;

        ByteBuf buf;

        if (directArena != null) {

            buf = directArena.allocate(cache, initialCapacity, maxCapacity);

        } else {

            if (PlatformDependent.hasUnsafe()) {

                buf = UnsafeByteBufUtil.newUnsafeDirectByteBuf(this, initialCapacity, maxCapacity);

            } else {

                buf = new UnpooledDirectByteBuf(this, initialCapacity, maxCapacity);

            }

        }

        return toLeakAwareBuffer(buf);

    }......

}
首先,我们看到它是通过threadCache.get()拿到一个类型为PoolThreadCache 的cache 对象,然后,通过cache 拿到directArena 对象,最终会调用directArena.allocate()方法分配ByteBuf。这个地方大家可能会看得有点懵,我们来详细分析一下。我们跟进到threadCache 对象其实是PoolThreadLocalCache 类型的变量, 跟进到PoolThreadLocalCache 的源码:
final class PoolThreadLocalCache extends FastThreadLocal<PoolThreadCache> {


        @Override

        protected synchronized PoolThreadCache initialValue() {

            final PoolArena<byte[]> heapArena = leastUsedArena(heapArenas);

            final PoolArena<ByteBuffer> directArena = leastUsedArena(directArenas);

            return new PoolThreadCache(

                    heapArena, directArena, tinyCacheSize, smallCacheSize, normalCacheSize,

                    DEFAULT_MAX_CACHED_BUFFER_CAPACITY, DEFAULT_CACHE_TRIM_INTERVAL);

        }.......

}
这里看到的 PoolArena,netty总的内存池是一个数组,数组每一个成员是一个独立的内存池。相当于一个国家(netty)有多个省(poolArena)分别自治管理不同的地区。
从名字来看,我们发现PoolThreadLocalCache 的initialValue()方法就是用来初始化PoolThreadLocalCache 的。首先就调用了leastUsedArena()方法分别获得类型为PoolArena 的heapArena 和directArena 对象。然后把heapArena 和directArena 对象作为参数传递到了PoolThreadCache 的构造器中。那么heapArena 和directArena 对象是在哪里初始化的呢?我们查找一下发现在PooledByteBufAllocator 的构造方法中调用newArenaArray()方法给heapArenas 和directArenas 赋值了。
public PooledByteBufAllocator(boolean preferDirect, int nHeapArena, int nDirectArena, int pageSize, int maxOrder,

                                  int tinyCacheSize, int smallCacheSize, int normalCacheSize) {

     ......if (nHeapArena > 0) {

            heapArenas = newArenaArray(nHeapArena);

            ......

        } else {

            heapArenas = null;

            heapArenaMetrics = Collections.emptyList();

        }

        if (nDirectArena > 0) {

            directArenas = newArenaArray(nDirectArena);

            ......

        } else {

            directArenas = null;

            directArenaMetrics = Collections.emptyList();

        }

}
private static <T> PoolArena<T>[] newArenaArray(int size) {
    return new PoolArena[size];
}
其实就是创建了一个固定大小的PoolArena 数组,数组大小由传入的参数nHeapArena 和nDirectArena 来决定。我们再回到PooledByteBufAllocator 的构造器源码, 看nHeapArena 和nDirectArena 是怎么初始化的, 我们找到PooledByteBufAllocator 的重载构造器:
public PooledByteBufAllocator(boolean preferDirect) {
   //调用重载构造器,如下

    this(preferDirect, DEFAULT_NUM_HEAP_ARENA, DEFAULT_NUM_DIRECT_ARENA, DEFAULT_PAGE_SIZE, DEFAULT_MAX_ORDER);

}
public PooledByteBufAllocator(boolean preferDirect, int nHeapArena, int nDirectArena, int pageSize, int maxOrder) {
    this(preferDirect, nHeapArena, nDirectArena, pageSize, maxOrder,
            DEFAULT_TINY_CACHE_SIZE, DEFAULT_SMALL_CACHE_SIZE, DEFAULT_NORMAL_CACHE_SIZE);
}
我们发现,nHeapArena 和nDirectArena 是通过DEFAULT_NUM_HEAP_ARENA 和DEFAULT_NUM_DIRECT_ARENA这两个常量默认赋值的。再继续跟进常量的定义(在静态代码块里):
final int defaultMinNumArena = runtime.availableProcessors() * 2;
final int defaultChunkSize = DEFAULT_PAGE_SIZE << DEFAULT_MAX_ORDER;
DEFAULT_NUM_HEAP_ARENA = Math.max(0,
                SystemPropertyUtil.getInt(

                        "io.netty.allocator.numHeapArenas",

                        (int) Math.min(

                                defaultMinNumArena,

                                runtime.maxMemory() / defaultChunkSize / 2 / 3)));

        DEFAULT_NUM_DIRECT_ARENA = Math.max(0,

                SystemPropertyUtil.getInt(

                        "io.netty.allocator.numDirectArenas",

                        (int) Math.min(

                                defaultMinNumArena,

                                PlatformDependent.maxDirectMemory() / defaultChunkSize / 2 / 3)));
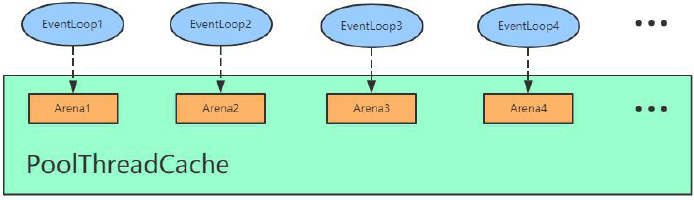
到这里为止, 我们才知道nHeapArena 和nDirectArena 的默认赋值。默认是分配CPU 核数*2 , 也就是把defaultMinNumArena 的值赋值给nHeapArena 和nDirectArena。对于CPU 核数*2 大家应该有印象,EventLoopGroup 给分配线程时默认线程数也是CPU 核数*2,。那么,Netty 为什么要这样设计呢?其实,主要目的就是保证Netty 中的每一个任务线程都可以有一个独享的Arena,保证在每个线程分配内存的时候是不用加锁的。
基于上面的分析,我们知道Arena 有heapArean 和DirectArena,这里我们统称为Arena。假设我们有四个线程,那么对应会分配四个Arean。在创建BtyeBuf 的时候,首先通过PoolThreadCache 获取Arena 对象并赋值给其成员变量,然后,每个线程通过PoolThreadCache 调用get 方法的时候会拿到它底层的Arena,也就是说EventLoop1 拿到Arena1,EventLoop2 拿到Arena2,以此类推,如下图所示:
那么PoolThreadCache 除了可以旨在Arena 上进行内存分配,还可以在它底层维护的ByteBuf 缓存列表进行分配。举个例子:我们通过PooledByteBufAllocator 去创建了一个1024 字节大小的ByteBuf,当我们用完释放之后,我们可能在其他地方会继续分配1024 字节大小的ByteBuf。这个时候,其实不需要在Arena 上进行内存分配,而是直接通过PoolThreadCache 中维护的ByteBuf 的缓存列表直接拿过来返回。那么,在PooledByteBufAllocator 中维护三种规格大小的缓存列表,分别是三个值tinyCacheSize、smallCacheSize、normalCacheSize:
public class PooledByteBufAllocator extends AbstractByteBufAllocator {

   private final int tinyCacheSize;

    private final int smallCacheSize;

    private final int normalCacheSize;

  static{
    DEFAULT_TINY_CACHE_SIZE = SystemPropertyUtil.getInt("io.netty.allocator.tinyCacheSize", 512);
    DEFAULT_SMALL_CACHE_SIZE = SystemPropertyUtil.getInt("io.netty.allocator.smallCacheSize", 256);
    DEFAULT_NORMAL_CACHE_SIZE = SystemPropertyUtil.getInt("io.netty.allocator.normalCacheSize", 64);
  }

  public PooledByteBufAllocator(boolean preferDirect) {

        this(preferDirect, DEFAULT_NUM_HEAP_ARENA, DEFAULT_NUM_DIRECT_ARENA, DEFAULT_PAGE_SIZE, DEFAULT_MAX_ORDER);

    }

    public PooledByteBufAllocator(int nHeapArena, int nDirectArena, int pageSize, int maxOrder) {

        this(false, nHeapArena, nDirectArena, pageSize, maxOrder);

    }

    public PooledByteBufAllocator(boolean preferDirect, int nHeapArena, int nDirectArena, int pageSize, int maxOrder) {

        this(preferDirect, nHeapArena, nDirectArena, pageSize, maxOrder,

                DEFAULT_TINY_CACHE_SIZE, DEFAULT_SMALL_CACHE_SIZE, DEFAULT_NORMAL_CACHE_SIZE);

    }

    public PooledByteBufAllocator(boolean preferDirect, int nHeapArena, int nDirectArena, int pageSize, int maxOrder,

                                  int tinyCacheSize, int smallCacheSize, int normalCacheSize) {

        super(preferDirect);

        threadCache = new PoolThreadLocalCache();

        this.tinyCacheSize = tinyCacheSize;

        this.smallCacheSize = smallCacheSize;

        this.normalCacheSize = normalCacheSize;

        final int chunkSize = validateAndCalculateChunkSize(pageSize, maxOrder);

      ......

    }

}
我们看到, 在PooledByteBufAllocator 的构造器中, 分别赋值了tinyCacheSize=512 , smallCacheSize=256 ,normalCacheSize=64。通过这样一种方式,Netty 中给我们预创建固定规格的内存池,大大提高了内存分配的性能。
DirectArena 内存分配流程:
Arena 分配内存的基本流程有三个步骤:
- 从对象池里拿到PooledByteBuf 进行复用;
- 从缓存中进行内存分配;
- 从内存堆里进行内存分配。
我们以directBuff 为例, 首先来看从对象池里拿到PooledByteBuf 进行复用的情况, 我们依旧跟进到PooledByteBufAllocator 的newDirectBuffer()方法:
@Override
protected ByteBuf newDirectBuffer(int initialCapacity, int maxCapacity) {
    PoolThreadCache cache = threadCache.get();
    PoolArena<ByteBuffer> directArena = cache.directArena;

    ByteBuf buf;
    if (directArena != null) {
        buf = directArena.allocate(cache, initialCapacity, maxCapacity);
    } else {
       .......
    }
    return toLeakAwareBuffer(buf);
}......
上面的PoolArena 我们已经清楚,现在我们直接跟进到PoolArena 的allocate()方法:
PooledByteBuf<T> allocate(PoolThreadCache cache, int reqCapacity, int maxCapacity) {

    PooledByteBuf<T> buf = newByteBuf(maxCapacity);

    allocate(cache, buf, reqCapacity);

    return buf;

}
在这个地方其实就非常清晰了,首先调用了newByteBuf()方法去拿到一个PooledByteBuf 对象,接下来通过allocate()方法在线程私有的PoolThreadCache 中分配一块内存,然后buf 里面的内存地址之类的值进行初始化。我们可以跟进到newByteBuf()看一下,选择DirectArena 对象:
@Override

protected PooledByteBuf<ByteBuffer> newByteBuf(int maxCapacity) {

    if (HAS_UNSAFE) {

        return PooledUnsafeDirectByteBuf.newInstance(maxCapacity);

    } else {

        return PooledDirectByteBuf.newInstance(maxCapacity);

    }
}
我们发现首先判断是否支持UnSafe , 默认情况下一般是支持Unsafe 的, 所以我们继续进入到PooledUnsafeDirectByteBuf 的newInstance()方法:
final class PooledUnsafeDirectByteBuf extends PooledByteBuf<ByteBuffer> {

    private static final Recycler<PooledUnsafeDirectByteBuf> RECYCLER = new Recycler<PooledUnsafeDirectByteBuf>() {

        @Override

        protected PooledUnsafeDirectByteBuf newObject(Handle<PooledUnsafeDirectByteBuf> handle) {

            return new PooledUnsafeDirectByteBuf(handle, 0);

        }

    };

    static PooledUnsafeDirectByteBuf newInstance(int maxCapacity) {

        PooledUnsafeDirectByteBuf buf = RECYCLER.get();

        buf.reuse(maxCapacity);

        return buf;

    }.......

}
顾名思义,我看到首先就是从RECYCLER(也就是内存回收站)对象的get()方法拿到一个buf。从上面的代码片段来看,RECYCLER 对象实现了一个newObject()方法,当回收站里面没有可用的buf 时就会创建一个新的buf。因为获取到的buf 可能是回收站里面拿出来的,复用前需要重置。因此,继续往下看就会调用buf 的reuse()方法:
final void reuse(int maxCapacity) {

    maxCapacity(maxCapacity);

    setRefCnt(1);

    setIndex0(0, 0);

    discardMarks();

}
我们发现reuse()就是对所有的参数重新归为初始状态。到这里我们应该已经清楚从内存池获取buf 对象的全过程。那么接下来,再回到PoolArena 的allocate()方法,看看真实的内存是如何分配出来的?buf 的内存分配主要有两种情况,分别是:从缓存中进行内存分配和从内存堆里进行内存分配。我们来看代码,进入allocate()方法具体逻辑:
private void allocate(PoolThreadCache cache, PooledByteBuf<T> buf, final int reqCapacity) {

  ...

  if (normCapacity <= chunkSize) {

    if (cache.allocateNormal(this, buf, reqCapacity, normCapacity)) {

      // was able to allocate out of the cache so move on

      return;

    }
    allocateNormal(buf, reqCapacity, normCapacity);

  } else {

    // Huge allocations are never served via the cache so just call allocateHuge

    allocateHuge(buf, reqCapacity);

  }

}
这段代码逻辑看上去非常复杂,其实我们省略掉的逻辑基本上都是判断不同规格大小,从其对应的缓存中获取内存。如果所有规格都不满足,那就直接调用allocateHuge()方法进行真实的内存分配。
Netty内存管理器ByteBufAllocator及内存分配的更多相关文章
- TaskTracker节点上的内存管理器
Hadoop平台的最大优势就是充分地利用了廉价的PC机,这也就使得集群中的工作节点存在一个重要的问题——节点所在的PC机内存资源有限(这里所说的工作节点指的是TaskTracker节点),执行任务时常 ...
- STL内存管理器的分配策略
STL提供了很多泛型容器,如vector,list和map.程序员在使用这些容器时只需关心何时往容器内塞对象,而不用关心如何管理内存,需要用多少内存,这些STL容器极大地方便了C++程序的编写.例如可 ...
- PHP V5.2 中的新增功能,第 1 部分: 使用新的内存管理器
PHP V5.2:开始 2006 年 11 月发布了 PHP V5.2,它包括许多新增功能和错误修正.它废止了 5.1 版并被推荐给所有 PHP V5 用户进行升级.我最喜欢的实验室环境 —— Win ...
- C/C++内存管理器
C标准库提供了malloc,free,calloc,realloc,C++标准库还提供了new, new[], delete, delete[].这些用来管理内存,看起来够用了,为啥还要自己写一个内存 ...
- 全面介绍Windows内存管理机制及C++内存分配实例(四):内存映射文件
本文背景: 在编程中,很多Windows或C++的内存函数不知道有什么区别,更别谈有效使用:根本的原因是,没有清楚的理解操作系统的内存管理机制,本文企图通过简单的总结描述,结合实例来阐明这个机制. 本 ...
- spark内存管理器--MemoryManager源码解析
MemoryManager内存管理器 内存管理器可以说是spark内核中最重要的基础模块之一,shuffle时的排序,rdd缓存,展开内存,广播变量,Task运行结果的存储等等,凡是需要使用内存的地方 ...
- 全面介绍Windows内存管理机制及C++内存分配实例
转自:http://blog.csdn.net/yeming81/article/details/2046193 本文基本上是windows via c/c++上的内容,笔记做得不错.. 本文背景: ...
- Go语言内存管理(一)内存分配
Go语言内存管理(一)内存分配 golang作为一种"高级语言",也提供了自己的内存管理机制.这样一方面可以简化编码的流程,降低因内存使用导致出现问题的频率(C语言使用者尤其是初学 ...
- BBS项目详解(forms快速创建登陆页面,登陆验证、通过阅读器进行头像上传的预览、内存管理器)
BBS项目涉及的知识点 django中知识点 钩子函数(局部钩子和全局钩子) 1.局部钩子就是用来做合法性校验,比如用户名有没有被使用等 2.全局的就是用来做对比校验,比如两次输入的密码是否一致 3. ...
随机推荐
- 07-Log日志
# 1. 日志相关概念 - 日志的级别(level) - 不同的用户关注不同的程序信息 - DEBUG - INFO - NOTICE - WARNING - ERROR - CRITICAL - A ...
- Vue.js——60分钟快速入门 一
来源:https://www.cnblogs.com/keepfool/p/5619070.html Vue.js介绍 Vue.js是当下很火的一个JavaScript MVVM库,它是以数据驱动和组 ...
- mybatis复习笔记(1):
一.简介:什么是MyBatis 1.MyBatis是一款优秀的持久层框架,支持定制化SQL.存储过程以及高级映射.MyBatis避免了几乎所有的JDBC代码和手动设置参数以及获取结果集.MyBatis ...
- box-shadow四个边框设置阴影样式
其实对于box-shadow,老白我也是一知半解,之前用的时候直接复制已有的,也没有仔细思考过box-shadow的数值分别对应什么,最后导致阴影的边如何自由控制,苦于懒人一个一直没有正式去学习,今天 ...
- Linux--shell grep与正则表达式--04
一.grep程序 Linux下有文本处理三剑客:grep.sed.awk grep:文本 行过滤工具 sed:文本 行编辑器(流编辑器) awk:报告生成器(做文本输出格式化) 1.grep grep ...
- ArrayUtils工具类更加方便的操作数据
不废话,上代码: package com.jxd; import org.apache.commons.lang3.ArrayUtils; public class TestArr { /** * A ...
- 对Kubernetes的研究
服务发现和负载平衡 自动包装 存储编排 自愈 自动部署和回滚 秘密和配置管理 批量执行 水平缩放 是一个对docer进行管理的平台.
- C++创建对象时什么时候用*,什么时候不用*
用*, 表示创建的是一个指针对象,而指针的创建,必须初始化,C++中用new关键字开辟内存. 另外指针对象访问成员变量用-> , 非指针用. 就这么个原则 但是指针也可以不用-> 例如 ( ...
- Incorporating ASP.NET MVC and SQL Server Reporting Services, Part 2
In the last issue, I introduced you to the basics of incorporating SQL Server Reporting Services int ...
- 特权第一讲--Lesson 1 课程概述与如何学好FPGA
FPGA的学习没有什么捷径,需要学习者多花时间和精力 . 1.设计输入 2.如何--对综合布局布线结果进行优化 3.如何--更有效地进行验证 4.如何--达到时序收敛 学习者需要用心去学习.去分析.去 ...