iOS设计模式之桥接模式
一,什么是桥接模式
定义
抽象出层次结构。
上层抽象接口的职能,实现上层抽象接口的职能,层级间的通信协议(可以抽象为接口)。
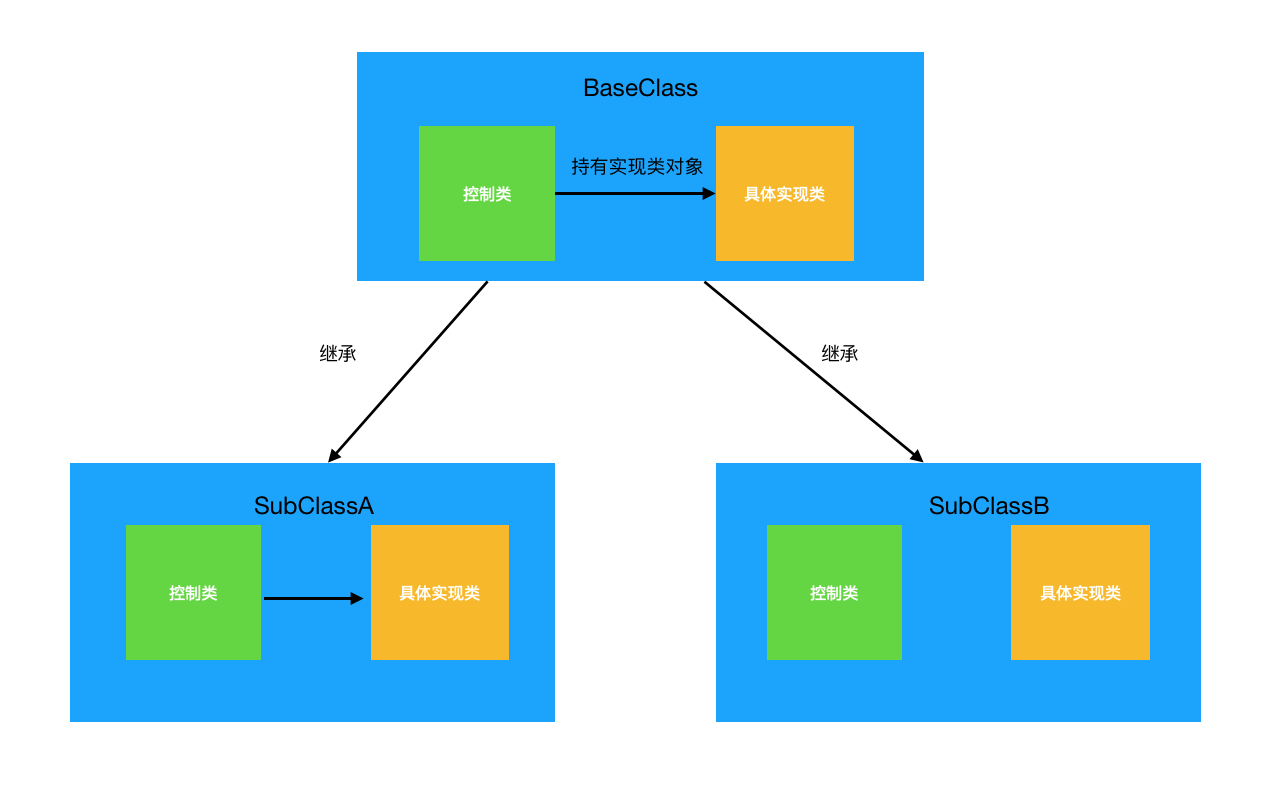
桥接模式的目的,就是把抽象层次结构从具体的实现中分离出来,使其能够独立变更。抽象层次定义了供客户端使用的上层抽象接口。实现结构定义了供抽象层使用的底层接口。实现类的引用被封装到控制类抽象层的实例中,桥接就形成了。使用场景
游戏机模拟器、H5混编解决方案
二,桥接模式结构图
实现步骤:
- 创建控制类基类,并定义变量持有具体实现类基类对象关系。
- 创建控制类基类子类,和实现类基类,并在控制器类接口方法中使用基类实现类对象实现功能(基类已经让控制器建立了持有实现类对象的关系)。
- 在控制器内调用控制器子类,建立控制器持有实现类对象。
结构图:
三,代码实现
- 基类
- 控制器基类
- ConsoleController
- ConsoleController.h
#import <Foundation/Foundation.h>
#import "ConsoleEmulator.h" @interface ConsoleController : NSObject /**
* 抽象模拟器
*/
@property (nonatomic, strong) ConsoleEmulator *emulator; /**
* 执行指令
*
* @param command 指令
*/
- (void)excuteCommand:(ConsoleCommand)command; @end - ConsoleController.m
#import "ConsoleController.h"

@implementation ConsoleController

- (void)excuteCommand:(ConsoleCommand)command {

    [_emulator loadInstructionsForCommand:command];

    [_emulator excuteInstructions];

}

@end
- ConsoleController.h
- ConsoleController
- 实现基类
- ConsoleEmulator
- ConsoleEmulator.h
#import <Foundation/Foundation.h> typedef enum : NSUInteger { kConsoleCommandUp,
kConsoleCommandDown,
kConsoleCommandLeft,
kConsoleCommandRight, kConsoleCommandSelect,
kConsoleCommandStart, kConsoleCommandAction1,
kConsoleCommandAction2, } ConsoleCommand; @interface ConsoleEmulator : NSObject /**
* 加载指令
*
* @param command 指令
*/
- (void)loadInstructionsForCommand:(ConsoleCommand)command; /**
* 执行指令
*/
- (void)excuteInstructions; @end - ConsoleEmulator.m
#import "ConsoleEmulator.h"

@implementation ConsoleEmulator

- (void)loadInstructionsForCommand:(ConsoleCommand)command {

    // 由子类重载实现

}

- (void)excuteInstructions {

    // 由子类重载实现

}

@end
- ConsoleEmulator.h
- ConsoleEmulator
- 控制器基类
- 子类
- 控制器基类
- GameBoyConsoleController
- GameBoyConsoleController.h
#import "ConsoleController.h" @interface GameBoyConsoleController : ConsoleController - (void)up;
- (void)down;
- (void)left;
- (void)right; - (void)select;
- (void)start; - (void)action1;
- (void)action2; @end - GameBoyConsoleController.m
#import "GameBoyConsoleController.h"

@implementation GameBoyConsoleController

- (void)up {

    [super excuteCommand:kConsoleCommandUp];

}

- (void)down {

    [super excuteCommand:kConsoleCommandDown];

}

- (void)left {

    [super excuteCommand:kConsoleCommandLeft];

}

- (void)right {

    [super excuteCommand:kConsoleCommandRight];

}

- (void)select {

    [super excuteCommand:kConsoleCommandSelect];

}

- (void)start {

    [super excuteCommand:kConsoleCommandStart];

}

- (void)action1 {

    [super excuteCommand:kConsoleCommandAction1];

}

- (void)action2 {

    [super excuteCommand:kConsoleCommandAction2];

}

@end
- GameBoyConsoleController.h
- GameBoyConsoleController
- 实现子类
- GameBoyEmulator
- GameBoyEmulator.h
#import "ConsoleEmulator.h"

@interface GameBoyEmulator : ConsoleEmulator

- (void)loadInstructionsForCommand:(ConsoleCommand)command;

- (void)excuteInstructions;

@end - GameBoyEmulator.m
#import "GameBoyEmulator.h"

@implementation GameBoyEmulator

- (void)loadInstructionsForCommand:(ConsoleCommand)command {

    NSLog(@"GameBoyEmulator loadInstructionsForCommand");

}

- (void)excuteInstructions {

    NSLog(@"GameBoyEmulator excute");

}

@end
- GameBoyEmulator.h
- GameBoyEmulator
- 控制器基类
- 打印结果:
-- ::13.226801+ BridgePattern[:] GameBoyEmulator loadInstructionsForCommand

-- ::13.226970+ BridgePattern[:] GameBoyEmulator excute

-- ::13.227075+ BridgePattern[:] GameGearEmulator loadInstructionsForCommand

-- ::13.227162+ BridgePattern[:] GameGearEmulator excute
四,优缺点
- 优点: 1、抽象和实现的分离。 2、优秀的扩展能力。 3、实现细节对客户透明。
- 缺点:桥接模式的引入会增加系统的理解与设计难度,由于聚合关联关系建立在抽象层,要求开发者针对抽象进行设计与编程。
五,demo
桥接模式
iOS设计模式之桥接模式的更多相关文章
- iOS 设计模式之工厂模式
iOS 设计模式之工厂模式 分类: 设计模式2014-02-10 18:05 11020人阅读 评论(2) 收藏 举报 ios设计模式 工厂模式我的理解是:他就是为了创建对象的 创建对象的时候,我们一 ...
- 乐在其中设计模式(C#) - 桥接模式(Bridge Pattern)
原文:乐在其中设计模式(C#) - 桥接模式(Bridge Pattern) [索引页][源码下载] 乐在其中设计模式(C#) - 桥接模式(Bridge Pattern) 作者:webabcd 介绍 ...
- java面试题之----jdbc中使用的设计模式(桥接模式)
1.JDBC(JavaDatabase Connectivity) JDBC是以统一方式访问数据库的API. 它提供了独立于平台的数据库访问,也就是说,有了JDBC API,我们就不必为访问Oracl ...
- php设计模式之桥接模式
php设计模式之桥接模式 一.概述 桥接模式:将两个原本不相关的类结合在一起,然后利用两个类中的方法和属性,输出一份新的结果. 其实就是讲不相关的东西通过类(本例中是SendInfo)结合在一起,从而 ...
- java设计模式7——桥接模式
java设计模式7--桥接模式 1.桥接模式介绍 桥接模式是将抽象部分与它的实现部分分离,使他们都可以独立的变化.它是一种对象结构型模式,又称为柄体模式或接口模式. 2.解决问题 2.1.将复杂的组合 ...
- C#设计模式之八桥接模式(Bridge)【结构型】
一.引言 今天我们要讲[结构型]设计模式的第二个模式,该模式是[桥接模式],也有叫[桥模式]的.大家第一次看到这个名称会想到什么呢?我第一次看到这个模式根据名称猜肯定是连接什么东西的.因为桥在我们现实 ...
- C#设计模式之七桥接模式(Bridge Pattern)【结构型】
一.引言 今天我们要讲[结构型]设计模式的第二个模式,该模式是[桥接模式],也有叫[桥模式]的,英文名称:Bridge Pattern.大家第一次看到这个名称会想到什么呢?我第一次看到这个模式根据名称 ...
- C++设计模式-Bridge桥接模式
作用:将抽象部份与它的实现部份分离,使它们都可以独立地变化. 将抽象(Abstraction)与实现(Implementation)分离,使得二者可以独立地变化. 桥接模式号称设计模式中最难理解的模式 ...
- 设计模式之桥接模式(Bridge)
注:本文不属于原创,而是根据原文重新整理,原文是:我给媳妇解释设计模式:第一部分 设计模式不是基于理论发明的.相反,总是先有问题场景,再基于需求和情景不断演化设计方案,最后把一些方案标准化成“模式”. ...
随机推荐
- 阶段1 语言基础+高级_1-3-Java语言高级_1-常用API_1_第5节 String类_5_字符串的获取相关方法
original:原来的.开始的 如果有多次的情况 因为查找的是第一次的出现的位置的索引值 如果要查找的字符串压根没有的话返回的就是-1
- golang md5 结果类型
golang md5 结果类型 package main import ( "crypto/md5" "encoding/hex" "fmt&quo ...
- 【ABAP系列】SAP WEB GUI的实现,SAP在网页中使用
公众号:SAP Technical 本文作者:matinal 原文出处:http://www.cnblogs.com/SAPmatinal/ 原文链接:[MM系列]SAP WEB GUI的实现,SAP ...
- 【ABAP系列】SAP ABAP 用BAPI批量导入物料的质量视图
公众号:SAP Technical 本文作者:matinal 原文出处:http://www.cnblogs.com/SAPmatinal/ 原文链接:[MM系列]SAP ABAP 用BAPI批量导入 ...
- Web API入门二(实例)
学习编程的最好方法就是实例,本人用的是VS2015 1.创建ASP.NET Web空项目 点击确定后即创建了空"WebApi"项目 2.下面,我们需要使用NuGet包管理器添加最新 ...
- <每日一题> Day3:CodeForces-1141B.MaximalContinuousRest(简单题)
题目链接 参考代码: #include <iostream> #include <algorithm> using namespace std; + ; int value[m ...
- Python之字符串和正则表达式
使用正则表达式 Python对正则表达式的支持 例子:替换字符串中的不良内容 import re def main(): sentence = '你丫是傻叉吗? 我操你大爷的. Fuck you.' ...
- SQLServer查看及设置最大连接数
很多时候自己本地开发会遇到 ,打开几个连接正常访问 之后就报错误,这时候需要调整sqlserver 最大连接数. 1. 查询最大连接数 SELECT value_in_useFROM sys.conf ...
- 深入JavaScript之获取cookie以及删除cookie
cookie存在哪? 存在document.cookie中 ookie长啥样? cookie是一个字符串,长下面这样:“name=xxx; age=22;” 注意:分号后面有个空格,记住这一点,下面的 ...
- 【知识强化】第二章 数据的表示和运算 2.4 算术逻辑单元ALU
从本节开始我们就进入到本章的最后一节内容了,也就是我们算术逻辑单元的它的实现.这部分呢是数字电路的一些知识,所以呢,如果你没有学过数字电路的话,也不要慌张,我会从基础开始给大家补起.那么在计算机当中, ...