
SpringMVC入门及拦截器
SSM最后一个框架springmvc,其实上手特别简单。但是我昨天看一个深入源码的视频,差点GG。其实以前学过很多东西,都忘了,不敢说学会,现在有了本书,看过一遍之后。多多少少记住一些,权当我会用了,不敢说精通。
本周计划,今天把springmvc搞完,明天搭建一个SSM项目,by the way 其实我毕设就是SSM项目。周三复习Maven,周四复习Redis,周五开始做SSM+Redis整合。下周开搞SSH,最后学习SpringBoot。这个月的主要事情就是学习框架。
springmvc的实际容器类是XmlWebApplicationContext。在web.xml文件中,如果我们使用idea的新建springmvc项目功能,会自动进行简单配置,非常聪明,我们一般需要进行字符过滤器CharacterEncoderingFilter的设置,启动参数context-param,来启动spring容器,spring容器是一个大的容器,包含springmvc容器。
web.xml配置如下
<?xml version="1.0" encoding="UTF-8"?>

<web-app xmlns="http://xmlns.jcp.org/xml/ns/javaee"

         xmlns:xsi="http://www.w3.org/2001/XMLSchema-instance"

         xsi:schemaLocation="http://xmlns.jcp.org/xml/ns/javaee http://xmlns.jcp.org/xml/ns/javaee/web-app_3_1.xsd"

         version="3.1">

    <context-param>

        <param-name>contextConfigLocation</param-name>

        <param-value>/WEB-INF/applicationContext.xml</param-value>

    </context-param>

    <listener>

        <listener-class>org.springframework.web.context.ContextLoaderListener</listener-class>

    </listener>

    <servlet>

        <servlet-name>dispatcher</servlet-name>

        <servlet-class>org.springframework.web.servlet.DispatcherServlet</servlet-class>

        <load-on-startup>1</load-on-startup>

        <init-param>

            <param-name>contextConfigLocation</param-name>

            <param-value>classpath:dispatcher-servlet.xml</param-value>

        </init-param>

    </servlet>

    <servlet-mapping>

        <servlet-name>dispatcher</servlet-name>

        <url-pattern>*.form</url-pattern>

    </servlet-mapping>

    <filter>

        <filter-name>encoder</filter-name>

        <filter-class>org.springframework.web.filter.CharacterEncodingFilter</filter-class>

        <init-param>

            <param-name>encoding</param-name>

            <param-value>UTF-8</param-value>

        </init-param>

    </filter>

    <filter-mapping>

        <filter-name>encoder</filter-name>

        <url-pattern>/*</url-pattern>

    </filter-mapping>

</web-app>
dispatcher-servlet.xml配置如下,也就是springmvc的配置,主要功能是
- sao描控制器上的注解,把他们加入springmvc容器
- <mvc:annotataion-driven/>启用默认的HandlerMapping,HandlerAdator,
- <mvc:interceptors>配置拦截器
- 配置视图解析器,这个功能更常用
<?xml version="1.0" encoding="UTF-8"?>

<beans xmlns="http://www.springframework.org/schema/beans"

       xmlns:xsi="http://www.w3.org/2001/XMLSchema-instance"

       xmlns:context="http://www.springframework.org/schema/context"

       xmlns:mvc="http://www.springframework.org/schema/mvc"

       xsi:schemaLocation="http://www.springframework.org/schema/beans http://www.springframework.org/schema/beans/spring-beans.xsd

 http://www.springframework.org/schema/mvc

                http://www.springframework.org/schema/mvc/spring-mvc.xsd http://www.springframework.org/schema/context

                http://www.springframework.org/schema/context/spring-context.xsd">

    <context:component-scan base-package="com.houjun.controller"></context:component-scan>

    <mvc:annotation-driven></mvc:annotation-driven>

</beans>
applicationContext.xml配置,这个是spring容器,能做的是太多了,我这里只是启用注解
<?xml version="1.0" encoding="UTF-8"?>

<beans xmlns="http://www.springframework.org/schema/beans"

       xmlns:xsi="http://www.w3.org/2001/XMLSchema-instance"

       xmlns:context="http://www.springframework.org/schema/context"

       xsi:schemaLocation="http://www.springframework.org/schema/beans http://www.springframework.org/schema/beans/spring-beans.xsd

       http://www.springframework.org/schema/context

                http://www.springframework.org/schema/context/spring-context.xsd">

        <context:component-scan base-package="com.houjun.pojo"></context:component-scan>

</beans>
一个简单的控制器如下
package com.houjun.controller;

import com.houjun.pojo.Student;

import com.houjun.pojo.User;

import org.springframework.beans.factory.annotation.Autowired;

import org.springframework.context.ApplicationContext;

import org.springframework.context.support.ClassPathXmlApplicationContext;

import org.springframework.stereotype.Controller;

import org.springframework.web.bind.annotation.RequestMapping;

import org.springframework.web.context.ConfigurableWebApplicationContext;

import org.springframework.web.context.WebApplicationContext;

import javax.servlet.http.HttpServletRequest;

/**

 * @Author: HouJun

 * @Date: 2019/11/8 15:21

 * @Description: com.houjun.controller

 * @version: 1.0

 */

@Controller

@RequestMapping("/student")

public class StudentController {

    @Autowired

    private Student student;

    @Autowired

    private ApplicationContext applicationContext;

    @Autowired

   private ConfigurableWebApplicationContext configurableWebApplicationContext;

    @RequestMapping("/hello")

    public String hello() {

        System.out.println("自动注入"+student);

        System.out.println("className"+applicationContext.getClass().getName());

        String[] beanDefinitionNames = applicationContext.getBeanDefinitionNames();

        for (String beanDefinitionName : beanDefinitionNames) {

            System.out.println(beanDefinitionName);

        }

        System.out.println("--------------------------------------------------------------------------------------");

        System.out.println("className"+configurableWebApplicationContext.getClass().getName());

        String[] beanDefinitionNames1 = configurableWebApplicationContext.getBeanDefinitionNames();

        for (String s : beanDefinitionNames1) {

            System.out.println(s);

        }

        return "/success.jsp";

    }

}
拦截器类,拦截器需要实现一个接口 HandlerInterceptorAdapter,可以有多个拦截器,拦截顺序以xml文件配置顺序为准,代码如下
package com.houjun.inerceptor;

import org.springframework.web.servlet.ModelAndView;

import org.springframework.web.servlet.handler.HandlerInterceptorAdapter;

import javax.servlet.http.HttpServletRequest;

import javax.servlet.http.HttpServletResponse;

/**

 * @Author: HouJun

 * @Date: 2019/11/11 9:58

 * @Description: com.houjun.inerceptor

 * @version: 1.0

 */

public class UserInterceptor extends HandlerInterceptorAdapter {

    @Override

    public boolean preHandle(HttpServletRequest request, HttpServletResponse response, Object handler) throws Exception {

        System.out.println("自定义拦截器1,进入控制器之前");

        return true;

    }

    @Override

    public void postHandle(HttpServletRequest request, HttpServletResponse response, Object handler, ModelAndView modelAndView) throws Exception {

        System.out.println("自定义拦截器1,控制器之后,进入视图之前");

    }

    @Override

    public void afterCompletion(HttpServletRequest request, HttpServletResponse response, Object handler, Exception ex) throws Exception {

        System.out.println("自定义拦截器1,控制器之后,进入视图之后");

    }

}
目录结构
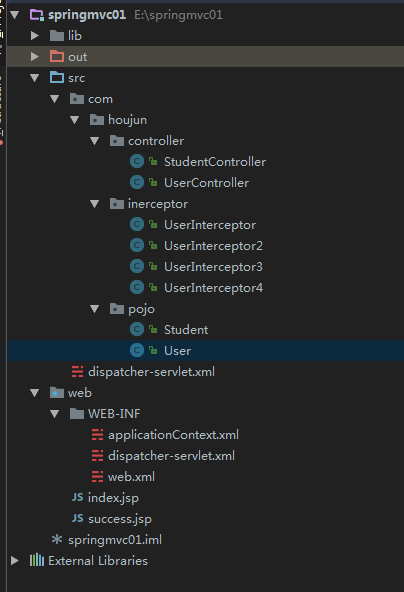
有了这些东西,就能启动一个web项目了,需要注意的是,配置Project Stucture -->Libraries和Tomcat容器之时可能会有各种问题,不过慢慢来,一点一点就是知道配置这些的含义了。
SpringMVC入门及拦截器的更多相关文章
- <SpringMvc>入门七 拦截器
什么是拦截器 1.SpringMVC框架中的拦截器用于 对处理器 进行预处理和后处理的技术. 2.可以定义拦截器链,按照顺序执行. 3.拦截器和过滤器功能类似,区别在 拦截器 过滤器 过滤器是Serv ...
- 9.springMVC中的拦截器
springMVC中的拦截器大概大致可以分为以下几个步骤去学习: 1.自定义一个类实现HandlerInterceptor接口,这里要了解其中几个方法的作用 2.在springMVC的配置文件中添加拦 ...
- springMVC的全局拦截器
先说说为什么要使用springMVC的全局拦截器,比如 当我们在访问接口的时候,我们一般都会先判断这个用户是否登陆,我们就要在每个接口的前面都要判断一下,想想是不是很蛋疼,那工作量... 这时候,我们 ...
- SpringMVC中的拦截器、过滤器的区别、处理异常
1. SpringMVC中的拦截器(Interceptor) 1.1. 作用 拦截器是运行在DispatcherServlet之后,在每个Controller之前的,且运行结果可以选择放行或拦截! 除 ...
- 【SpringMVC学习11】SpringMVC中的拦截器
Springmvc的处理器拦截器类似于Servlet 开发中的过滤器Filter,用于对处理器进行预处理和后处理.本文主要总结一下springmvc中拦截器是如何定义的,以及测试拦截器的执行情况和使用 ...
- SpringMVC 学习笔记(拦截器的配置))
在设置SpringMVC的拦截器时,需要在SpringMVC中配置 拦截器对象,拦截器的的对象要 实现 HandlerInterceptor 接口 拦截器类的设置: public class inte ...
- (转)SpringMVC学习(十二)——SpringMVC中的拦截器
http://blog.csdn.net/yerenyuan_pku/article/details/72567761 SpringMVC的处理器拦截器类似于Servlet开发中的过滤器Filter, ...
- SpringMVC(AbstractController,拦截器,注解)
1.Controller接口及其实现类 Controller是控制器/处理器接口,只有一个方法handleRequest,用于进行请求的功能处理(功能处理方法),处理完请求后返回ModelAndVie ...
- SpringMVC 自定义一个拦截器
自定义一个拦截器方法,实现HandlerInterceptor方法 public class FirstInterceptor implements HandlerInterceptor{ /** * ...
随机推荐
- 转载:LESS基本用法
转载出处:https://blog.csdn.net/qq_38209578/article/details/80566860 转载出处:https://blog.csdn.net/weixin_44 ...
- 转 使用Python的logging.config.fileConfig配置日志
Python的logging.config.fileConfig方式配置日志,通过解析conf配置文件实现.文件 logglogging.conf 配置如下: [loggers]keys=root,f ...
- 后端数据推送-EventSource
服务器发送事件(以下简称SSE)是HTML 5规范的一个组成部分,可以实现服务器到客户端的单向数据通信.通过SSE,客户端可以自动获取数据更新,而不用重复发送HTTP请求.一旦连接建立,“事件”便会自 ...
- 在Python中写入文件时,权限被拒绝错误
我想创建一个文件并在python中写一些整数数据.例如,我有一个变量abc = 3,我试图将它写入一个文件(它不存在,我假设python将自己创建): fout = open("newfil ...
- ajax跨域请求,状态码200,F12控制台报错
在接口的地方加上请求头.//跨域请求header('Access-Control-Allow-Origin:*'); 不要在ajax里面加!!!!!!!!!
- Vue-基础(二)
一,Vue中的组件化开发: Vue中的组件也就是Vue实例 组件类型: 通用组件(例如,表单,弹窗,布局类等) 业务组件(抽奖,机器分类) 页面组件(单页面开发程序的每个页面都是一个组件) 组件开发三 ...
- Ansible --05 ansible jinja2
ansible jinja2 什么是jinjia2模板 jinjia2是Python的全功能模块引擎 Jinjia2与Ansible的关系 Ansible通常会使用jinjia2模板来修改被管理主机的 ...
- CentOS 6.5安装aria2(转载)
CentOS 6.5安装aria2 由于yum install aria2无法找到安装包,试了好几个源,都找不到,于是自己找了一些地址: 1.下载安装包: # wget http://ftp.tu-c ...
- Java中File的处理
不知道“文件”和“文件路径”是否存在的处理情况 1.如果是文件,先获取文件父路径,没有就生成父路径,然后再生成文件. public class TestMain { public static voi ...
- linux find grep
find是文件查找, grep是文件内容查找. 1. find find path expression -options[-print -exec -ok] -print 将结果输出到标准输出: - ...